

Anyone else break the two clips that attach to the engine (on the head just below the valve cover)? I tried wiggling them out but the connector just snapped on both. I'm assuming its fine to leave?
645KVIEWS
1KREPLIES
145APPRECIATES
06-27-2025LAST POST
aututto wroteI did:lol:Anyone else break the two clips that attach to the engine (on the head just below the valve cover)? I tried wiggling them out but the connector just snapped on both. I'm assuming its fine to leave?
I just left them hanging. They seemed taut enough to not be an issue.
I think I am up for a TVA change now but want to confirm my undertstanding of the codes before I order an expensive part. The codes pointing me to this are 2B15 and 5E19, the latter of which I don't actually see in the code sticky. The 2B15 suggested actions are: Check plug and wiring harness at throttle valve sensor DKG1 and electronic throttle valve control EDR1, then Replace DKG1 or EDR for Bank 1. I don't know exactly what those are, but I see people replacing TVA to resolve.
Is this the likely solution? I am getting occasional limo mode, increasingly frequently over last few weeks.
Is this the likely solution? I am getting occasional limo mode, increasingly frequently over last few weeks.
My buddies E90 M3 needed Bank 2 replaced last weekend and after reviewing this thread, I put together these tools that made this task just a little easier, especially disconnecting some of those connectors (used nylon interior trim tool).
Another post on this forum recommended the following tricks for the different types of connectors that you encounter with this task and I thought that I would reiterate again:
- for the connectors with the M shaped wire, squeeze the wire towards the connector
- for the TVA connectors, press down on the latch which is at the wire end of the connector
- for the tubular connector in the V that is held by a metal U shaped clamp just remove the connector from the clamp and you will create enough slack to lift the wiring bundle sufficiently to extract the TVAs
Of note, the dry lube is for high heat applications up to 500 F which makes it ideal for this area of the engine. I use it on my E92 M3 and have not had any squeaking or issues (e.g. 1 minute cold start) with my TBAs at 86k miles.
Now I am not saying that you have to have all of these tools to perform this task, only that it made this DIY a little easier.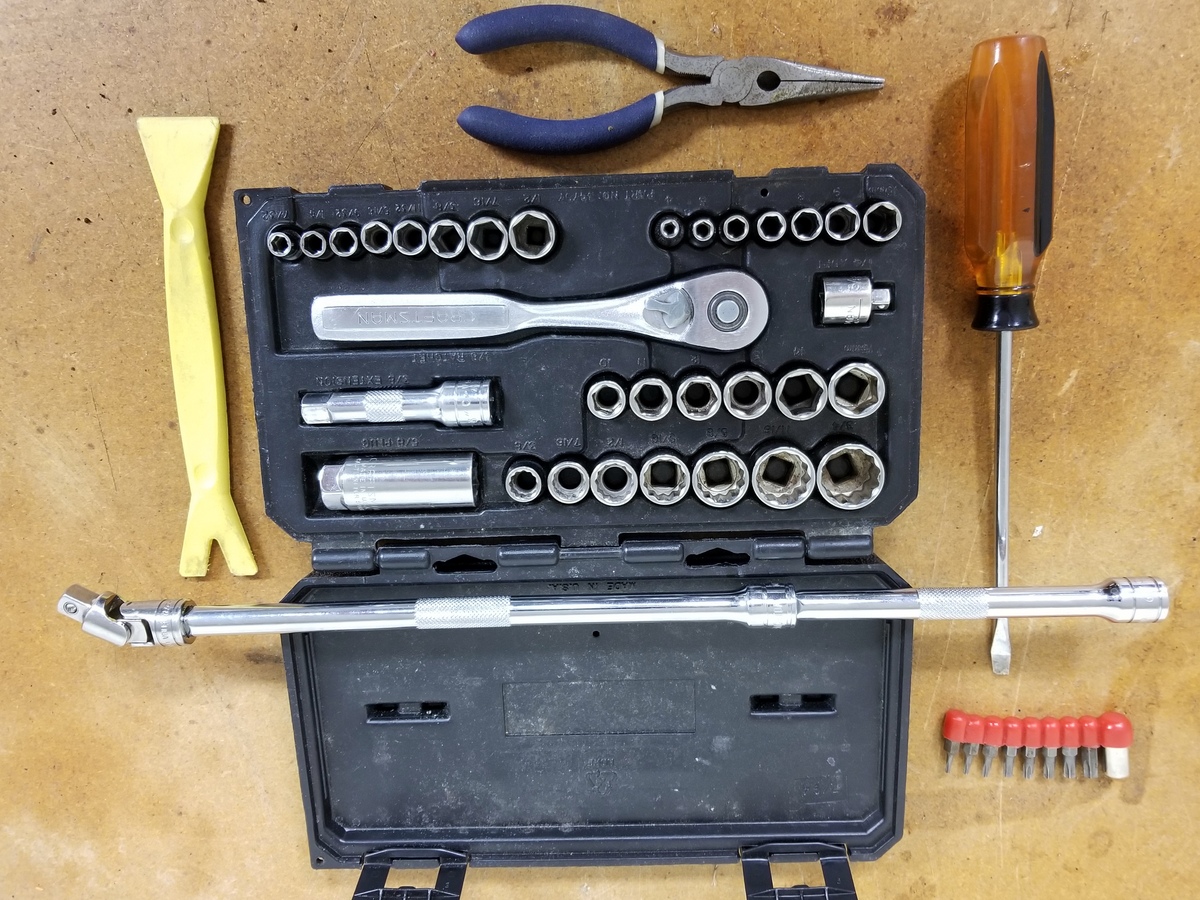

Another post on this forum recommended the following tricks for the different types of connectors that you encounter with this task and I thought that I would reiterate again:
- for the connectors with the M shaped wire, squeeze the wire towards the connector
- for the TVA connectors, press down on the latch which is at the wire end of the connector
- for the tubular connector in the V that is held by a metal U shaped clamp just remove the connector from the clamp and you will create enough slack to lift the wiring bundle sufficiently to extract the TVAs
Of note, the dry lube is for high heat applications up to 500 F which makes it ideal for this area of the engine. I use it on my E92 M3 and have not had any squeaking or issues (e.g. 1 minute cold start) with my TBAs at 86k miles.
Now I am not saying that you have to have all of these tools to perform this task, only that it made this DIY a little easier.
Locksmythe wrote2B15 i believe is certain for one if the TAs going bad. Had the same code popping up + limp mode, gone since replacement. Heres som more details on the codes:I think I am up for a TVA change now but want to confirm my undertstanding of the codes before I order an expensive part. The codes pointing me to this are 2B15 and 5E19, the latter of which I don't actually see in the code sticky. The 2B15 suggested actions are: Check plug and wiring harness at throttle valve sensor DKG1 and electronic throttle valve control EDR1, then Replace DKG1 or EDR for Bank 1. I don't know exactly what those are, but I see people replacing TVA to resolve.
Is this the likely solution? I am getting occasional limo mode, increasingly frequently over last few weeks.
https://www.rebuild.org.uk
We just took this out of my friend's M3 and thought I would share a picture of what the definition of "shredded" might be for some of the DIYers on this thread. As a follow on to my recently added tools to use for anyone wanting to change out their TBAs themselves and save a bit of money when compared to the BMW stealerships, the most handy tool was the 11" long flex driver in 6mm that was used to remove the eight clamps on the velocity stacks. I caution you not to use a flex drive that has multiple ends that you switch around as these ends could come off of the back two 6mm clamp's nuts and create even more dilemna for your job. Both the uninstall and the install tasks were a bit easier than using swivel sockets and swivel ratchets as we could "hang" the tool on the 6mm clamp's nut and not push it towards the rubber stop. Pushing the nut towards the rubber stop can lead to the clamp rotating on you even if you have taken the caution of removing as much slack from the clamp so that the clamp does not rotate.
Another trick that I used was I applied some high temp lithium grease to the inside of the rubber on the velocity stacks and I also applied it to the outside of the plastic stacks on the intake manifold (or whatever it is called?). But before I applied the grease to the plastic intake manifold, I took a debur tool and ever so lightly scraped the outside edges of the plastic velocity stacks. I couldn't believe the sharp edges on this plastic which, by my estimation, can catch the rubber rings on the metal velocity stacks and make for installing all eight for difficult (forgot to take a picture). The aforementioned process made the installation go on the first time. But I throw caution to anyone doing the deburring task, just a tiny little bit of plastic removal (debur) is best.
I then, as a matter of good housekeeping, vacuumed out any debris on the plastic intake manifold's rings and inside of it so that no FOD would be present prior to using the lithium grease.
Anyways, sorry for being so lengthy in my Tips & Tricks. I hope that it helps someone else...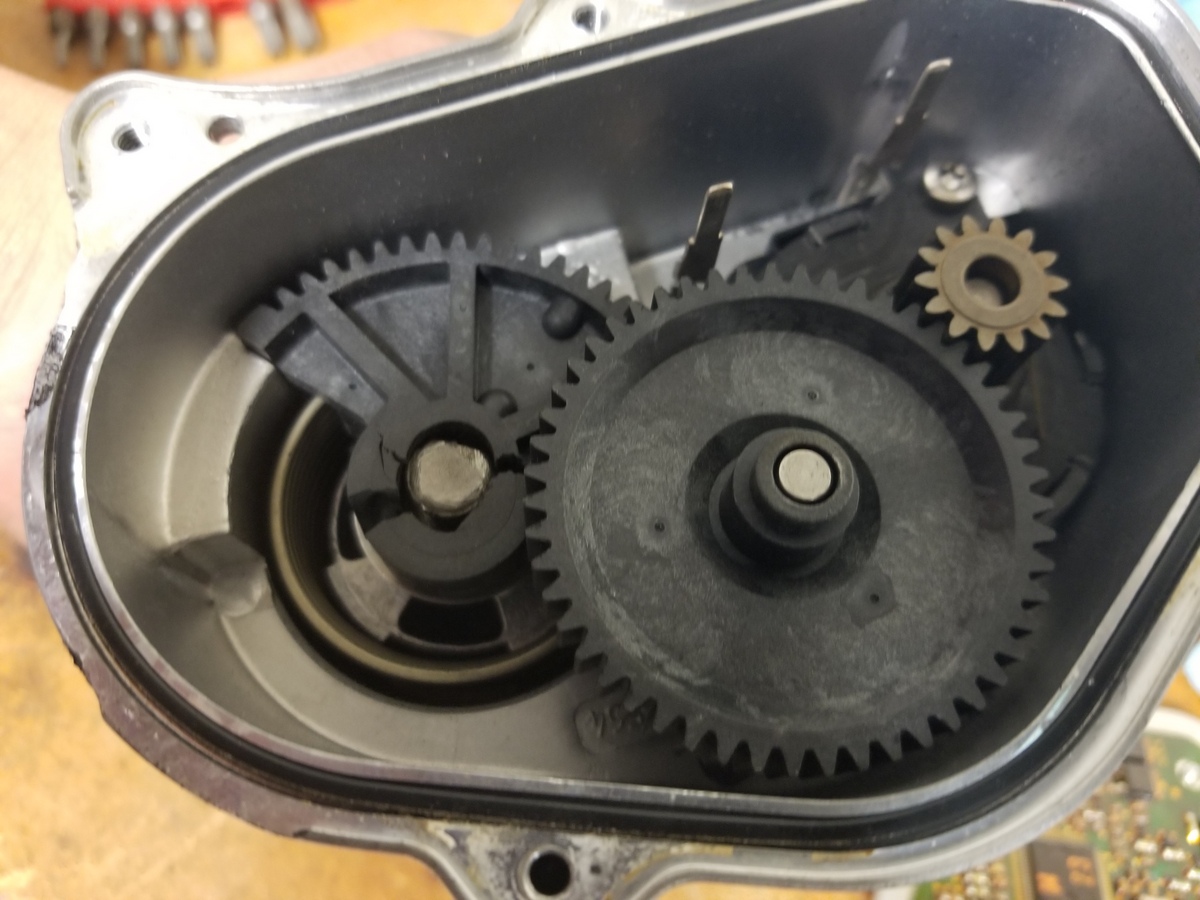
Another trick that I used was I applied some high temp lithium grease to the inside of the rubber on the velocity stacks and I also applied it to the outside of the plastic stacks on the intake manifold (or whatever it is called?). But before I applied the grease to the plastic intake manifold, I took a debur tool and ever so lightly scraped the outside edges of the plastic velocity stacks. I couldn't believe the sharp edges on this plastic which, by my estimation, can catch the rubber rings on the metal velocity stacks and make for installing all eight for difficult (forgot to take a picture). The aforementioned process made the installation go on the first time. But I throw caution to anyone doing the deburring task, just a tiny little bit of plastic removal (debur) is best.
I then, as a matter of good housekeeping, vacuumed out any debris on the plastic intake manifold's rings and inside of it so that no FOD would be present prior to using the lithium grease.
Anyways, sorry for being so lengthy in my Tips & Tricks. I hope that it helps someone else...
im4ipsc wroteThat looks like a replacement gear. That cracked.We just took this out of my friend's M3 and thought I would share a picture of what the definition of "shredded" might be for some of the DIYers on this thread. As a follow on to my recently added tools to use for anyone wanting to change out their TBAs themselves and save a bit of money when compared to the BMW stealerships, the most handy tool was the 11" long flex driver in 6mm that was used to remove the eight clamps on the velocity stacks. I caution you not to use a flex drive that has multiple ends that you switch around as these ends could come off of the back two 6mm clamp's nuts and create even more dilemna for your job. Both the uninstall and the install tasks were a bit easier than using swivel sockets and swivel ratchets as we could "hang" the tool on the 6mm clamp's nut and not push it towards the rubber stop. Pushing the nut towards the rubber stop can lead to the clamp rotating on you even if you have taken the caution of removing as much slack from the clamp so that the clamp does not rotate.
Another trick that I used was I applied some high temp lithium grease to the inside of the rubber on the velocity stacks and I also applied it to the outside of the plastic stacks on the intake manifold (or whatever it is called?). But before I applied the grease to the plastic intake manifold, I took a debur tool and ever so lightly scraped the outside edges of the plastic velocity stacks. I couldn't believe the sharp edges on this plastic which, by my estimation, can catch the rubber rings on the metal velocity stacks and make for installing all eight for difficult (forgot to take a picture). The aforementioned process made the installation go on the first time. But I throw caution to anyone doing the deburring task, just a tiny little bit of plastic removal (debur) is best.
I then, as a matter of good housekeeping, vacuumed out any debris on the plastic intake manifold's rings and inside of it so that no FOD would be present prior to using the lithium grease.
Anyways, sorry for being so lengthy in my Tips & Tricks. I hope that it helps someone else...
Hey guys i just got an e92 m3 manual gearbox like 50 days ago and yesterday i got my first "limp mode" on the car. Also, i noticed some eletric malfunctions like lamps that dont work and "increased battery discharge" advise on pannel. Guy that sold me the car said battery was changed 3 months before, like September/2019. Question is: can changing the battery and not registering/coding lead to "limp mode" or is it actually a mechanical problem (not electric)? Ty in advance and sorry for my bad english.
drrust wroteDefinitely....the shaft is so out-of-round it's definitely been replaced.That looks like a replacement gear. That cracked.
Some replacement sets come with the shaft already in the gear to avoid this.
Rmcampanholi wroteNo don't believe that can generate limp mode, or any issues at all other than possibly decrease battery life time. I'd get a scanner such as Carly to get a better understanding. Also, check voltage with engine on to make sure the alternator works.Hey guys i just got an e92 m3 manual gearbox like 50 days ago and yesterday i got my first "limp mode" on the car. Also, i noticed some eletric malfunctions like lamps that dont work and "increased battery discharge" advise on pannel. Guy that sold me the car said battery was changed 3 months before, like September/2019. Question is: can changing the battery and not registering/coding lead to "limp mode" or is it actually a mechanical problem (not electric)? Ty in advance and sorry for my bad english.
Helmsman wroteWell, I got a late start today, in the driveway, because it was warm, and now I am working with a lamp and flashlight. Can't get enough play in the wiring harness to get the actuator out. ^*!^#$(2B15 i believe is certain for one if the TAs going bad. Had the same code popping up + limp mode, gone since replacement. Heres som more details on the codes:
https://www.rebuild.org.uk
Edi: Ok, pulled another cable out of a clip on the driver side throttle bank and removed a cable going into the bottom of thermostat housing. Changing both now, I don't need to do this BS again soon!
Locksmythe wroteHaha, I know the feeling mate! I looked at 2-3 differnet DIY's they are all slightly different and in fact I ended up doing it slightly different again. Major pain for me was to actually disconnect some of them, damn took hard finger tops!Well, I got a late start today, in the driveway, because it was warm, and now I am working with a lamp and flashlight. Can't get enough play in the wiring harness to get the actuator out. ^*!^#$(
Edi: Ok, pulled another cable out of a clip on the driver side throttle bank and removed a cable going into the bottom of thermostat housing. Changing both now, I don't need to do this BS again soon!
Ps. Be sure you don't forget the front hose to the plenum. Bit tricky to connect once plenum in place...

Helmsman wroteI got then reconnected okay, but the plastic clamp on the front hose under the intake cracked when I was removing it. I am guessing by the way it routes it goes back to the idle valve. I really don't want to disassemble everything again. It does seem to hold fast with the one side still grasping.Haha, I know the feeling mate! I looked at 2-3 differnet DIY's they are all slightly different and in fact I ended up doing it slightly different again. Major pain for me was to actually disconnect some of them, damn took hard finger tops!
Ps. Be sure you don't forget the front hose to the plenum. Bit tricky to connect once plenum in place...
Anyone know if I can splice a new one on that hose?
Locksmythe wroteI drove for a day before I realized I forgot the front hose. Noticed to difference, no codes, so maybe ok with a temporary fix for now?I got then reconnected okay, but the plastic clamp on the front hose under the intake cracked when I was removing it. I am guessing by the way it routes it goes back to the idle valve. I really don't want to disassemble everything again. It does seem to hold fast with the one side still grasping.
Anyone know if I can splice a new one on that hose?
Locksmythe wroteI've been driving like this for over 3 years now. That hose is firm enough that it stays put inside the opening.I got then reconnected okay, but the plastic clamp on the front hose under the intake cracked when I was removing it. I am guessing by the way it routes it goes back to the idle valve. I really don't want to disassemble everything again. It does seem to hold fast with the one side still grasping.
Anyone know if I can splice a new one on that hose?
da jemster wroteWhich is why I cracked it. Kept squeezing harder because it didn't pop out. Had not taken the plenum off in years and didn't remember there was an O-ring on that one.I've been driving like this for over 3 years now. That hose is firm enough that it stays put inside the opening.
I did this over the weekend, and everything worked out, but question for someone... i dont know how the plenum is supposed to sit over the TB's, and i looks like there is a rubber ridge on the plenum gasket but does that go gasket???
If anyone has pix of what it should look like on each side, that would help.
If anyone has pix of what it should look like on each side, that would help.
ThatM3guy wroteIt should seat totally flush when properly mounted. Your gaskets may of become still from age as mine did. You can buy new gaskets and the clamps to resolve this issue.I did this over the weekend, and everything worked out, but question for someone... i dont know how the plenum is supposed to sit over the TB's, and i looks like there is a rubber ridge on the plenum gasket but does that go gasket???
If anyone has pix of what it should look like on each side, that would help.
randrews15 wroteI plan to take it back a part and lube with (white lithium?) and then try to re-seat the plenum. I know the back cylinder isnt sitting correctly.It should seat totally flush when properly mounted. Your gaskets may of become still from age as mine did. You can buy new gaskets and the clamps to resolve this issue.
ThatM3guy wroteMake sure your hose clamps are backed of enough to allow the rubber boots to slip over the butterflies ports on the engine. if they are too tight they will hold you back from getting a good seat. Then you lean on the plenum until they are all seated fully. The two rear ones will take some leverage as you cant get up on top to push down. i had to bounce on it a few times with my fist to get them to seat. You can check them with a mirror and a light. You could also look for a plenum DIY, There's probably a pile of videos or photos.I plan to take it back a part and lube with (white lithium?) and then try to re-seat the plenum. I know the back cylinder isnt sitting correctly.
Took it apart yesterday, and one of the rear cylinders had the rubber boot bent in, preventing it from being pushed down.
I lubed the rubber with some white lithium, and it popped down with much less effort. That said, I forgot to plug in all the hoses (one back, two front) until after i pushed the plenum down, and so now I am getting an SES light w/ 'Incrased Emissions. Need to check my hoses, but pretty sure its the rear one.
I lubed the rubber with some white lithium, and it popped down with much less effort. That said, I forgot to plug in all the hoses (one back, two front) until after i pushed the plenum down, and so now I am getting an SES light w/ 'Incrased Emissions. Need to check my hoses, but pretty sure its the rear one.
ThatM3guy wroteI ran the codes, and it was for a cam position sensor, bank A---anyone have a picture of which wire the cam position sensors are?Took it apart yesterday, and one of the rear cylinders had the rubber boot bent in, preventing it from being pushed down.
I lubed the rubber with some white lithium, and it popped down with much less effort. That said, I forgot to plug in all the hoses (one back, two front) until after i pushed the plenum down, and so now I am getting an SES light w/ 'Incrased Emissions. Need to check my hoses, but pretty sure its the rear one.
