

 |
|
 |

|
|
|
| 11-05-2017, 12:09 PM | #1 |
|
Master Baiter
4171
Rep 634
Posts
Drives: 18 M2
Join Date: Jan 2007
Location: Soddy Daisy
|
Headlight mods with Bavgruppe DTM style LED rings
Back a couple of months ago, I saw an @ozc thread here showing his headlight mods. With his inspiration, I decided to tackle my own headlights.
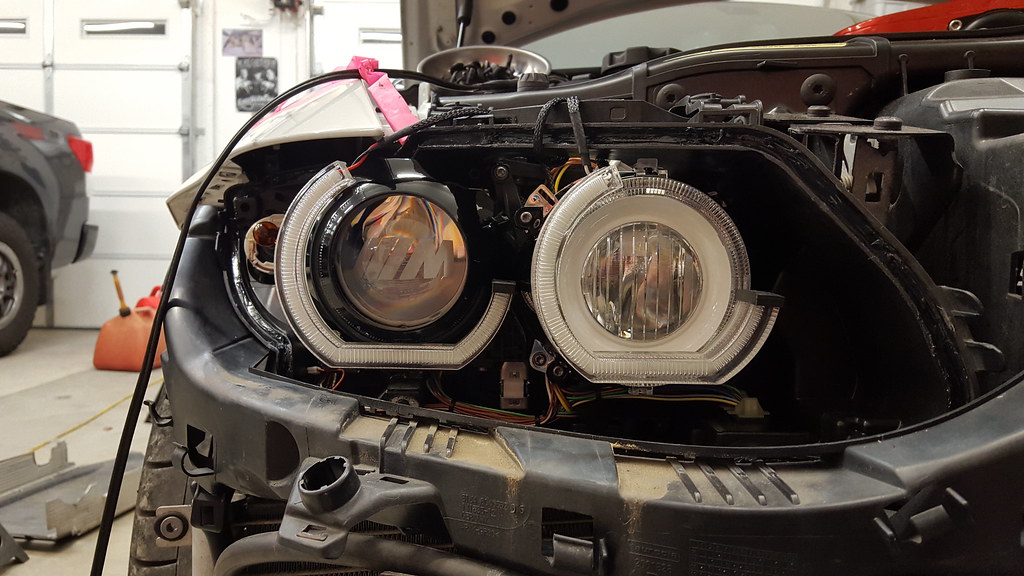
This will not be a complete DIY, because I can't remember to take pictures of everything I do. I just hope that posting what I did can help people in the future tackle what they have in their heads for their headlights. I'll also be adding my comments on the bavgruppe instructions and what I would do differently. I found another thread by M3PO here showing all the information and more details on how he did his. A good friend in town does some headlight mods as well as hydrographics. He will be doing this full time starting in 2018. If you are interested in having something done, he can be contacted via facebook here Took a before shot. 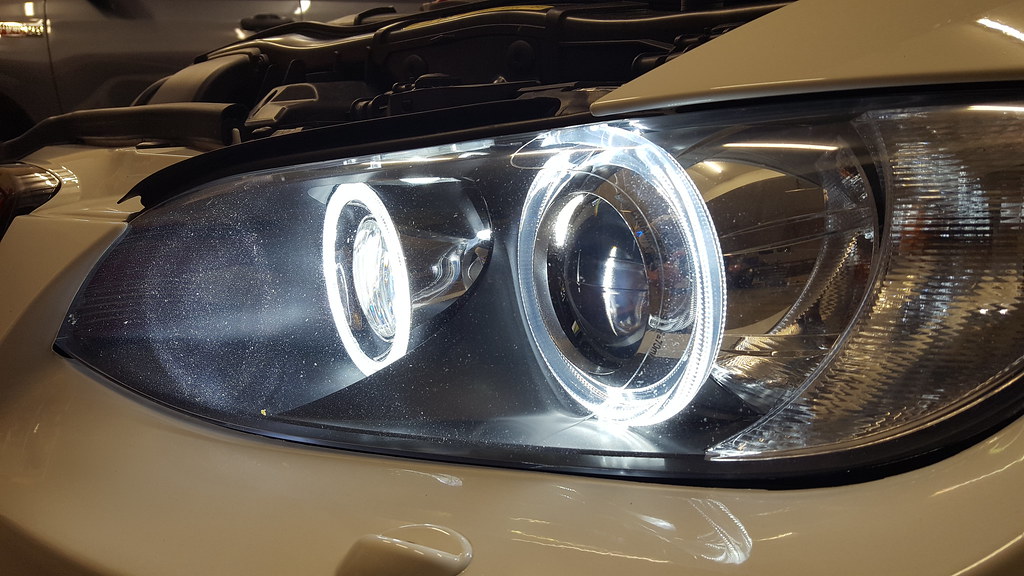 20170921_202036 by thetastelingers, on Flickr 20170921_202036 by thetastelingers, on FlickrHere's a shot after baking and removal of the front cover. 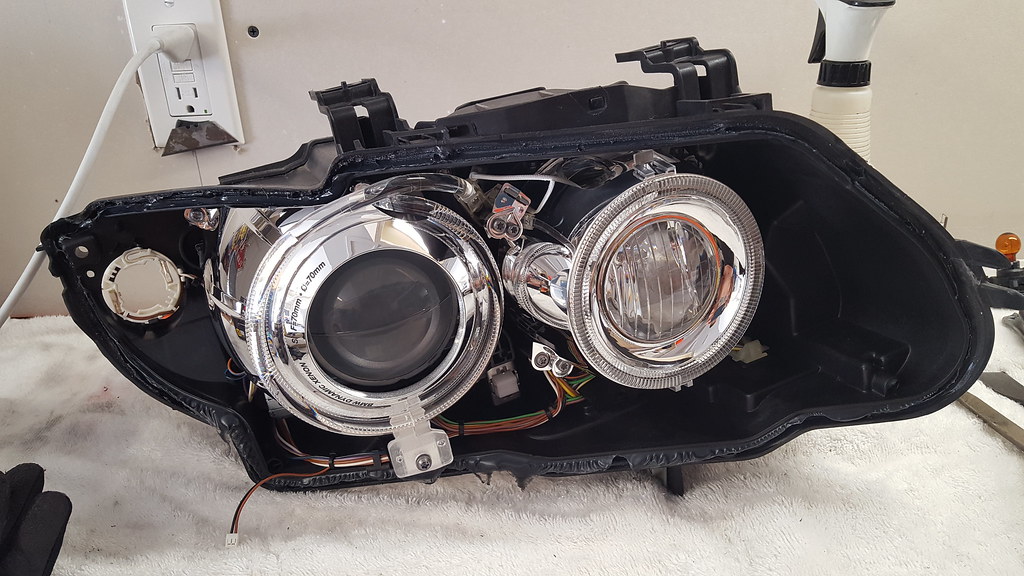 20171009_143116 by thetastelingers, on Flickr 20171009_143116 by thetastelingers, on Flickr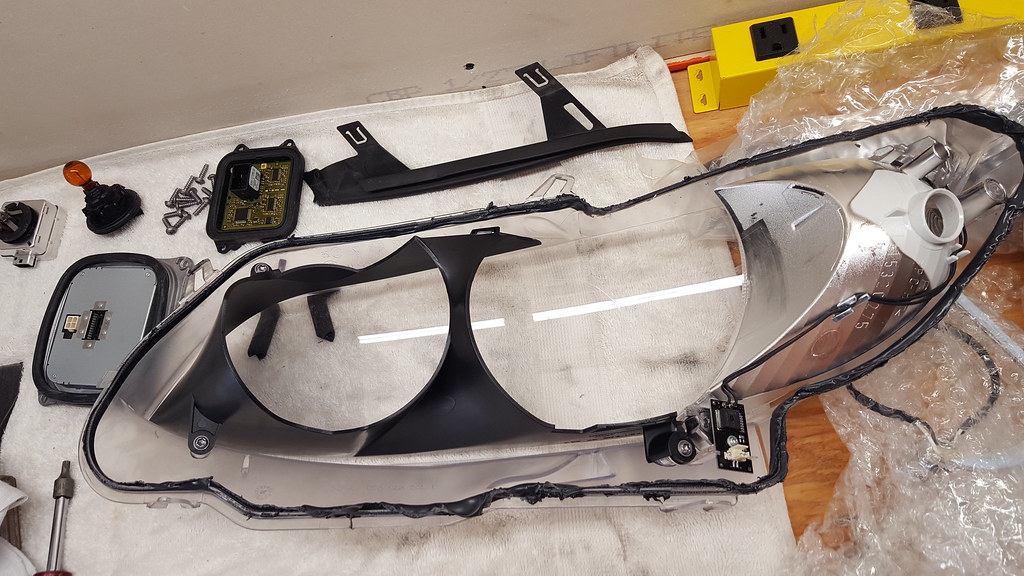 20171009_143123 by thetastelingers, on Flickr 20171009_143123 by thetastelingers, on FlickrWhen you purchase Bavgruppe LED rings, they send you a link on their suggestions on how to install them. Here are all the parts removed. 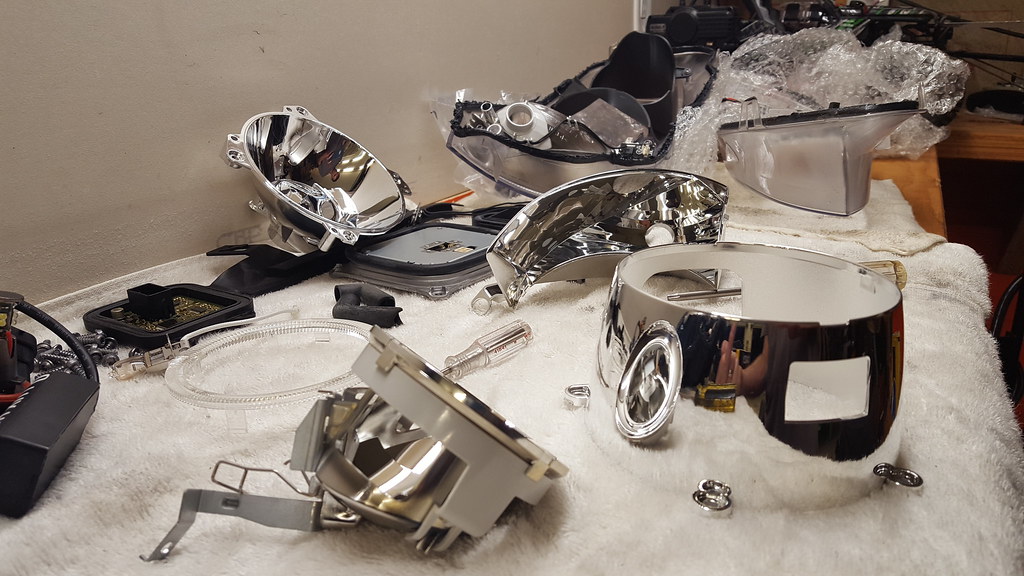 20171009_193037 by thetastelingers, on Flickr 20171009_193037 by thetastelingers, on FlickrFor the install, there needs to be a relief cut made into the shroud as shown. 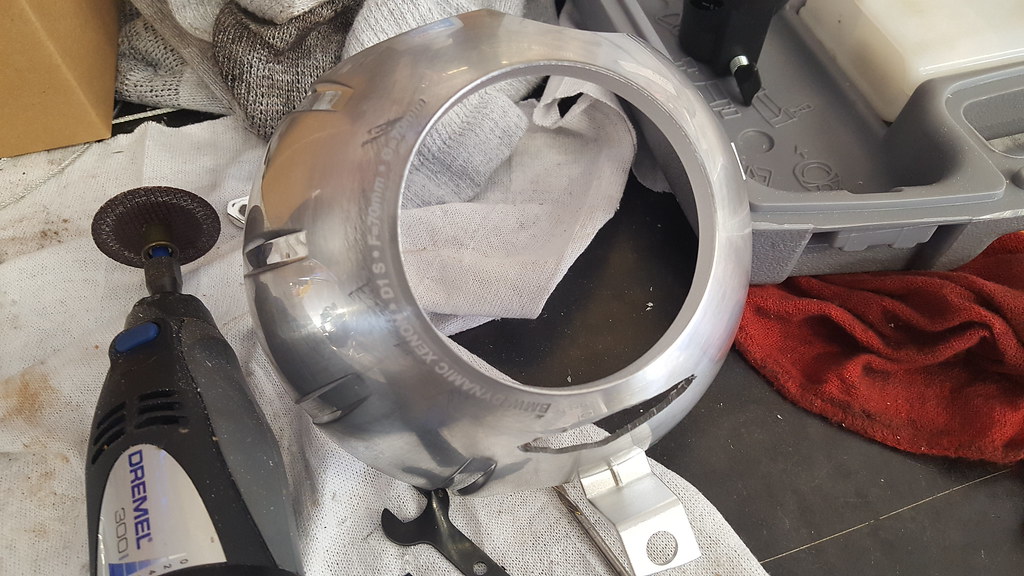 20171013_100717 by thetastelingers, on Flickr 20171013_100717 by thetastelingers, on Flickr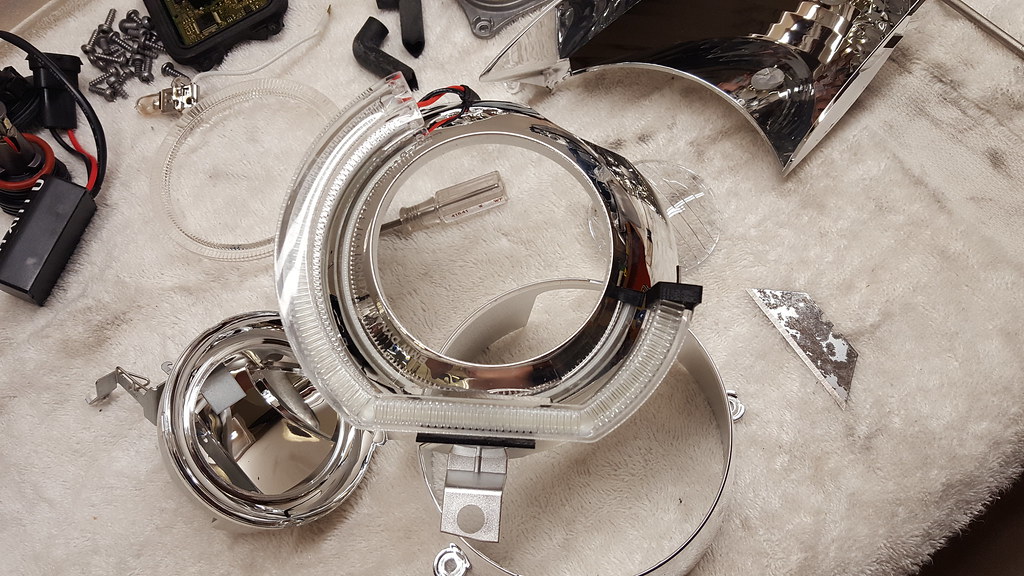 20171009_203847 by thetastelingers, on Flickr 20171009_203847 by thetastelingers, on FlickrI went to a local automotive paint store and got them to mix up some paint.I don't have a good set up for painting, so I tried out these sprayers. They did an alright job. I ended up taking my parts to a friend that mods headlights and had him spray the clear on all the parts for me with his pro setup. 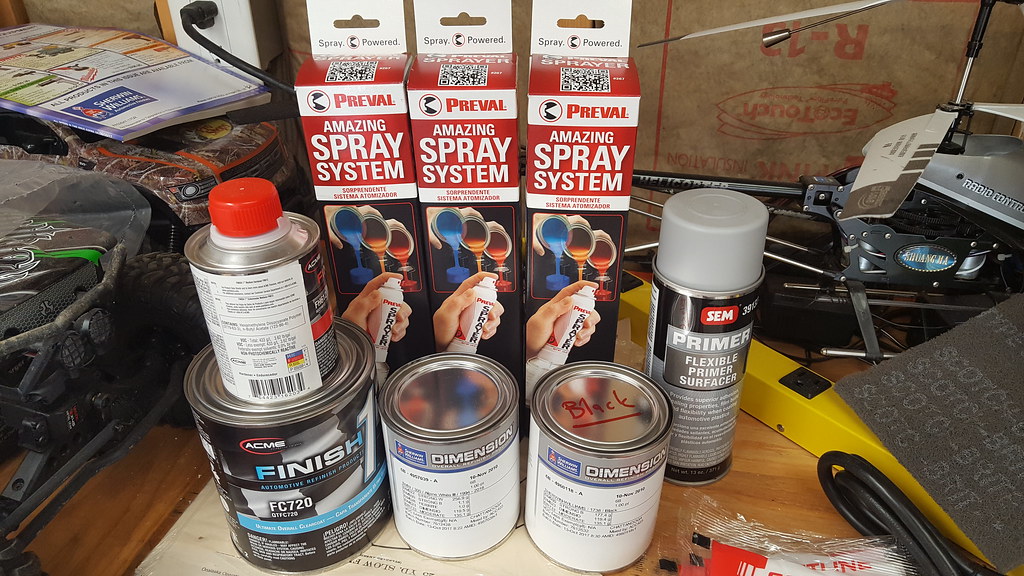 20171013_100649 by thetastelingers, on Flickr 20171013_100649 by thetastelingers, on FlickrHere are the parts sanded and waiting for paint. 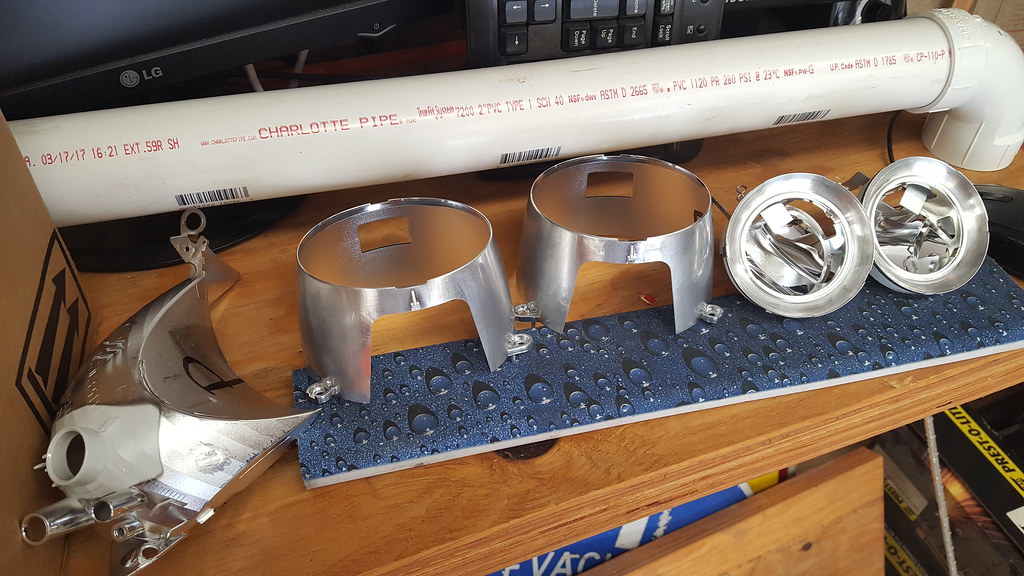 20171013_100700 by thetastelingers, on Flickr 20171013_100700 by thetastelingers, on FlickrHere is one cut shroud vs the uncut shroud. There were no measurements provided for where to cut or how long or deep, so there was quite a bit of time figuring out exactly where to make the cut. 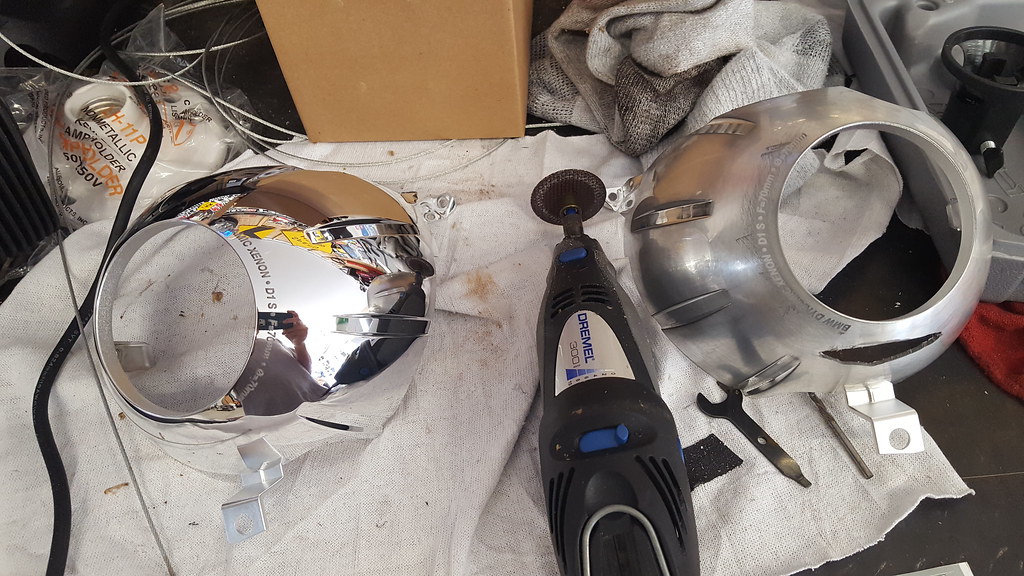 20171013_100721 by thetastelingers, on Flickr 20171013_100721 by thetastelingers, on FlickrHere are the white painted parts before the clear coat was applied. 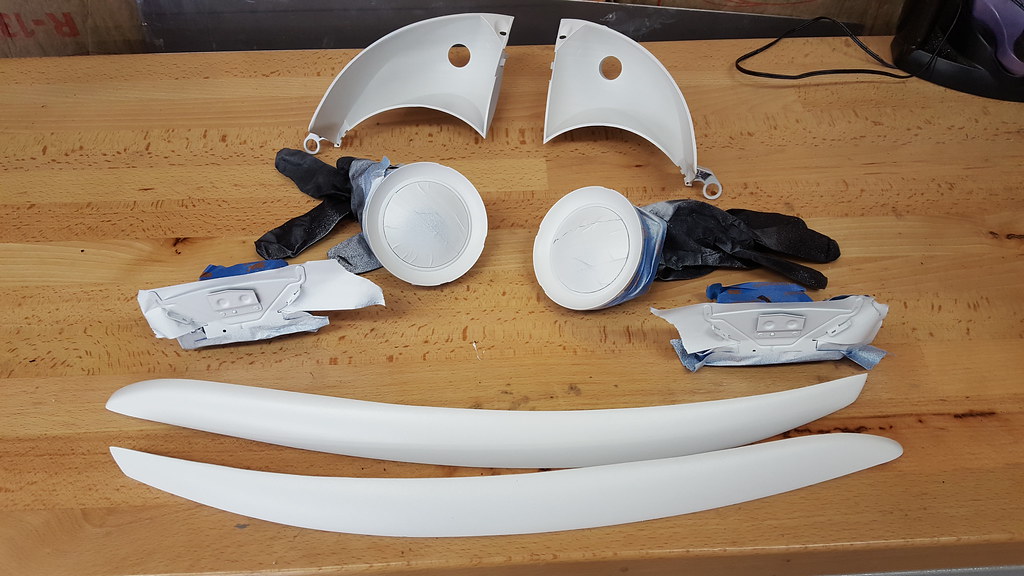 20171013_133139 by thetastelingers, on Flickr 20171013_133139 by thetastelingers, on FlickrAnd the rest of them.  20171013_135224 by thetastelingers, on Flickr 20171013_135224 by thetastelingers, on FlickrContinued... Last edited by thetastelingers; 11-05-2017 at 12:46 PM.. |
| 11-05-2017, 12:21 PM | #2 |
|
Master Baiter
4171
Rep 634
Posts
Drives: 18 M2
Join Date: Jan 2007
Location: Soddy Daisy
|
At this point, I wanted to do a test fit and see what I had going on.
This is still before clear coat.  20171013_151757 by thetastelingers, on Flickr 20171013_151757 by thetastelingers, on FlickrThere was one shroud that was a complete PITA. When we shot clear over it, the paint started to bubble up. I ended up having to strip the entire thing. When I did, it messed up some of the plastic, so I had to do some filling.  20171017_205744 by thetastelingers, on Flickr 20171017_205744 by thetastelingers, on Flickr 20171017_213502 by thetastelingers, on Flickr 20171017_213502 by thetastelingers, on Flickr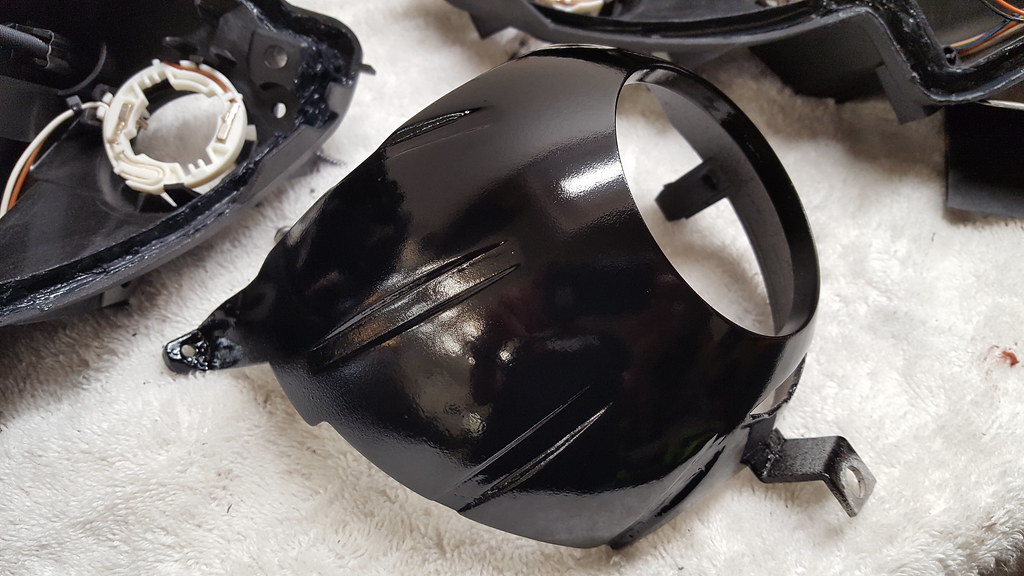 20171018_205909 by thetastelingers, on Flickr 20171018_205909 by thetastelingers, on FlickrTest fitting with clear applied. 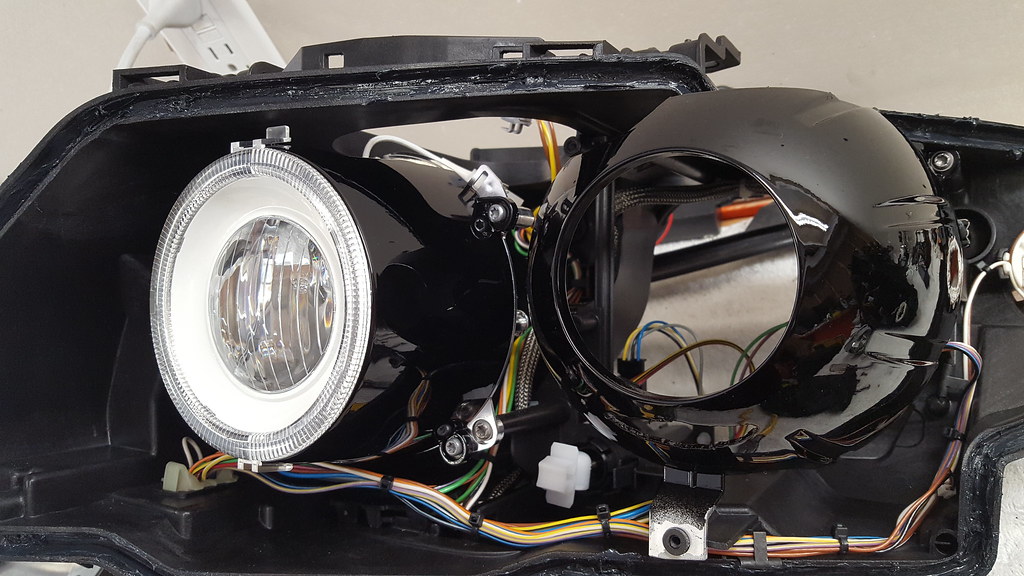 20171019_125536 by thetastelingers, on Flickr 20171019_125536 by thetastelingers, on FlickrAt this point, it is time to start setting the LED Rings. You want to set the rings parallel to the ground. This is a painstaking task. 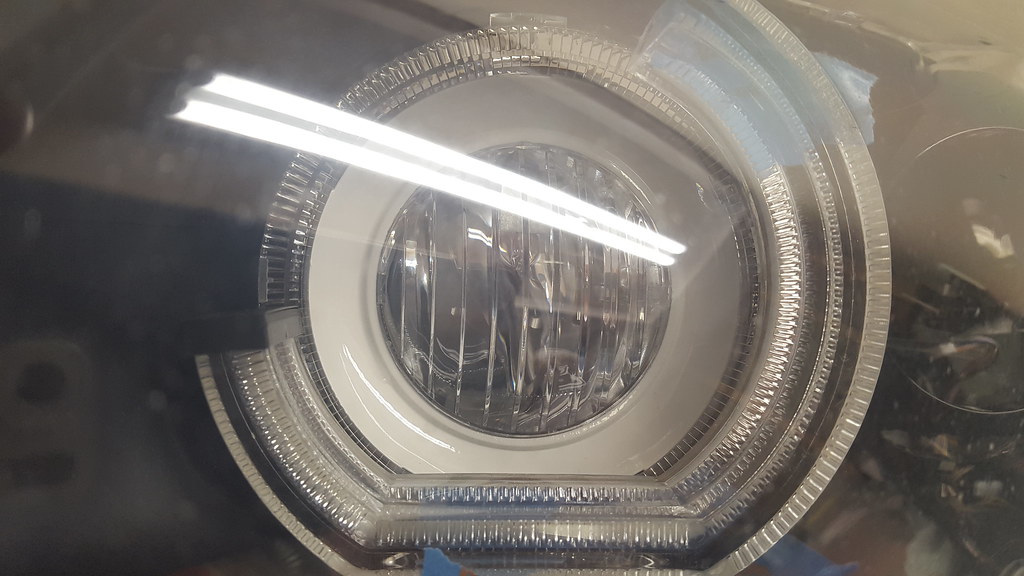 20171019_132108 by thetastelingers, on Flickr 20171019_132108 by thetastelingers, on FlickrLots of looking and tweaking  20171019_140528 by thetastelingers, on Flickr 20171019_140528 by thetastelingers, on Flickr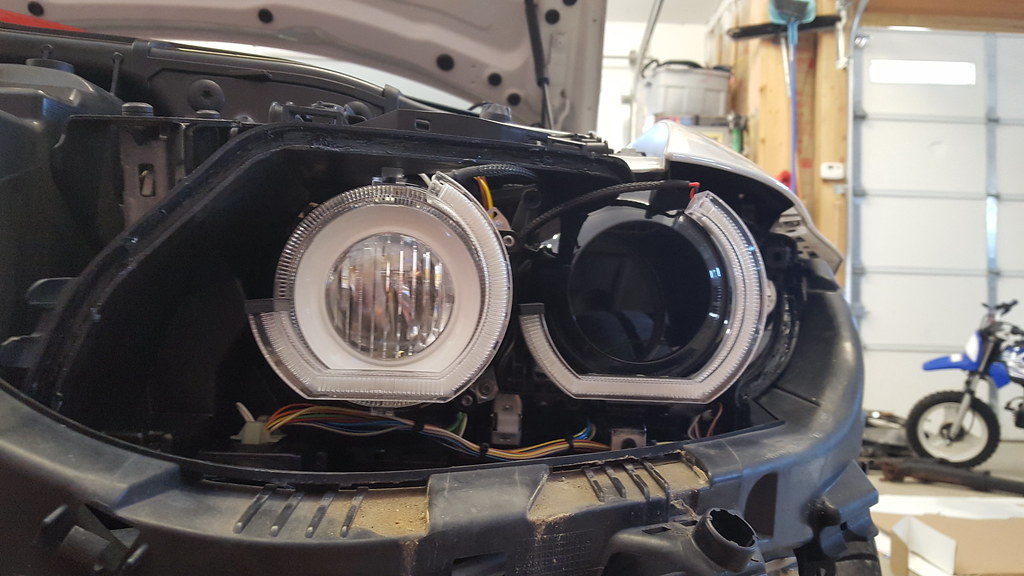 20171019_144027 by thetastelingers, on Flickr 20171019_144027 by thetastelingers, on FlickrShoe GOO is what I used to mate the parts together. It is workable for a few minutes, dries like epoxy and can be removable if needed. The instructions say to plastic weld the rings in, but this way if they need to be removed, it won't be as hard. 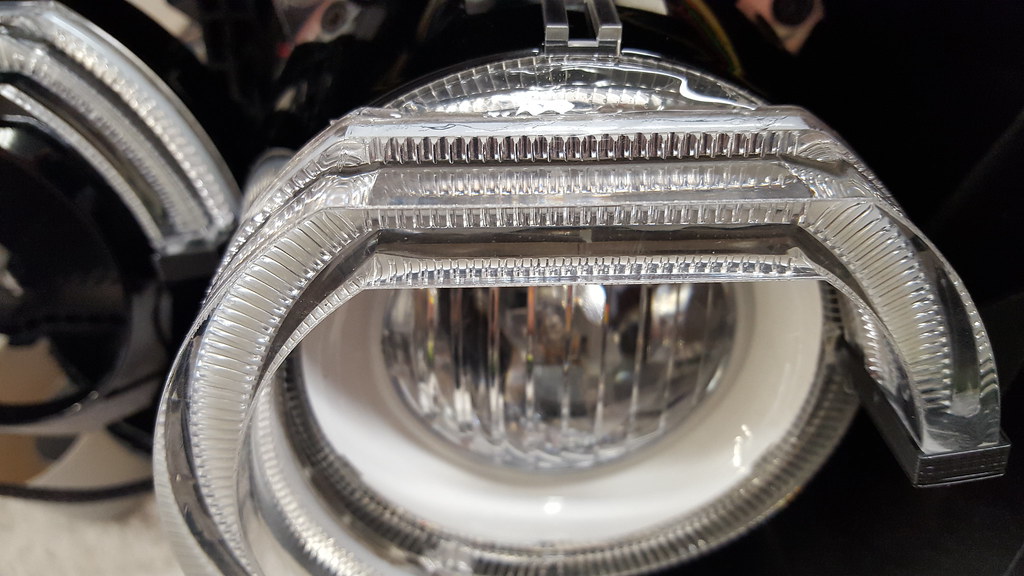 20171019_155419 by thetastelingers, on Flickr 20171019_155419 by thetastelingers, on Flickr 20171019_155427 by thetastelingers, on Flickr 20171019_155427 by thetastelingers, on FlickrSomething else I added to my build (to the suggestion of my buddy Eric) were some new lenses. He also some etching for me. (also at his suggestion) He mods headlights and provides this service if you are interested. You can find him on facebook here  20171023_190605 by thetastelingers, on Flickr 20171023_190605 by thetastelingers, on Flickr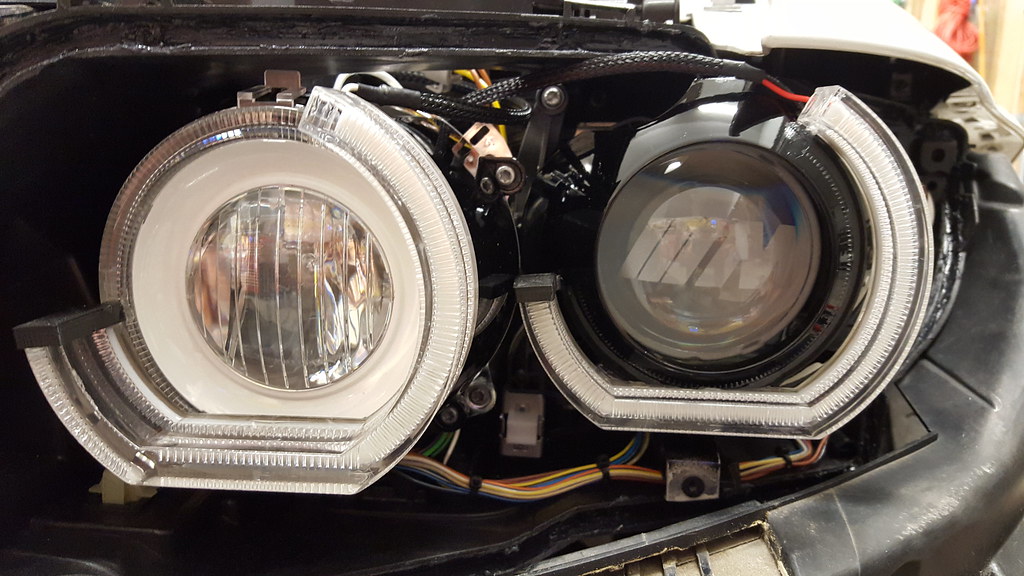 20171023_203111 by thetastelingers, on Flickr 20171023_203111 by thetastelingers, on FlickrMORE test fitting 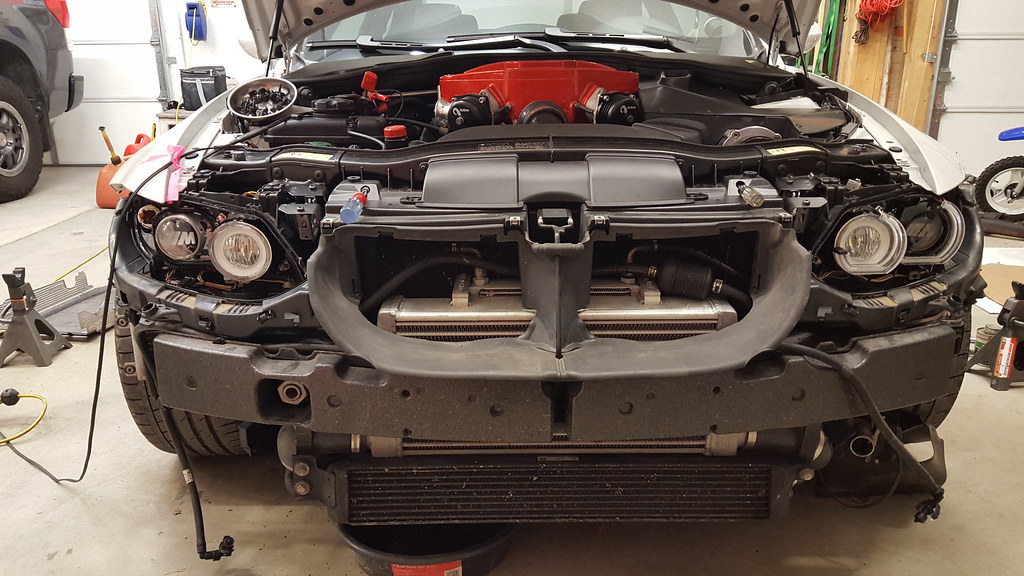 20171023_203512 by thetastelingers, on Flickr 20171023_203512 by thetastelingers, on Flickrcontinued... |
|
Appreciate
0
|
| 11-05-2017, 12:32 PM | #3 |
|
Master Baiter
4171
Rep 634
Posts
Drives: 18 M2
Join Date: Jan 2007
Location: Soddy Daisy
|
 20171023_211031 by thetastelingers, on Flickr 20171023_211031 by thetastelingers, on FlickrOk so time to fit the Eyebrows and do some cutting on the Rings. trimming the ring is required, because they are too wide to allow the cover to go on. IMO they should cast the rings with this into them already since they are made for this car anyway. 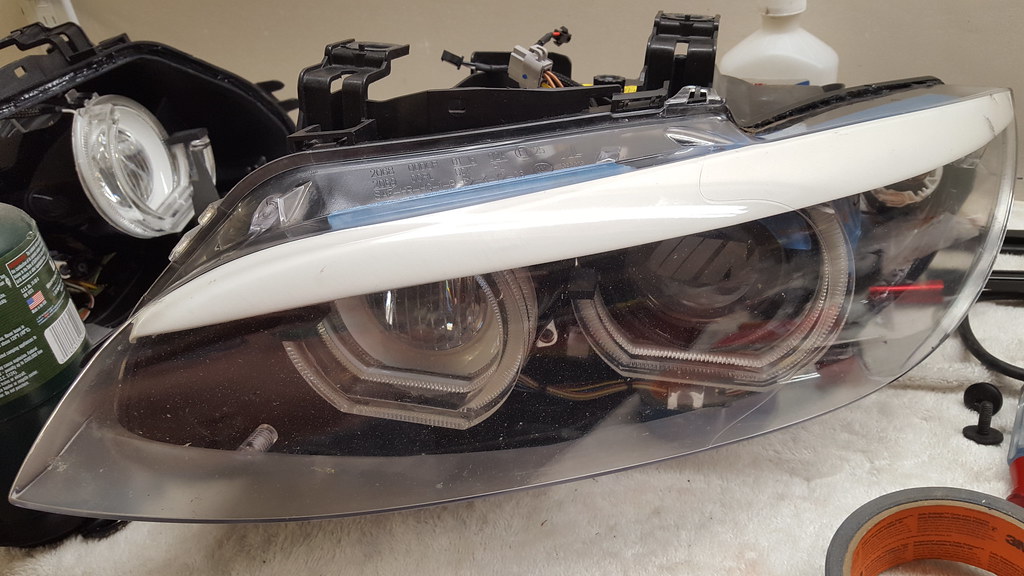 20171024_210953 by thetastelingers, on Flickr 20171024_210953 by thetastelingers, on FlickrIn this picture, you can see the ring and where I started cutting.  20171025_213759 by thetastelingers, on Flickr 20171025_213759 by thetastelingers, on FlickrI ended up sanding the cut portion with 320, 400, 800, 1500, 2000 grits, then finishing with "finesse" polishing compound. More fitting and clearance testing. 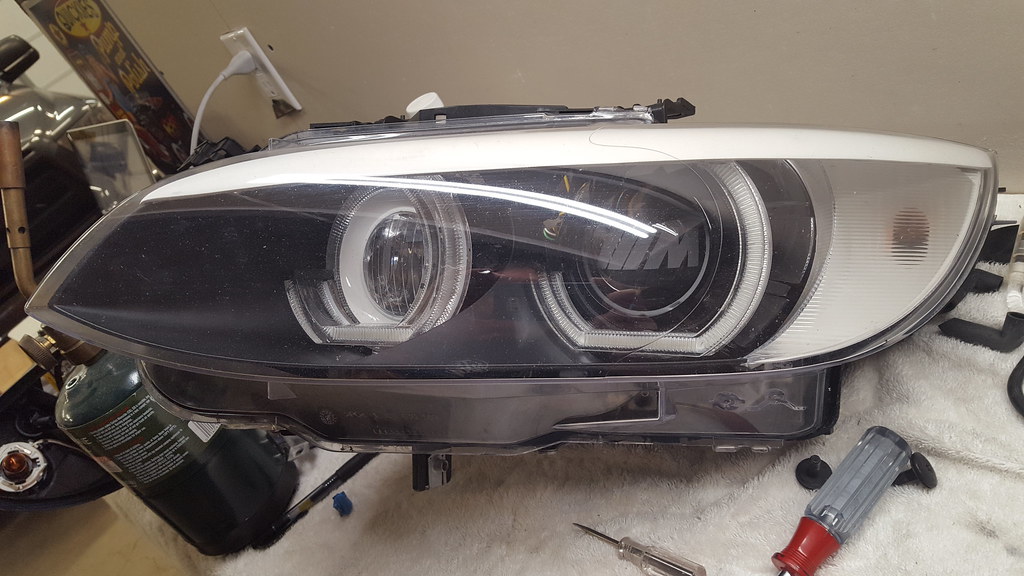 20171101_225630 by thetastelingers, on Flickr 20171101_225630 by thetastelingers, on FlickrEric said TEST EVERYTHING before you put the covers on. He said you can get pretty angry if it is all together and something doesn't work. Here is the driver side. 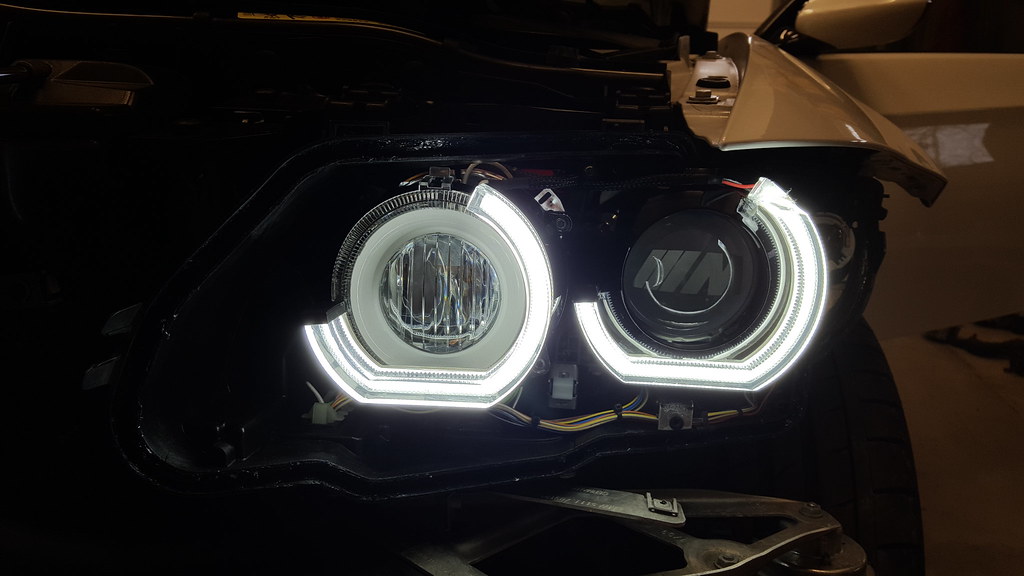 20171102_100113 by thetastelingers, on Flickr 20171102_100113 by thetastelingers, on Flickr 20171102_100326 by thetastelingers, on Flickr 20171102_100326 by thetastelingers, on Flickr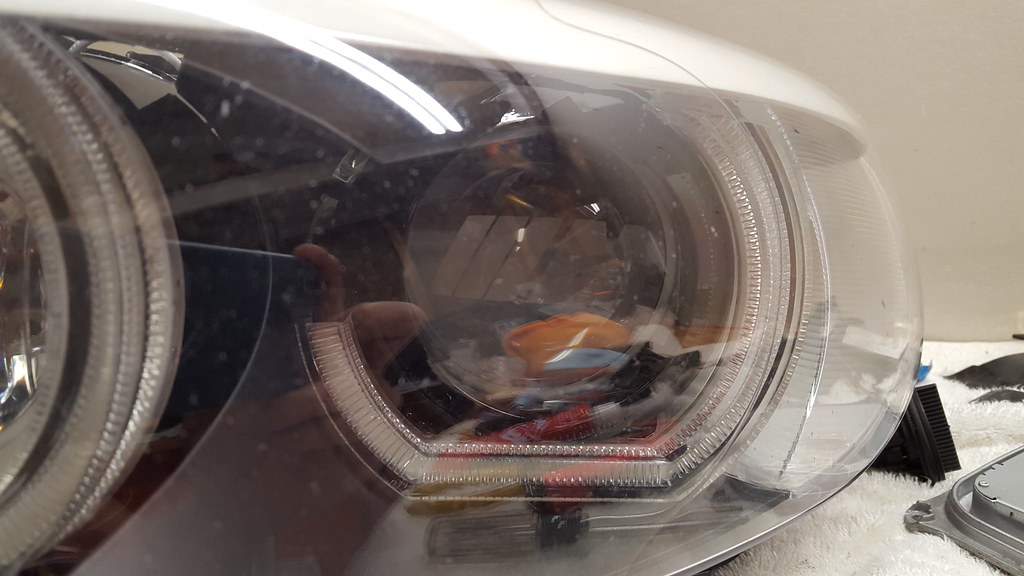 20171102_104226 by thetastelingers, on Flickr 20171102_104226 by thetastelingers, on Flickr 20171102_105716 by thetastelingers, on Flickr 20171102_105716 by thetastelingers, on FlickrOk, so I purchased the butyl sealant to put the headlights back together. Got everything back together and see a spot on the eyebrow. Turns out that maybe it being smushed against the cover and the heat caused the paint to smudge. Below is a picture of that. 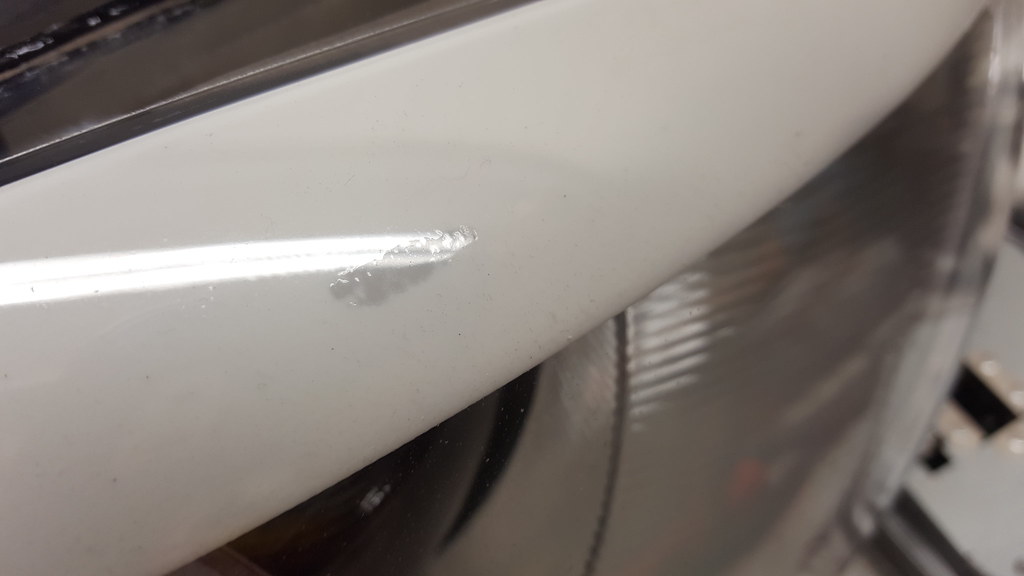 20171102_110502 by thetastelingers, on Flickr 20171102_110502 by thetastelingers, on FlickrNow that the driver side is together, time to do the passenger side. Here is the passenger side.  20171102_114332 by thetastelingers, on Flickr 20171102_114332 by thetastelingers, on FlickrHere are both of them finished side by side. I got a little bit of the gray smudges on the passenger side, but a lot smaller than the driver side. 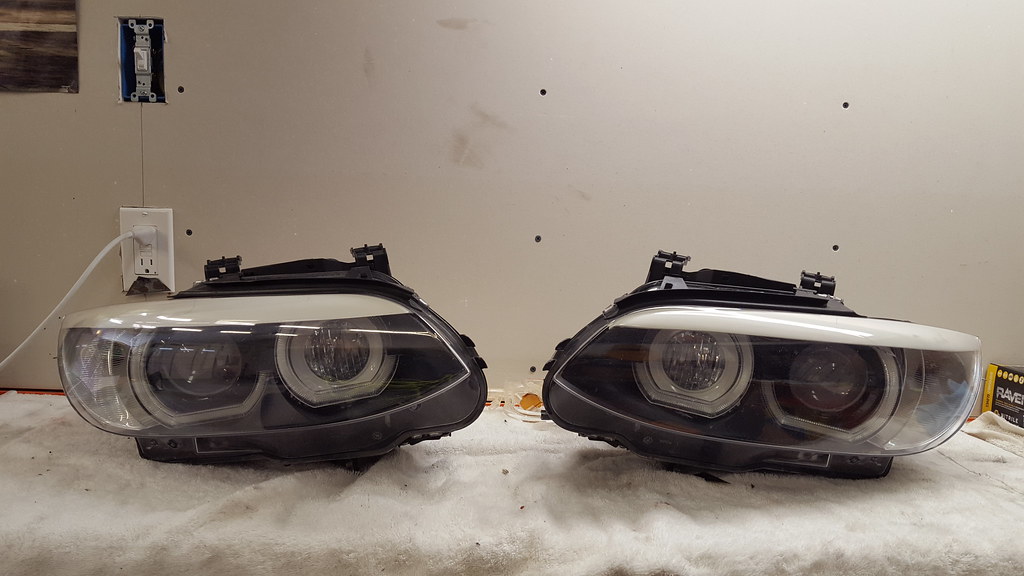 20171102_124836 by thetastelingers, on Flickr 20171102_124836 by thetastelingers, on Flickr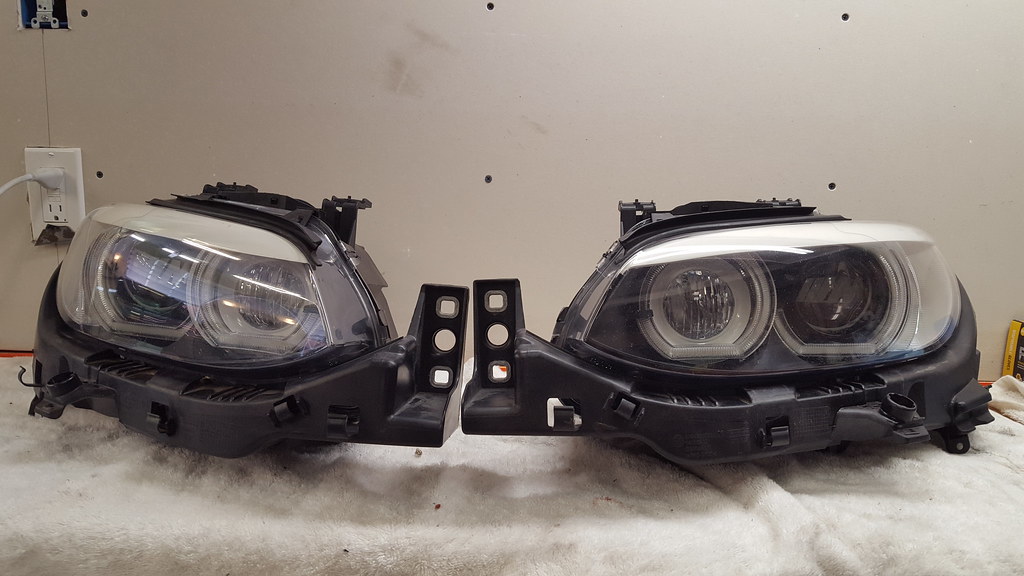 20171102_130602 by thetastelingers, on Flickr 20171102_130602 by thetastelingers, on Flickrcontinued... |
|
Appreciate
0
|
| 11-05-2017, 12:40 PM | #4 |
|
Master Baiter
4171
Rep 634
Posts
Drives: 18 M2
Join Date: Jan 2007
Location: Soddy Daisy
|
Final fit on the car.
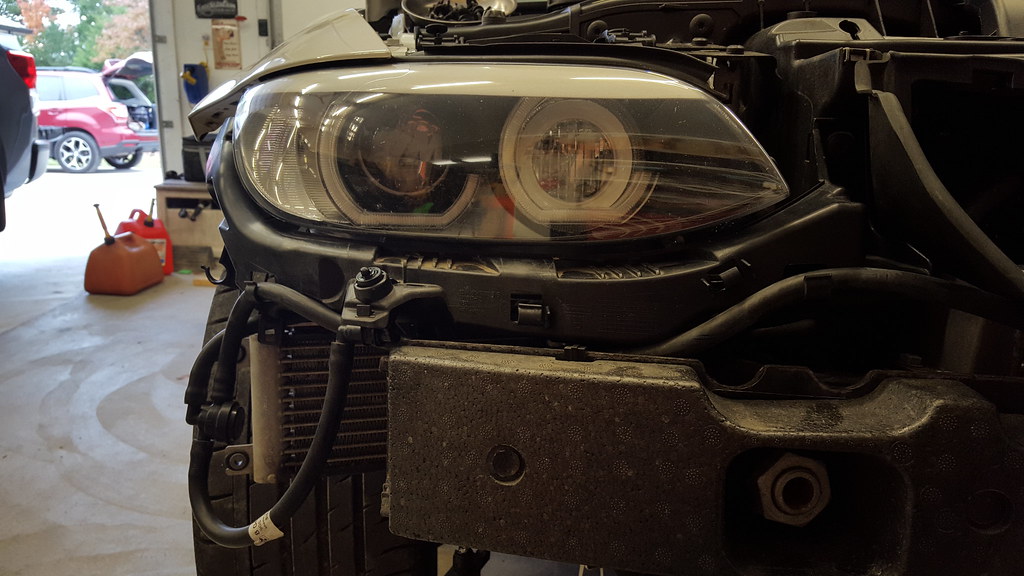 20171102_131601 by thetastelingers, on Flickr 20171102_131601 by thetastelingers, on Flickr 20171102_141747 by thetastelingers, on Flickr 20171102_141747 by thetastelingers, on Flickr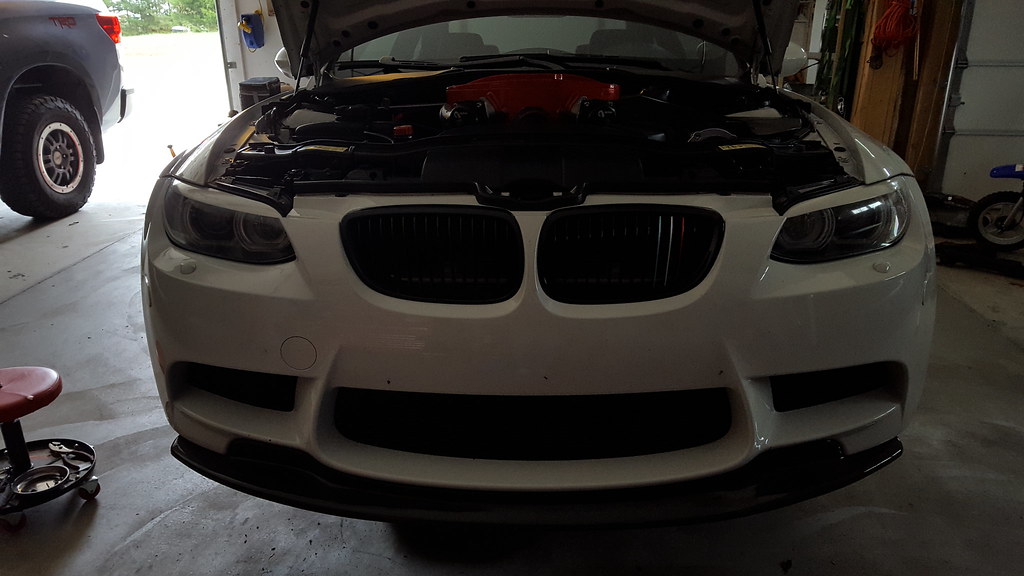 20171102_152610 by thetastelingers, on Flickr 20171102_152610 by thetastelingers, on Flickr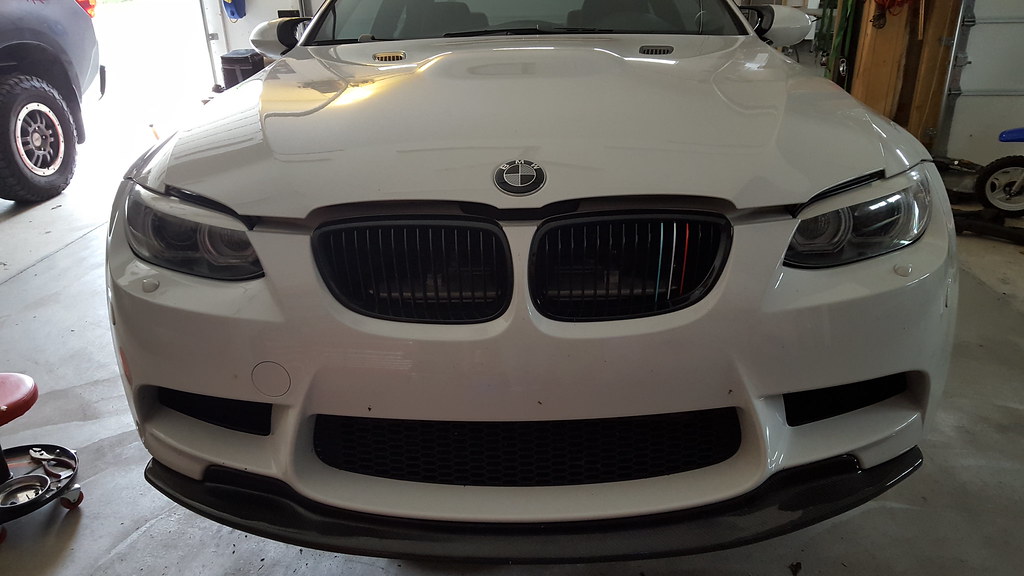 20171102_152627 by thetastelingers, on Flickr 20171102_152627 by thetastelingers, on FlickrGot the car outside for the finished pictures.  20171103_095126 by thetastelingers, on Flickr 20171103_095126 by thetastelingers, on FlickrReally happy with them. 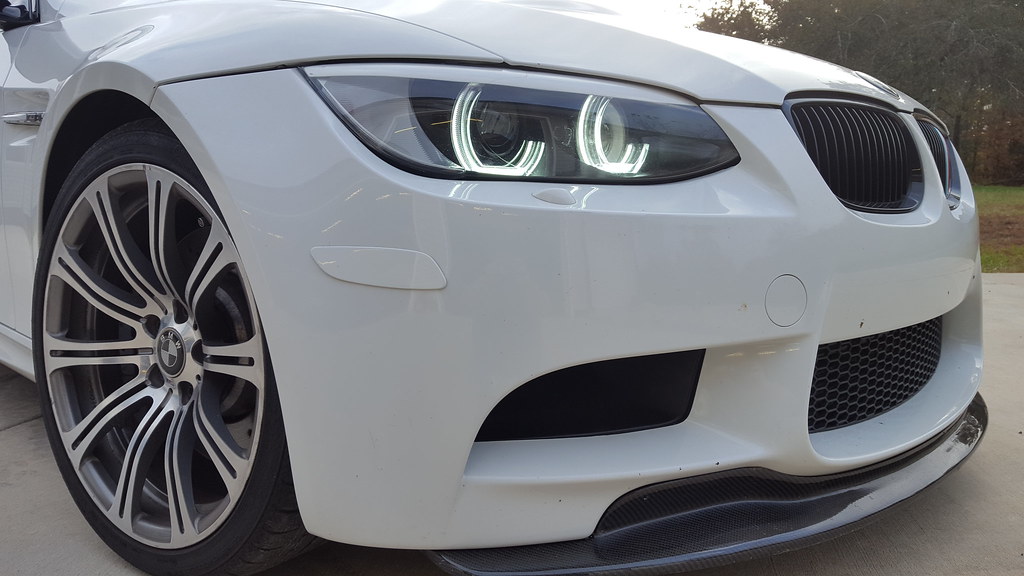 20171103_095142 by thetastelingers, on Flickr 20171103_095142 by thetastelingers, on Flickr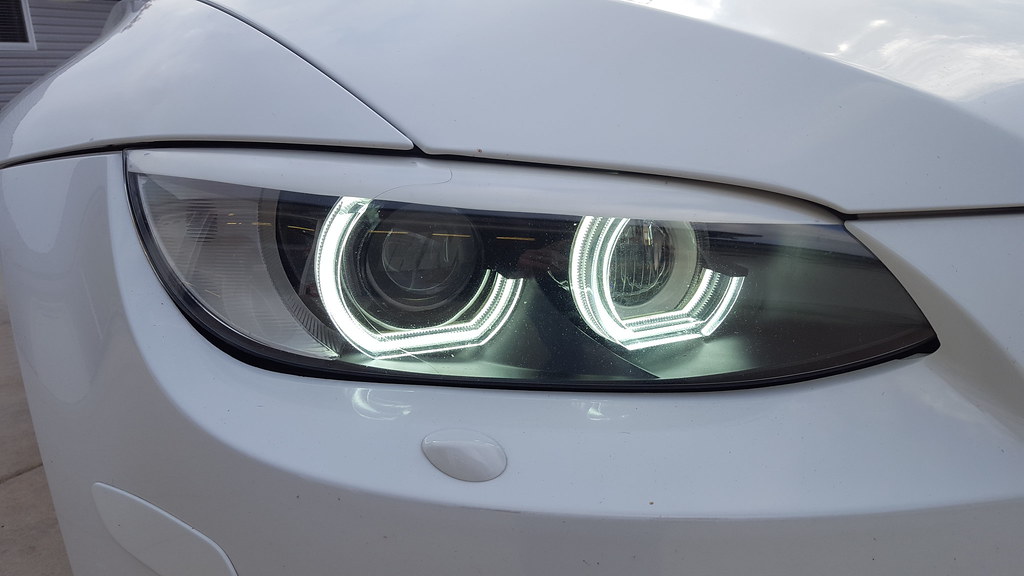 20171103_095436 by thetastelingers, on Flickr 20171103_095436 by thetastelingers, on Flickr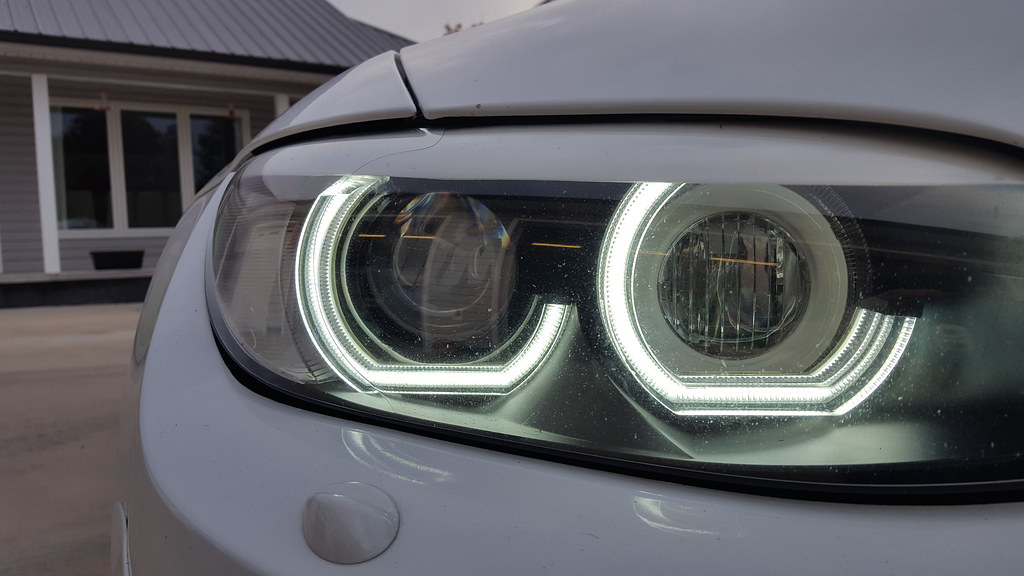 20171103_095442 by thetastelingers, on Flickr 20171103_095442 by thetastelingers, on Flickr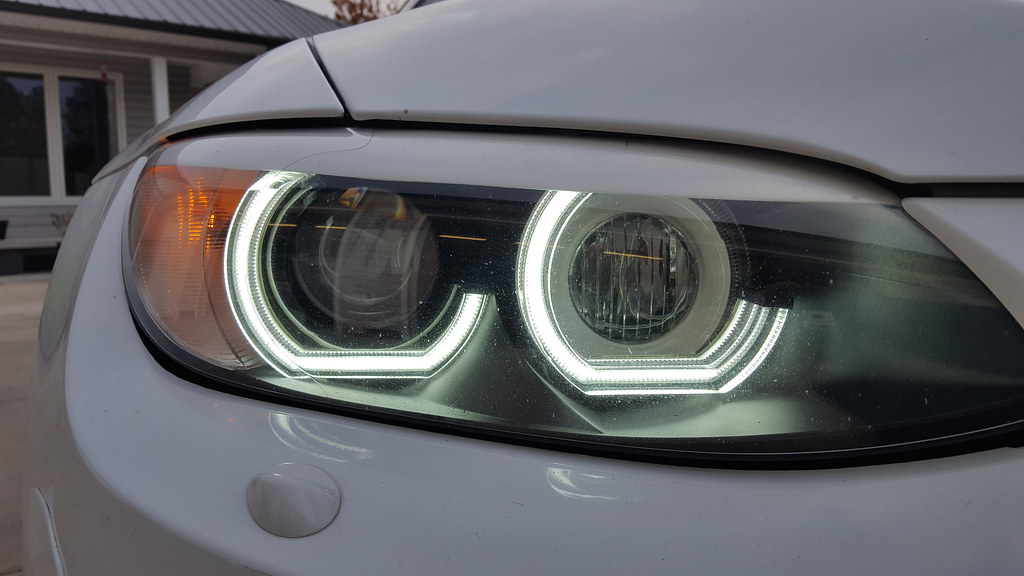 20171103_095454 by thetastelingers, on Flickr 20171103_095454 by thetastelingers, on Flickr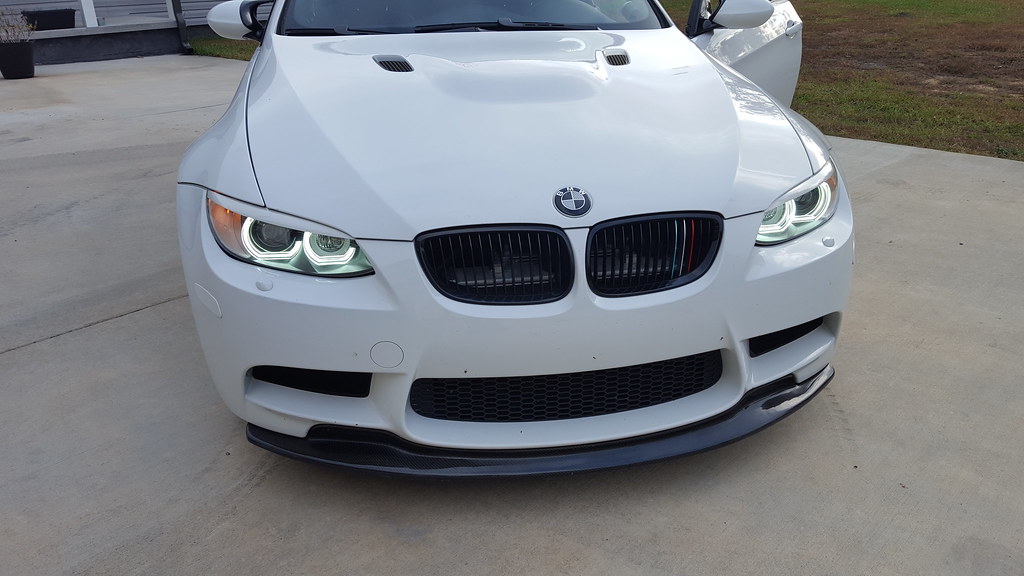 20171103_095503 by thetastelingers, on Flickr 20171103_095503 by thetastelingers, on Flickr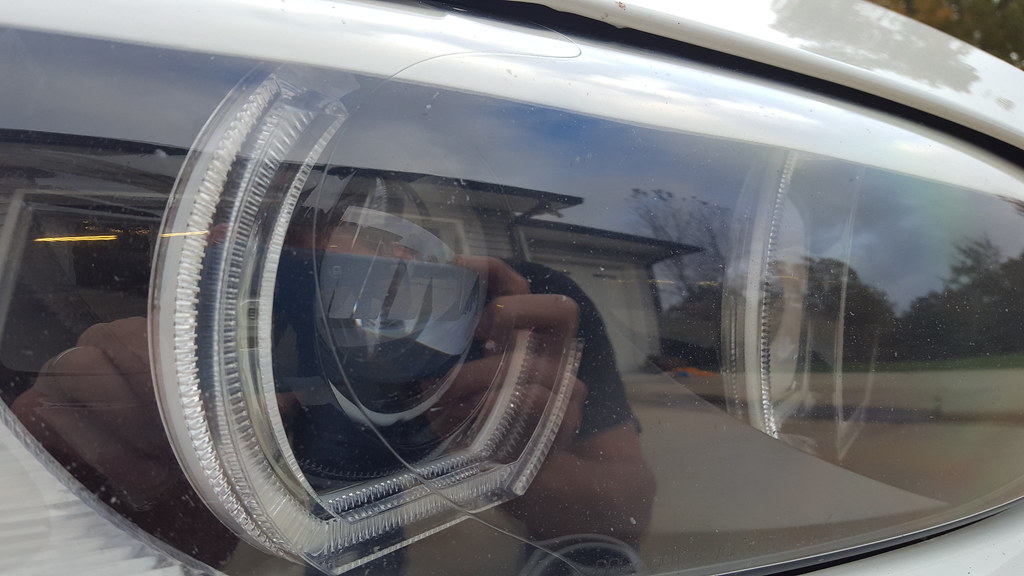 20171103_095615 by thetastelingers, on Flickr 20171103_095615 by thetastelingers, on Flickr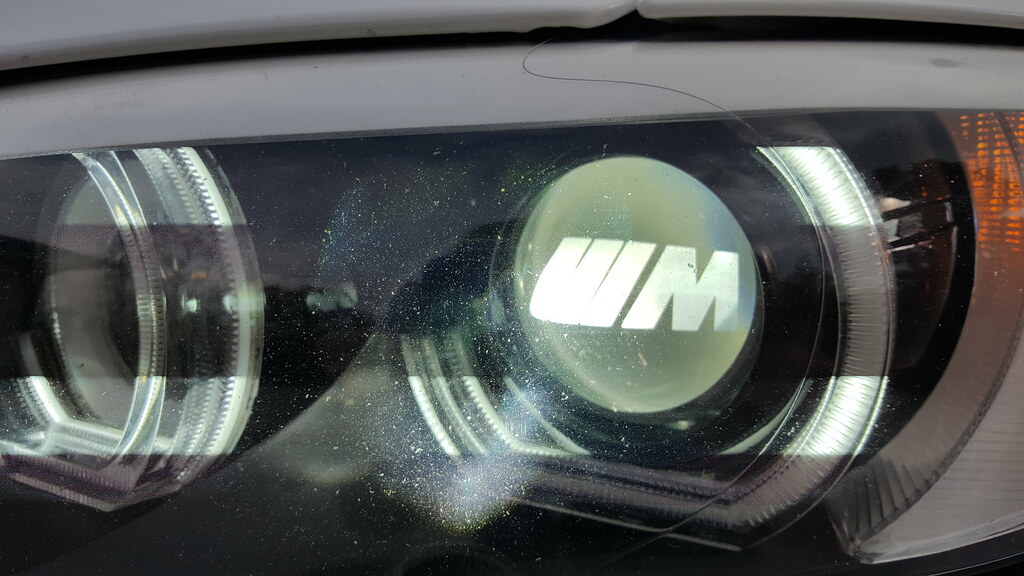 20171103_100831 by thetastelingers, on Flickr 20171103_100831 by thetastelingers, on Flickr 20171105_085740 by thetastelingers, on Flickr 20171105_085740 by thetastelingers, on FlickrIf I had it to do over again, I would buy new covers. These covers have some pitting in them. I would also cut more on the rings, so that the cover wouldn't push on them and make the shroud look crooked vs the lens. Other than that, I am pretty happy with them. I hope this helps any of you who choose to tackle this task. There is a reason these pros charge so much to do these headlights. Everything they do has to be top notch and no corners cut, or it is a reflection on the job they do. I'll gladly answer any questions. Thanks |
|
Appreciate
5
|
| 11-06-2017, 05:57 AM | #7 | |
|
Master Baiter
4171
Rep 634
Posts
Drives: 18 M2
Join Date: Jan 2007
Location: Soddy Daisy
|
Quote:
|
|
|
Appreciate
0
|
| 11-07-2017, 04:58 PM | #8 |
|
Major
 347
Rep 1,097
Posts
Drives: Melbourne Red e90 M3
Join Date: Jul 2012
Location: Bellevue, WA
|
Thanks for the thread. This re-affirms that I will not be doing any painting, and just going to do the DTM halos and CF eyebrows when I do the mods this winter

__________________
6MT | 11:1 Forged 4.1L | ESS-G1 | KW ClubSport | Sparta 380/355 BBK
|
|
Appreciate
0
|
| 11-07-2017, 11:39 PM | #9 | |
|
Brigadier General
 
2141
Rep 3,647
Posts |
Quote:
Anyhow, just an FYI. Not saying whatever you have planned won't work. Good luck! |
|
|
Appreciate
1
thetastelingers4170.50 |
| 11-08-2017, 01:50 AM | #10 | |
|
First Lieutenant
 329
Rep 336
Posts |
Quote:
You can see the frosted area in image below. Not ideal but is better than scratching the inside of your lens. There is about a 1mm gap between angel eye and lens. (At the top) It does not affect light output. |
|
|
Appreciate
1
thetastelingers4170.50 |
| 11-08-2017, 01:57 AM | #11 | |
|
Major General
965
Rep 5,032
Posts |
Quote:
|
|
|
Appreciate
1
thetastelingers4170.50 |
| 11-08-2017, 02:00 AM | #12 | |
|
Major General
965
Rep 5,032
Posts |
Quote:
|
|
|
Appreciate
1
///IVI III329.00 |
| 11-08-2017, 02:04 AM | #13 | ||
|
First Lieutenant
329
Rep 336
Posts |
Quote:
by the time I reached this stage of the headlight mod, my patience was running short.. and I could not find 2000 grit.. didn't even know it exists.. anyway.. Will definitely consider your method for next time.. |
||
|
Appreciate
0
|
| 11-08-2017, 06:12 AM | #14 | ||
|
Master Baiter
4171
Rep 634
Posts
Drives: 18 M2
Join Date: Jan 2007
Location: Soddy Daisy
|
Quote:
Quote:
Yeah going to 1500 to 2000 was a big difference then hitting with polishing compound helped even more. Thanks for posting the pictures. It'll give the next person more ammo to work with.  |
||
|
Appreciate
0
|
| 11-08-2017, 06:14 AM | #15 | |
|
Master Baiter
4171
Rep 634
Posts
Drives: 18 M2
Join Date: Jan 2007
Location: Soddy Daisy
|
Quote:
Just trying to do my part.  |
|
|
Appreciate
0
|
| 11-08-2017, 03:15 PM | #16 | |
|
Major General
965
Rep 5,032
Posts |
Quote:
2500 is out there, and if you are really serious about your finish get hold of a 3m 3000 grit finishing pad. When using those two I like to use Meguiar's quik detailer as lube instead of water.  |
|
|
Appreciate
1
///IVI III329.00 |
| 02-13-2018, 10:43 AM | #17 |
|
Lieutenant

64
Rep 548
Posts |
Do you have any pictures of the wiring or a wiring diagram by any chance? Or even just instructions that came with the rings for wiring them up?
I want to purchase a set of these to replace the failing rings in my headlights now but somebody else wired them and I want to see if the bavgruppe rings wire up the same way.
__________________
 2011 AW / CR 6MT 335i Xdrive Coupe | JB4 Stage 2 | BMS Intake | Performance Spoiler | Powder Coated Red Linea Corse 818 | Blacked Out Roof | Wrapped Interior Trim 2011 AW / CR 6MT 335i Xdrive Coupe | JB4 Stage 2 | BMS Intake | Performance Spoiler | Powder Coated Red Linea Corse 818 | Blacked Out Roof | Wrapped Interior Trim |
|
Appreciate
1
thetastelingers4170.50 |
| 02-13-2018, 11:35 AM | #18 | |
|
Major
612
Rep 1,326
Posts |
Quote:
__________________
2014 Frozen Black F10 M5 | Agency Power HFC Downpipes | Custom Open Flash Stage 2 Tune | KW HAS kit | 3D Design Lip | 3D Design Skirts | 3D Design Spoiler | IND Front & Rear Reflectors | IND M5 Badge | M Performance Steering Wheel | M Performance CF Shift Knob | Pedal Haus Pedals & Paddles | Turner Exhaust |
|
|
|
Appreciate
1
thetastelingers4170.50 |
| 02-13-2018, 03:37 PM | #20 | |
|
Master Baiter
4171
Rep 634
Posts
Drives: 18 M2
Join Date: Jan 2007
Location: Soddy Daisy
|
Quote:

__________________
 FYI, if you get an infraction in the off-topic section, you can never visit that section again. |
|
|
Appreciate
1
azndrunk74611.50 |
| 02-23-2018, 11:19 AM | #21 |
|
Private
 10
Rep 82
Posts |
Looks pretty cool.
What's the reason to place new angel eye above stock one? Also interested in how the eyebrow is held inside?
__________________
|
|
Appreciate
0
|
| 02-26-2018, 07:00 AM | #22 | |
|
Master Baiter
4171
Rep 634
Posts
Drives: 18 M2
Join Date: Jan 2007
Location: Soddy Daisy
|
Quote:
Eyebrow is held with double sided sticky tape and the housing pushes against it to hold it in place as well.
__________________
FYI, if you get an infraction in the off-topic section, you can never visit that section again. |
|
|
Appreciate
0
|
Post Reply |
| Bookmarks |
|
|


