

Last Update: July 10, 2021
Update - Since writing the original Carsara Box which this DIY details appears to be replaced by a new part. The link to purchase and the DIY + Video below do not match this new unit. I will update or add information as it becomes available
There have been a lot of posts and discoveries on how to install Carplay/Android Auto boxes in the E9x. There are a lot of existing great resources, but I thought I would try to consolidate as much as possible in one up to date post so that it isn’t expected to search through 80+ pages of content and so new people who are interested can find that info more easily. (I’m looking at you Facebook Groups).
This thread will focus on the OLDER Carsara (Available BEFORE Summer 2021) CIC Carplay box specifically. There are a number of Carplay boxes available under various resellers (Joyeauto, Andream, Kremersino, etc) – based on pictures of the device internals, most of these boxes are the same or similar, using the GPLink processor to do most of the work. The Carsara is one of the latest revisions of these boxes (my unit was dated 8/2020) and seems to have the most reliable combination of software and features.
What is it?
If you made it this far, these boxes allow for in-car specific UI from your smartphone (Carplay/Android Auto) as well as screen mirroring (Airplay/Screen mirroring) which displays what is on your phone screen, but does not allow you to interact with it from your phone:
This allows you to run specific CP/AA apps like Google Maps, Waze, Pandora, Spotify, SiriusXM, messaging, and more, while providing direct access to your phones assistant through the steering wheel and iDrive controllers.
It’s important to know that these boxes do not eliminate your existing iDrive – your existing radio, CD player, navigation, onboard diagnostics etc will all remain in place. This is different from some Android headunits which replace the iDrive completely.
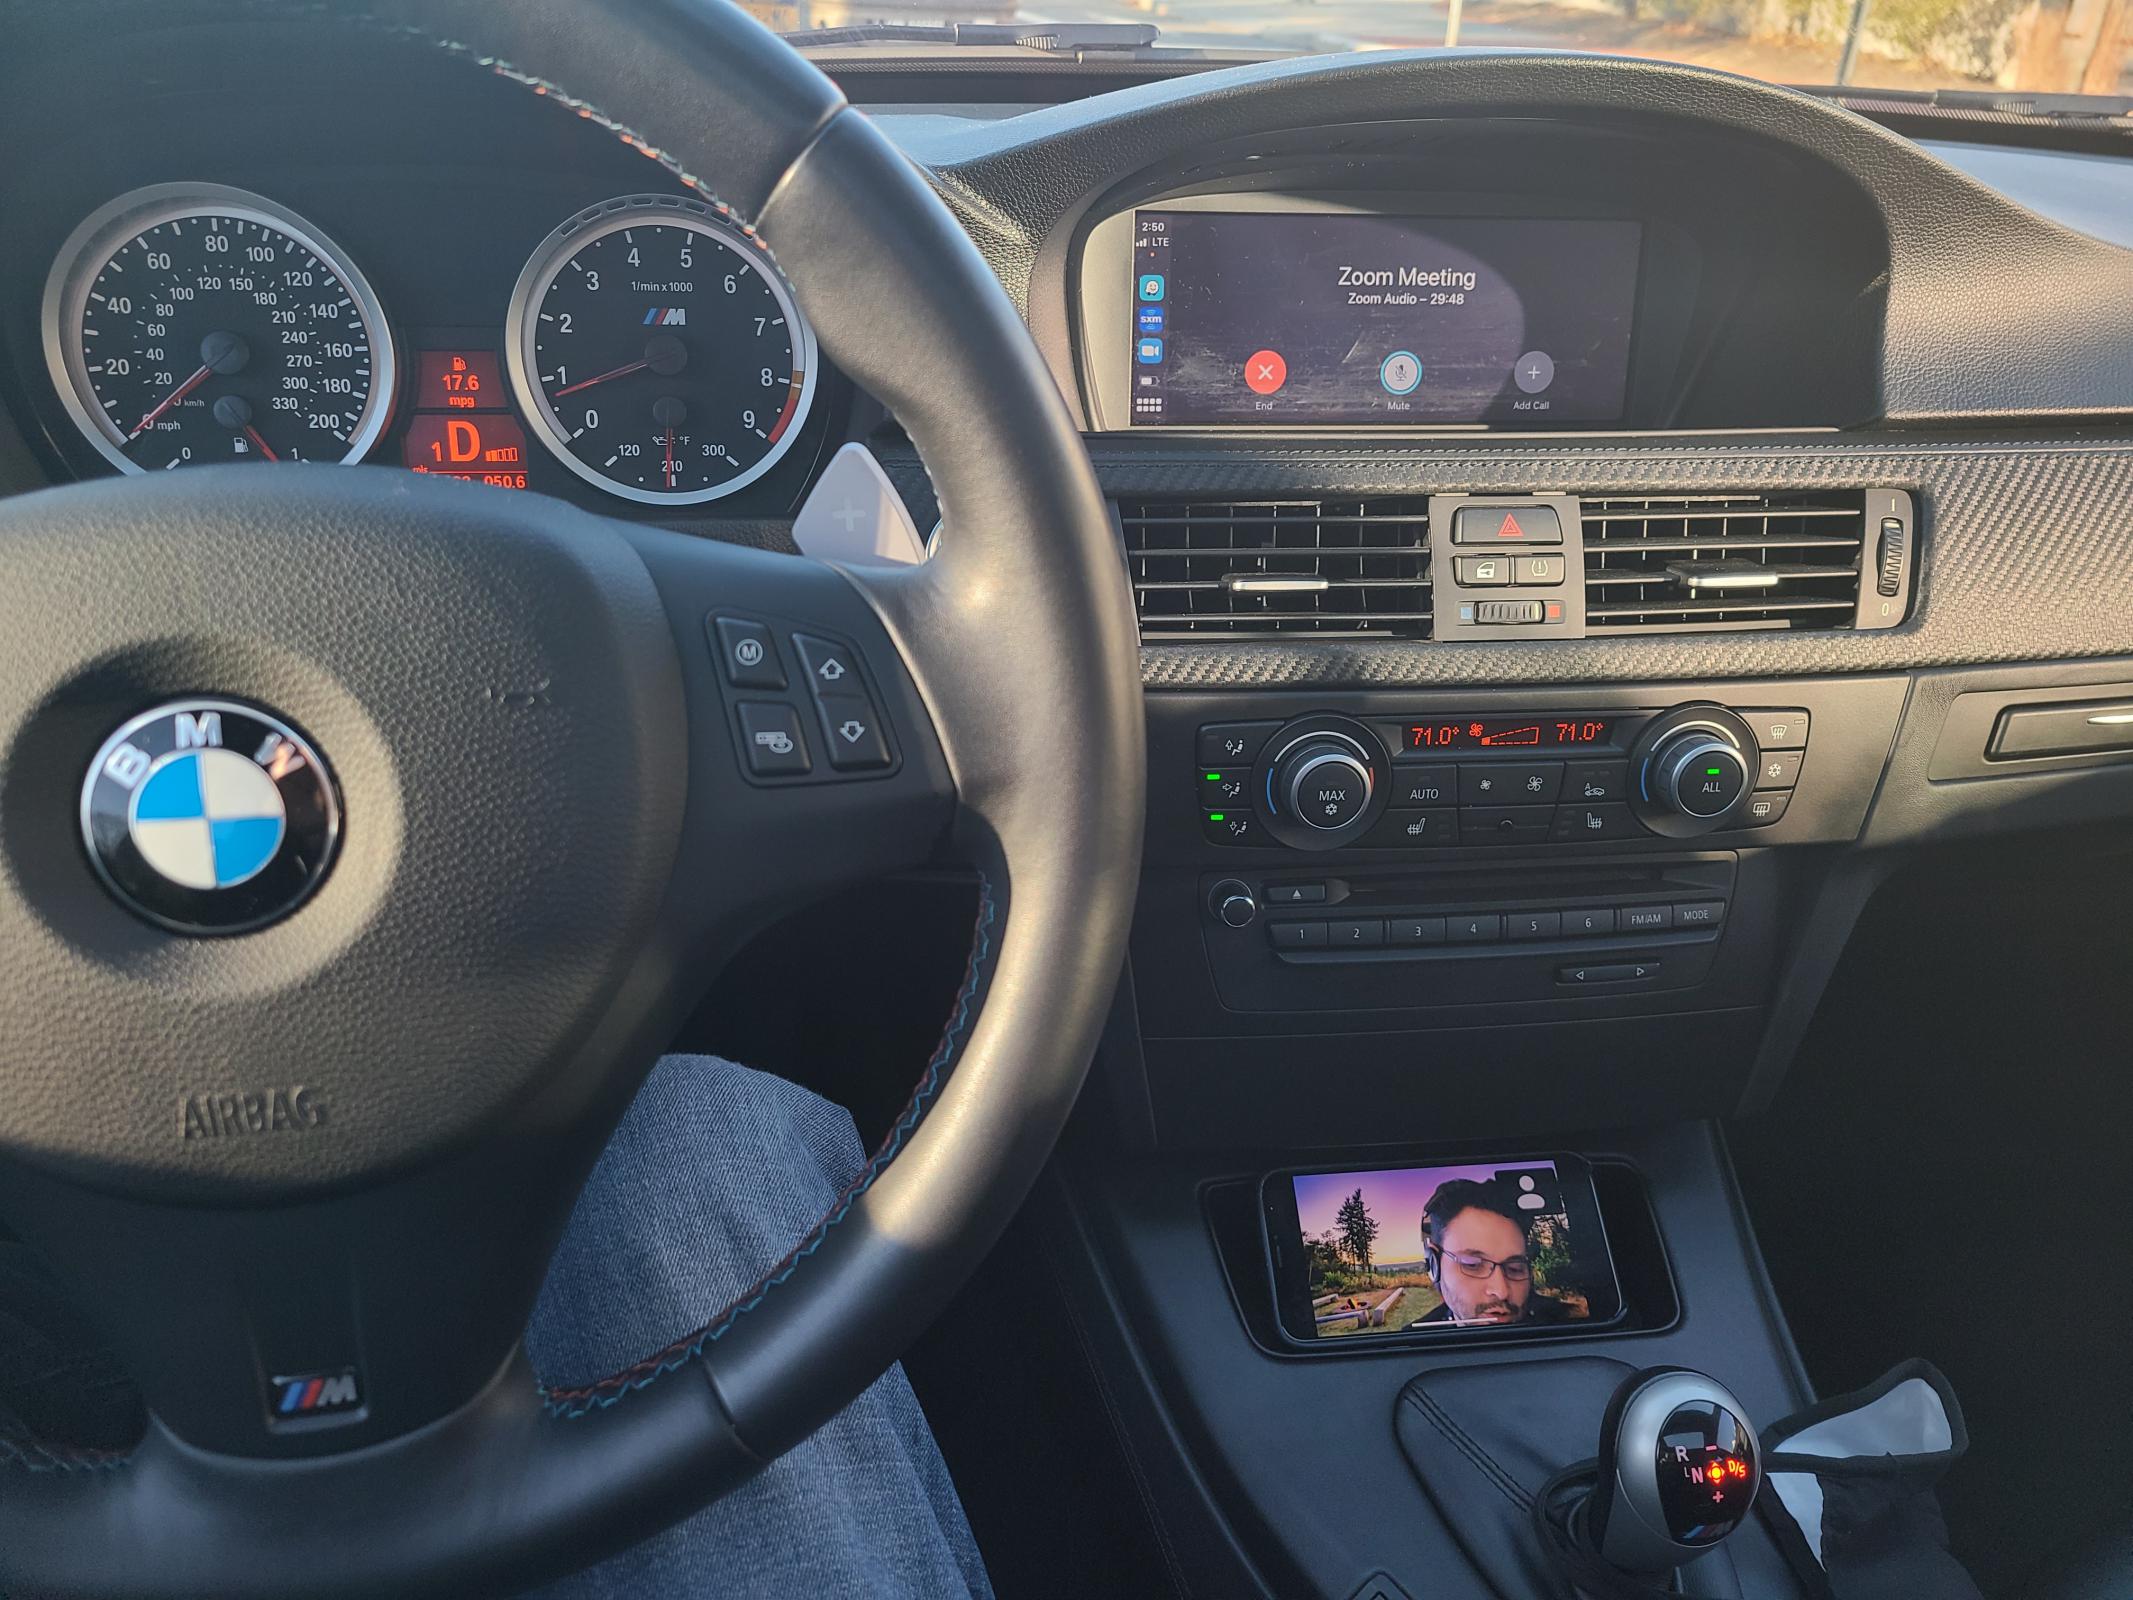
My installation including the Induktiv Wireless Charger.
Compatibility
The only pre-requisite for these units is a CIC iDrive system (2009-2013 E9X) cars. These instructions may also be relevant on other E chassis cars, but will focus on the E9x info here.
If you have a CCC (2008 Idrive with the silver knob) – this solution is not recommended. The display is too low resolution to effectively display the UI and an all in one solution which replaces the screen would likely be a better choice. https://www.android-car-dvd.com/collections/carplay-head-unit/products/ew963wadcpxccc?variant=33378244952200
A combox, Bluetooth, and other specific features do not change the compatibility of the box. If you did not have Bluetooth, you will be able to use Bluetooth through the Carplay box using the included microphone.
Where do I buy it?
The latest Aliexpress link for the LATEST Carsara unit for CIC is here:
****UPDATE 7/10/21 - This newest unit linked is NOT the same as the unit in my writeup, and may be similar but not an identical installation procedure. Keeping this guide for reference only, your installation may differ slightly. Refer to the manufacturers installation guide before starting.
Shipping to the US from my experience took approximately 10 business days. Your results may vary.
Want to add a backup camera?
There are many camera options that will work with this system. I used this camera, Option D:
It was a high-res sensor and wide angle view, but does NOT have a thin connector making routing a bit more difficult (see installation instructions for more details). Shipping was longer however at close to 4 weeks.
I also tested this camera which is more expensive ($65 via Amazon), but has the slim line connector making it easier to route and shipped via Amazon Prime.
Installation Tips and Videos
There are lots of videos for installation available, but Bimmer-tech is most similar to this unit and suggested to watch to understand the complexity and steps.
For tools it is recommended to have:
Tips
***Before beginning, it’s important to note a key feature of the Carsara box is allowing audio input directly through the Quadlock connector. This requires coding for most vehicles. BEFORE installing the Carsara box it is recommended you change the following parameters in the CIC module: Thanks cannyjock for this discovery.
CDMM_AUX_HU
aktiv
CDMM_USB_AUDIO_SINGLE
nicht_aktiv
CDMM_USB_AUDIO_DOUBLE_0B
nicht_aktiv
Note: Coding these changes will disable the USB data port and aux input inside of the console. It is a concession for having a higher quality audio source. If you do not want to code, you can skip this step and run the 3.5mm cable as shown in the video, but be aware there is some audio degradation using this approach.
Backup Reverse Camera installation
There are several guides for this, this video does a decent overview for routing the cable itself, however when it comes to installing the MMI box I recommend following the Bimmertech steps. You do not need to remove the screen, or cupholders to route the cable. I found it most easy to route the camera wire underneath the glove box just by removing the floor kick panel and that was it.
For squeezing the RCA or 4 pin connector through the rubber shroud that connects the trunk lid to the inside of the trunk, I recommend putting lots of vaseline on the cable, using a good wire fish or hangar, and rather than trying to pull the cable THROUGH the rubber shroud, apply upwards pressure and slowly roll the ribs of the shroud over the thickest part of the cable. This will let you slowly pull it through smoothly. I rolled it on like this and it went very quickly. (Remove the shroud from both ends in order to do this, don't try to push it through with the rubber still installed).
Wiring the camera should follow the Carsara instructions.
For DCT: There should be a red wire bundled with your long wire extension (either the RCA cable or 4 pin mini cable). This connects to the yellow Carsara wire and provides 12V switched power to the camera. The black cable should attach to ground. For my E90 I ran an extension wire down to the chassis bolt inside the battery box. Many older threads recommend pulling power from the tail light, but this will cause issues as that power source is ~11.6v not 12V and will cause flicker issues.
NOTE There is a default setting that needs to be changed for the camera work. Reverse Line Detect->Off for DCT cars. Camera should be set to Aftermarket.
For 6MT: Additional details Post 6
I will work on keeping this thread as up to date as possible, and add FAQ’s as they come up.
Update - Since writing the original Carsara Box which this DIY details appears to be replaced by a new part. The link to purchase and the DIY + Video below do not match this new unit. I will update or add information as it becomes available
There have been a lot of posts and discoveries on how to install Carplay/Android Auto boxes in the E9x. There are a lot of existing great resources, but I thought I would try to consolidate as much as possible in one up to date post so that it isn’t expected to search through 80+ pages of content and so new people who are interested can find that info more easily. (I’m looking at you Facebook Groups).
This thread will focus on the OLDER Carsara (Available BEFORE Summer 2021) CIC Carplay box specifically. There are a number of Carplay boxes available under various resellers (Joyeauto, Andream, Kremersino, etc) – based on pictures of the device internals, most of these boxes are the same or similar, using the GPLink processor to do most of the work. The Carsara is one of the latest revisions of these boxes (my unit was dated 8/2020) and seems to have the most reliable combination of software and features.
What is it?
If you made it this far, these boxes allow for in-car specific UI from your smartphone (Carplay/Android Auto) as well as screen mirroring (Airplay/Screen mirroring) which displays what is on your phone screen, but does not allow you to interact with it from your phone:
- Apple Carplay - https://www.apple.com/ios/carplay/
- Android Audio - https://www.android.com/auto/
This allows you to run specific CP/AA apps like Google Maps, Waze, Pandora, Spotify, SiriusXM, messaging, and more, while providing direct access to your phones assistant through the steering wheel and iDrive controllers.
It’s important to know that these boxes do not eliminate your existing iDrive – your existing radio, CD player, navigation, onboard diagnostics etc will all remain in place. This is different from some Android headunits which replace the iDrive completely.
My installation including the Induktiv Wireless Charger.
Compatibility
The only pre-requisite for these units is a CIC iDrive system (2009-2013 E9X) cars. These instructions may also be relevant on other E chassis cars, but will focus on the E9x info here.
If you have a CCC (2008 Idrive with the silver knob) – this solution is not recommended. The display is too low resolution to effectively display the UI and an all in one solution which replaces the screen would likely be a better choice. https://www.android-car-dvd.com/collections/carplay-head-unit/products/ew963wadcpxccc?variant=33378244952200
A combox, Bluetooth, and other specific features do not change the compatibility of the box. If you did not have Bluetooth, you will be able to use Bluetooth through the Carplay box using the included microphone.
Where do I buy it?
The latest Aliexpress link for the LATEST Carsara unit for CIC is here:
****UPDATE 7/10/21 - This newest unit linked is NOT the same as the unit in my writeup, and may be similar but not an identical installation procedure. Keeping this guide for reference only, your installation may differ slightly. Refer to the manufacturers installation guide before starting.
Shipping to the US from my experience took approximately 10 business days. Your results may vary.
Want to add a backup camera?
There are many camera options that will work with this system. I used this camera, Option D:
It was a high-res sensor and wide angle view, but does NOT have a thin connector making routing a bit more difficult (see installation instructions for more details). Shipping was longer however at close to 4 weeks.
I also tested this camera which is more expensive ($65 via Amazon), but has the slim line connector making it easier to route and shipped via Amazon Prime.
Installation Tips and Videos
There are lots of videos for installation available, but Bimmer-tech is most similar to this unit and suggested to watch to understand the complexity and steps.
For tools it is recommended to have:
- Plastic trim removal tools
- A small metal pick set to remove connectors
- 10mm socket
- T-20 Torx Bit
- A thick towel for protecting your dash and console
- If installing a rear camera, electrical tape, wire cutters, a metal hangar or wire fish
- An OBD cable or dongle for coding your headunit. Bimmercode, or NCS Expert. Coding advice can be found in existing threads here and on E90post.
Tips
***Before beginning, it’s important to note a key feature of the Carsara box is allowing audio input directly through the Quadlock connector. This requires coding for most vehicles. BEFORE installing the Carsara box it is recommended you change the following parameters in the CIC module: Thanks
cannyjock for this discovery.CDMM_AUX_HU
aktiv
CDMM_USB_AUDIO_SINGLE
nicht_aktiv
CDMM_USB_AUDIO_DOUBLE_0B
nicht_aktiv
Note: Coding these changes will disable the USB data port and aux input inside of the console. It is a concession for having a higher quality audio source. If you do not want to code, you can skip this step and run the 3.5mm cable as shown in the video, but be aware there is some audio degradation using this approach.
- Make sure to put a THICK towel or blanket down on your console and seats to protect them. The CIC headunit has sharp edges and can knick or dent your dash or seats.
- Do not mount the antenna on a metal surface. I recommend mounting the antenna to the plastic directly underneath the iDrive screen. There is a flat open surface and this will ensure good RF connectivity. Do not stick it directly to the Carsara box.
- E9X M3 Note: The iDrive extension cable does not work for everyone. I recommend removing it entirely, the Carsara box should pick up the iDrive signals directly from the Quadlock (labelled L#->B# for Canbus High, or A#->B# for Canbus Low.). The white jumper terminator loop (D#) should be removed entirely. Note: You will not able to code the CIC headunit after this change is made. If you wish to try the iDrive connector, connect it to your iDrive controller, then connect it to either A# or B# and see if your iDrive menus respond. Multiple people have responded that they may have faulty harnesses, but it is not clear and is not needed.
- F10 Note: user reports car required the CIC-KT connected to iDrive and connection to A#, with B# having the loop D# connected.
- The quad lock connector is very bulky. You should be able to gently pass it through into the a void near the glove box on the back right corner behind the CIC head unit. It is important to neatly dress the cables with Zip ties to get them all to sit snugly and not be crushed or cut when reinstalling the head unit. Take your time to clean this up when you’ve confirmed everything works OK.
- The connection to the microphone is important. The AIRBAG flap which covers the A pillar screw was very difficult for me to remove, try using a pick or guitar pick to pry this out It will take some force since it is thin metal. Make sure to route the wire neatly behind the airbag.
- If you do not have factory Bluetooth, you will use the included microphone, otherwise you will piggyback on the OEM microphone. I recommend removing both center sun visor clips to get enough room to remove the overhead light/microphone compartment. You will need to press both metal clips in blindly to easily get this down. The sun visor itself does not need to be removed.
- If you experience issues with navigation audio playing much louder than your music, try modifying the alter volume setting from the audio settings.
- I recommend routing the USB cable either into the glove box, or into the hole where the 12v outlet goes on some cars if you want it out of the way.
Backup Reverse Camera installation
There are several guides for this, this video does a decent overview for routing the cable itself, however when it comes to installing the MMI box I recommend following the Bimmertech steps. You do not need to remove the screen, or cupholders to route the cable. I found it most easy to route the camera wire underneath the glove box just by removing the floor kick panel and that was it.
For squeezing the RCA or 4 pin connector through the rubber shroud that connects the trunk lid to the inside of the trunk, I recommend putting lots of vaseline on the cable, using a good wire fish or hangar, and rather than trying to pull the cable THROUGH the rubber shroud, apply upwards pressure and slowly roll the ribs of the shroud over the thickest part of the cable. This will let you slowly pull it through smoothly. I rolled it on like this and it went very quickly. (Remove the shroud from both ends in order to do this, don't try to push it through with the rubber still installed).
Wiring the camera should follow the Carsara instructions.
For DCT: There should be a red wire bundled with your long wire extension (either the RCA cable or 4 pin mini cable). This connects to the yellow Carsara wire and provides 12V switched power to the camera. The black cable should attach to ground. For my E90 I ran an extension wire down to the chassis bolt inside the battery box. Many older threads recommend pulling power from the tail light, but this will cause issues as that power source is ~11.6v not 12V and will cause flicker issues.
NOTE There is a default setting that needs to be changed for the camera work. Reverse Line Detect->Off for DCT cars. Camera should be set to Aftermarket.
For 6MT: Additional details Post 6
I will work on keeping this thread as up to date as possible, and add FAQ’s as they come up.

