

Jason, you and iND have done an incredible job.
160.7KVIEWS
363REPLIES
95APPRECIATES
02-02-2026LAST POST
I saw the car today and was thoroughly impressed! It was nice meeting you. Great work.
I would love to see this in person. Thanks for sharing this special build.
And1M3 wroteVery nice build and you car looks sick. But for a name I will call it Kappa. That is a Japanese name for a water demon. Since your M is a monster why not use a montser name.
Alen E90 wroteWOW bro your M is a legit monster, iND did a fantastic job with the build and so did you:thumbsup:
thanks so much for sharing and as far as a name goes i think we can all agree what she should be called;)...

tpowerdinny wroteKermit, The Hulk and Kappa are all good names! I had never heard of a Kappa... I like it.ZKERMIT is definitely an icon. Remember "kermit" from 2007 when they started that. Awesome car, pretty famous on a lot of tv shows.
Ker///Mit is not a bad idea for your M though. I like it.
Powerbeast wroteThanks again Felix... I assume I will see your car next month!Jason, you and iND have done an incredible job.
slicer wroteNice meeting you man! Thanks for the kind words.I saw the car today and was thoroughly impressed! It was nice meeting you. Great work.
Jason
Unreal car.....!!! The most epic of all! Congrats on going and doing mods yourself!
RESPECT.
got to be honest, your car is one of my fav build in this forum.
We have the same name btw, jason. lol
got to be honest, your car is one of my fav build in this forum.
We have the same name btw, jason. lol
Amazing colour and build... 
Interestingly enough you're another one that came with 260Ms in silver
Interestingly enough you're another one that came with 260Ms in silver
Impressive ///Monster 
OMG...fantastic decision and well done on the build! Please keep me in mind if ever decide to part wit this beast! 
WOW! I cant come up with enough word for this....simply AMAZING!
JEllis wroteKappa does sound pretty good. I like it. Remember MCP's E46 M3 abortion? That was called Hulk... don't get stuck in Google searches with thatKermit, The Hulk and Kappa are all good names! I had never heard of a Kappa... I like it.
Jason

My MINI Cooper "RS" is Koopa. I just pronounced it like a New Yorker, pretty easy lol. She's got Porsche brakes and a few other RS style goodies.

so sick
Amazing build - congrats:thumbsup:
How do you like the GTS rear section paired with Challenge front?
We nearly run the same setup
How do you like the GTS rear section paired with Challenge front?
We nearly run the same setup
Checkcaptain wroteI absolutely love the GTS exhaust! I could not be happier with the way it sounds. At idle its actually rather quiet. However, once the RPMs start increasing the exhaust sound really comes alive. My friend says he wished he could bottle the sound.Amazing build - congrats:thumbsup:
How do you like the GTS rear section paired with Challenge front?
We nearly run the same setup
tpowerdinny wroteLove the green mini!Kappa does sound pretty good. I like it. Remember MCP's E46 M3 abortion? That was called Hulk... don't get stuck in Google searches with that
My MINI Cooper "RS" is Koopa. I just pronounced it like a New Yorker, pretty easy lol. She's got Porsche brakes and a few other RS style goodies.
Jason
I agree. I paired the GTS rear with Akra Front and like it more than Akra Evo ;-)
With the clear bra, vents, RE SSK and full exhaust system on, it was time to move to the suspension and brakes. I have never installed a big brake kit and to be honest I was not looking forward to it.
Again, there are quite a few good DIYs on the forum with regards to changing brake setups ect... I used one of European Cars E90 M3 technical articles for the BBK.
I could not find an actual KW Clubsport DIY but I have done a few suspension setups before and in the end the Clubsport install was fairly straight forward.
Its also worth mentioning that all the modifications in the build came from manufacturers that were trusted/respected and I was confident would work. I tried to avoid the newest gadgets and stick to parts that were reliable.
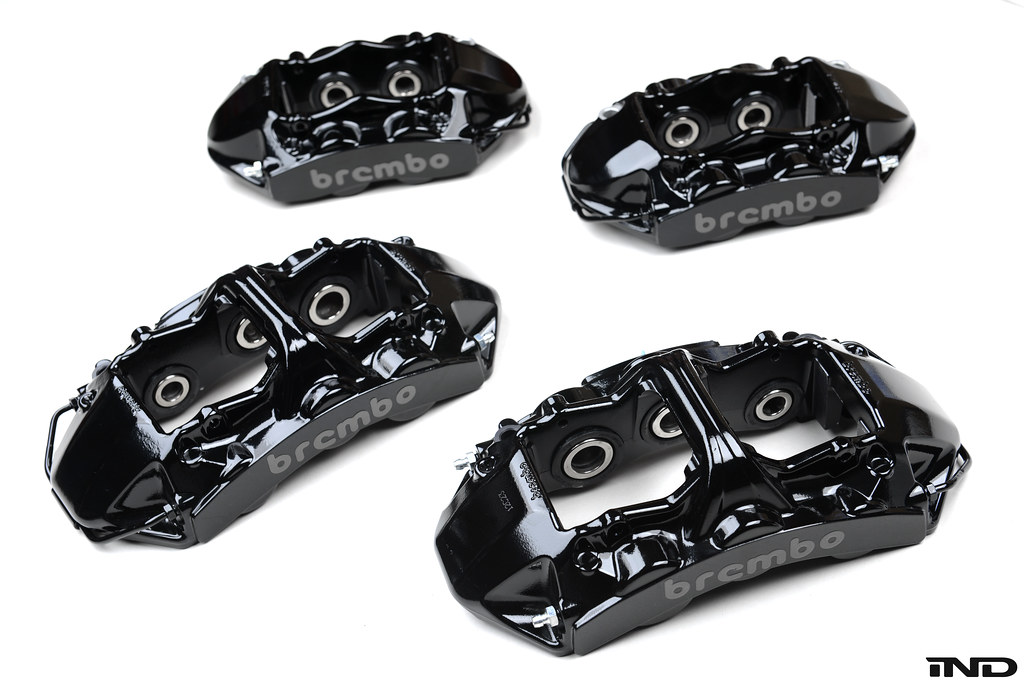
I chose Brembos 380mm front and rear kit. The kit uses 6 piston calipers in the front and 4 piston calipers in the rear to maintain the correct balance and bias. Given the color of the car and green wheels with gold accents, IND and I decided it would be best to keep the brake calipers subtle. The calipers are gloss black with classic black chrome brembo logos.
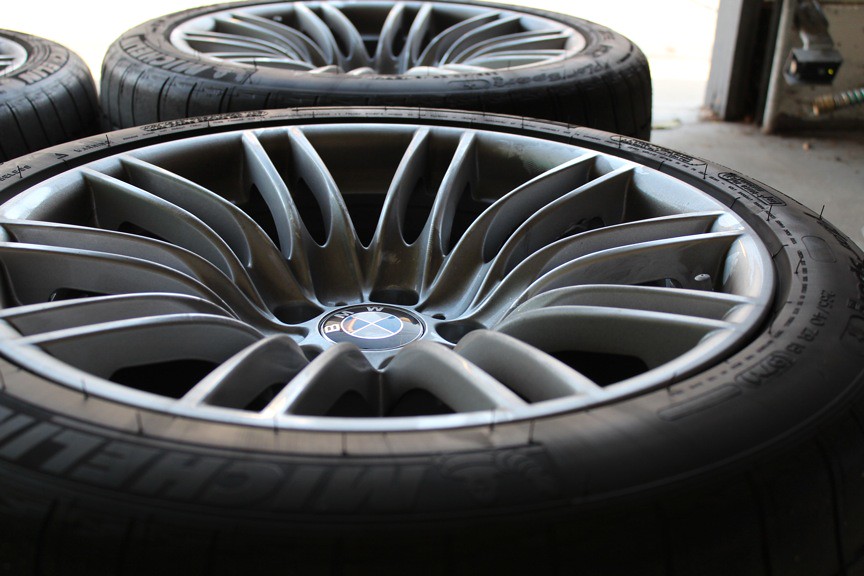
Time to say goodbye to the OE wheels! Sad day because I actually like the OE 18s, especially in silver. I need to turn one of them into a coffee table or wall art or something!
 IMG_0130 by JMEllis, on Flickr
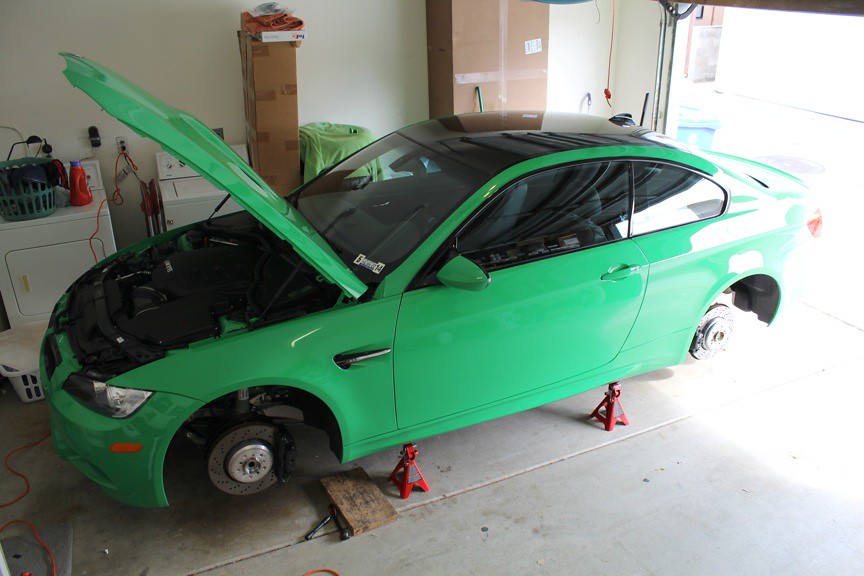
For the suspension/brake install I obviously needed to get the car all the way in the air to get to all four corners at the same time. For jack points, I used the front center jack point and the rear portion of the rear subframe (not the diff).
 IMG_0134 by JMEllis, on Flickr
I focused on the suspension first. The KW Clubsport kit is extremely well built. Having had Bilstein Damptronics and Moton Clubsports on my 997, the KW meets or exceeds the quality of those two kits. Of course that is just my humble opinion after holding all three in my hands.
The kit comes with everything you need with the top mounts already installed!
 IMG_0135 by JMEllis, on Flickr
As I stated previously, the install of the suspension was very straight forward. Remember to always support the hub when removing the suspension components. I failed to do this once and I am surprised I did not break anything.
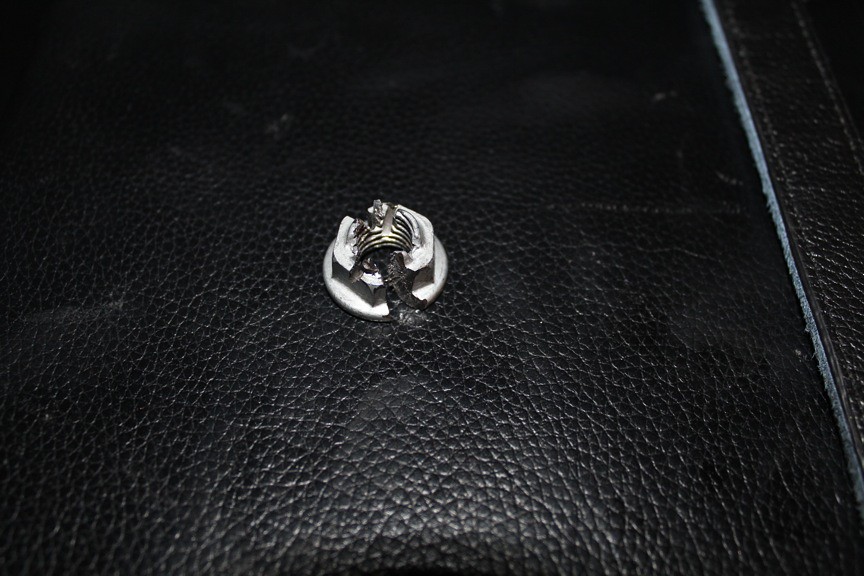
Also, I was an idiot and assumed the KW sway bar links utilized the OE nuts for mounting (I missed the KW nuts in the box). I ended up having to cut the nut off of the sway bar link and then replace the chewed up link. I have to say that KW US customer service was great and they overnighted me a new link (helps I am in CA).
 IMG_0142 by JMEllis, on Flickr
With the suspension installed I moved on to the Brembo BBK. Again, I was not looking forward to this install. But, with the technical article from European Car, I found the install rather easy and straight forward. It helps that the car was brand new with no rusted on bolts!
I decided to keep the front heat shields and I modified them with a Dremel to allow enough clearance for the calipers. I have read there is potential for the hot brakes to melt the front tie bar bushes/covers. I imagine this is probably not true but given that my car will see the track, I figured why take the chance.
Here is the cut heat shield. Note the oxidation already forming on my 600 mile wheel hubs.
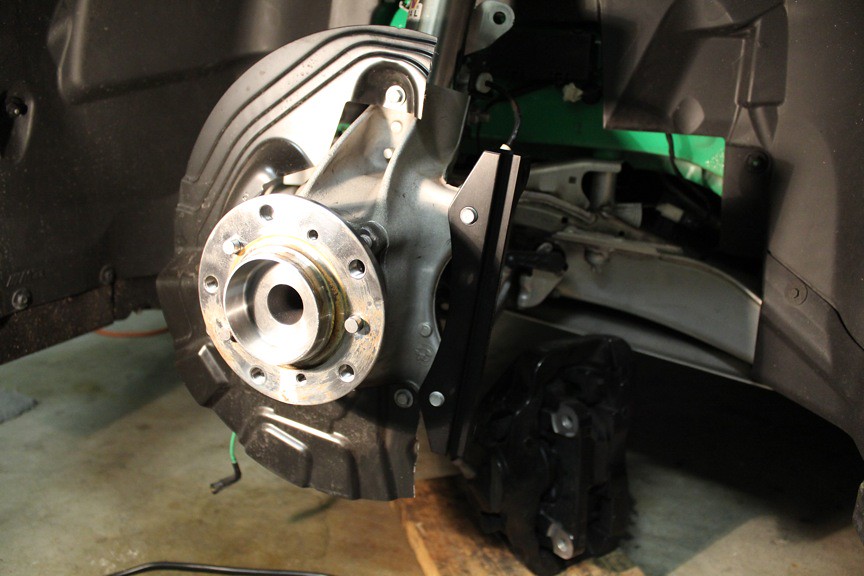 IMG_0139 by JMEllis, on Flickr
I painted the cut edge of the heat shield with black caliper paint and then installed the Brembo Caliper bracket. This is one of the areas where I paid attention to torque values. I purchased a relatively inexpensive torque wrench from Home Depot to ensure this portion of the install was done correctly.
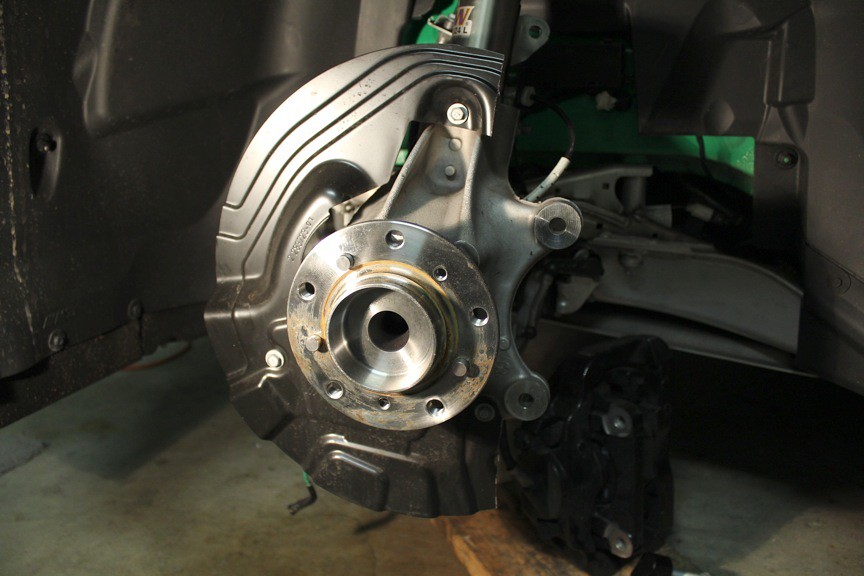 IMG_0137 by JMEllis, on Flickr
Here is the finished product. I decided to loop the OE brake sensor wire to avoid getting the code or installing them into the Brembo caliper. I followed the DIY in the DIY section which was helpful. Also, notice the nice and clean hubs! I used a product called "Fluid Film". Its a rust preventative liquid that comes in a spray can. I got the idea from someone else on this website. Apparently it has been used for years to prevent farm equipment from rusting. So far its working like a charm, however, it smells horrible!
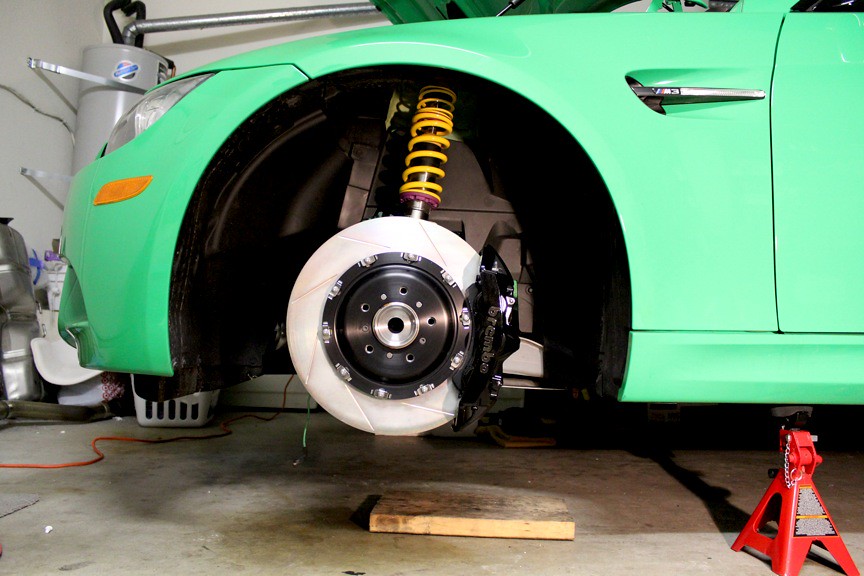 IMG_0145 by JMEllis, on Flickr
Next up, wheels and test a drive!
Jason
Again, there are quite a few good DIYs on the forum with regards to changing brake setups ect... I used one of European Cars E90 M3 technical articles for the BBK.
I could not find an actual KW Clubsport DIY but I have done a few suspension setups before and in the end the Clubsport install was fairly straight forward.
Its also worth mentioning that all the modifications in the build came from manufacturers that were trusted/respected and I was confident would work. I tried to avoid the newest gadgets and stick to parts that were reliable.
I chose Brembos 380mm front and rear kit. The kit uses 6 piston calipers in the front and 4 piston calipers in the rear to maintain the correct balance and bias. Given the color of the car and green wheels with gold accents, IND and I decided it would be best to keep the brake calipers subtle. The calipers are gloss black with classic black chrome brembo logos.
Time to say goodbye to the OE wheels! Sad day because I actually like the OE 18s, especially in silver. I need to turn one of them into a coffee table or wall art or something!
IMG_0130 by JMEllis, on FlickrFor the suspension/brake install I obviously needed to get the car all the way in the air to get to all four corners at the same time. For jack points, I used the front center jack point and the rear portion of the rear subframe (not the diff).
IMG_0134 by JMEllis, on FlickrI focused on the suspension first. The KW Clubsport kit is extremely well built. Having had Bilstein Damptronics and Moton Clubsports on my 997, the KW meets or exceeds the quality of those two kits. Of course that is just my humble opinion after holding all three in my hands.
The kit comes with everything you need with the top mounts already installed!
IMG_0135 by JMEllis, on FlickrAs I stated previously, the install of the suspension was very straight forward. Remember to always support the hub when removing the suspension components. I failed to do this once and I am surprised I did not break anything.
Also, I was an idiot and assumed the KW sway bar links utilized the OE nuts for mounting (I missed the KW nuts in the box). I ended up having to cut the nut off of the sway bar link and then replace the chewed up link. I have to say that KW US customer service was great and they overnighted me a new link (helps I am in CA).
IMG_0142 by JMEllis, on FlickrWith the suspension installed I moved on to the Brembo BBK. Again, I was not looking forward to this install. But, with the technical article from European Car, I found the install rather easy and straight forward. It helps that the car was brand new with no rusted on bolts!
I decided to keep the front heat shields and I modified them with a Dremel to allow enough clearance for the calipers. I have read there is potential for the hot brakes to melt the front tie bar bushes/covers. I imagine this is probably not true but given that my car will see the track, I figured why take the chance.
Here is the cut heat shield. Note the oxidation already forming on my 600 mile wheel hubs.
IMG_0139 by JMEllis, on FlickrI painted the cut edge of the heat shield with black caliper paint and then installed the Brembo Caliper bracket. This is one of the areas where I paid attention to torque values. I purchased a relatively inexpensive torque wrench from Home Depot to ensure this portion of the install was done correctly.
IMG_0137 by JMEllis, on FlickrHere is the finished product. I decided to loop the OE brake sensor wire to avoid getting the code or installing them into the Brembo caliper. I followed the DIY in the DIY section which was helpful. Also, notice the nice and clean hubs! I used a product called "Fluid Film". Its a rust preventative liquid that comes in a spray can. I got the idea from someone else on this website. Apparently it has been used for years to prevent farm equipment from rusting. So far its working like a charm, however, it smells horrible!
IMG_0145 by JMEllis, on FlickrNext up, wheels and test a drive!
Jason
Checkcaptain wroteInteresting, does the Akra front mate to the OE GTS rear without modification?I agree. I paired the GTS rear with Akra Front and like it more than Akra Evo ;-)
Alen E90 wroteI would agree with you on that name, but the hulk is taken.
thanks so much for sharing and as far as a name goes i think we can all agree what she should be called;)...
http://www.m3post.com/forums/showthread.php?t=707983
JEllis wroteOnly adapters required - no Big deal.Interesting, does the Akra front mate to the OE GTS rear without modification?
JEllis wroteRear GTS is a little heavier than AkraCool! I bet the setup is light!
Jason
but sounds better.
When it came to tires I used the advice of others and chose Dunlop Direzza Sport Z1s in 275/35/18 all around. Not only is it a great looking tire, it is a great street/track tire. However, I have yet to verify the track part.
Thanks to M3post member Kaiv, I took the car to San Diego Wheel and Tire Outlet on Convoy in SD. Omar gave me a good deal and the wheels came back with zero scratches/blemishes. I will use them again!
Kaiv, you probably do not remember giving me the advice here:
http://www.m3post.com/forums/showthread.php?t=763398
Great meeting you at the MFest meet on Saturday!
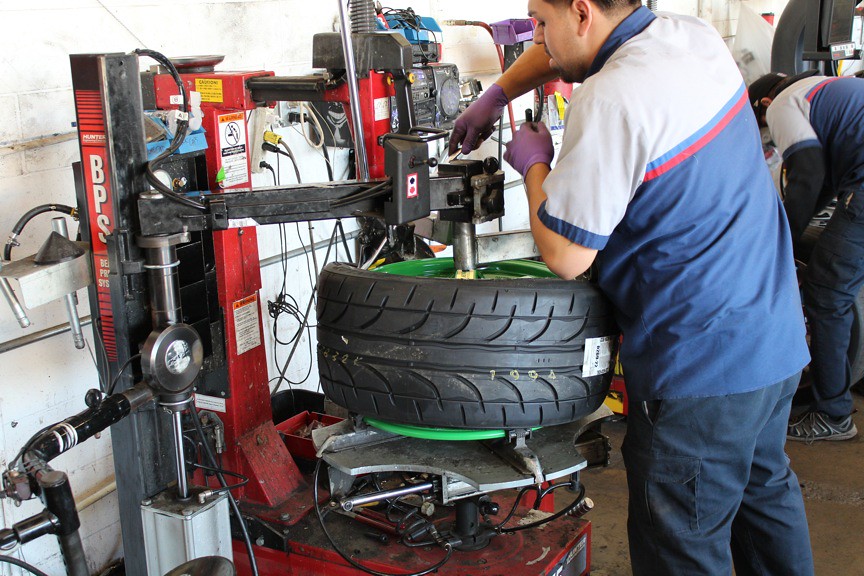 IMG_0017 by JMEllis, on Flickr
Ready for mounting to the car!
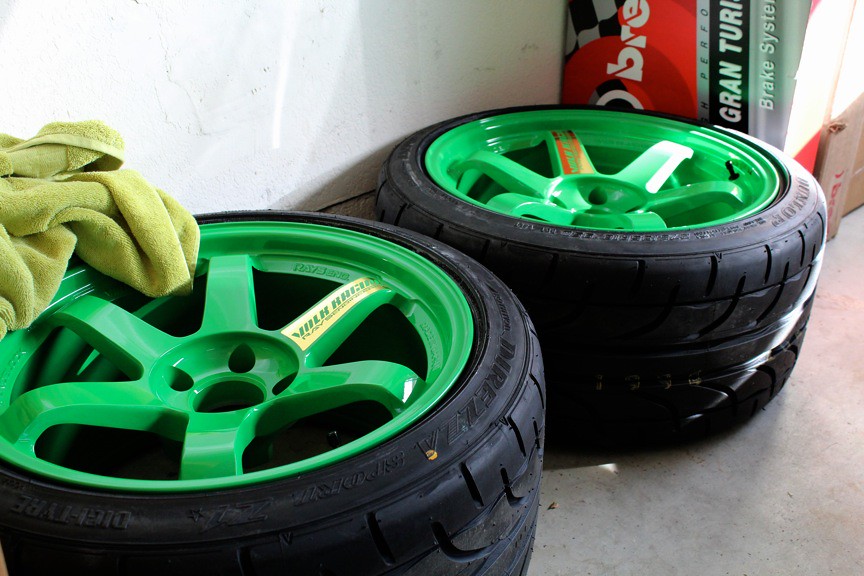 IMG_0022 by JMEllis, on Flickr
More to come!
Jason
Thanks to M3post member Kaiv, I took the car to San Diego Wheel and Tire Outlet on Convoy in SD. Omar gave me a good deal and the wheels came back with zero scratches/blemishes. I will use them again!
Kaiv, you probably do not remember giving me the advice here:
http://www.m3post.com/forums/showthread.php?t=763398
Great meeting you at the MFest meet on Saturday!
IMG_0017 by JMEllis, on FlickrReady for mounting to the car!
IMG_0022 by JMEllis, on FlickrMore to come!
Jason
