I originally posted about this here but am officially putting my DIY here to share with M3Post members. 
Unlike a Euro-spec E9x's, the US-Spec cars do not have the rear fog lights option. Enabling the rear fog lights is an easy and free way to aid others to see you during heavy fog. This DIY involves nothing more than removing the light control switch assembly and trimming off four small tabs front the lower right button. All the electronics are already there and even the light on the dash works!
IMPORTANT: Check your local laws concerning the use of the rear fog lights. Please use this feature responsibly. Do not abuse it or blind others with it!
Parts
Tools Required
Before you begin:
Make sure your car is completely off before disconnecting any wire harnesses from the car. To be safe, you should disconnect your battery.
Step 1. Remove upper trim / ventilation duct
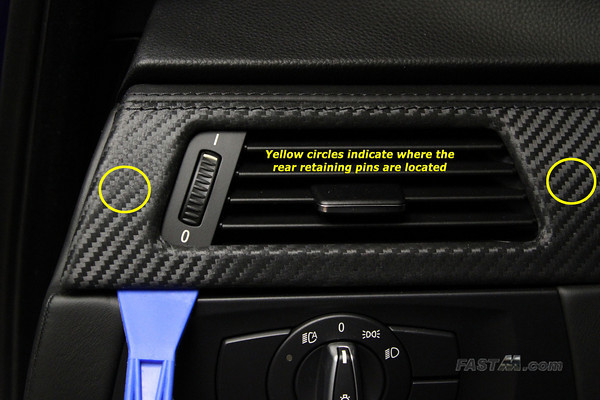
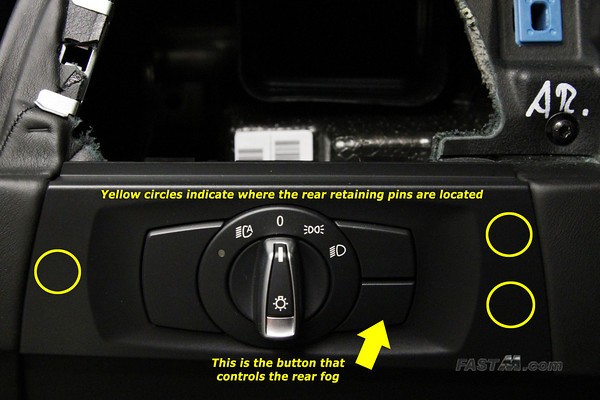
Study the image below. The yellow circles indicate where the rear retaining pins are located. You need to basically wiggle the trim panel so that the pins from behind will work itself free.
I used my trim removal tool on the bottom and top of the trim panel to work the it free. Once there's a slight gap on either side, you can use your finger tips to grab the trim and rock it free.
IMPORTANT: Be careful not to damage the surrounding leather if you have the extended leather package.
Step 2. Remove light control switch assembly
Study the image below. The yellow circles indicate where the rear retaining pins are located.
With the upper trim removed you have access to rear inside and grab the entire assembly. Once you have a hold of the assembly, rotate your wrist to rock the assembly and the pins should release.
Step 3. Remove wire harness connector
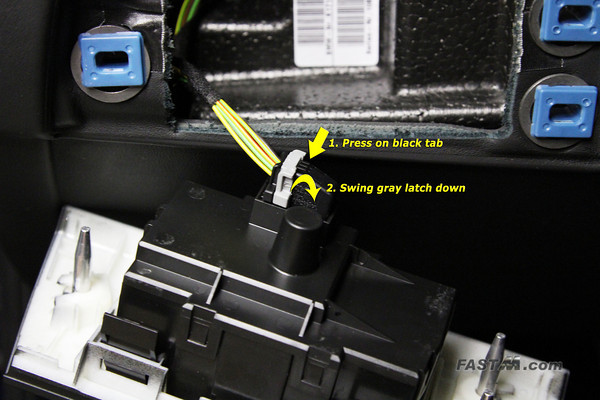
Removing the connector requires a two step process. The gray latch is held in place with a black tab. Simply press down on that tab then switch the gray latch down. The connector should start sliding out as you switch the gray latch. Once the latch is at a 90 degree angle the connector should be completely disconnected.
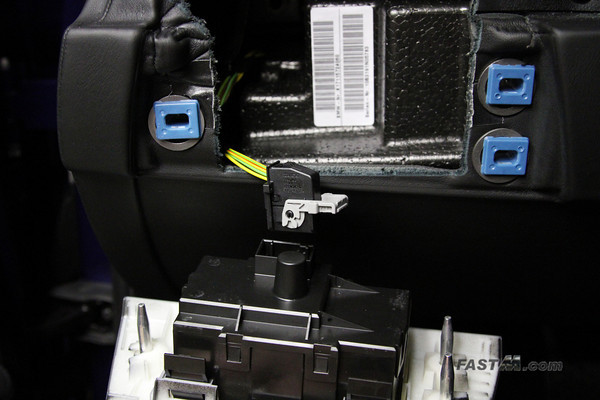
Below is an image showing the connector disconnected.
Step 4. Remove trim from light assembly
Using the proper trim removal tool or a flat head screw driver, unlatch the four clips holding the light assembly to the trim plate.
Step 5. Remove rear cover from light assembly
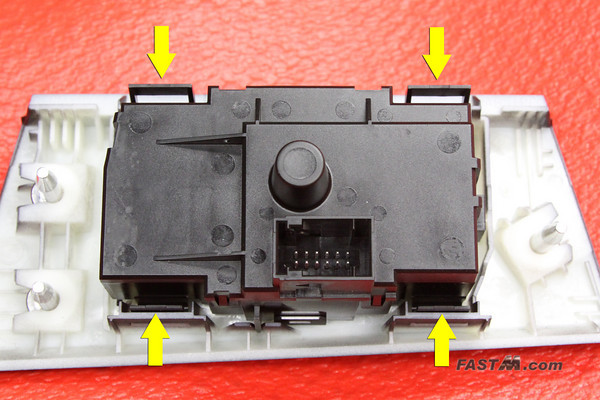
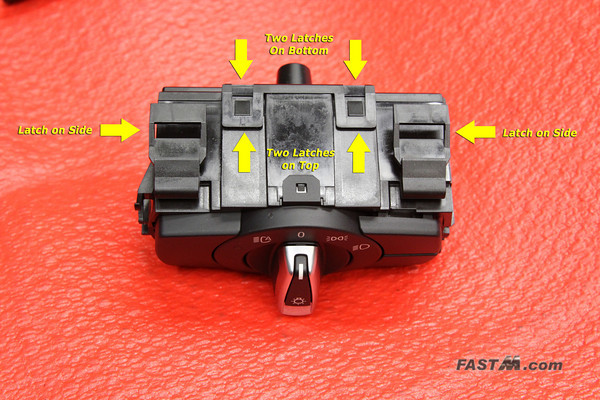
There are 6 clips total that will need to be unlatched. Using the proper trim removal tool or flat head screw driver, unlatch the 6 clips holding the back cover in place.
NOTE: Image below only shows the two clips on top. You should be able to see the other clips as you rotate the assembly.
Step 6. Remove circuit board
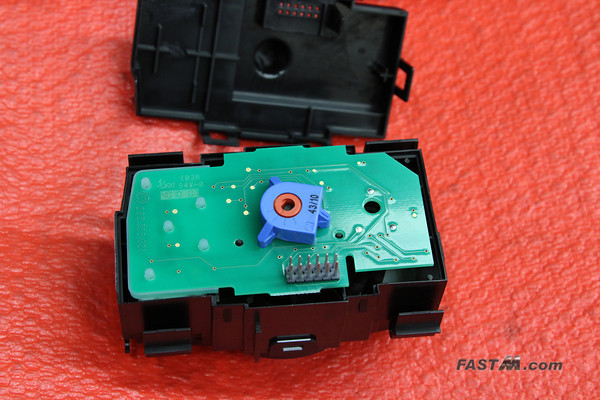
The circuit board simply lifts out.
Step 7. Remove the white button extensions
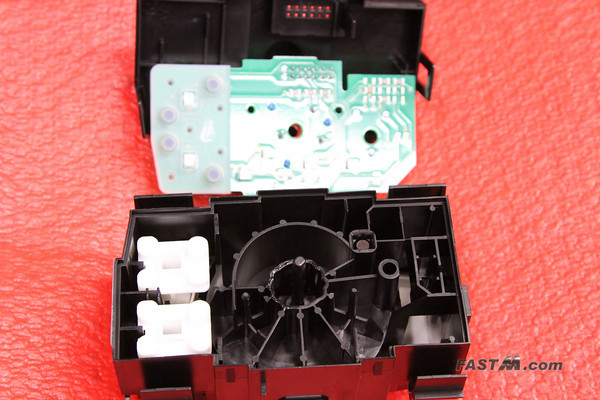
These white button extensions simply lift out.
Step 8. Unlatch lower button
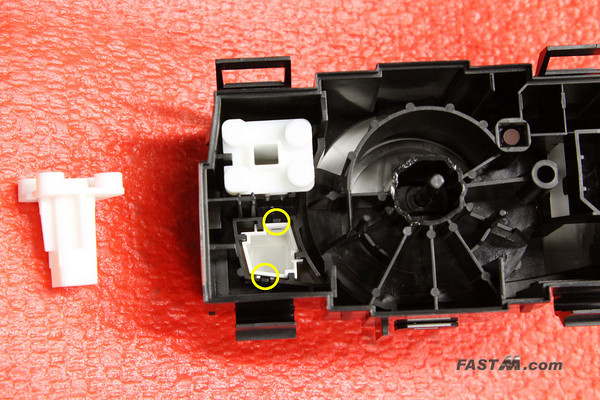
In order to unlatch the clip holding the lower button in place, you will need a small flat head screw driver. Carefully unlatch the two black clips holding the button in place. See yellow circles below showing the black clips holding the white button in place.
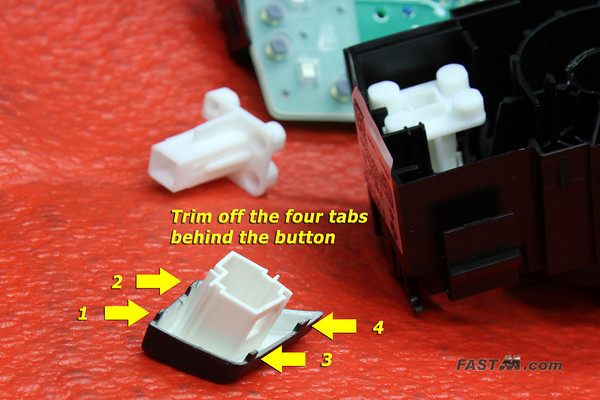
Step 9. Trim off tabs from button
Notice the four little tabs around the back of the button. Carefully trim these tabs off with a sharp utility knife. These are the tabs that holds the button in place and restricts it from being functional.
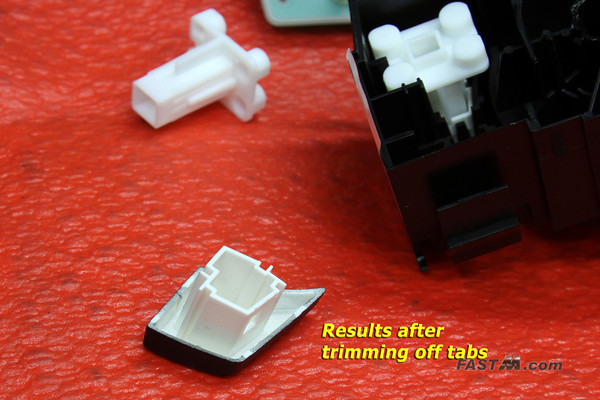
Below shows the result after trimming.
Step 10. Reinstall light control switch assembly
The rest should be fairly straightforward.
Step 11. Final inspection
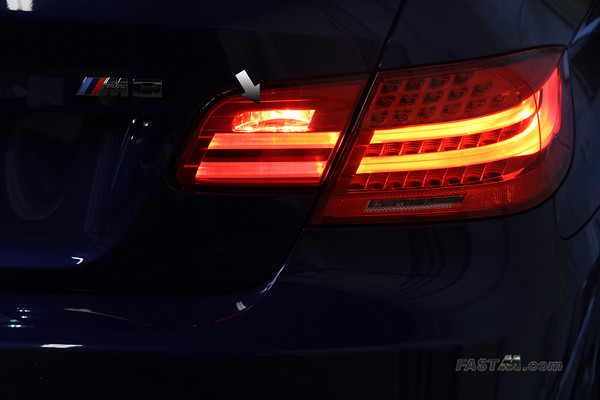
To activate the rear fog, simply turn on your car and press the lower right button on the light control switch.
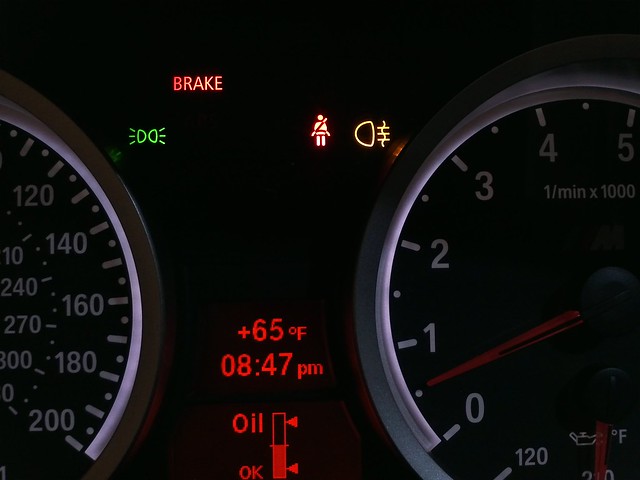
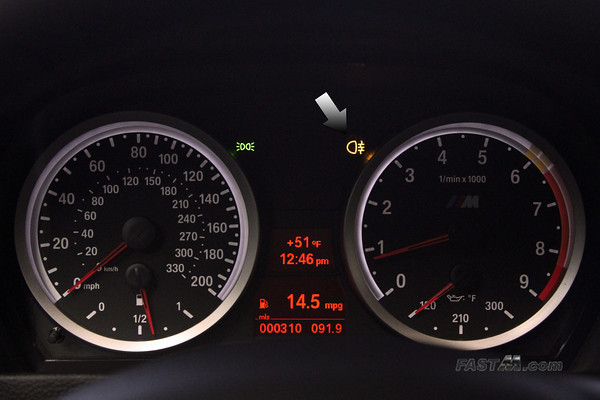
Working dash light - check!
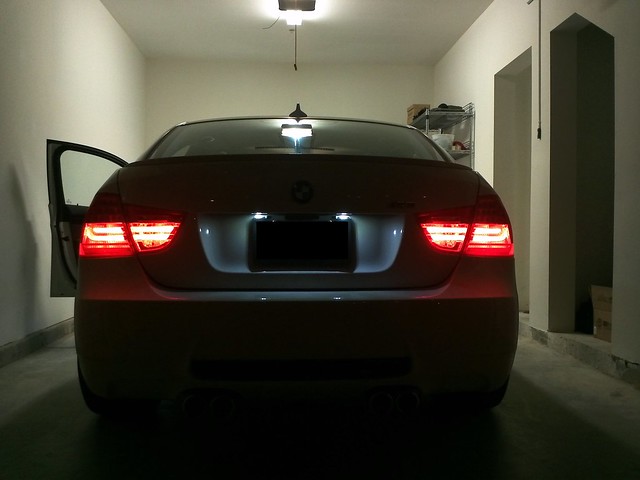
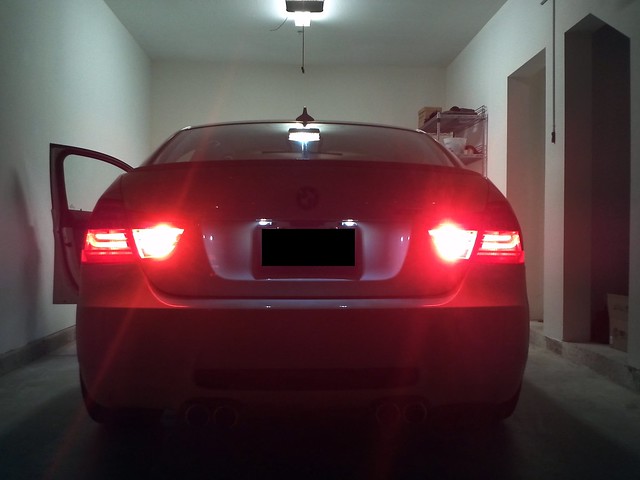
Working rear fog lights - check!
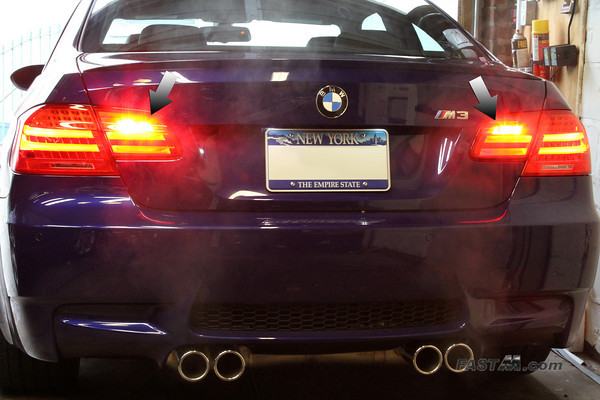
Closer inspection - check!
Disclaimer: Use this DIY at your own risk, I'm not responsible for any damage to your car.
Unlike a Euro-spec E9x's, the US-Spec cars do not have the rear fog lights option. Enabling the rear fog lights is an easy and free way to aid others to see you during heavy fog. This DIY involves nothing more than removing the light control switch assembly and trimming off four small tabs front the lower right button. All the electronics are already there and even the light on the dash works!
IMPORTANT: Check your local laws concerning the use of the rear fog lights. Please use this feature responsibly. Do not abuse it or blind others with it!
Parts
- 2011+ E9x (and some 2010): Requires no additional parts unless you want the Euro switch that has the rear fog light icon printed on the button.
- 2008-2010 (for 2010 you need to check yours): If you have an older E9x, you can do a search on M3Post.com for other DIY's using the Lego piece method or swapping out the entire switch assembly with a Euro switch.
Tools Required
- Trim removal tools
- Utility Knife
- Flat head screw driver
Before you begin:
Make sure your car is completely off before disconnecting any wire harnesses from the car. To be safe, you should disconnect your battery.
Step 1. Remove upper trim / ventilation duct
Study the image below. The yellow circles indicate where the rear retaining pins are located. You need to basically wiggle the trim panel so that the pins from behind will work itself free.
I used my trim removal tool on the bottom and top of the trim panel to work the it free. Once there's a slight gap on either side, you can use your finger tips to grab the trim and rock it free.
IMPORTANT: Be careful not to damage the surrounding leather if you have the extended leather package.
Step 2. Remove light control switch assembly
Study the image below. The yellow circles indicate where the rear retaining pins are located.
With the upper trim removed you have access to rear inside and grab the entire assembly. Once you have a hold of the assembly, rotate your wrist to rock the assembly and the pins should release.
Step 3. Remove wire harness connector
Removing the connector requires a two step process. The gray latch is held in place with a black tab. Simply press down on that tab then switch the gray latch down. The connector should start sliding out as you switch the gray latch. Once the latch is at a 90 degree angle the connector should be completely disconnected.
Below is an image showing the connector disconnected.
Step 4. Remove trim from light assembly
Using the proper trim removal tool or a flat head screw driver, unlatch the four clips holding the light assembly to the trim plate.
Step 5. Remove rear cover from light assembly
There are 6 clips total that will need to be unlatched. Using the proper trim removal tool or flat head screw driver, unlatch the 6 clips holding the back cover in place.
NOTE: Image below only shows the two clips on top. You should be able to see the other clips as you rotate the assembly.
Step 6. Remove circuit board
The circuit board simply lifts out.
Step 7. Remove the white button extensions
These white button extensions simply lift out.
Step 8. Unlatch lower button
In order to unlatch the clip holding the lower button in place, you will need a small flat head screw driver. Carefully unlatch the two black clips holding the button in place. See yellow circles below showing the black clips holding the white button in place.
Step 9. Trim off tabs from button
Notice the four little tabs around the back of the button. Carefully trim these tabs off with a sharp utility knife. These are the tabs that holds the button in place and restricts it from being functional.
Below shows the result after trimming.
Step 10. Reinstall light control switch assembly
The rest should be fairly straightforward.
- Press rear fog light button back in place on light control switch.
- Drop the two white button extensions into the rear of the buttons.
- Line up the green circuit board drop it in place.
- Reinstall rear of light assembly. Inspect each of the 6 clips to insure they have snapped in place.
- Reinstall light assembly onto trim plate. Inspect each of the 4 clips to insure they have snapped in place.
- Reinstall connector on the back of the light assembly.
- **This would be a good time to test the switch.
- Press light assembly trim back in place on the dash.
- Press the upper trim/air duct back in place on the dash.
Step 11. Final inspection
To activate the rear fog, simply turn on your car and press the lower right button on the light control switch.
Working dash light - check!
Working rear fog lights - check!
Closer inspection - check!
Disclaimer: Use this DIY at your own risk, I'm not responsible for any damage to your car.