

Heya, i know lots of people have done their own, but i didn't see a DIY here. Maybe cuz it's not complex enough? I dunno, apologies if this is a trivial one, but as long as i was under the car, i took a camera and snapped a few pics so others would know what to expect.
You'll need a few tools, but nothing too special really.
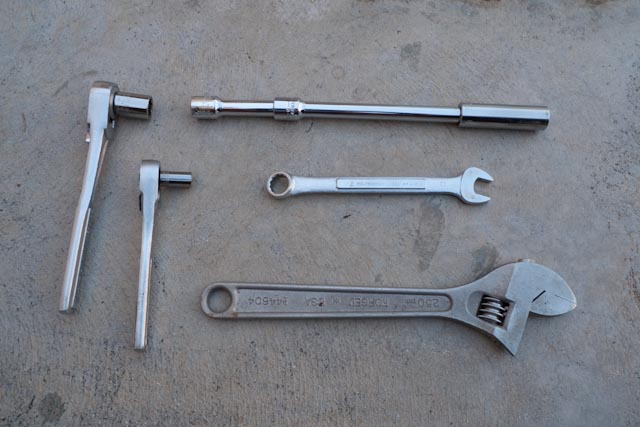
Mandatory :
low profile ramps or jack stands
socket wrench(es)
1/2" or 13mm deep socket
5/16" socket
~10" socket extender bar
medium adjustable wrench
Helpful:
floor jack
blanket/padding
1/2" or 13mm standard socket
Elevate the car, i can't imagine doing this with the car on the ground. I didn't try, so i can't say it's impossible tho. I backed the car up on a pair of Rhino Ramps and there was more than enough room to do the job.
Once underneath, here are the steps i took to remove the catback, with photos of the attachment points and needed tools listed:
1. Loosen L/R compression pipe clamps at front of stock catback.
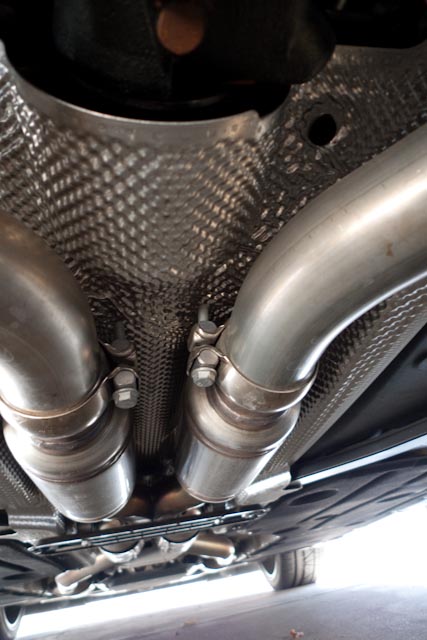
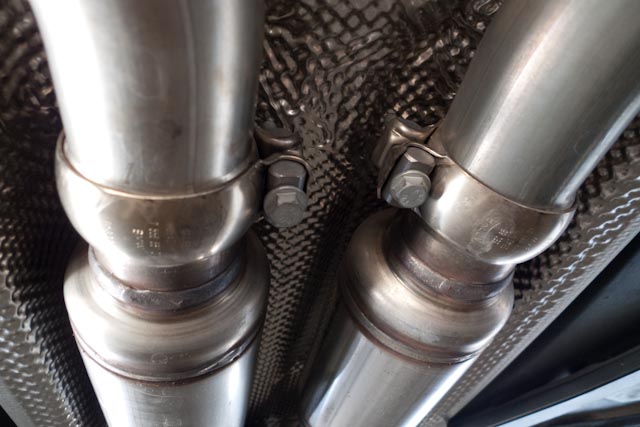
Use the 13mm socket and ratchet to loosen these clamps. Without removing the bolt, open the clamp wide and slide toward the front of the car so it's off the junction of the two ends. This way they stay on the car when you remove the catback:
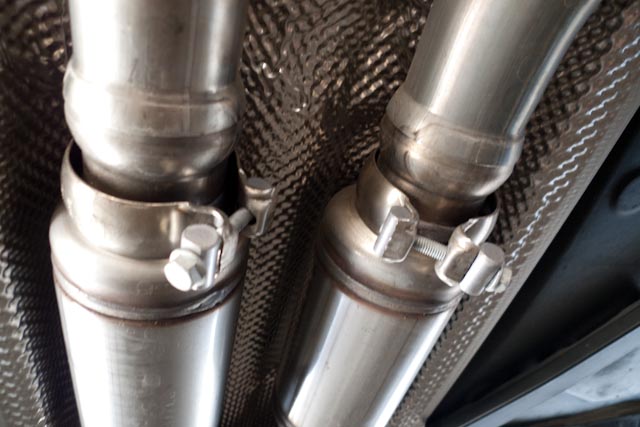
2. Remove L/R exhaust hanger near front of catback from car.
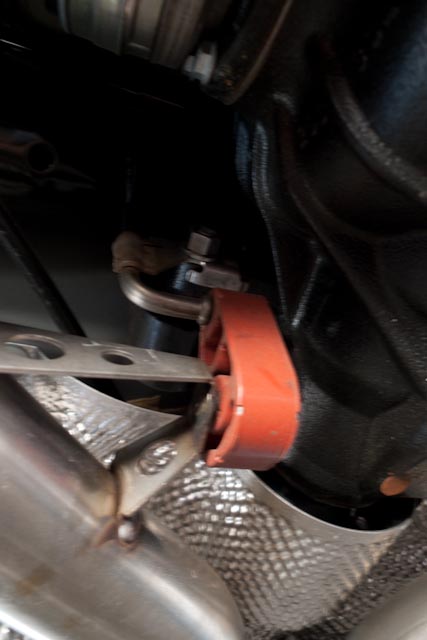
It's easier to just remove all of the hangars from the car, rather than muscle the red poly bushings off of the catback while lying on your back. Use the adjustable wrench to remove the large rear facing nut that holds the hangar bracket to the car and pivot the bracket off of the threaded rod so that it's no longer bearing any weight. If you don't have an adjustable wrench, you might be able to fit a socket up there, but it looked tight...i think it's an 18mm. Remove both left and right sides:
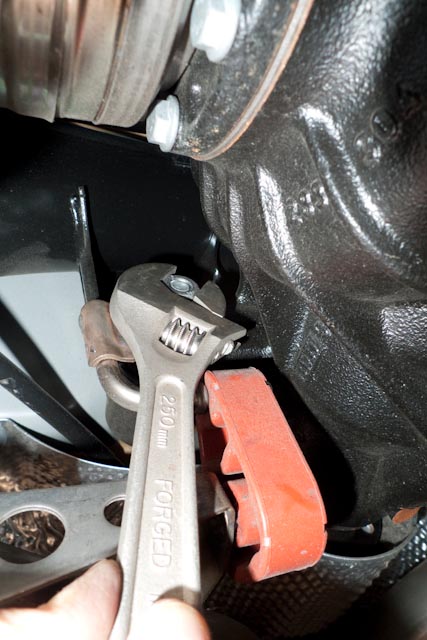
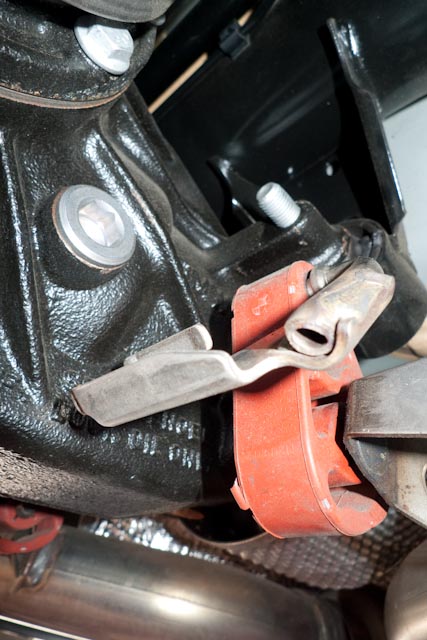
3. Remove L/R exhaust hanger on sides of muffler at rear of car.
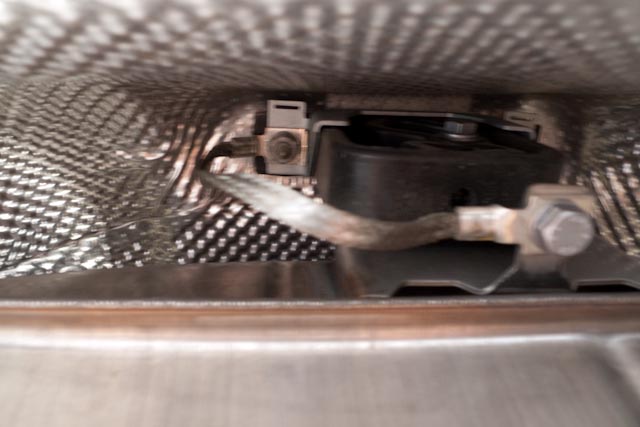
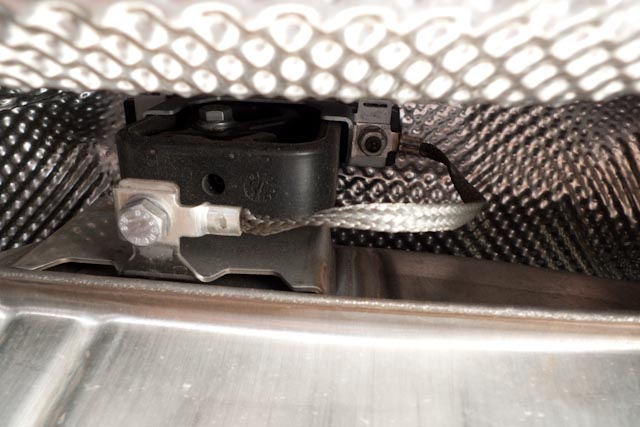
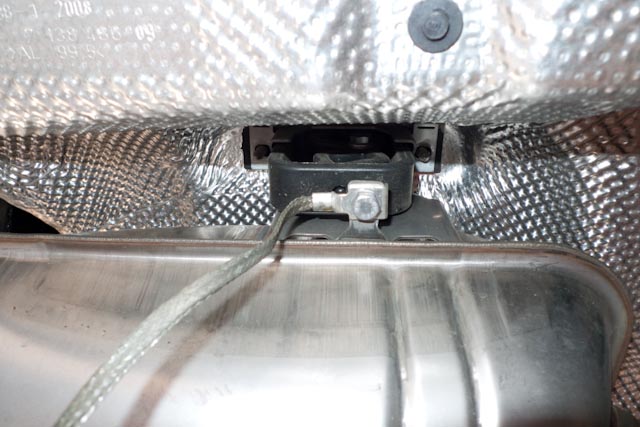
Use the 13mm deep socket and the extenders to remove the two nuts on either side of the bracket. Note that there's a flat braided cable attached to one of the nuts and the muffler. At first i thought it was some kind of ground wire, but upon further inspection i think it's a safety cable in case this bracket comes loose/breaks. Do both left and right sides. Here's a couple pics with the nuts removed:
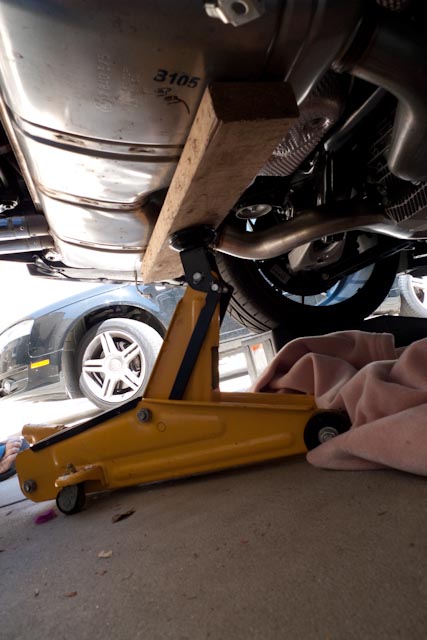
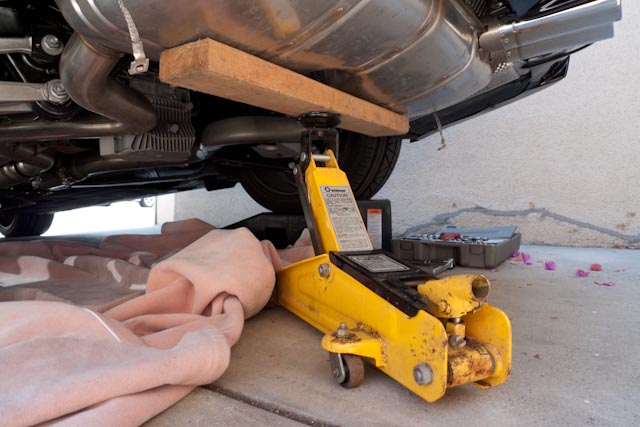
4. At this point the catback is being supported at the front by the insertion of the catback into the forward exhaust and in the rear by the center bracket. I highly recommend a floor jack here. Get a 2x4 or a piece of wood about the width of the muffler and with the wood between the jack pad and muffler, raise the jack until the wood just contacts the muffler:
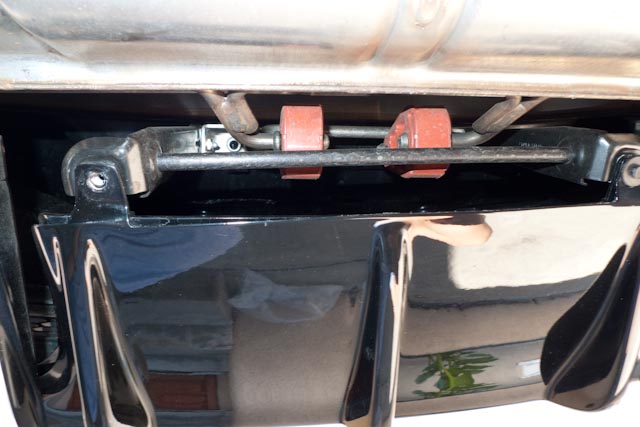
5. Remove center exhaust hanger at back of muffler, behind bumper. Use the 5/16" socket to remove the small black screws that attach the middle of the rear bumper cover to the hangar bracket. This whole thing is coming down. Once those are removed, pivot the black part of the bracket toward the front of the car so it will clear the bumper. Here's a pic of left screw removed, right still in place :
Again use the deep 13mm with the extender to remove the two downward facing nuts that're high up where the bracket meets the vehicle. A bit tough to see, but here's pics of each side:
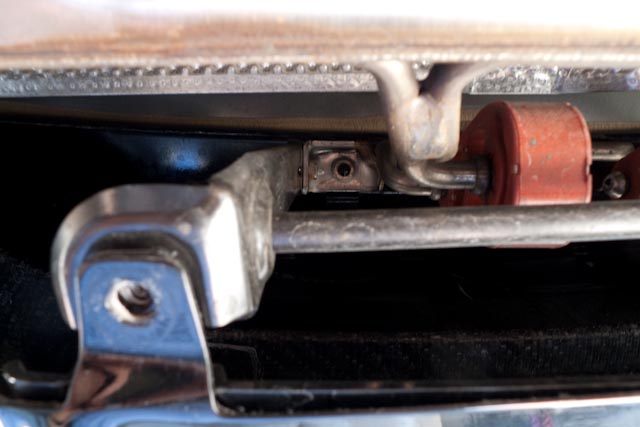
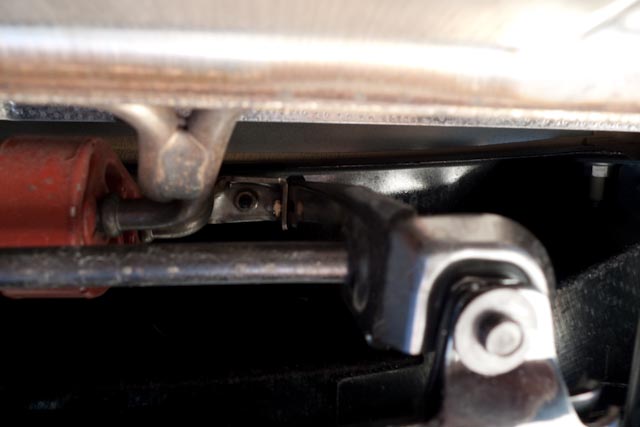
6. Once the center bracket nuts are removed, the jack should be supporting most of the weight of the muffler. Now slowly start to lower the jack, making sure the black bumper bracket on the center hanger is clearing your bumper. If the muffler isn't coming straight down with the jack, stop and raise the jack back up so the muffler is level and make sure the two side brackets are releasing. My side brackets were a little sticky, so i had to reach up there and kind of walk them off the bolts on both the left and right sides.
Once the muffler is free, lower it enough that it's clear of the brackets on the left and right and stop lowering:
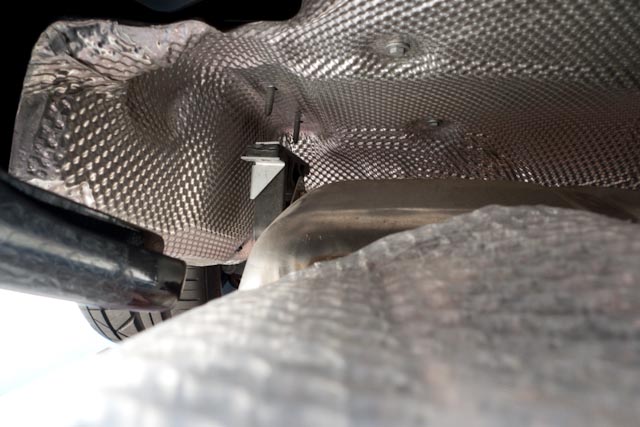
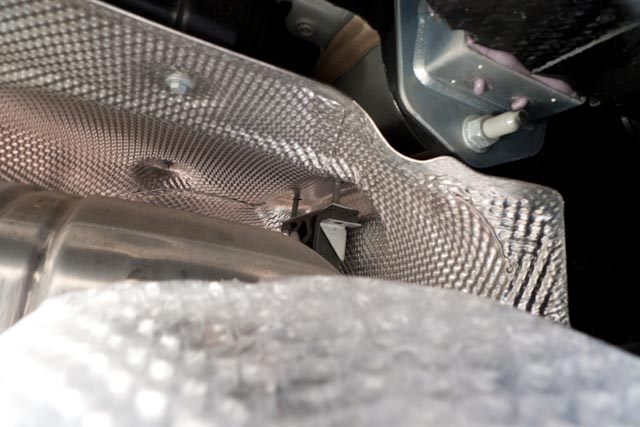
I put a padded blanket and some bubble wrap under the front of the catback so when it dropped it wouldn't damage it. If you have a two people, you could have someone instead lay under there and hold them. Anyway, at this point, the whole thing should be clear of any brackets on the car and just sitting on top of the jack with the two pipes still attached cats. Now slowing pull the jack and muffler back until the catback slips out of the cats up front. With the entire thing free of the car, lower the jack to the ground and remove the jack from under the catback. Nice to have a blanket down so you can lay it down and drag it out without damaging it.
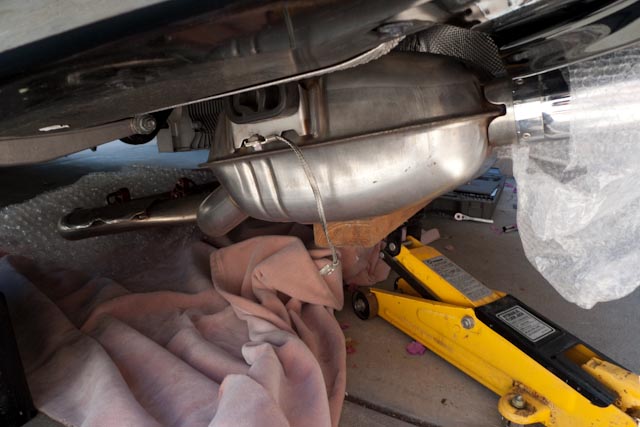
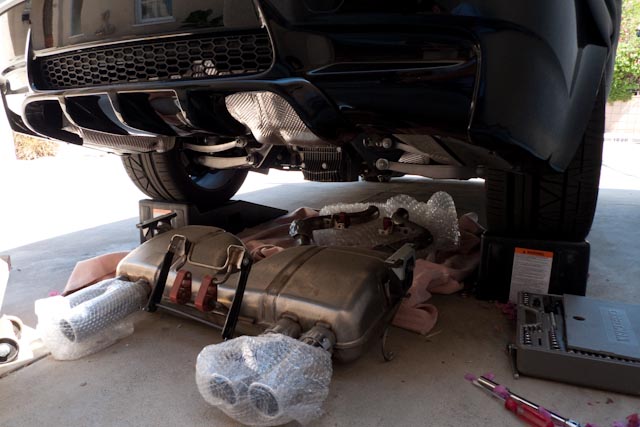
Once off the car, you can now remove the two front/mid hangers as well as the center hanger. Both are attached via red poly bushings. Make your life easier and spray some kind of WD40 type of thing at the contact point. You can pretty much get this off by just pulling really hard, you might need to help the bushing over the flange on the hanger rod with a flat blade screw driver. Once you've tackled the 3 bushing hangers, remove the left and right hangers that're attached to the muffler. These are just bolted on. Note that all of these left/right bracket pairs are side specific, so you might want to keep track of which is which, just to make putting it back together simpler.
To install your new catback, attach these 5 hangers to your new system and reverse the above process. If you've got a lightweight catback, you can pretty much do it without the jack. If not, i'd line it up and raise it with the jack about a foot. Then attach the 2 front pipes to the exposed cats, slip on the compression clamps and loosely snug them up so that it'll hold up the front end. Slowly lift or jack the muffler up, making sure the center bracket is clearing the bumper and dropping over the bolts that point down. Now over to the side of a muffler, with one hand pushing the muffler upward, align the bracket and use your other with the socket to replace the two nuts on the muffler brackets. Do both sides. If your new catback is height adjustable, it's probably part of these two brackets, so leave any adjustment bolts loose. Now reattach the forward hangers to the chassis and tighten the pipe clamps up front while you're under there. Move to the back and reinstall the two high nuts on the rear center bracket and the little black screws that hold the bumper. Crawl out and admire your work. If you have height adjustments on the muffler side brackets and/or adjustable tips, adjust your height and tip length, then tighten those all down too. Celebrate with a beer!
You'll need a few tools, but nothing too special really.
Mandatory :
low profile ramps or jack stands
socket wrench(es)
1/2" or 13mm deep socket
5/16" socket
~10" socket extender bar
medium adjustable wrench
Helpful:
floor jack
blanket/padding
1/2" or 13mm standard socket
Elevate the car, i can't imagine doing this with the car on the ground. I didn't try, so i can't say it's impossible tho. I backed the car up on a pair of Rhino Ramps and there was more than enough room to do the job.
Once underneath, here are the steps i took to remove the catback, with photos of the attachment points and needed tools listed:
1. Loosen L/R compression pipe clamps at front of stock catback.
Use the 13mm socket and ratchet to loosen these clamps. Without removing the bolt, open the clamp wide and slide toward the front of the car so it's off the junction of the two ends. This way they stay on the car when you remove the catback:
2. Remove L/R exhaust hanger near front of catback from car.
It's easier to just remove all of the hangars from the car, rather than muscle the red poly bushings off of the catback while lying on your back. Use the adjustable wrench to remove the large rear facing nut that holds the hangar bracket to the car and pivot the bracket off of the threaded rod so that it's no longer bearing any weight. If you don't have an adjustable wrench, you might be able to fit a socket up there, but it looked tight...i think it's an 18mm. Remove both left and right sides:
3. Remove L/R exhaust hanger on sides of muffler at rear of car.
Use the 13mm deep socket and the extenders to remove the two nuts on either side of the bracket. Note that there's a flat braided cable attached to one of the nuts and the muffler. At first i thought it was some kind of ground wire, but upon further inspection i think it's a safety cable in case this bracket comes loose/breaks. Do both left and right sides. Here's a couple pics with the nuts removed:
4. At this point the catback is being supported at the front by the insertion of the catback into the forward exhaust and in the rear by the center bracket. I highly recommend a floor jack here. Get a 2x4 or a piece of wood about the width of the muffler and with the wood between the jack pad and muffler, raise the jack until the wood just contacts the muffler:
5. Remove center exhaust hanger at back of muffler, behind bumper. Use the 5/16" socket to remove the small black screws that attach the middle of the rear bumper cover to the hangar bracket. This whole thing is coming down. Once those are removed, pivot the black part of the bracket toward the front of the car so it will clear the bumper. Here's a pic of left screw removed, right still in place :
Again use the deep 13mm with the extender to remove the two downward facing nuts that're high up where the bracket meets the vehicle. A bit tough to see, but here's pics of each side:
6. Once the center bracket nuts are removed, the jack should be supporting most of the weight of the muffler. Now slowly start to lower the jack, making sure the black bumper bracket on the center hanger is clearing your bumper. If the muffler isn't coming straight down with the jack, stop and raise the jack back up so the muffler is level and make sure the two side brackets are releasing. My side brackets were a little sticky, so i had to reach up there and kind of walk them off the bolts on both the left and right sides.
Once the muffler is free, lower it enough that it's clear of the brackets on the left and right and stop lowering:
I put a padded blanket and some bubble wrap under the front of the catback so when it dropped it wouldn't damage it. If you have a two people, you could have someone instead lay under there and hold them. Anyway, at this point, the whole thing should be clear of any brackets on the car and just sitting on top of the jack with the two pipes still attached cats. Now slowing pull the jack and muffler back until the catback slips out of the cats up front. With the entire thing free of the car, lower the jack to the ground and remove the jack from under the catback. Nice to have a blanket down so you can lay it down and drag it out without damaging it.
Once off the car, you can now remove the two front/mid hangers as well as the center hanger. Both are attached via red poly bushings. Make your life easier and spray some kind of WD40 type of thing at the contact point. You can pretty much get this off by just pulling really hard, you might need to help the bushing over the flange on the hanger rod with a flat blade screw driver. Once you've tackled the 3 bushing hangers, remove the left and right hangers that're attached to the muffler. These are just bolted on. Note that all of these left/right bracket pairs are side specific, so you might want to keep track of which is which, just to make putting it back together simpler.
To install your new catback, attach these 5 hangers to your new system and reverse the above process. If you've got a lightweight catback, you can pretty much do it without the jack. If not, i'd line it up and raise it with the jack about a foot. Then attach the 2 front pipes to the exposed cats, slip on the compression clamps and loosely snug them up so that it'll hold up the front end. Slowly lift or jack the muffler up, making sure the center bracket is clearing the bumper and dropping over the bolts that point down. Now over to the side of a muffler, with one hand pushing the muffler upward, align the bracket and use your other with the socket to replace the two nuts on the muffler brackets. Do both sides. If your new catback is height adjustable, it's probably part of these two brackets, so leave any adjustment bolts loose. Now reattach the forward hangers to the chassis and tighten the pipe clamps up front while you're under there. Move to the back and reinstall the two high nuts on the rear center bracket and the little black screws that hold the bumper. Crawl out and admire your work. If you have height adjustments on the muffler side brackets and/or adjustable tips, adjust your height and tip length, then tighten those all down too. Celebrate with a beer!
 .
. ).
).

 Unfortunately I would get a ticket immediately and the drone inside the car was literally unbearable!
