

Does anyone know if there is a DIY out there on removing the front bumper? Or if anyone has done it, could you shed some light on the basic steps?
103.4KVIEWS
32REPLIES
8APPRECIATES
04-03-2015LAST POST
sorry for german language, but I think it still will help...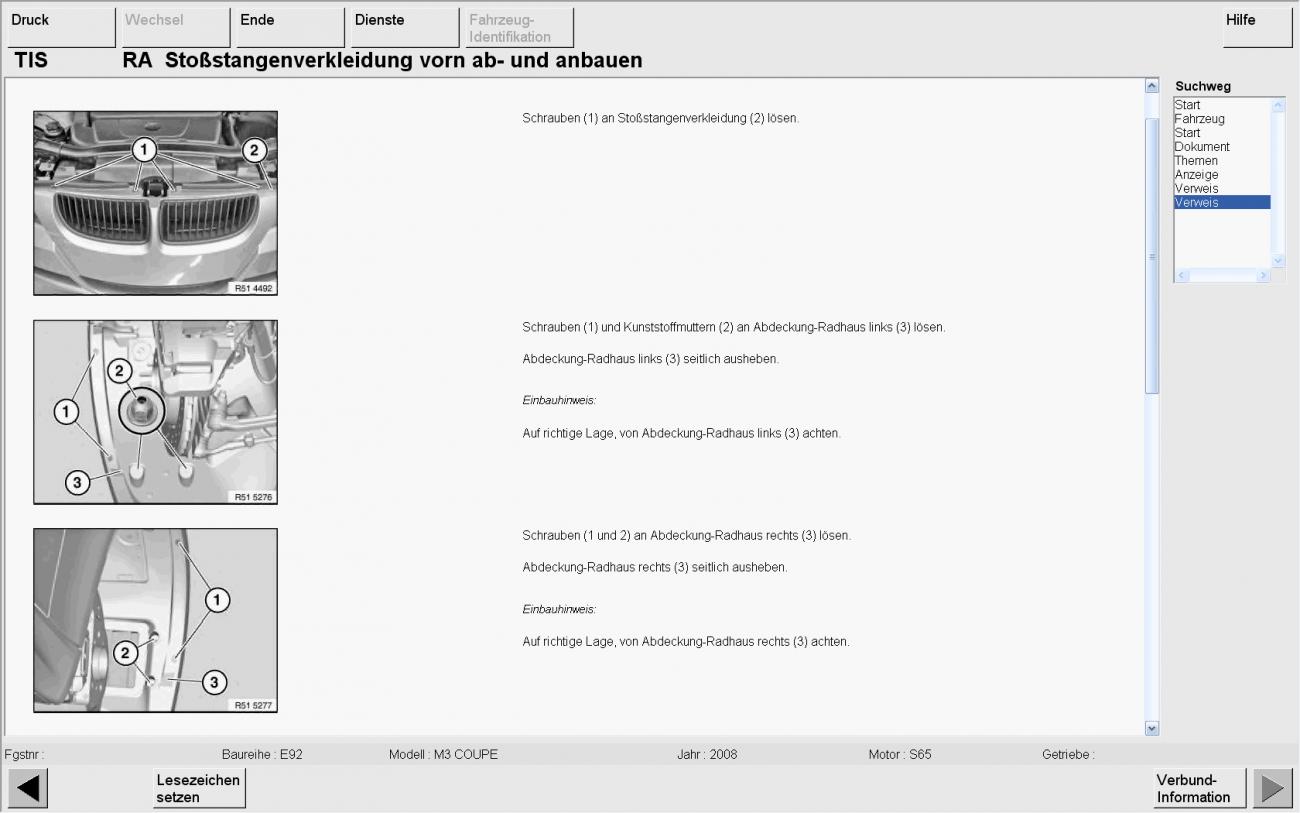
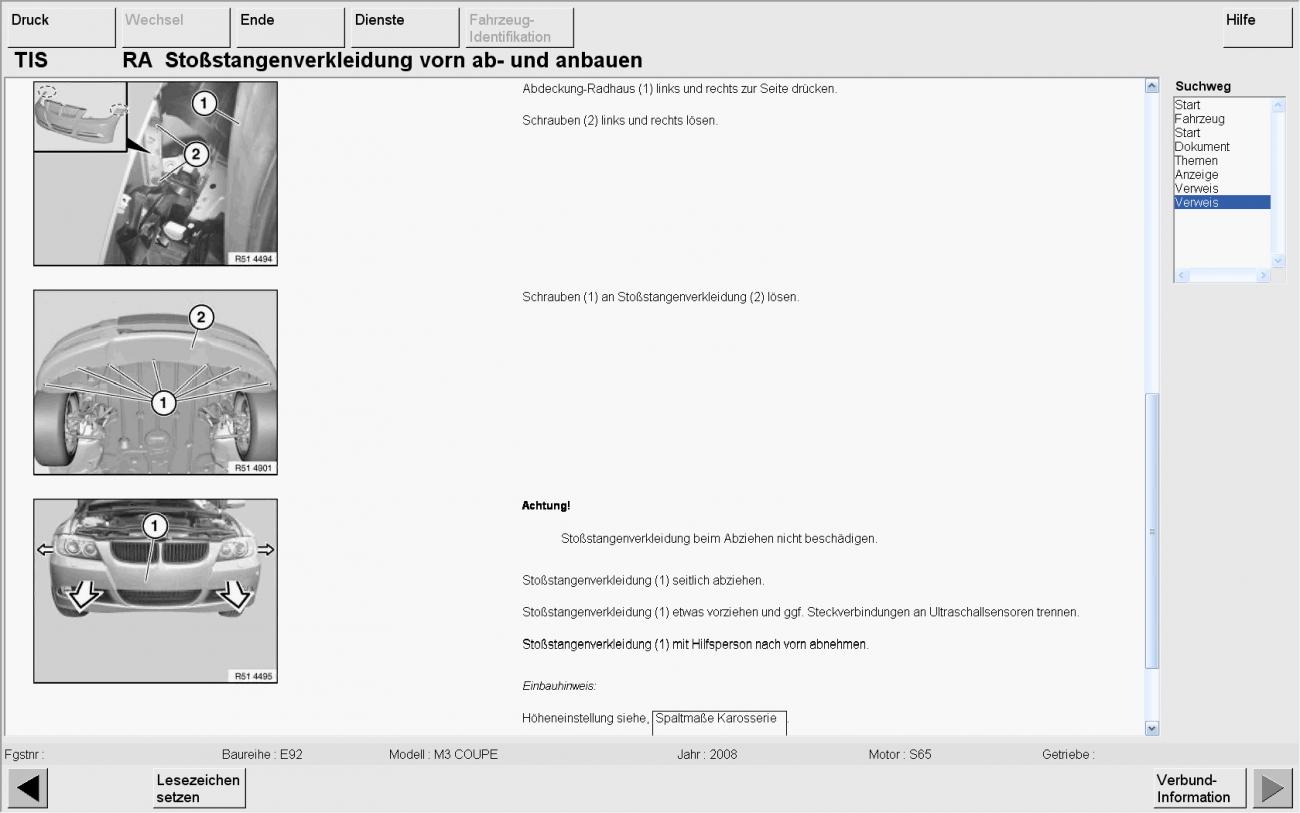
The same document as above but in English.
Mike
Mike
doba_s wroteMuch the same, but you will also need a 10mm ro remove 2 plastic nuts on the driver's side wheel well. You DO NOT need to do the part of waiting to straighten out the wheels to put the wheel well liners to the side. As long as you take out ALL the screws on the bottom of the liner, you will be able to get to the top 2 screw in the bumper, but you will need a long extention to your socket to get it unscrewed.
I'm doing it as I'm typing this on my E90 M3!
what about the headlight washers any special notes since some of us may have them?
Boost3dm3 wroteNope. Did mine a few weeks ago. They're fixed; you just have to slightly lift the bumper there to clear the nozzles. In fact, the washers worked perfect for me since I was by myself; I just pushed in the bumper slightly inclined to one side, waited until the nozzle 'popped' (holding the bumper in place), then did the otherwhat about the headlight washers any special notes since some of us may have them?
 .
.Just a comment. I did remove the bumper only 'loosening' the inner fenders, but decided to remove them to put it back on. Not worth the aggravation of trying to line up the fender screws. Besides, I was only missing 2 fasteners on each side to fully remove them (and the wheel, of course, but I always take the opportunity to clean everything in there, including the wheels). Good luck.
will do
elp_jc wroteThere are two rubber strips along the front and back edges of the vent rectangle of the center undertray. Here's a pic of a new undertray (had to replace mine). The front edge of the undertray is closer to the camera. Hope this helps.By the way, found a straight rubber strip at the bottom (and middle) of the pan below the radiator, and couldn't find out where it was originally installed, but figured it'd fall again, so didn't investigate any further. If you see it (use a flashlight from the driver's side) somewhere, please take a pic so I know where it belongs (photo below). Thanks, and good luck.
nice!
cchan wroteAbsolutelyThere are two rubber strips along the front and back edges of the vent rectangle of the center undertray. Hope this helps.
 . Many thanks man. Doesn't look critical, but will try to reinstall it from the bottom. Wonder how it got loose
  . Didn't see any evidence of bumper being removed before, or that part being replaced. Oh well. Thanks again.
LOL I took off my front bumper this morning and found the same rubber lying there doing nothing so I put it back just like the pic above from cchan.
I just put my new undertray on this afternoon. The rubber strips seem to seal the airflow that passes through the lower radiator, and down through the vent. If you look behind the radiator, there is a curved piece of plastic which diverts the airflow down under the car. I think the back rubber strip should seal behind the curved plastic, to prevent any of the air from getting above the undertray (otherwise if airflow gets up in there, the undertray could start scooping more air and bending down which will be bad - ask me how I know). The front rubber strip doesn't seem to be as critical though.
Leozap wroteDid you notice that the rubber was all torn where the 3 clips were, meaning it was properly installed to begin with? Wonder what's causing itfound the same rubber lying there doing nothing so I put it back
. Will reinstall it myself as well, but will be checking to see if it dislodges itself again. My underbumper has zero damage, so nothing hit that part.cchan wroteThere's only one big radiator (and condenser), plus the power steering and oil cooler radiators in front of it at the bottom (probably the ones you're referring to). I don't think either rubber piece is critical at all, but of course it's better for them to be in place. Even the channel that the rubber strips mount to doesn't seem to be for aerodynamic purposes, but who knows.The rubber strips seem to seal the airflow that passes through the lower radiator
This is making me curious too as to why the rubber strips are coming off by themselves, especially since they don't touch the bumper itself. They seemed pretty well stuck on the replacement undertray I put on.
My front bumper was replaced a few months ago due to a minor accident (someone ran an intersection). The undertray was not replaced and looked fine, but perhaps some of the plastic may have been cracked/weakened and not obvious. That, combined with the possibility that the rubber pieces may not have been in place correctly may (and I'm only making an educated guess) have caused my undertray to eventually break. This happened at a recent HPDE, hence my belief that there is significant aero/airflow going through the lower bumper and out that undertray vent at speed.
So this definitely looks like an item we should be checking on every now and then.
My front bumper was replaced a few months ago due to a minor accident (someone ran an intersection). The undertray was not replaced and looked fine, but perhaps some of the plastic may have been cracked/weakened and not obvious. That, combined with the possibility that the rubber pieces may not have been in place correctly may (and I'm only making an educated guess) have caused my undertray to eventually break. This happened at a recent HPDE, hence my belief that there is significant aero/airflow going through the lower bumper and out that undertray vent at speed.
So this definitely looks like an item we should be checking on every now and then.
Okay, just finished reinstalling the piece, and here's what I found (which I didn't notice when I removed the bumper and installed a radiator protective screen):
- Both radiator and oil cooler end at the bottom of the lower bumper opening.
- Engine cooler is placed ahead of the radiator by about 2".
- Right behind this radiator there's a 1/4-circle shroud that starts at the top and ends at the bottom (stick your fingers from the bottom opening and you'll feel it).
- The bottom of the cooler sits in the 'front' rubber seal we're talking about. The bottom of the shroud sits at the 'rear' rubber seal that some us found laying around. We can remove both of them and there's about a 1/2" gap between surfaces. Even with the seals in place, you can squeeze your fingers to push the strip down (make sure you push hard enough -both hands- where the clips are).
- For some reason, BMW wanted the airfrow from the oil cooler to be dumped below the car, rather than hitting the radiator.
Here are my deductions:
-The strips are just to prevent road crap (especially when raining) from getting into the tray. Without the rear guard, my tray was filthy, but I didn't bother to remove the middle part (the one in post #9) during my project. In retrospect, I should have done that. That area is not sealed, but those rubber seals cover most of the bumper opening, minimizing water/crap accumulation inside the tray. NOTE: These are the same seals that protect water from getting into the engine compartment from the front/rear of hood.
- The seal was knocked out during assembly (nice QC ). It's not going to go anywhere again (we'll see about that
  ).
).
- The very bottom of the radiator gets no airflow, but it's probably better than hotter air from the oil cooler (nice design).
Final note to all M3 owners: slide your fingers under the bottom of the front bumper until you feel the opening we're talking about. Reach a little higher and feel that BOTH rubber seals are installed, and press down on both in case one (most likely the rear) is coming off. Push the rubber all around so it fits squarely on the upper surface, sealing the area nicely.
- Both radiator and oil cooler end at the bottom of the lower bumper opening.
- Engine cooler is placed ahead of the radiator by about 2".
- Right behind this radiator there's a 1/4-circle shroud that starts at the top and ends at the bottom (stick your fingers from the bottom opening and you'll feel it).
- The bottom of the cooler sits in the 'front' rubber seal we're talking about. The bottom of the shroud sits at the 'rear' rubber seal that some us found laying around. We can remove both of them and there's about a 1/2" gap between surfaces. Even with the seals in place, you can squeeze your fingers to push the strip down (make sure you push hard enough -both hands- where the clips are).
- For some reason, BMW wanted the airfrow from the oil cooler to be dumped below the car, rather than hitting the radiator.
Here are my deductions:
-The strips are just to prevent road crap (especially when raining) from getting into the tray. Without the rear guard, my tray was filthy, but I didn't bother to remove the middle part (the one in post #9) during my project. In retrospect, I should have done that. That area is not sealed, but those rubber seals cover most of the bumper opening, minimizing water/crap accumulation inside the tray. NOTE: These are the same seals that protect water from getting into the engine compartment from the front/rear of hood.
- The seal was knocked out during assembly (nice QC
). It's not going to go anywhere again (we'll see about that ).- The very bottom of the radiator gets no airflow, but it's probably better than hotter air from the oil cooler (nice design
).Final note to all M3 owners: slide your fingers under the bottom of the front bumper until you feel the opening we're talking about. Reach a little higher and feel that BOTH rubber seals are installed, and press down on both in case one (most likely the rear) is coming off. Push the rubber all around so it fits squarely on the upper surface, sealing the area nicely.
Any updates or perhaps an actual E92 bumper?
The OP should add this video to the original post and rename thread if possible to DIY front bumper and headlamp removal. Going to do this today for LS3!
Finally took off my front bumper to get the headlamps. I want to mention you will need a 10mm for two plastic bolts on the drivers side. Also the headlight washers shouldn't get in your way. Just slightly lift when removing. Also on a side note I found removing the headlamps to be a fucking nightmare. Reaching the bottom hex bolt is a pain and the wheel wells aren't the most malleable.
It wasn't the easiest thing to do, but I did it, thanks to this guide. :-)
There is a slight gap between the bumper and headlights as well as where the top of the bumper meets the hood. Any suggestions on how to fix this without removing the whole bumper and putting it back on?
Just a few tips from someone who just removed his bumper and headlights:
-Bumper removal is pretty easy and straight forward if you follow the PDF instructions posted above. Don't be afraid to remove more screws from the fender liner than those instructions tell you to. I found it made things easier.
-Make sure you take the front wheels off first.
-Have a "torx 30" bit that fits on your socket wrench. Craftsman makes them and I got one at sears for my 3/8" drive socket wrench.
-when removing the headlights remove the headlight bracket that each of the headlights sit on. It will allow you to remove the headlights without having to try and remove the one almost impossible to get to screw that is directly under the headlight and connects it to the headlight bracket. It took me 2 hours to get that bolt out on the first headlight I did. On the second one I noticed I could just remove the whole bracket with the headlight and it took like 10 minutes instead!
-Bumper removal is pretty easy and straight forward if you follow the PDF instructions posted above. Don't be afraid to remove more screws from the fender liner than those instructions tell you to. I found it made things easier.
-Make sure you take the front wheels off first.
-Have a "torx 30" bit that fits on your socket wrench. Craftsman makes them and I got one at sears for my 3/8" drive socket wrench.
-when removing the headlights remove the headlight bracket that each of the headlights sit on. It will allow you to remove the headlights without having to try and remove the one almost impossible to get to screw that is directly under the headlight and connects it to the headlight bracket. It took me 2 hours to get that bolt out on the first headlight I did. On the second one I noticed I could just remove the whole bracket with the headlight and it took like 10 minutes instead!
