
473VIEWS
21REPLIES
3APPRECIATES
08-03-2026LAST POST
Had been fighting bank 1 VANOS codes in my car since picking it up cheap a few months ago. Finally got everything else fixed enough that it is time to dive into the engine. Doing the full cooling system, all the drive belts and pulleys, valve covers, oil filter housing gasket, and throtte actuators all at once. Actually just pulled the crash bar off the front to make it nice and easy..

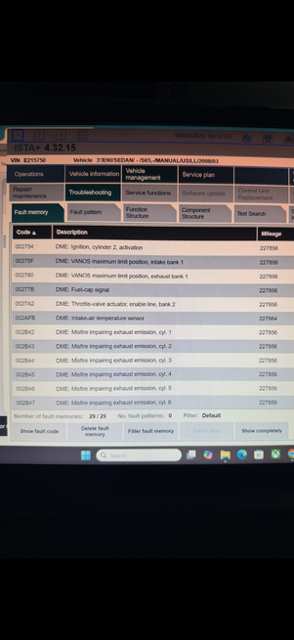
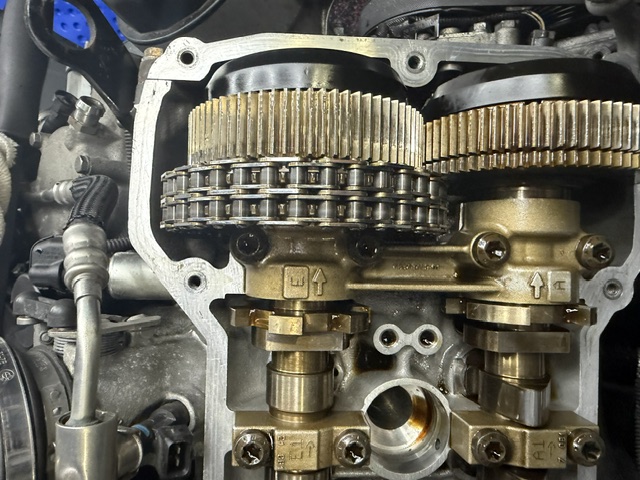
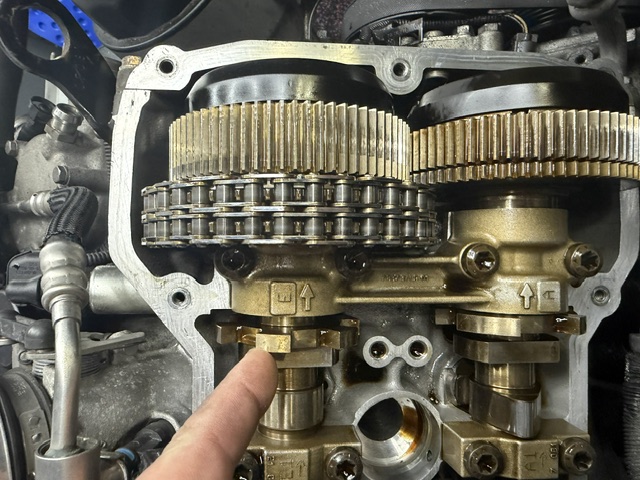
Here is what I found under bank 1 valve cover.. The intake is obviously different than the exhaust side. While I dont have a great understanding of how this one works yet, I rebuilt the vanos in my e46 a few years back so im somewhat competent with it. If you notice my ISTA screen shot, I did at one point when I first got this car have a code for both bank 1 vanos, but as of recent it was just the intake. Is this gear just stuck out? I mean I do think this car sat for quite some time.. I know e46's get sludged up and have issues because of that. Or should I be thinking about just ordering a remanufactured vanos adjuster? I have the timing tool, and did purchase stainless vanos spring caps and new bolts from NRW when I got the valve covers..

Just want to hear yalls thoughts before I tear into it too far over the weekend

edit- didnt realize that picture is so bad. Codes were 00275f vanos max limit position intake and the same thing for exhaust, 002760. The exhaust seems to have went away but still had the intake code at time of tear down.
Attached imageAttached imageAttached image
HDdave wrote
Had been fighting bank 1 VANOS codes in my car since picking it up cheap a few months ago. Finally got everything else fixed enough that it is time to dive into the engine. Doing the full cooling system, all the drive belts and pulleys, valve covers, oil filter housing gasket, and throtte actuators all at once. Actually just pulled the crash bar off the front to make it nice and easy..

Here is what I found under bank 1 valve cover.. The intake is obviously different than the exhaust side. While I dont have a great understanding of how this one works yet, I rebuilt the vanos in my e46 a few years back so im somewhat competent with it. If you notice my ISTA screen shot, I did at one point when I first got this car have a code for both bank 1 vanos, but as of recent it was just the intake. Is this gear just stuck out? I mean I do think this car sat for quite some time.. I know e46's get sludged up and have issues because of that. Or should I be thinking about just ordering a remanufactured vanos adjuster? I have the timing tool, and did purchase stainless vanos spring caps and new bolts from NRW when I got the valve covers..

Just want to hear yalls thoughts before I tear into it too far over the weekend

edit- didnt realize that picture is so bad. Codes were 00275f vanos max limit position intake and the same thing for exhaust, 002760. The exhaust seems to have went away but still had the intake code at time of tear down.
This is probably one of the more difficult VANOS issues to diagnose on the S65.

From what I've seen, the Vanos adjusters themselves rarely fail. More often, the problem ends up being one of the supporting components like the VANOS solenoids, O-rings, seals, or another issue affecting oil control.

The S65 also uses a relatively low-pressure VANOS system compared to the S85, so adjuster failures aren't nearly as common.

If the adjuster itself is at fault, I'd be more inclined to suspect debris or contamination causing it to stick rather than an outright mechanical failure.

As a first step, I'd swap the VANOS solenoids from bank to bank and see if the fault follows the solenoid. That's a quick, inexpensive test that can help narrow things down before replacing more expensive parts.
I know I removed the solenoids and cleaned them when I first got the car (I cant remember if I swapped them or not I want to say yes) and was chasing this issue among hundreds of others.. As you can see from the photo- I am a long ways from anything I can button up and test run at this point. I am also at the point in this build where honestly--- screw it, it is what it is $ wise. I am trying to get this from an undrivable $15k car in the middle of April- to hopefully driving it 9 hours to Mpact in the Poconos at the end of August to chill with some old college friends. So basically I am replacing things just because they might break..

I have not done my research enough yet to understand how deep into this system I get when I remove the bolts to put on the stainless spring caps.. Someone has been inside of this bank in the past it was obvious because a couple bolts were grade 10 not factory..
Attached image
HDdave wrote
I know I removed the solenoids and cleaned them when I first got the car (I cant remember if I swapped them or not I want to say yes) and was chasing this issue among hundreds of others..
Yeah, I don't think cleaning the VANOS solenoids really does much, to be honest. At that point, I'd rather just replace them with new ones. They're a lot cheaper than buying refurbished VANOS adjusters and VANOS caps from Mporium.

And damn, if you picked that car up for $15k, then me listing mine at $20k with all the track parts is looking like a pretty good deal.
Yeah I still am not sure if I got a good deal or a terrible one. Only time will tell.. Seems on the east coast I'd have to spend $25k to get one that ran. Then god only knows how much maintenance from there.. Interior is super clean and the car was mostly stock (still had original EDC suspension it was so blown it looked like a 70's cadillac bouncing on the trailer)..

You know what. I didnt touch the solenoids... I pulled out something underneath the camshafts thats bolted into the cylinder head and cleaned that.
That might have been the check valve that you cleaned. If they were in the V side of the heads. Dirty or damaged solenoids may show up as a cam being a few degrees off or behind the other in a test. Great idea to swap banks and see
What shakes out.
That would be what I cleared yes... Sorry this platform is entirely new to me, it will take me a minute to get up to speed.. My main knowledge is the s54 or an LML duramax. For the price might as well just replace both of them with new ones. Hell i bought new injectors today when i realized they were only like $450 and I was in the process of spending over $1k on belts tensioners and pulleys..
HDdave wrote
Had been fighting bank 1 VANOS codes in my car since picking it up cheap a few months ago. Finally got everything else fixed enough that it is time to dive into the engine. Doing the full cooling system, all the drive belts and pulleys, valve covers, oil filter housing gasket, and throtte actuators all at once. Actually just pulled the crash bar off the front to make it nice and easy..

Here is what I found under bank 1 valve cover.. The intake is obviously different than the exhaust side. While I dont have a great understanding of how this one works yet, I rebuilt the vanos in my e46 a few years back so im somewhat competent with it. If you notice my ISTA screen shot, I did at one point when I first got this car have a code for both bank 1 vanos, but as of recent it was just the intake. Is this gear just stuck out? I mean I do think this car sat for quite some time.. I know e46's get sludged up and have issues because of that. Or should I be thinking about just ordering a remanufactured vanos adjuster? I have the timing tool, and did purchase stainless vanos spring caps and new bolts from NRW when I got the valve covers..

Just want to hear yalls thoughts before I tear into it too far over the weekend

edit- didnt realize that picture is so bad. Codes were 00275f vanos max limit position intake and the same thing for exhaust, 002760. The exhaust seems to have went away but still had the intake code at time of tear down.

I had a similar code on bank 2. 2761: VANOS maximum stop inlet bank 2.
This post details some of my troubleshooting and what ultimately fixed the issue (replacing VANOS adjuster).
https://www.m3post.com/forums/showthread.php?t=2225537
Any indication that this engine has had bearing failure in the past? I found from my research that these VANOS adjusters rarely fail but when they do, it is often because of fine particles jamming up the really tight tolerances that these adjusters have. I'm pretty sure thats what caused the issue for me.
Just wanted to post a little update here- I pulled the valve cover off the drivers side too, and the intake camshaft looked exactly the same position wise as the pass side. Now, correct me if I am wrong, but all 4 should look the same as the exhaust cam in the picture I shared- correct? The gear I am pointing to in my first post should be adjusted all the way towards the timing chain as it is on the exhaust?

It seems to really properly diagnose this I should have ran a VANOS test before I tore this car apart- I just knew I was doing valve covers, and vanos caps that required re-timing the car and using new bolts in the adjusters and everything- so my thought process was who cares, I have to re time the cane no matter what.

I also retract my previous statement about the solenoids being cheap lol.. That was just from a quick google search and it was not for an s65. Looks like its about $900+ PER SIDE if I replaced exhaust and intake solenoids both, or like $550 a piece for a single intake solenoid. Rebuilt adjuster is $550 as well.. So I might pump the brakes on just throwing money and new parts at the car to fix it. Really pinpoint the issue- I did see that ECS had a Vaico intake solenoid I could get for $120 or so. Tempted to try it, but not sure if anyone has experience with these cheaper replacements vs OE? I know that is a no-go for the coil packs.


To answer your question on if this car had a rod bearing failure I cannot say... I know it came with a receipt for having them replaced by Off Camber Racing in Rockway, NJ back in October of 2020. I will say this car strikes me as having NO maintence done to it. Just incredibly poorly taken care of (least they kept the interior nice).
HDdave wrote
Just wanted to post a little update here- I pulled the valve cover off the drivers side too, and the intake camshaft looked exactly the same position wise as the pass side. Now, correct me if I am wrong, but all 4 should look the same as the exhaust cam in the picture I shared- correct? The gear I am pointing to in my first post should be adjusted all the way towards the timing chain as it is on the exhaust?

It seems to really properly diagnose this I should have ran a VANOS test before I tore this car apart- I just knew I was doing valve covers, and vanos caps that required re-timing the car and using new bolts in the adjusters and everything- so my thought process was who cares, I have to re time the cane no matter what.

I also retract my previous statement about the solenoids being cheap lol.. That was just from a quick google search and it was not for an s65. Looks like its about $900+ PER SIDE if I replaced exhaust and intake solenoids both, or like $550 a piece for a single intake solenoid. Rebuilt adjuster is $550 as well.. So I might pump the brakes on just throwing money and new parts at the car to fix it. Really pinpoint the issue- I did see that ECS had a Vaico intake solenoid I could get for $120 or so. Tempted to try it, but not sure if anyone has experience with these cheaper replacements vs OE? I know that is a no-go for the coil packs.


To answer your question on if this car had a rod bearing failure I cannot say... I know it came with a receipt for having them replaced by Off Camber Racing in Rockway, NJ back in October of 2020. I will say this car strikes me as having NO maintence done to it. Just incredibly poorly taken care of (least they kept the interior nice).
A full set of re-man VANOS adjusters w/ bolt on vanos caps is around $2,200.

Replacing the VANOS solenoids is definitely the cheaper route if we had ran a vanos test prior.

Right now, though, we don't really have a confirmed root cause, so you'd be shooting in the dark. It would've been nice to buy a single VANOS solenoid and swap it between banks to see if the issue followed the solenoid before deciding to replace the rest.

Replacing just one VANOS adjuster doesn't really make sense if you're already going down that path, especially since we don't actually know which adjuster is at fault. If it does turn out to be an adjuster issue, I'd rather do the full set.
That makes sense... I am trying to figure out my next exact plan of attack here.. Itll be middle of next week at the earliest that I will have all the parts to seal this back up.

Do I go ahead and install the vanos caps, re time the engine myself so I know thats done correctly, then if the issue returns- start with one new OE intake solenoid and see what that can do for me ?

Or do I button it back up without installing the caps? Kind of a toss up for me really. Tempted to throw it them on and do the timing. Ive got NRW valve covers, spark plug tubes all that jazz ready to go on with it anyhow. Worse case I have to take the valve covers back off and do timing again.

Someone 100% has been under these valve covers before- and judging by the rest of their maintenance on the car they were a real window licker. So that pushes me to say time the thing myself, button it up and then go from there once its running again. Again- trying to get this thing to drive to Mpact which I think is like the 3rd week in August.. 9 hour drive for me.
HDdave wrote
That makes sense... I am trying to figure out my next exact plan of attack here.. Itll be middle of next week at the earliest that I will have all the parts to seal this back up.

Do I go ahead and install the vanos caps, re time the engine myself so I know thats done correctly, then if the issue returns- start with one new OE intake solenoid and see what that can do for me ?

Or do I button it back up without installing the caps? Kind of a toss up for me really. Tempted to throw it them on and do the timing. Ive got NRW valve covers, spark plug tubes all that jazz ready to go on with it anyhow. Worse case I have to take the valve covers back off and do timing again.

Someone 100% has been under these valve covers before- and judging by the rest of their maintenance on the car they were a real window licker. So that pushes me to say time the thing myself, button it up and then go from there once its running again. Again- trying to get this thing to drive to Mpact which I think is like the 3rd week in August.. 9 hour drive for me.
If your goal is just to get the car running again so you can properly diagnose the issue, I'd put it back together and get it running first.

You don't necessarily have to install the VANOS caps if you're only planning to run it briefly for testing.

If you're planning on driving it around or making the trip to MPACT, then I'd go ahead and install the caps while you're in there.

Like you said, the worst-case scenario is having to pull it back apart. But if it turns out to be something simple like a VANOS solenoid, you could end up saving yourself a lot of money. At that point, you may only need to replace the one faulty solenoid and leave the others alone until they actually show signs of failing.

It's still not a common failure point, but it's a much easier and less expensive place to start than throwing a full set of adjusters at it.
I mean ideally the goal is put it back together, and not have to tear it back apart. I also realize that is not a super realistic thought. I think I will just go ahead and put the caps on. I trust myself timing the car- it sure looks a hell of a lot easier than my e46 was, and its still running great several thousand miles later. I would prefer if I can get it 100% right before I take it for such a long trip.
HDdave wrote
I mean ideally the goal is put it back together, and not have to tear it back apart. I also realize that is not a super realistic thought. I think I will just go ahead and put the caps on. I trust myself timing the car- it sure looks a hell of a lot easier than my e46 was, and its still running great several thousand miles later. I would prefer if I can get it 100% right before I take it for such a long trip.
yeah its not bad timing the car, you just gotta make sure your timing tool sits perfectly flat at TDC, just follow TIS basically.. but, i've seen some bad timing tools that were off a bit.

But if you're just doing the vanos covers, you just need the tool to lock down the timing.
Yeah I started the process following TIS exactly (idk why but took me quite a few times of reading through it to fully understand the "why am i doing it this way" behind the process.

What I find very interesting from that- TIS says you need to rotate each camshaft inwards towards eachother with an open end wrench, to allow the timing tools to fit. Well I didnt have to move anything at TDC for the intake cam on bank 1, exhaust cam I had to rotate to get everything flush.

Then I noticed when reading the procedure, you use both tdc and 10* while timing. So (and again this is my limited knowledge- just guessing from a common sense standpoint)- I kinda think someone tried to re-time this car for whatever reason, and didnt follow the instructions exactly.. Because the 10* mark makes sense when considering its a variable camshaft, so you need both marks on the crank- tighten both bolts at the exact right timing- THEN when you release the tools- the cams go to their pre (vtech just kicked in yo) positions, and are from there actuated based on oil pressure...? If I am wrong please someone correct me.. I honestly bought a cheap, broken one of these on purpose because i think rebuilding shit satisfys my mild undiagnosed 'tism haha.. So its important for me to understand the "why" of the situation more so than just follow these instrucions because youre supposed to...

lmk yalls thoughts
Okay, so for an update- I went ahead and followed this TIS. file:///C:/Users/davel/Downloads/AdjustingCamshaftTimingS65.pdf Did everything exactly step by step, but I think something is still wrong. I can rotate the engine (clockwise if youre in front looking at it)- the timing tools will sit perfectly flush on bank 2. Bank 1- at TDC I have like 1/4 inch on the inside bolt of the timing tool.. If I switch the crank to 10 degrees, its not even right then, the two smaller 10mm bolts lift about 1/8" off.

So am i doing this wrong? I did the entire Besian vanos upgrades myself on my e46. Granted this was 8 years ago... so my memory is blurry. But I remember for a fact having an issue getting timing right. Came down to me having to rotate the crank a few times clockwise before torquing everything down..

Is the correct process to rotate the crank, then the cam tools sit flush at TDC? One thing i have found is that with the e46- literally everything you can do to that car (including the smg- 6 speed conversion which i did myself) has a very detailed youtube video. I cannot personally find any videos of timing this engine correctly. I plan to make one- once I get this figured out. I have already ordered new main bolts bc i know they are tty.. So as understand, you pretty much have one shot to get it right. My plan is to try again multiple times with the current bolts- till I get it right , then i will install the new ones. If I am doing something wrong please let me know.
HDdave wrote
Okay, so for an update- I went ahead and followed this TIS. file:///C:/Users/davel/Downloads/AdjustingCamshaftTimingS65.pdf Did everything exactly step by step, but I think something is still wrong. I can rotate the engine (clockwise if youre in front looking at it)- the timing tools will sit perfectly flush on bank 2. Bank 1- at TDC I have like 1/4 inch on the inside bolt of the timing tool.. If I switch the crank to 10 degrees, its not even right then, the two smaller 10mm bolts lift about 1/8" off.

So am i doing this wrong? I did the entire Besian vanos upgrades myself on my e46. Granted this was 8 years ago... so my memory is blurry. But I remember for a fact having an issue getting timing right. Came down to me having to rotate the crank a few times clockwise before torquing everything down..

Is the correct process to rotate the crank, then the cam tools sit flush at TDC? One thing i have found is that with the e46- literally everything you can do to that car (including the smg- 6 speed conversion which i did myself) has a very detailed youtube video. I cannot personally find any videos of timing this engine correctly. I plan to make one- once I get this figured out. I have already ordered new main bolts bc i know they are tty.. So as understand, you pretty much have one shot to get it right. My plan is to try again multiple times with the current bolts- till I get it right , then i will install the new ones. If I am doing something wrong please let me know.
You might find a good visual guide with M359 restorations s65 project. since he tore his entire engine apart and put back together.
Thanks for the pointer there- I am a visual learner big time. I still might do a video specific to timing, but he does a great job explaining it (and of rebuilding that whole motor I mean damn thats impressive- I can do that to an LS maybe idk about an s65).

Seems to me like I was incorrectly checking the timing, as I have got it dead nuts perfect on bank two, but bank 1 must be checked with the markings on the camshafts pointing DOWN... That was what I missed. At least I think.. I will dive into that once I get back to the house later
It is poorly explained in TIS that bank one timing is checked after bank two, at overlap. NOT TDC. Pretty unusual but it is what it is.
Yeah, I was trying to check bank 1 at TDC as well.

I have a feeling I am going to go home and it will check out perfectly. At least thats the hope- because I followed the procedure exactly as TIS states. I do think I forgot to put the little clamp on the bank 2 exhaust adjuster.. Everything spins fine though so I am not sure if maybe I should just do the whole process again even if it is timed correctly. I'll upload a couple pics tonight.
Okay- so got home and checked timing and its dead on.

So pretty much ready to start putting everything back together now, I am just curious what yall think of my exhaust adjuster on bank 2? I forgot to attach the clamp to that one when I was re torquing it down- in my defense TIS never shows it on that side in the instructions..

Everything rotates just fine- honestly I think these splines were sightly off when I took it apart too. But I am not sure if you can tell from the pictures- bank 1 is absolutely perfectly in line and bank 2 is just slightly off. Again everything rotates just fine.. But my OCD is arguing with me now.. I did order 4 new bolts when I thought I had f'd up the timing, but I can return them... Would yall loosen this one, clamp those splines perfectly straight like bank 1, and run that same bolt back in? It has already been stretched once then final torqued... Or I could wait a few days and do that and install a new bolt. Or just put it all back together beecsuse its fine and im being crazy?
Attached imageAttached image
HDdave wrote
Okay- so got home and checked timing and its dead on.

So pretty much ready to start putting everything back together now, I am just curious what yall think of my exhaust adjuster on bank 2? I forgot to attach the clamp to that one when I was re torquing it down- in my defense TIS never shows it on that side in the instructions..

Everything rotates just fine- honestly I think these splines were sightly off when I took it apart too. But I am not sure if you can tell from the pictures- bank 1 is absolutely perfectly in line and bank 2 is just slightly off. Again everything rotates just fine.. But my OCD is arguing with me now.. I did order 4 new bolts when I thought I had f'd up the timing, but I can return them... Would yall loosen this one, clamp those splines perfectly straight like bank 1, and run that same bolt back in? It has already been stretched once then final torqued... Or I could wait a few days and do that and install a new bolt. Or just put it all back together beecsuse its fine and im being crazy?
There's an easy way to check if your anti-lash springs are appropriately tensioned- get an eyeball on the hole where you put the M5 screw to lock the two halves of the gear together. You should be able to see most of the threaded hole in the spring that lives in there.

There should be a LOT of spring force between the two halves of the gear.