

Thanks to edsonreds on this thread and everyone who has posted advice and videos for this challenging DIY.
Non-obvious advice I didn't learn from other posts:
1. If cost is not your number one priority then get AC system degassed at a shop first.
2. Video yourself OR take photos of every non obvious step AND bag all fasteners with respective parts together AND put labels on the electrical connectors so you won't have to rely on memory/fit.
3. The only wiring parts I broke were (2) white wiring harness clips. Order a few of these ahead of time (photo attached from ebay). It is also a good idea to get a roll of Tesa wiring harness tape for small repairs as you go.
4. The only dash clips I broke were these unusual spiral things attached to the cross member and the left knee foam protector 2 x (51457130934). They take a week to come to the USA from Germany.
5. There are two bolts that need to be accessed from the engine bay. One is from the evap/matrix box and it is (a torx) in the middle of the firewall/bulkhead about 12cm (4") down from the top. It is behind circular plug 11 on http://www.realoem.com/bmw/enUS/showparts?id=VA93-USA-03-2008-E90-BMW-M3&diagId=51_5865. The second is from the cross member behind the steering column and it comes out behind some brake lines to the right (from front of car) of the coolant and AC lines through the fire wall.
6. I recommend removing as much as you need to in the engine bay to make accessing coolant and AC lines easier (air filter, plenum, etc.). Buy hose removal pliers ($15 from harbor freight) https://www.harborfreight.com/3-piece-long-reach-hose-grip-pliers-37909.html?_br_psugg_q=hose+pliers
7. The engine bay work on this job is the most challenging part. The interior work is a memory test and a test of skill in not breaking clips/connectors.
8. Honorable mention to the 2 speaker connectors in the back center of the dash board. You need to set the dash in place then lift it and reach back in and up towards the windshield. A maneuver that almost put my back out.
9. If you do not have the phone option there will be two unused connectors on the center console wiring loom.
Good luck and enjoy not paying the $3300 I was quoted at a Bay Area dealer. That will pay for a lot of $1 clips!!
p.s. A few days later while adjusting my steering wheel back to straight ahead I broke the clock spiral. It is part of the control stalk assembly so it is very expensive. You can find it used by searching for bmw 698955702 to get the OEM part (part of the larger assembly). I paid $45 on Ebay.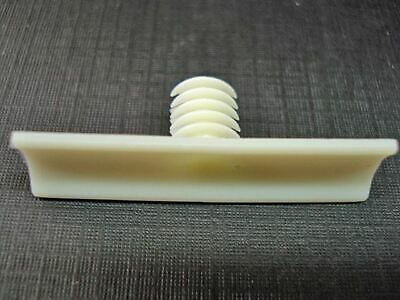
Non-obvious advice I didn't learn from other posts:
1. If cost is not your number one priority then get AC system degassed at a shop first.
2. Video yourself OR take photos of every non obvious step AND bag all fasteners with respective parts together AND put labels on the electrical connectors so you won't have to rely on memory/fit.
3. The only wiring parts I broke were (2) white wiring harness clips. Order a few of these ahead of time (photo attached from ebay). It is also a good idea to get a roll of Tesa wiring harness tape for small repairs as you go.
4. The only dash clips I broke were these unusual spiral things attached to the cross member and the left knee foam protector 2 x (51457130934). They take a week to come to the USA from Germany.
5. There are two bolts that need to be accessed from the engine bay. One is from the evap/matrix box and it is (a torx) in the middle of the firewall/bulkhead about 12cm (4") down from the top. It is behind circular plug 11 on http://www.realoem.com/bmw/enUS/showparts?id=VA93-USA-03-2008-E90-BMW-M3&diagId=51_5865. The second is from the cross member behind the steering column and it comes out behind some brake lines to the right (from front of car) of the coolant and AC lines through the fire wall.
6. I recommend removing as much as you need to in the engine bay to make accessing coolant and AC lines easier (air filter, plenum, etc.). Buy hose removal pliers ($15 from harbor freight) https://www.harborfreight.com/3-piece-long-reach-hose-grip-pliers-37909.html?_br_psugg_q=hose+pliers
7. The engine bay work on this job is the most challenging part. The interior work is a memory test and a test of skill in not breaking clips/connectors.
8. Honorable mention to the 2 speaker connectors in the back center of the dash board. You need to set the dash in place then lift it and reach back in and up towards the windshield. A maneuver that almost put my back out.
9. If you do not have the phone option there will be two unused connectors on the center console wiring loom.
Good luck and enjoy not paying the $3300 I was quoted at a Bay Area dealer. That will pay for a lot of $1 clips!!
p.s. A few days later while adjusting my steering wheel back to straight ahead I broke the clock spiral. It is part of the control stalk assembly so it is very expensive. You can find it used by searching for bmw 698955702 to get the OEM part (part of the larger assembly). I paid $45 on Ebay.

