

 |
|
 |

|
|
|
|

|
|||||||||
Post Reply |
|
|
Thread Tools | Search this Thread |
| 12-10-2014, 04:10 AM | #1 |
|
Private First Class
 35
Rep 139
Posts |
DIY: Rear differential and Subframe solid aluminum bushings
I wanted to give back to the community since i have received a lot of help
there were some DIYs out there for subframe bushings, but i wanted to do a full one where the whole subframe was removed. I am not a mechanic and so please correct anything if it is wrong, and please do this at your own discretion. This job wasn't all that hard, but i did this all by my self. First off my differential bolt broke off a while ago, and i noticed my bushing was also kind of ruined when that happened, but i opted out and just replaced the nut, not know that it would cause even more damage because i did not replace the bushing. 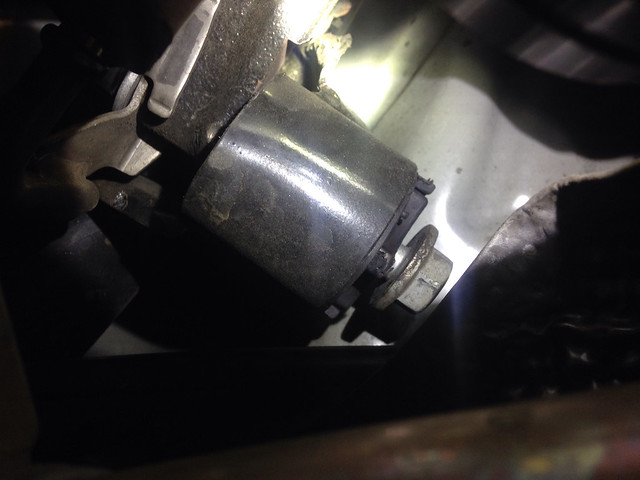  a month or two passed..... herd a clunk again... and what do you know... broken bolt again... and bent subframe 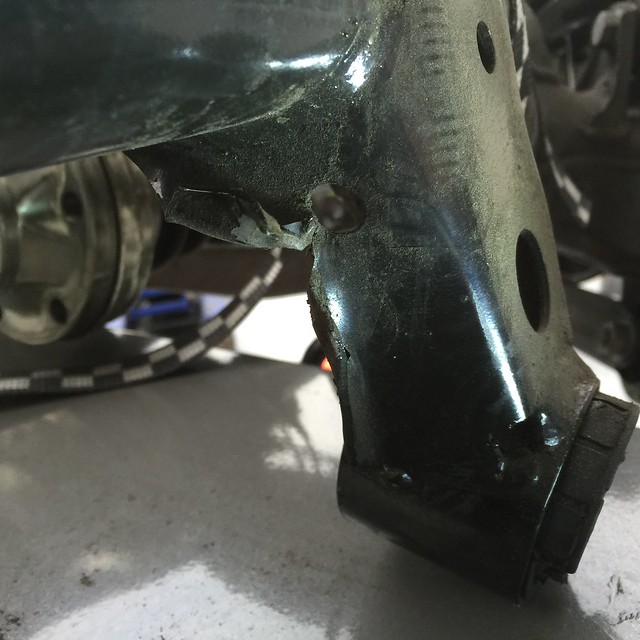 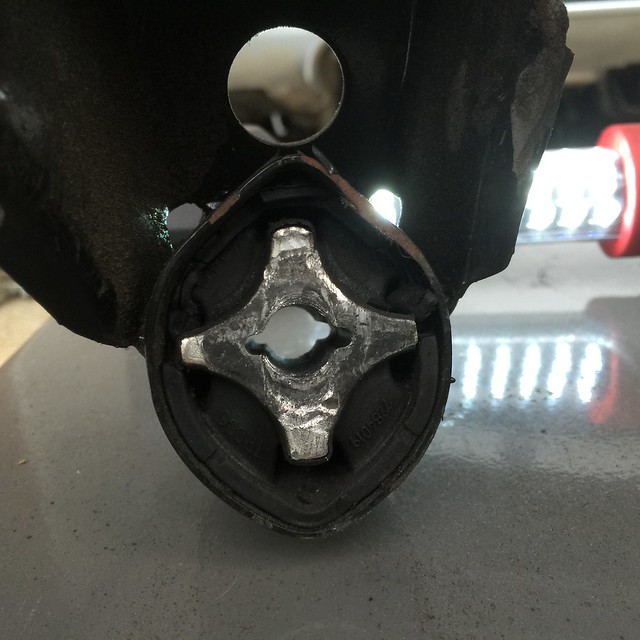 ended up buying an used subframe from eBay. was in pretty good condition, checked to make sure it matched up with my rear, and wasn't bent. fit perfectly. first i jacked up the car, and placed it on jackstands, also placed my rims under the car (extra precaution) removed the V brace, removed the exhaust started to remove the differential by starting with the E14 torx from the drive axles there are 6 on each side then the 6 E12 torx on the driveshaft to differential. I used Zipties top hold up the drive axles and drive shaft (DONT LET THEM HANG) the drive shaft is stuck onto the differential, there should be some dimples where u can use a flat head to pry the differential and drive shaft apart, also mark up the driveshaft and differential with markings, so you can install it back in the same position, same goes for the drive axles, i just made some marks using a paint pen. to drop the differential i used a lift table, the differential is REALLY HEAVY there are two front position bolts, and 1 rear position bolt, loosen then drop the differential. Subframe removal: disconnect the brake sensors, and rear height sensor, and speed sensor to get to those you need to remove the wheel well covers also you need to remove the E Brake, i did that by taking off the brakes, and rotors, and then removing the E brake and hard line. also the brake lines need to be removed. compress the brakes in the car, and leave them compressed as long as the brake lines are disconnected. i used a stick. 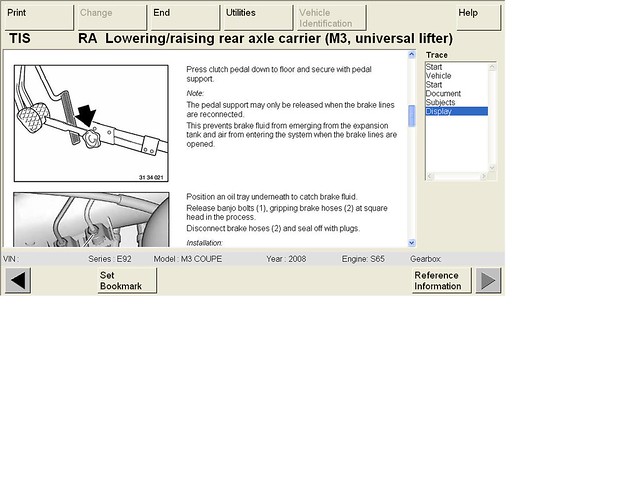 then remove the bolt from the bottom of the rear strut. then you are ready to drop the subframe. subframe is held on by four e18 torx? I'm going off memory. loosen all and drop the subframe slowly, i used a lift table to hold up the subframe 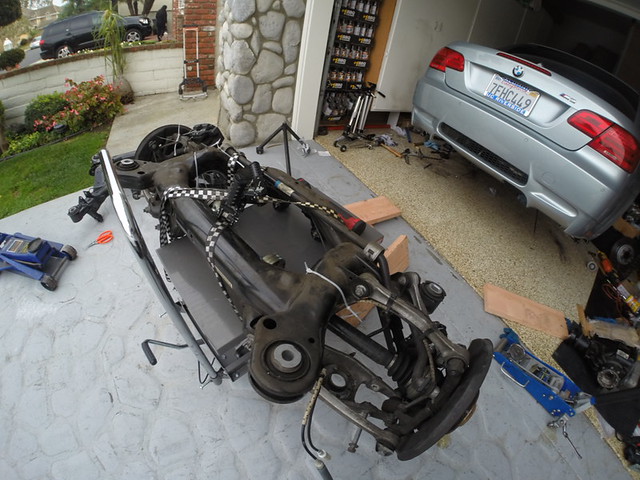 remove the bushings.... now this step is a PITA. but after you find some thing that works.... it becomes easy. i had to macgyver a few things. this tool could be found at harbor freight, rod bearing puller, i cut off the original nut it came with and bought the biggest bolt to fit. then i pulled them out using PB blaster and pulling it out, now this tool is a one time use thing... bends easily i fortified it after i noticed that it was bending 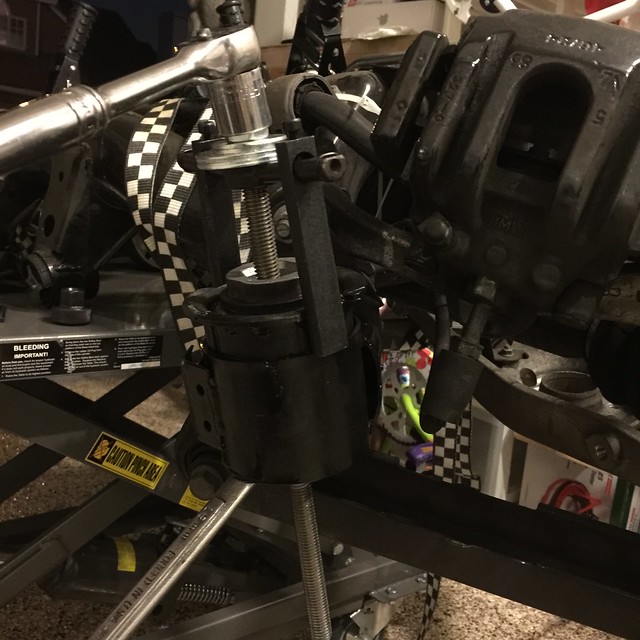  i used this method for the 4 subframe bushings and the rear differential bushing. for the front position differential bushings i used a 2 jaw puller; it pressed out the middle of the bushing, but left the metal part still stuck in, so i used an electric saw to cut the metal part then pried it out, but be careful with the electric saw, you don't want to start cutting into the frame. i did it very slowly and checked it every so often to the point where i could pry it out with a flat head. 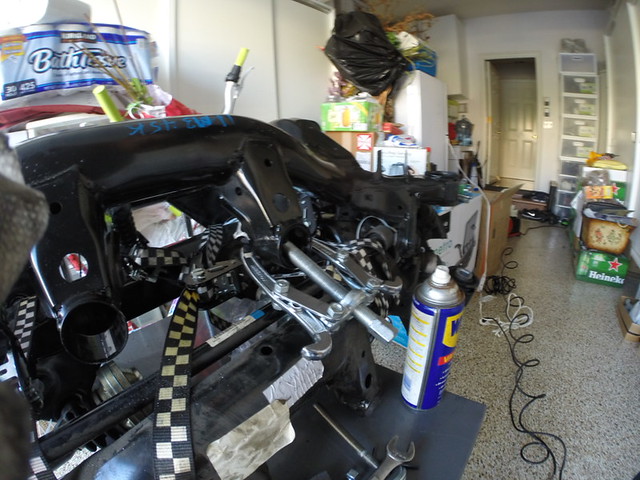 after all the bushings are pulled out i cleaned the while subframe and sprayed off with some high temp paint where some of the metals chipped off. to press the differential bushings in i used the screw press method basically used the same tool to take it out to put it back in: press the bushings with the lip side facing the bottom.  for the subframe bushings i started to use the screw pull method, but after getting it half way in it started to get difficult. it takes a lot of force to get these bushings in. so i tapped out and gave in and bought a 12 ton shop press. by the way if any one is interested I'm selling it for 80 dollars..... LOL i have a 12 ton shop press sitting in my garage taking up space  but if not you can buy this at harbor freight, makes life a lot easier. also use a little grease on the bushings, i used a minimal amount, because I'm not sure if you are supposed to use a lot of grease. but if not you can buy this at harbor freight, makes life a lot easier. also use a little grease on the bushings, i used a minimal amount, because I'm not sure if you are supposed to use a lot of grease. press the bushings in, also you need to allow a hole on the bottom of the press, since a part of the bushing goes past the frame housing. also make sure the bushing goes straight into the housing, you have to be extra careful so you don't warp your subframe. my bushings did not go in straight at first, but after a few adjustments they straightened out. what i mean by that is, while pressing the bushings, i checked every time i pressed it to try to adjust the where i placed more pressure on the bushing so it would go in straight. or taping the side that was higher with a hammer. another note is with the bigger subframe bushing i used 3 pieces of 1/4 inch steel plates as a spacer between the subframe because i saw that it flexed a little while it was getting pressed down. the space in the picture circled in red 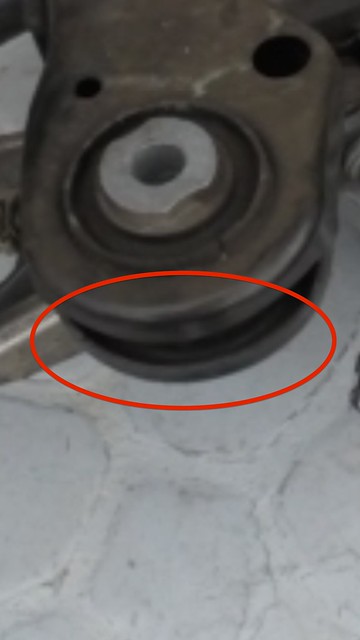 you can do all that to press in the bushings or send it out to a reputable shop to press them in for you, i was going to send it into an indy shop... but it was the weekend, and i wanted it done asap... so i just ended up getting a press. luckily it all came out fine and i didn't warp anything! woooo 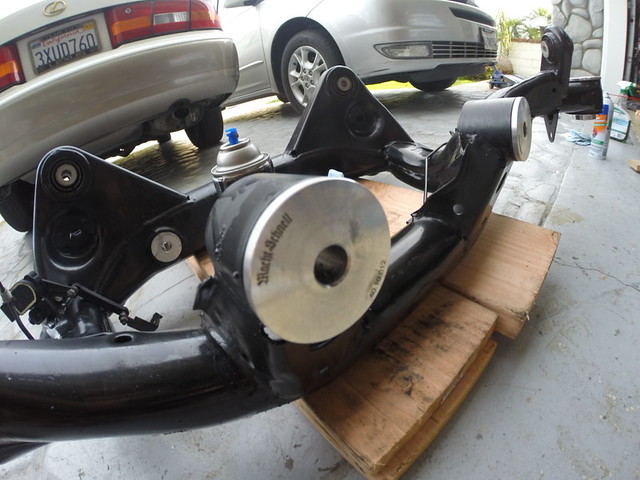 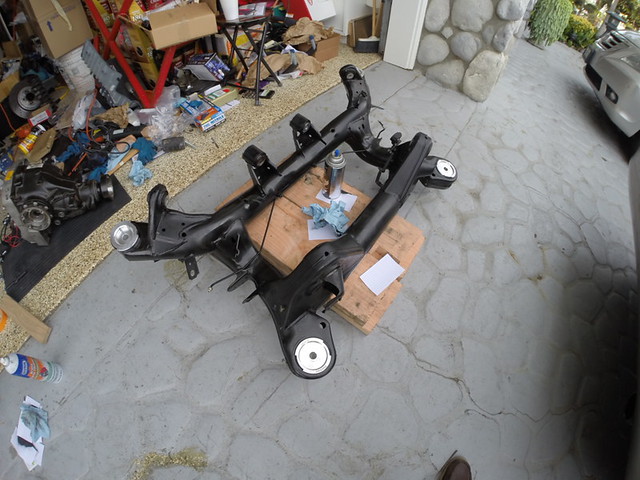 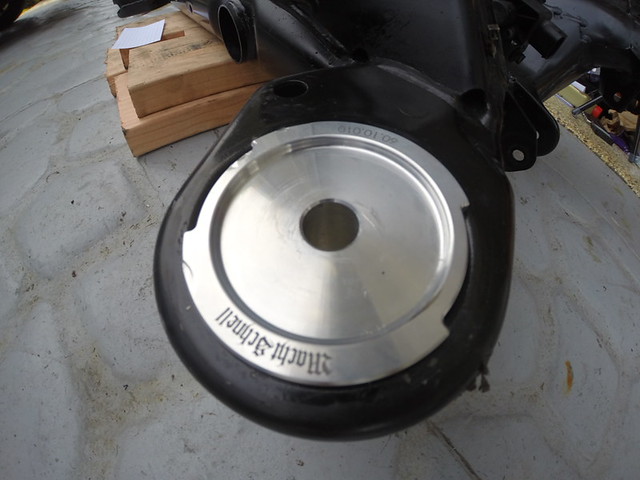 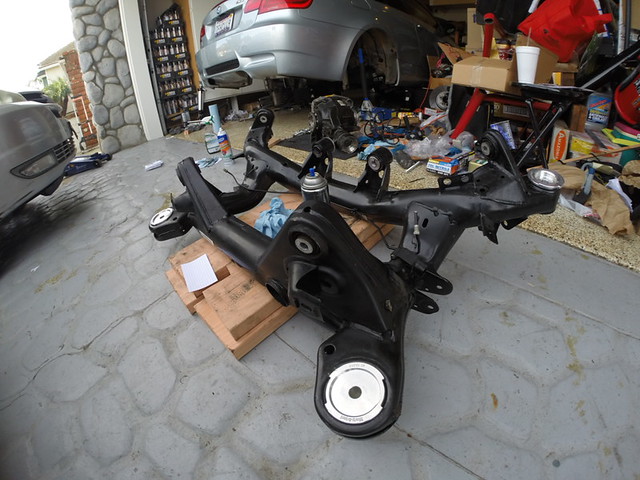 after pressing in the bushings every thing is the reverse pushing back in your subframe and raise it then bolt everything back up and get an alignment and bleed brakes also recommend replacing differential fluid since your differential is already out. torque values: Rear shock: 100nm Subframe: 100nm M12 Drain and fill: differential 60nm Differential front: 100nm M12 Differential rear: 165nm M14 Differential drive axle: e92 s65 M12 120nm* -M12 torx screw with ribs Brakes 65nm Drive shaft to differential : 20nm and 90 degree angel M10 ZNS3 Last edited by e46m3tony; 12-10-2014 at 04:24 AM.. |
|
Appreciate
9
|
| 12-10-2014, 11:22 AM | #3 |
|
Major General
 2768
Rep 5,483
Posts |
Seems like a great time to do the inner control arm bushings as well, what kind of shape were yours in? I don't even know if those are rubber on the M3 or if they're the hybrid monoball-type found in some other places in the M3's suspension so maybe they don't wear much
__________________
 |
|
Appreciate
0
|
| 12-10-2014, 04:40 PM | #4 | |
|
Private First Class
35
Rep 139
Posts |
Quote:
|
|
|
Appreciate
0
|
| 12-15-2014, 01:40 AM | #7 |
|
First Lieutenant
 23
Rep 386
Posts |
So you stacked (3) 1/4" thick metal spacers in between the two subframe halves to keep it from collapsing when pressing the new bushings in? Is it exactly a 3/4" gap, or should i get something a little larger like say 13/16" or 7/8" to fill the gap? I ask because I have been searching for what to use to fill the void but was unsure of the exact dimensions needed. Thanks in advance!
|
|
Appreciate
0
|
| 12-15-2014, 01:57 AM | #8 | |
|
Private First Class
35
Rep 139
Posts |
Quote:
I had 3 slabs of 1/4 inch thick metal I used for my bushing puller tool, so I ussed that. So yeh 3/4. There was still a little space available, but very minimal. Maybe 3/4 and shove a dime in there? |
|
|
Appreciate
0
|
| 12-15-2014, 02:42 AM | #9 | ||
|
First Lieutenant
23
Rep 386
Posts |
Quote:
|
||
|
Appreciate
0
|
| 12-15-2014, 05:08 PM | #10 | |
|
Private First Class
35
Rep 139
Posts |
Quote:
|
|
|
Appreciate
0
|
| 12-18-2014, 06:55 PM | #11 |
|
Private First Class

62
Rep 105
Posts |
So.....review of the bushings? How are they compared to OEM?
Have you replaced your diff/tranny/engine mounts as well?
__________________
2011 E92 M3 6MT MCB | ESS Tune | SS Catless Downpipes/No-Res X-Pipe/F1 Race Mufflers | Turner Solid Diff/SF Mounts | DSS Carbon DS | MS UDP/S2 Intake | BMS Cowl Filters | ST Trophy BBK | Apex Arc8 | UCP | VPH750 | IND Reflectors/Grills/Gills | LUX V3 Angel Eyes
|
|
Appreciate
0
|
| 12-18-2014, 06:58 PM | #12 | |
|
Private First Class
35
Rep 139
Posts |
Quote:
i will be doing a full review on them soon to be posted in the suspension and chassie section |
|
|
Appreciate
0
|
| 01-07-2016, 06:54 PM | #13 |
|
Major
 145
Rep 1,130
Posts |
Has anyone been able to replace the subframe bushings without completely removing the subframe? I have read some DIYs where they install the stock M3 bushings onto 1 series and they just angled the subframe and wedged in the tool. Is this possible on the M3?
|
|
Appreciate
0
|
| 01-31-2016, 09:04 AM | #15 |
|
Second Lieutenant

70
Rep 279
Posts |
I used a hydraulic press when I did mine. It was harder to press in the metal bushings than it was to press out the rubber ones. I don't think any non-hydraulic tool will be able to do the job considering the tight space to work with when the sub frame is in the car.
|
|
Appreciate
0
|
| 06-02-2016, 02:08 PM | #16 |
|
Captain

134
Rep 673
Posts
Drives: Adidas and Puma
Join Date: Sep 2010
Location: Kitsap County, WA
|
Just knocked this out this past weekend and figured I'd add some additional torque values for those who go my route or just need the torque values in general. My original subframe was damaged just like e46m3tony when one of my front diff bolts snapped. So I ended up buying a brand new subframe from ECS tuning and transferring the wheel carrier, it's associated arms and the stabilizer bar over to the new subframe. I have access to a tech manual, but for those who don't here are the torque specs.
Stabilizer bar to subframe = 21 NM Stabilizer bar to Stabilizer link = 58 NM Trailing arm to subframe = 100 NM Trailing arm to wheel carrier = 100 NM Guide arm to subframe = 100 NM Guide arm to wheel carrier = 100 NM + 90 degree turn Upper control arm to subframe = 100 NM Upper control arm to wheel carrier = 100 NM + 90 degree turn Toe arm to subframe = 100 NM Toe arm to wheel carrier = 100 NM Camber arm to subframe = 165 NM Camber arm to wheel carrier = 165 NM Compression strut (or V brace as tony calls it, either way it's the 2 black support bars that connect the front of your subframe to where your x-pipe is mounted) Compression strut to x-pipe mount = 24 NM Compression strut to chassis (2 E torx slightly forward of front subframe mounting point) = 47 NM + 90 degree turn Compression strut to subframe = 100 NM which is of course the same torque as the subframe, since the 2 pieces are joined together Another side note. Tony used a lift table when removing his subframe and diff, I used my transmission jack, works just as well, just ensure the chain is snug around whatever you're raising or lowering. Thanks to e46m3tony for starting the initial thread, and I hope this additional info helps those who need it.
__________________
Highway Star Garage / Ruined Luxury Auto
InstaGram: Ruinedluxury_vybz NA1 NSX - Storage 2nd Gen Taco - Daily |
| 08-10-2016, 10:59 PM | #17 |
|
Mvua
18
Rep 75
Posts |
The values for the driveshaft to differential is 20nm + 90 degrees. Wondering if this value is for the 6 torx bolts!??
__________________
08' E93 M3 6M/T | 12' F30 N20 6M/T SPORT | 08' E92 N52 6/MT (SOLD).
|
|
Appreciate
0
|
| 08-11-2016, 11:40 PM | #18 | |
|
Captain
134
Rep 673
Posts
Drives: Adidas and Puma
Join Date: Sep 2010
Location: Kitsap County, WA
|
Quote:
__________________
Highway Star Garage / Ruined Luxury Auto
InstaGram: Ruinedluxury_vybz NA1 NSX - Storage 2nd Gen Taco - Daily |
|
|
Appreciate
0
|
| 08-12-2016, 08:33 PM | #19 | |
|
Colonel
 1269
Rep 2,490
Posts |
Quote:
Any idea roughly what torque spec 20nm+90 degrees is? Strange that the diff to axle is 120nm then they give you a 20nm + 90 for a similar bolt (although it's M10). I just did this last night and eyeballed the angle since i didn't have an angle gauge handy.
__________________
2010 E92 M3 DCT
|
|
|
Appreciate
0
|
| 08-13-2016, 02:10 AM | #20 | |
|
Captain
134
Rep 673
Posts
Drives: Adidas and Puma
Join Date: Sep 2010
Location: Kitsap County, WA
|
Quote:
Torque to 20 nm (14.75 ft lbs). Then mark the bolt at any point, and rotate till that mark is now 90 degrees clockwise from where it was.
__________________
Highway Star Garage / Ruined Luxury Auto
InstaGram: Ruinedluxury_vybz NA1 NSX - Storage 2nd Gen Taco - Daily |
|
|
Appreciate
0
|
| 12-18-2016, 11:33 PM | #21 | |
|
Moderator
683
Rep 4,737
Posts |
Quote:
How many bolts/screws are there on EACH v brace? I'm confused about what realoem is telling me... Let me know if my below understanding is correct: Mounting v brace to area near x pipe bracket (item no. 05) -2x? -M8 or M12? -24 NM? (seems low for a big bolt) Mounting v brace to body (item no. 06) -2x? -47 NM + 90 degree -are they of different lengths? one is 35 mm and the other 25? TIA! |
|
|
Appreciate
0
|
| 12-30-2016, 12:24 PM | #22 |
|
Captain
134
Rep 673
Posts
Drives: Adidas and Puma
Join Date: Sep 2010
Location: Kitsap County, WA
|
I'm so sorry Rzm3, I didn't get a notification for your message and I just happened to find it this morning.
Bolt #5: There are (2) M8 x 35 hex head bolts for each brace. I just double checked the torque it is 24 NM. I don't see this bolt on your list though, which is odd. Bolt #6: There are (2) M10 x 35. Same length. There is no M10x25. Lastly you have the giant M12 that is the subframe bolt. It goes through both the v brace and the subframe. That's it though. NOT including the subframe bolt, there are only 4 bolts utilized. Once again, I apologize for not responding earlier, m3post didn't give me a notification for your message. You probably have your answer already, but if not, hope this helps!
__________________
Highway Star Garage / Ruined Luxury Auto
InstaGram: Ruinedluxury_vybz NA1 NSX - Storage 2nd Gen Taco - Daily |
|
Appreciate
0
|
Post Reply |
| Bookmarks |
|
|


