|
|
 |

|
|
|
| 06-10-2017, 12:33 PM | #683 |
|
Lieutenant
 
669
Rep 412
Posts |
If you are reading this thread and plan to do this work yourself in the near future, can you take a close up photo of the screw head for the screw that holds the throttle actuators in place? Looking for the "grade" markings. With that info, the torque value can be looked up and added to this thread. It most likely reads 8.8, 10.9 or 12.2 on the screw somewhere, just not sure which one. Thanks.
 |
|
Appreciate
0
|
| 06-19-2017, 02:49 PM | #684 |
|
Second Lieutenant
243
Rep 241
Posts |
So over the past few months I've started to get the dreaded limp mode that was triggered by a faulty bank 1 throttle actuator. Codes were pulled via my OBDII scanner so they were generic codes. Everything pointed to bank 1 being the culprit.
Bank 1 was replaced with a brand new TVA this weekend and the limp mode issue will now only occur with the car hot. It used to trigger limp mode all the time. Frustrated I had a local indy shop use their scanner to pull codes and I'm getting the following: CDC0 - Throttle-valve actuator CAN message, bank 2. 2B15 - Throttle-valve actuator, governor monitoring, bnak 1. Seems bank 2 is bad as well? I can wrap my head around that possiblity, the car has 180k miles on it now as my DD. BUT why is it still throwing codes for bank 1 which is brand spankin new? Tips or suggestions welcome. Thanks! |
|
Appreciate
0
|
| 06-20-2017, 03:50 PM | #685 | |
|
Lieutenant
669
Rep 412
Posts |
Quote:
EDIT: This suggestion is just to remove carbon buildup on the butterfly vslves/throttle body intakes only so they return to near new cleanliness. I can't find any recommendation from BMW to add lubricant to the throttle body linkages. Some users swear by it, but be warned some have reported additional problems after doing that.
__________________
Last edited by Theodore; 06-29-2017 at 05:47 PM.. Reason: Additional comment added |
|
|
Appreciate
0
|
| 06-26-2017, 01:19 AM | #686 | |
|
Registered
3
Rep 3
Posts |
Quote:
The comment on dirty / rough running linkage is a good one. I lubed mine and clearly noticed afterwards that they were running much smoother (also without the squeaking noise). Recommendations: (1) try manually if they run smoothly, lube them properly (2) swap actuators from left to right bank, see if the failure follows the actuator (3) i think you will generally a new actuator for bank 2 as well, so go buy a new one and do step (1) also |
|
|
Appreciate
0
|
| 06-28-2017, 09:50 AM | #687 | |
|
Lieutenant General
 7494
Rep 12,310
Posts |
Quote:
Once you've done this DIY once, it should be much quicker the next time around. For what it's worth, my second TVA failed at 88k miles (I saw no signs that it was replaced before warranty ran out on the car), so sometimes you can get lucky.
__________________
Current:
16 F82 M4 GTS, Black Sapphire/Black, DCT 08 E92 M3, Sparkling Graphite/Bamboo Beige, 6MT 07 E85 Z4M Roadster, Alpine White/Red, 6MT 99 E36 M3, Techno Violet/Dove Grey, 6MT |
|
|
Appreciate
0
|
| 06-29-2017, 02:29 PM | #688 |
|
Private First Class

52
Rep 151
Posts |
well it seems even after replacing the gears preventatively, my electronics have appeared to have gone bad. I haven't taken it apart yet but man i really thought I had the mechanical side of the actuator pretty well refreshed from my previous rebuilds.
Being the curious type and since now I am overly committed to fixing these actuators myself after replacing gears, bearings and rebuilding them about 3 times each.....I just ordered like 6 different ICs to replace on my circuit board in my code throwing actuator. I am going to inspect my linkages too... even though I have lubed them twice with 3M spray in the last year. I had a odometer gear crack after the last time I lubed them so I got a little shy on lubing them and it's probably been 6 months since now. I really haven't put that many miles on since. I let you guys now how it goes.... I was really hoping fresh gears would extend the actuator life 10-20k miles at least. I think it's only been 7k miles max since I changed the gears and I had to crack them open twice in that time. Once from that gear cracking after lubing linkages and once to change the bearings. I had sprayed the silicone on the actuator shaft during reassembly and it gummed up the bearings. I suppose it's possible the bearing is gummed up again. Apparently it's impossible to completely remove silicone from metal from what I read. I had cleaned it with isopropyl alcohol as best I could. |
|
Appreciate
1
W///7494.00 |
| 07-01-2017, 03:53 AM | #689 | |
|
Private First Class
40
Rep 117
Posts |
Quote:
|
|
|
Appreciate
0
|
| 07-04-2017, 10:57 AM | #691 | |
|
Private First Class
45
Rep 111
Posts |
Quote:
__________________
Current:
///More Ms than friends at this point in my life and I am ok with it. Currently own all 7 gens of the ///M3 = life complete |
|
|
Appreciate
0
|
| 07-05-2017, 09:05 AM | #692 |
|
New Member
4
Rep 21
Posts |
great DIY, just replaced bank 2 actuator due to failure which put the car into limp mode. was thinking to replace both but since this only took me 2 hrs to do i didnt see the point. i picked up an actuator from BMW for 722$ with tax. would have been cheaper online (~600$) but i would have to wait on shipping. since this is my DD i was ok with picking up the part which they had in stock and replacing it same day. i might just order the second one online to have on hand, since i plan to keep this car forever.
|
|
Appreciate
1
W///7494.00 |
| 07-07-2017, 07:25 AM | #693 | |||
|
Lieutenant General
7494
Rep 12,310
Posts |
Quote:
Quote:
If you guys have any questions in the meantime, feel free to PM and I'll answer them if I can Quote:
__________________
Current:
16 F82 M4 GTS, Black Sapphire/Black, DCT 08 E92 M3, Sparkling Graphite/Bamboo Beige, 6MT 07 E85 Z4M Roadster, Alpine White/Red, 6MT 99 E36 M3, Techno Violet/Dove Grey, 6MT |
|||
|
Appreciate
1
ares05x6.00 |
| 07-09-2017, 03:10 AM | #694 | |
|
Major General


2659
Rep 6,290
Posts |
Quote:
Last edited by TheMidnightNarwhal; 07-09-2017 at 12:09 PM.. |
|
|
Appreciate
0
|
| 07-10-2017, 06:59 PM | #695 | |
|
Private
 
24
Rep 94
Posts |
Quote:
 |
|
|
Appreciate
0
|
| 07-10-2017, 08:01 PM | #696 |
|
Private First Class
40
Rep 117
Posts |
I had replaced my gears about 5k miles ago and decided to open them up again:
  They still look good. I see little to no wear at all. Last edited by ohhgourami; 07-11-2017 at 07:30 PM.. |
|
Appreciate
0
|
| 07-11-2017, 05:24 PM | #697 | |
|
Private First Class
52
Rep 151
Posts |
Quote:
I am still getting TA codes occasionally and going into limp mode but I noticed that I don't seem get the limp mode as much if I make sure to go WOT at least once every drive (assuming i didn't get limp mode that particular drive)....another excuse to haul ass haha I was wondering if maybe the WOT helps dirt and grime from building up somewhat in the linkages...who knows |
|
|
Appreciate
0
|
| 07-11-2017, 07:32 PM | #698 | |
|
Private First Class
40
Rep 117
Posts |
Quote:
Yeah, I've heard others saying that dirty linkages as possibly the root cause of the gear issues. I haven't found a good way to clean them without taking everything apart. I recorded the squeaky linkages: http://www.m3post.com/forums/showthread.php?t=1400383 |
|
|
Appreciate
0
|
| 07-11-2017, 07:55 PM | #699 | |
|
Lieutenant
155
Rep 561
Posts |
Quote:
|
|
|
Appreciate
0
|
| 07-11-2017, 08:43 PM | #701 | |
|
Private First Class
40
Rep 117
Posts |
Quote:
Definitely not willing to take everything apart as it seems like a ton of work. |
|
|
Appreciate
0
|
| 07-11-2017, 09:09 PM | #702 | |
|
Lieutenant
155
Rep 561
Posts |
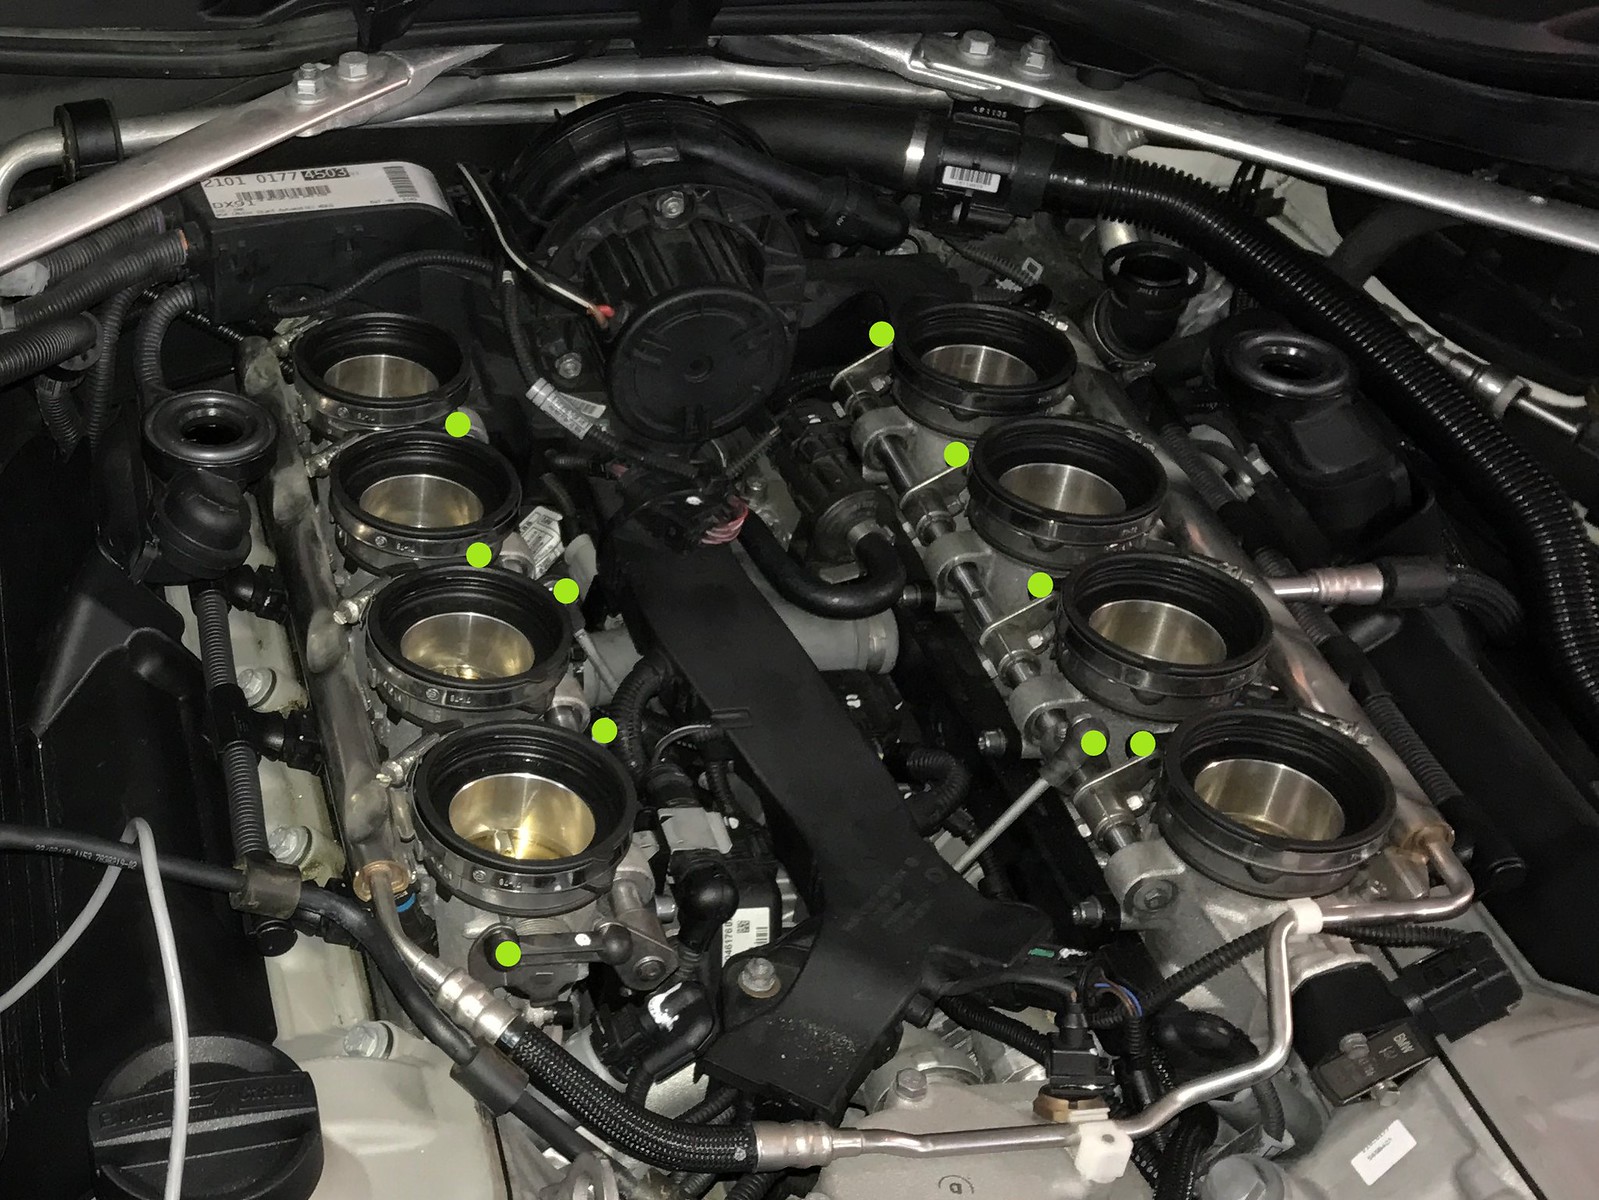
Quote:
There are two long rods and eight short ones (one and four on each bank); the long ones (#10 on the picture) connect the actuators to the shafts (#4) and the short ones (#9) each connects to an individual throttle body. Disconnect the rods where they connect the shafts/throttle bodies with one of those trim removal tools (gently, but no worries) and then the clean/lube procedure. Let me know how it goes or if you need additional info. 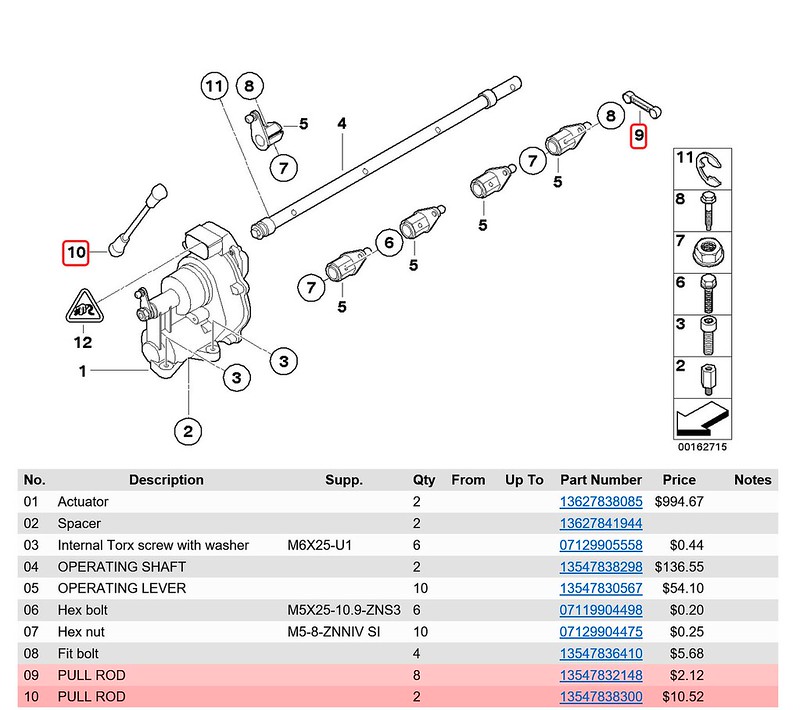 |
|
|
Appreciate
0
|
| 07-11-2017, 09:16 PM | #703 |
|
Lieutenant
155
Rep 561
Posts |
Forgot to mention (again): no need to disconnect the long rods at the actuator end and the short ones at the shaft if you don't want to. Leave the long ones connected to the actuators and the short ones connected to the shaft (remove these at the plates).
I am taking this info from memory and memory not always serves me well, so please forgive me if the steps are not exactly like this, but the end result is the same. |
|
Appreciate
0
|
Post Reply |
| Bookmarks |
|
|