

 |
|
 |

|
|
|
| 05-15-2011, 07:55 PM | #1 |
|
Lieutenant
 
98
Rep 525
Posts
Drives: '21 F95 X5 M C, '11.5 E92 M3 C
Join Date: Mar 2008
Location: NYC
|
DIY: Replace Front Kidney Grills on E92
Tools Required
Before you begin:
Step 1. Remove upper bumper Torx screws As illustrated below, there are four Torx screws on top that will need to be remove to gain access to the front kidney grills. 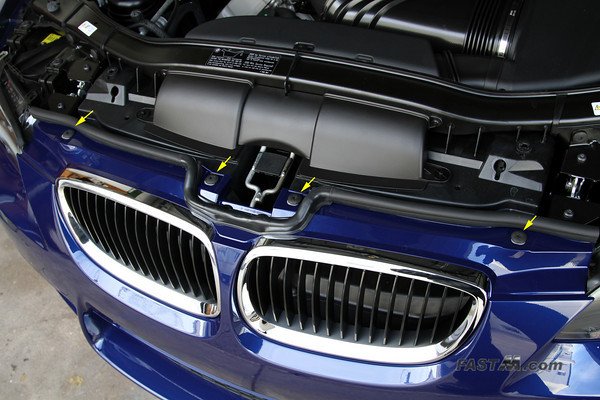 Step 2. Separate top of bumper Gently pull the top of the bumper forward to gain access to the back of the kidney grills. There should be enough flex to get your hands behind there. Feel around for the grill latches to familiarize yourself with their location. 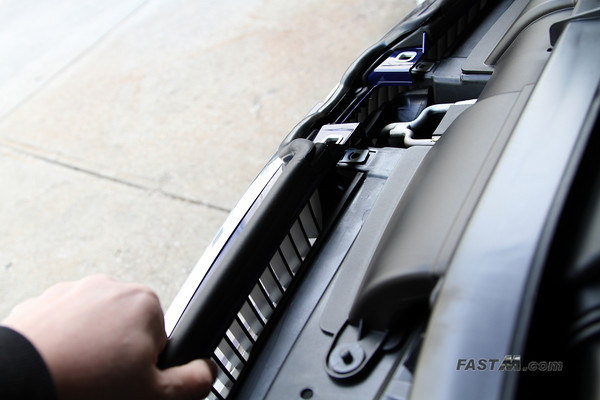 Step 3. Unlatch grill As illustrated below, there are a total of 6 latches. First use your fingers to see if you can unlatch it, if you can't you can use a body panel tool to unlatch the grill. The numbers on the illustration represents the end of the tool you should use. NOTE: Each latch has a small little tab that needs to be released. It can be difficult if you are using your fingers. A body panel tool or a flat head screwdriver should be used to make it easier to press the small tab in to unlatch the grill. 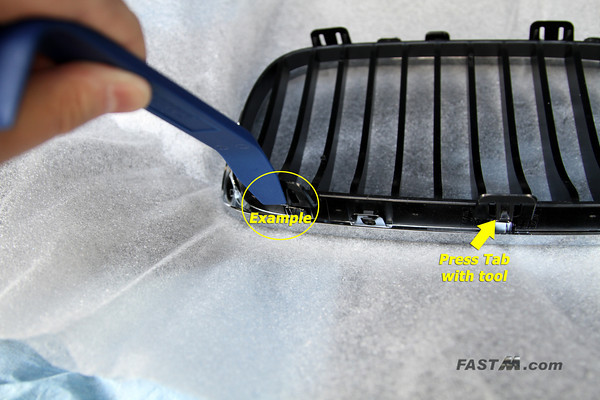 I found the bottom was easy to unlatch with fingers only. If you can't do it with your fingers, use a body panel tool similar to the one pictured or a flat head screw driver. To begin, I unlatched the bottom first while gently tugging on the grill outward. Then I unlatched the top using the tool to press the latch down. Lastly, I used the tool on the last outer latch (the latch closest to headlights). Once you get the first grill off you'll find doing the other grill much easy. 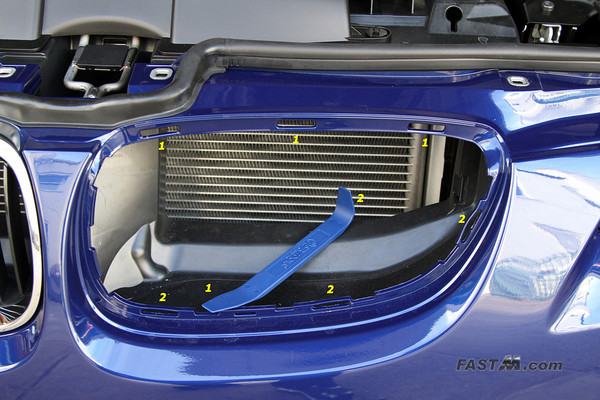 Step 4. Install new kidney grills and reinstall Torx screws This step couldn't be easier, simply push the new grills in till all the latches click in place. Reinstall the four Torx screws once you have verified the grill is secure. 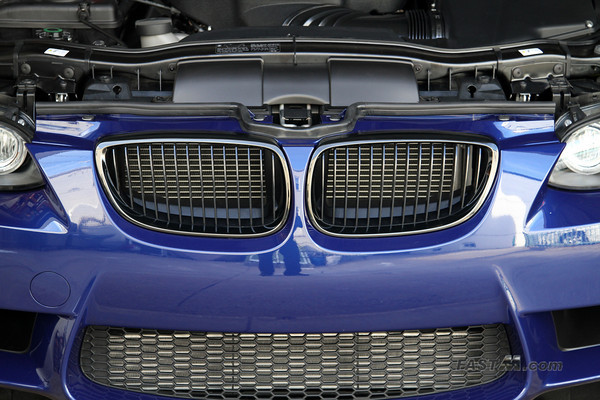 Step 5. Sit back and enjoy your new grills  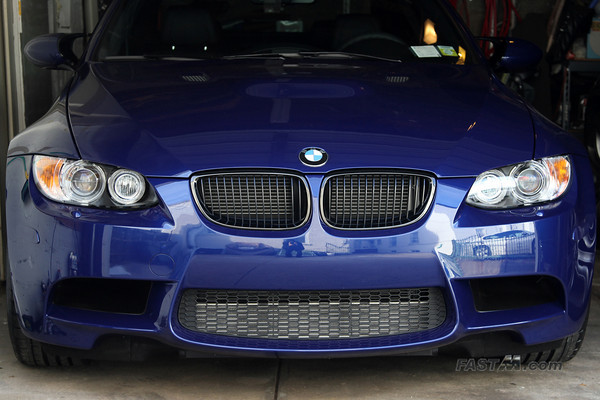 Disclaimer: Use this DIY at your own risk, I'm not responsible for any damage to your car.
__________________
 Drives: '11.5 Interlagos Blue E92 M3 Comp, '21 F95 X5 M Comp DIYs: Enable Rear Fog | Easy Side Gill Replacement | Front Grill Replacement |
| 05-25-2011, 09:44 AM | #3 | |
|
Lieutenant
98
Rep 525
Posts
Drives: '21 F95 X5 M C, '11.5 E92 M3 C
Join Date: Mar 2008
Location: NYC
|
Quote:
__________________
Drives: '11.5 Interlagos Blue E92 M3 Comp, '21 F95 X5 M Comp DIYs: Enable Rear Fog | Easy Side Gill Replacement | Front Grill Replacement |
|
|
Appreciate
0
|
| 09-15-2011, 06:31 PM | #5 |
|
40oz. to Freedom

12
Rep 92
Posts |
Thx for the DIY...just used it with no issues.
__________________
2013 e92 M3 6MT IB/BB - ZPP - ZCP - Dinan S1
2001 e46 325xiT 5MT - ZPP -ZSP - TiAg/Grey Leather 2003 e46 M3 SMG - LSB/BLK - Dedicated Track Car SOLD - 2008 e90 M3 6MT AW/FR - Dinan S1 |
|
Appreciate
0
|
| 12-15-2011, 10:53 AM | #7 |
|
Private
 6
Rep 87
Posts |
I did this mod yesterday. The clips by the headlights were pretty difficult for me to remove.
This is what I learned: 1.) I removed the air snorkel (4 Torx bolts) that leads from the kidney grill area to the intake tube. It takes 2 minutes to remove, and increases the area available to work by 500%. 2.) I think it's easiest to remove the clip closest to the headlight by removing the upper and lower clip nearest the headlight clip, and prying the grill out a bit, and then going after the headlight clip. This creates a little tension on the grill so that when you compress the headlight clip, it unseats due to the tension. YMMV. 3.) I found it helpful to have a flashlight and to use the flashlight to examine the headlight clip. Once I had the other 2 clips removed, I could get in there with a flathead screwdriver (I don't have panel tools) and put some leverage on the clip closest to the headlight. It took considerable force for me to get this particular clip undone. It was literally 10x harder to remove compared to the remaining clips, which are easy. 4.) Once I had both grills out, I had to use a moderate force to install the new grills, to make sure they were seated. It's easy to look behind the grill once it's attached to make sure all the clips are fully seated and properly installed. 5.) I installed an AFE ram air scoop system at the same time as doing this install. If you are thinking of installing air scoops of any brand, it makes sense to do this all at the same time. Overall I am happy with the mod. Getting both grills replaced and installing the scoops took me about 1.5 hours. I took a few breaks, but really struggled to crack the code on getting that first headlight clip removed.
__________________
Jason - Bend, OR
2011.5 E92 - Alpine White DCT ZCP Dinan: Exhaust, Intake, ECU, UD Pulley, Pedals; AFE: Air Scoops; |
|
Appreciate
0
|
| 03-31-2012, 02:53 PM | #8 |
|
Enlisted Member
 6
Rep 47
Posts |
Thanks for the excellent write-up. I was able to complete the install without much difficulty using a flat head screwdriver and an allen wrench (didnt have a torx bit).
|
|
Appreciate
0
|
| 04-10-2012, 03:29 PM | #10 | |
|
Lieutenant
98
Rep 525
Posts
Drives: '21 F95 X5 M C, '11.5 E92 M3 C
Join Date: Mar 2008
Location: NYC
|
Quote:

__________________
Drives: '11.5 Interlagos Blue E92 M3 Comp, '21 F95 X5 M Comp DIYs: Enable Rear Fog | Easy Side Gill Replacement | Front Grill Replacement |
|
|
Appreciate
0
|
| 05-04-2012, 10:42 AM | #12 |
|
Major General

4993
Rep 6,860
Posts |
Just replaced my grilles and this DIY was spot on. I must say though the tabs were VERY difficult to unlatch! My hands took a beating while doing this but I'm happy in the end.
|
|
Appreciate
0
|
| 06-07-2012, 09:30 PM | #14 |
|
Banned

314
Rep 8,496
Posts |
easy as pie, just did this with little drama. I used my fingers for the lower pins first, then use a flat head for the top 3. Finally, use the flat head for the one on the side.
|
|
Appreciate
0
|
| 07-10-2012, 04:48 PM | #15 |
|
Captain
13
Rep 682
Posts |
Thanks for this DIY!!! So helpful everyone. I did mine in less than 15mins, thank god...I was scared it might take a long time...but after reading this it was easy.
- I had a small pocket screw driver that fit the tabs almost perfectly. -the headlight clip was the only tough one. - I wore a headlamp which was very helpful for seeing back there behind the bumper.
__________________
|
|
Appreciate
0
|
| 02-07-2014, 04:06 AM | #16 |
|
Second Lieutenant
58
Rep 205
Posts
Drives: 2021 G80 Competition
Join Date: Feb 2013
Location: PERTH WESTERN AUSTRALIA
|
Thanks for the thread.
This sticky plus a you tube demo I found on google made this an easy job. 15 min job, smallish allen key worked fine. I tried to do this slowly and nicely with a small flat head for leverage but patience isn't one of my virtues and I used my bare hands and a bit of brute force to get it done quickly.
__________________
 2019 F87 M2 Competition 2021 G80 M3 Competition (sold) 2010 E90 M3 Competition (sold) 1995 E36 M3 (sold) |
|
Appreciate
0
|
| 12-11-2014, 02:15 PM | #19 |
|
First Lieutenant
50
Rep 357
Posts |
This looks a lot easier. Just did this with 15cm snow coming on to us. The tab closest to the headlight was nuts. Bruised my wrists struggling to pop that. Otherwise great write up and looks transformed.
|
|
Appreciate
0
|
| 12-26-2014, 04:00 PM | #20 |
|
Retired Curmudgeon
2985
Rep 4,047
Posts |
Thanks for the DIY write up (and the additions by jwarner). Worked great on my E90M3!
__________________
 '19 X3 M40 Carbon Black/Oyster, '23 Jeep Grand Cherokee L Summit, Past BMWs: '18 M550i, '18 330 GT, '16 X5 40e, '11 E90M3, '06 X5 4.4, '03 330i ZHP, '02 M3, '97 Z3 2.8, '95 M3 (2x), '94 530i (manual), '92 525i (manual), '88 M3, '87 325iS |
|
Appreciate
0
|
| 02-27-2016, 02:28 PM | #21 |
|
New Member
11
Rep 28
Posts |
The clip closest to the headlight was ridiculous. I was not able to get it with my fingers or with a screwdriver. I ended up having success by using a pair of needle nose pliers.
Unclip all of the other tabs. I found the bottom clips to be the easiest by reaching my hand down behind the grill and just using my fingers. Then I pushed out the top tabs, this required a flathead screwdriver. For the headlight clip, I reached my hand in with the pliers, clamped down on the tab, rotated the pliers, pushed out (away from the car), and with my other hand pulled the grill out from the outside. I wasn't able to take a picture of doing this, but this is what it would look like. 
__________________
'13 JZB E92 ZCP
 |
|
Appreciate
0
|
Post Reply |
| Bookmarks |
|
|


