

 |
|
 |

|
|
|
|
|
|||||||||
Post Reply |
|
|
Thread Tools | Search this Thread |
| 11-04-2019, 03:59 PM | #1 |
|
BimmerPost Supporting Vendor
9572
Rep 10,855
Posts  |
Future Classic - E9X M3 Reinforced Trailing Arm Set Install Guide
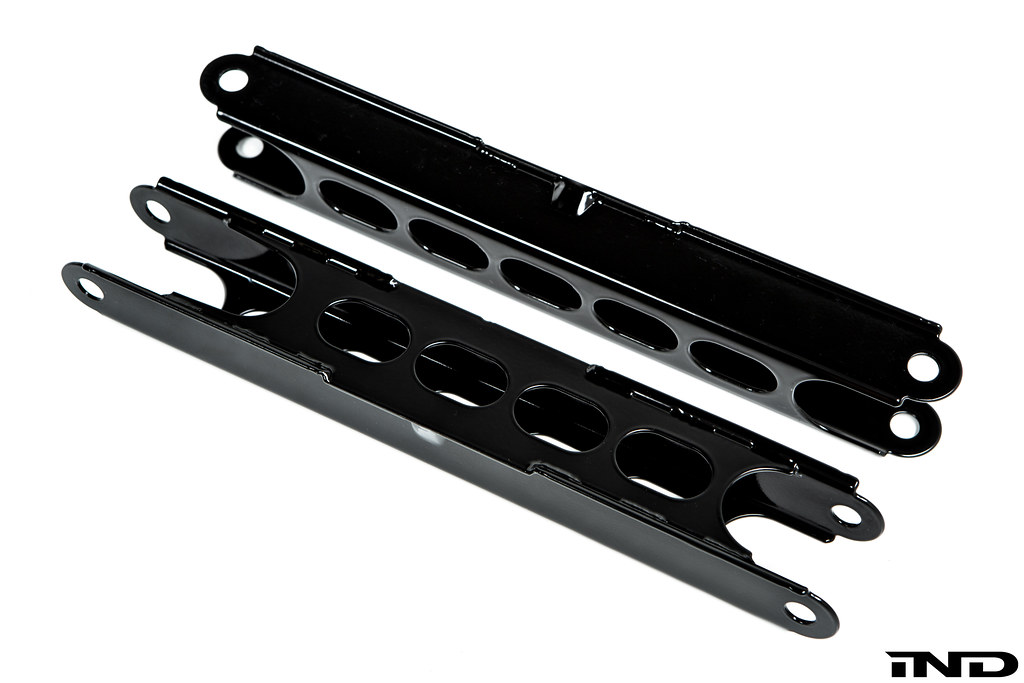 It has taken well past the E9X M3s production run to see some of the more innovative suspension solutions come to market. Amidst all of the components available for the platform today, there is one that has gone overlooked the longestthe stamped steel trailing arm. Over time, this arm has been known to fatigue and bend, especially under hard cornering or suspension compression. Consequently, the arm can buckle without warning which can be, at the very least, inconvenient or downright devastating. Future Classic's trailing arm set beefs up the OE arms by adding a dimpled, CNC machined steel reinforcement plate to the open end. By doing so, we effectively create a boxthis increases the rigidity of the trailing arm and thereby reduces unwanted flex. And, as an arm susceptible to bending, committing to steel further prevents deformation under weight, force, or heat versus any aluminum counterpart. Installing FCs replacement trailing arms couldnt be easier and would take a DIY garage enthusiast no more than 30 minutes to tackle. For Trailing Arms Only: Step 1: Raise the car safely using an automotive lift. Step 2: There are two 18mm bolts that hold the trailing arm into place on each side. Unbolt each and slide the trailing arm out. Step 3: Installation of the Future Classic trailing arms is the reverse of removal*. Seat each arm into place and install the two 18mm bolts into the replacement. Repeat this procedure for the other side. Torque to 100nm or 74 ft/lbs (no new alignment necessary). *NOTE: We implemented a deeper cutout on the inboard side of the trailing arm to ensure no subframe impact under load.  For those seeking a complete solution with improved suspension articulation, the Future Classic reinforced trailing arms can also be optioned with their sealed trailing link bearing set. These bearings are constructed with long-life operation in mind, ensuring trouble-free miles for years to come. For Trailing Arms + Bushing Set: Step 1: Raise the car safely using an automotive lift. Step 2: Remove brakes for easier access. Begin by removing the two hub bolts with a 6mm Allen. Follow by removing the caliper bolts (in this case using a 10mm Allen). Step 3: There are two 18mm bolts that hold the trailing arm into place on each side. Unbolt each and slide the trailing arm out. Step 4: Using a factory bushing removal tool, press each of the four OE trailing arm bushings out. Step 5: Apply Copaslip Copper Anti-Seize to the Future Classic trailing arm bushings and, using a factory bushing tool, press each of them into place**. **NOTE: During the installation procedure, ensure that each bushing is seated squarely prior to pressing them into place. Step 6: Installation of the Future Classic trailing arms is the reverse of removal*. Seat each arm into place and install the two 18mm bolts into the replacement. Repeat this procedure for the other side. Torque to 100nm or 74 ft/lbs *NOTE: We implemented a deeper cutout on the inboard side of the trailing arm to ensure no subframe impact under load. Step 7: Perform a new alignment.
__________________
Last edited by IND-Distribution; 11-04-2019 at 04:11 PM.. |
Post Reply |
| Bookmarks |
|
|


