

 |
|
 |

|
|
|
| 02-23-2018, 03:55 AM | #1 |
|
Lieutenant
 
669
Rep 412
Posts |
DIY: Fix Your Leaking Differential
Is your E9X M3 leaking oil from the rear differential? Most likely it is due to a failing axle or pinion seal. Here's how you fix it:
Assess What is Leaking: 1. At minimum you need to raise the rear of the car, lifting all 4 corners is best for this repair. 2. Identify where your differential is leaking and how many seals you need to replace. Leaking axle seal: Leaking pinion seal: Image borrowed from testdriver here. For Axle Seal Repair: Specialized tools you'll need: - E14 Torx socket (swivel version - better, impact swivel - best if you have an impact ratchet) - Something to remove the seal from the differential "ear" flange (seal driving kit - acceptable, piece of pipe slightly smaller in diameter than the seal - better, BMW specialty tools - best) - Something to re-install the seal into the differential "ear" flange (seal driving kit - acceptable, this particular oil filter - better, BMW specialty tools - best) - Something to remove and replace the retaining ring and the rubber o-ring seal (metal picks - better, BMW specialty tools - best). E9X M3 axle seals, BMW Part # 33107510289 (one for right side and one for the left side, identical, consider purchasing one extra than you need in case you damage one during install) 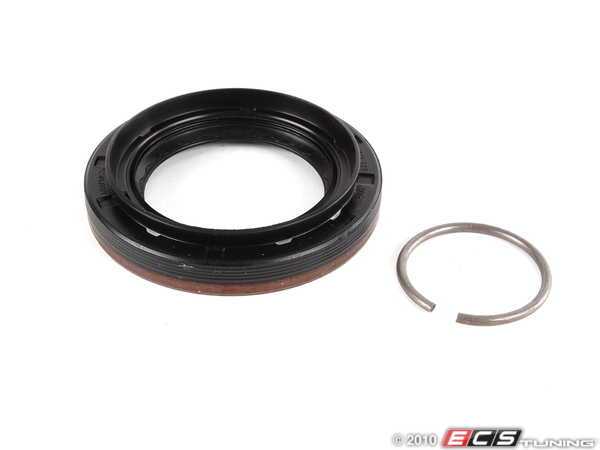 Image borrowed from here. E9X M3 differential o-rings, BMW Part # 33111214144 (one for right side and one for the left side, identical) 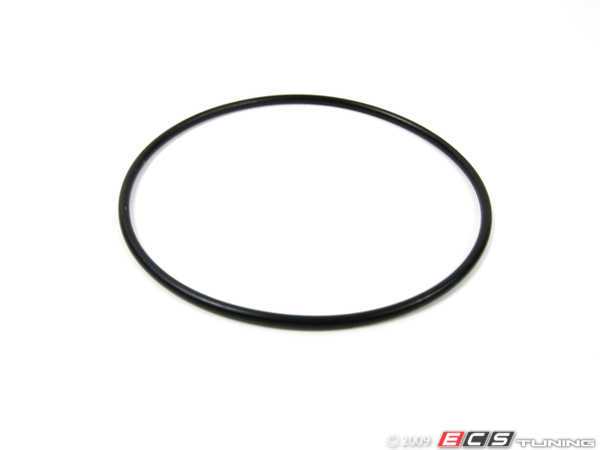 Image borrowed from here. A. Remove the rear section of the exhaust for axle seal only repairs (see the Axle-Back DIY Exhaust Removal from shiblanor). B. Hang your axles supported by something such as zip ties. C. Unbolt your axle(s) using a Torx E14 socket. D. Mark your axle flange and pop it off with 1 or 2 screwdrivers: E. You can easily remove the old seal by hammering the seal out with a piece of pipe the same size or carefully pull it out with a pair of pliers or seal removal tool. F. Use this oil filter socket (or something else of the same size) to drive in the new seal until it covers only half of the oil relief hole. Lubricate the sides of the axle seal with diff fluid. Use a metal pick to remove and replace the rubber ring seal around the outside of the ear. G. Pull the small retaining ring out of the differential and replace it with the new one that came in your axle seal kit by pre-installing it in the differential. H. Reinstall the axle ear (tighten bolts to 19NM), push in the output drive flange (with new retaining ring pre-installed inside the diff) and then re-attach the axle (tighten axle bolts to 120 NM). Great video from Lars Fuglsang that explains some of these concepts: For Pinion Seal Repair: Specialized tools you'll need: - E12 Torx socket (swivel version - better, impact swivel - best if you have an impact ratchet) - Something to remove the pinion seal from the differential (seal puller tool - better, BMW specialty tools - best). - Something to drive the new pinion seal back into the differential (Miller Pinion Seal Installer 8891 - better, BMW specialty tools - best) E9x M3 pinion seal, BMW Part # 33121213949 (one total, consider purchasing one extra in case you damage the first one during install). 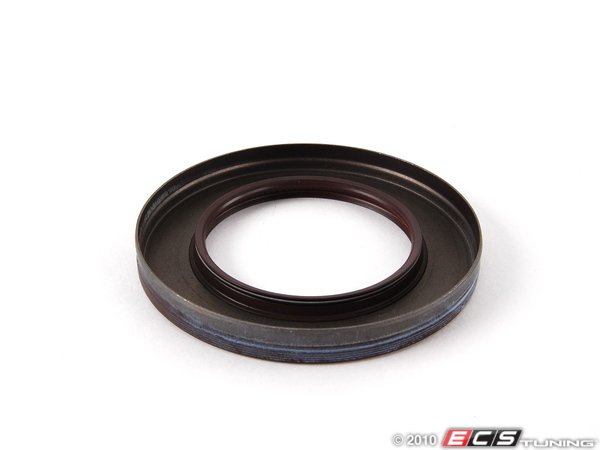 Image borrowed from here. E9X M3 pinion nut flange, BMW Part # 33121205138 (one total) a. Remove the mid-section of the exhaust as well if you need to replace the pinion seal (see the Fabspeed X-Pipe DIY Install from jo8M3) b. Remove the heat shield closest to the differential. c. Remove the 6 drive shaft bolts. A torx E12 socket will be needed. Mark the position of any colored (weighted) bolts to return them to the same position. If you are following BMW's recommendation to replace all of these bolts, be prepared (or prepare in advance) to have any needed specialty (green or black) bolts on hand. d. Mark the position of the pinion nut with a line, remove the flimsy pinion nut retainer and count how many thread rotations is it to the return the pinion nut to its original position (not shown). Also draw the same line on your socket (32mm). e. Use puller (this cheap one works fine for this job) to remove driveshaft flange. f. Remove the leaking pinion seal with a seal puller tool. g. Use a seal driving tool to hammer in the new pinion seal flush with the lip oft the differential (the Miller Pinion Seal Installer 8891 is widely available on Ebay, sells for cheap and offers great fitment for the E9X M3 diff). Coat the sides of the seal with diff oil. h. Admire the new pinon seal, coat the face of the drive flange with oil and reinstall everything in reverse order. Top off the differential with oil (you'll lose just a little during this fix). The online TIS offers up two competing torque specs for driveshaft to differential bolts (ZNS M10 with ribs), which to appear to both offer a final torque value very similar to one another, either: 20 NM + 90 degrees additional turn or 40 NM + 45 degrees additional turn
__________________
Last edited by Theodore; 02-24-2018 at 02:55 AM.. |
| 02-23-2018, 06:07 AM | #2 |
|
///M Powered for Life
11477
Rep 10,328
Posts |
Very nice! Thank you for the DIY!
|
| 02-26-2019, 09:30 AM | #4 |
|
Captain
592
Rep 769
Posts |
Thanks for putting together this detailed DIY. Just finished this job and it took me about 1.5 hours, but I already had the diff disconnected and on the floor due to doing subframe work. The only thing I had trouble with was getting the metal cover/ring off that has all the bolts in. It was a bit stubborn, but working a screwdriver in around all the sides and using a rapid up and down motion after getting a little clearance ended up working nicely. Also I rolled the dice on this Amazon seal remover kit and it worked perfectly.
https://www.amazon.com/gp/product/B0...?ie=UTF8&psc=1 I used the 64mm to hammer it out, and used the 59mm to hammer it in. |
|
Appreciate
2
Theodore668.50 wfdeacon881105.00 |
| 03-18-2019, 11:22 PM | #5 |
|
Major
 502
Rep 1,055
Posts |
Recently completed a rear subframe bushing overhaul and discovered one of my axle seals had a slight leak after bringing down the diff. This guide was excellent, thanks a bunch! I expected working with the diff to be a pia but this is a very easy diy.
__________________
aFe Stage 2 Intake | BW Race X-Pipe | UUC Corsa Exhaust | Alpine MS Tune | Brembo GT
|
|
Appreciate
1
Theodore668.50 |
| 08-25-2019, 06:52 AM | #6 |
|
First Lieutenant
306
Rep 315
Posts |
Great writeup, thanks for sharing!
Planning on doing this myself next weekend for my pinion seal leak. Came across following on FCP euro: "Also, vehicles before 9/2009 use special alignments for balancing. A special washer is required to balance the assembly of the drive shaft when the CV joint is bolted to the input flange." Anyone know how is this part done?
__________________
2009 E90 M3, SSII/Black, 6spd
2005 ZCP M3, Silbergrau/Black, 6spd - SOLD  2003.5 M3, Silbergrau/Black, 6spd - SOLD |
|
Appreciate
1
Theodore668.50 |
| 08-25-2019, 09:27 AM | #7 | |
|
Lieutenant
669
Rep 412
Posts |
Quote:
|
|
|
Appreciate
1
Yugo305.50 |
| 08-26-2019, 04:59 PM | #8 |
|
Captain
922
Rep 933
Posts
Drives: E90 M3
Join Date: Mar 2019
Location: Tampa
|
How much differential fluid do you lose with the axle seal replacement?
|
|
Appreciate
0
|
| 08-26-2019, 11:47 PM | #9 | |
|
Major
502
Rep 1,055
Posts |
Depends. Keeping the diff level will keep it inside, tilt the diff and you will lose fluid while the half shafts and seals are removed.
I topped mine off a bit to replace any fluid I lost as a result of the leak. Quote:
|
|
| 01-16-2021, 04:58 AM | #10 |
|
Captain

881
Rep 787
Posts |
Hey guys
I'm planning on doing the pinion seal soon, when I'll do the aluminum subframe bushings. As the diff will be off the car, should be easier. By the way, I don't have the seal installer, could improvise with a wood block, but I'm afraid it doesn't fit so perfectly. As I'll use dry ice to shrink the aluminum sf bushing, can I do the same to the pinion seal, in order to avoid needing the seal installer? |
|
Appreciate
0
|
| 02-04-2021, 01:50 PM | #14 |
|
Captain
881
Rep 787
Posts |
That thing doesn't pass through. I feel like there are two separated parts that are united there, but shouldn't be.
Last edited by jvictormp; 02-05-2021 at 05:33 AM.. |
|
Appreciate
0
|
| 02-04-2021, 03:43 PM | #15 |
|
Captain
881
Rep 787
Posts |
Done.
So, I needed to disconnect tri-angle flange at the trans, and the CSB, in order to fold the drive shaft, and get the clearance to remove it from the diff. I don't know if every one had to do that and it was obvious, but for me it didn't look obvious. So if it's the case, OP should consider adding that information in the letter C of the procedure. |
|
Appreciate
0
|
| 02-04-2021, 05:04 PM | #16 |
|
Captain
881
Rep 787
Posts |
Pinion nut wouldn't go out, so I used the impact wrench. Easy!!
But I wasn't able to count the thread rotations. After removing the nut, I drove it back again and counted 9 easy rotations, and the 10th one would be the torque rotation. |
|
Appreciate
0
|
| 03-22-2021, 06:47 AM | #17 |
|
Captain
881
Rep 787
Posts |
Guys,
I installed all back, no problems. It's pending only the exhaust, because I had to travel on work, leaving the car home. I'm going home this week and before I install the exhaust, I'd like to ask: I didn't coat with oil the inner face nor the outer one (refer to the picture below). I just installed it the way it was. Will I have problem with that? The drive flange was oily, as I just cleaned it with a dry cloth. Did the same with the diff case. |
|
Appreciate
0
|
| 06-02-2021, 11:17 AM | #18 |
|
Captain

743
Rep 647
Posts |
Thank you to the OP for the DIY! I feel good about being able to tackle this on my own. As jvictormp mentioned I also had to disconnect the driveshaft from the guibo and the CSB in order to fold the driveshaft and remove it from the diff flange. 10 rotations on the pinion nut for me as well. Getting the last bit of the 10th rotation was honestly the most difficult part of the whole process. It would have been much easier to get the leverage needed with the car on a lift.
On a side note - if anyone wants a good deal on a new genuine pinion seal (33121213949) and dust cover (33137600693) let me know. I bought spares from FCP but I'm beyond the 90-day return window and didn't end up needing them. I also picked up the Miller 8891 seal installer if anyone needs to borrow it.
__________________
Le Mans Blue '09 BMW M3 Sedan - Current Polar Silver '04 Porsche GT3 - Gone Persian Blue '08 Lotus Exige S240 - Gone Space Gray/Imola '08 BMW M Coupe - Gone |
| 06-14-2021, 05:46 PM | #19 |
|
Lieutenant
83
Rep 468
Posts |
Two questions:
1/ So I need to replace my pinion seal. Any thoughts on doing the axle seals at the same time? I have a 2009 with 97k miles as a daily driver (lucky me!). I guess the jobs aren't actually related except for lifting the car...but kind of feels like I ought to go ahead and do both? 2/ My puller only has two arms...think that is good enough or will I struggle w/o the third arm? Last edited by MTM; 06-14-2021 at 05:54 PM.. |
|
Appreciate
0
|
| 06-15-2021, 09:57 AM | #20 |
|
Lieutenant
669
Rep 412
Posts |
1. The slippery slope of old BMW maintenance, might as well...
2. 2 jaw puller should work fine, it's not on there very tight. |
|
Appreciate
0
|
| 06-18-2021, 12:41 PM | #21 |
|
Captain
881
Rep 787
Posts |
I wouldn't touch a seal that is not leaking. It may last all the vehicle's life, who knows. And if you change it, some failure may happen during installation, and you'll have to re-do.
|
|
Appreciate
0
|
| 06-18-2021, 06:51 PM | #22 |
|
Lieutenant
83
Rep 468
Posts |
So I removed the drive shaft bolts, but can't get any axial movement on the drive shaft to get it away from the pinion flange. Is the only method to do so as described by jvictormp? I really don't want to mess with the drive shaft near the tranny but I guess I have no choice?
I should also add that the drive shaft is in a position such that one of the trip-flange bolts is exactly at 12 o'clock so no way to really access it. Thoughts? And for the axle seals....fyi....now that I am under the car I'm pretty sure they are also leaking....quite a bit of grease all over the area. Last edited by MTM; 06-18-2021 at 07:16 PM.. |
|
Appreciate
0
|
Post Reply |
| Bookmarks |
|
|


