|
|
 |

|
|
|
| 02-13-2021, 12:28 PM | #2355 | |
|
Colonel
 5355
Rep 2,806
Posts
Drives: '09 E90 M3 - IB
Join Date: Feb 2012
Location: 93 million miles from the Sun
|
Quote:
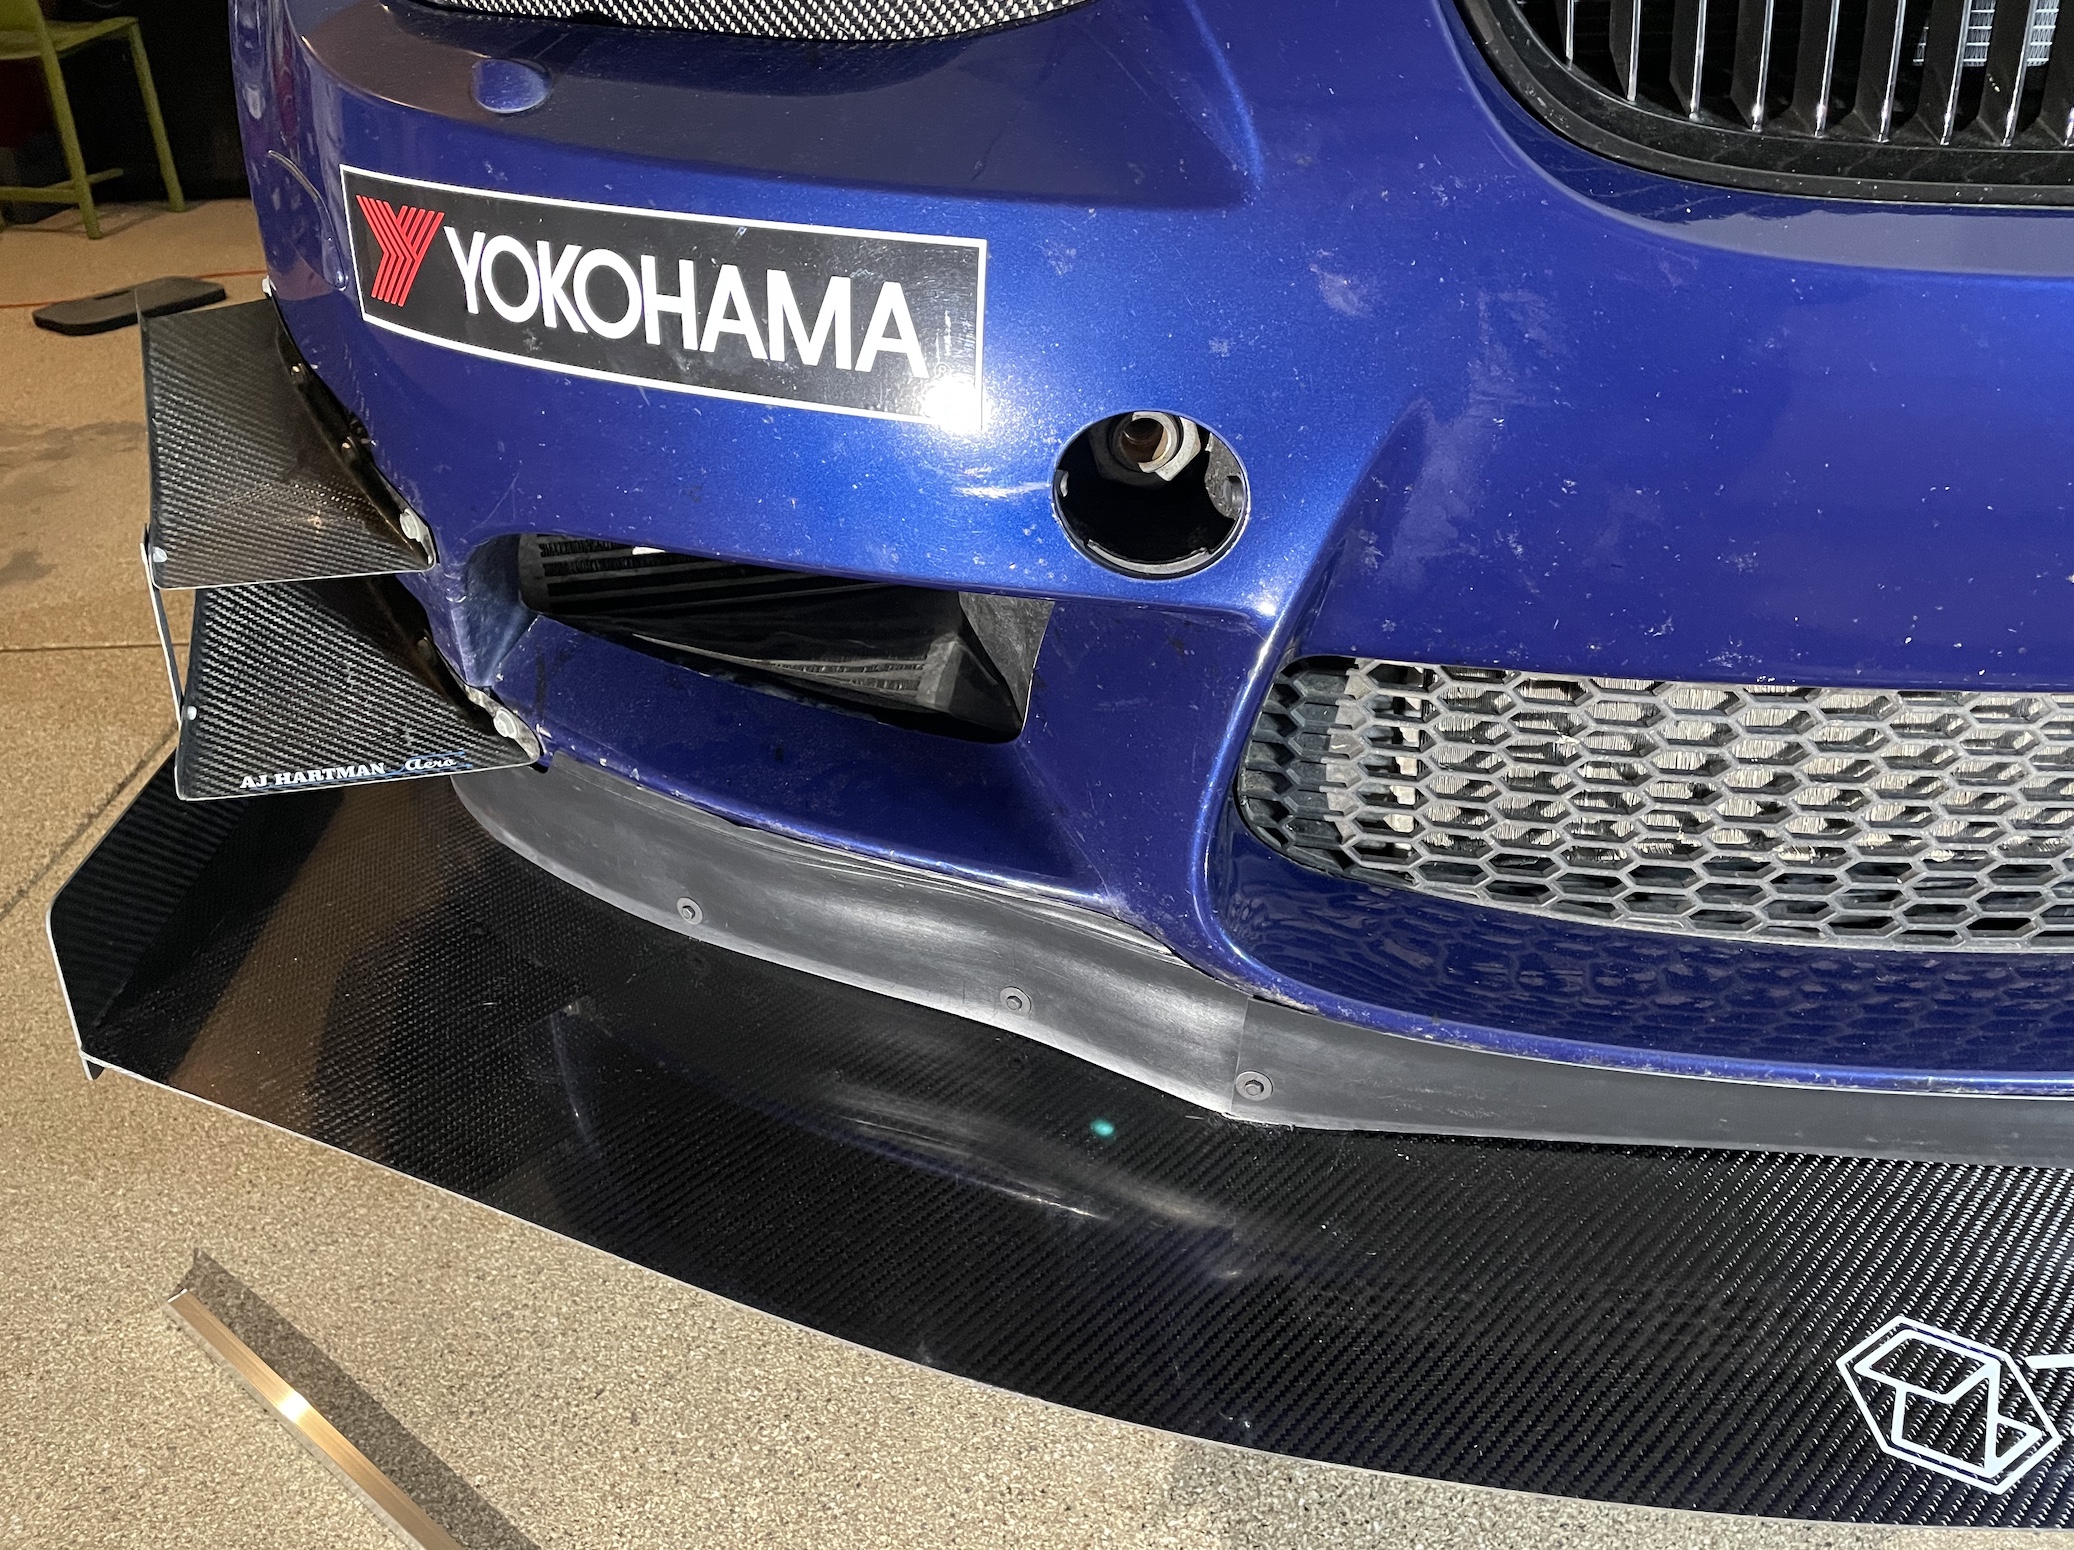
As DRLane said, the splitter comes off in about 5 minutes, but you do need to have some access underneath the car to get to the rear bolts. Either you jack up the front or if you have some race ramps, move the ramps away from the trailer and then run the car up onto them to get some room to access the rear bolts. You just need enough room to get your ratchet to the rear bolts. In thinking about it just a little bit more, I might recommend actually unscrewing the rear bolts first and having some kind of cloth/towel/blanket under it, gently lower it on the towel and let the rear sit on that. The front of the splitter can rotate to allow the rear to drop without issue because it's held by pins. Then remove the front pins last. You would not need to be under the car at all in that case for removal. My current plan is to leave the splitter on 100% of the time. On Tuesday, when we did the install, I wanted to leave the splitter on when I brought the car home. We only needed to add a small 1/2” of wood on top of the current ramp in a specific spot to be able to get the car in. After seeing that, I decided to buy new Race Ramps and leave the splitter on all the time. They should be delivered today. I went with Race Ramps RR-TR-7. From my measurements, I believe they will be enough. If not, then RR-TR-10 would definitely work, but the TR-10 is more expensive and it's a 4-piece set which I’d like to avoid dealing with if I can...I’d rather just deal with two ramps. I would love to experiment with the ramps today if they are delivered, but it's 0ºF out right now......I think I'll wait for a little bit better weather......My dog wanted to go outside this AM when it was -2ºF. I let him out-----he felt those temps and turned his ass around immediately and tapped on the door glass to come back in. He was like, "uhhhhh I'll just piss later......or maybe I'll just go down in the basement and piss on the carpet".....  I use Mac's Tie Down Straps with wheel straps. Strapping the car with the splitter was no problem. And the straps do go under the splitter. No ride height adjustment was needed on my car. FWIW, I’d say my front is pretty low. The old bumper mounted splitter was around 3.5” off the ground. The air dams took a little experimentation to get them to this result. This was the one part of the install that I got involved with. And I'm glad I did because now I'm 100% familiar with it. On the day of the splitter install, we tried taping the plastic air dam to the brackets. But the next day, the tape wasn’t holding. I think the temps here were too cold. I'm glad they didn't stick because it set me down the path of revisiting the topic. A couple days later, I took on the project in my garage and added one more bracket on each side so that the air dam would follow the bumper more closely and stay flush, and decided to go with screws on the air dam instead of tape. When I was working on this in my garage, it was 32°F in the garage. I had to tape the additional brackets to the splitter. The 3M tape was not sticking AT ALL. I brought out a heat gun and heated up the tape and, holy cow, it was sticking like super glue when it was warm. Ultimately, I wanted screws in the air dam because it will make removing the bumper easier without the air dams being taped and permanently in the way. It takes a bit of wrestling to get the bumper out from behind the air dam, and then a bit of wrestling to get it back in place if the air dams are there. Anyway, I like how it is now and am hopeful it will be able to take the punishment that is surely coming its way soon. I guess I should probably have some more air dam pieces waiting in case these get damaged. The material is inexpensive.
__________________
Last edited by dogbone; 02-13-2021 at 12:36 PM.. |
|
|
Appreciate
3
|
| 02-14-2021, 01:39 PM | #2356 | |
|
BimmerPost Supporting Vendor
4693
Rep 2,542
Posts  |
Quote:
Do you use the over the tire straps (or nets) going down to an idler and then out to the lock down point? Definitely sounds nice being able to leave everything on like that. My stuff is actually going to be pretty tame. The current car's splitter can only protrude 2" past the front of the bumper & have no vertical deviations. Can also only do a single element wing with a max chord length of 11" & the end plates cannot get real crazy either. The car where are starting on now will have some more freedom in design but will not go too wild with the wheel to wheel element still there. You are going to get to have all the fun with your crazy end plates & fences 
__________________
|
|
|
Appreciate
0
|
| 02-14-2021, 02:07 PM | #2357 | |
|
Private
 65
Rep 78
Posts |
Quote:
|
|
|
Appreciate
0
|
| 02-14-2021, 02:29 PM | #2358 | |
|
Colonel
5355
Rep 2,806
Posts
Drives: '09 E90 M3 - IB
Join Date: Feb 2012
Location: 93 million miles from the Sun
|
Quote:
For towing, I just toss a wheel strap through the spokes, and the tie down D-ring is in front of the car on the floor. My car is too low to efficiently get a strap or net over the tire. Yeah class rules suck....hehe Another tidbit I found out the other day during the install-the monstrous end plates that Chris has on his Zebulon rear wing are monstrous for a reason: the end plates can accommodate a dual element wing (which he is not running right now). Ryan was showing me the end plate for a single element wing and its noticeably smaller. He was saying that no normal production car could balance out a dual element wing-the downforce is massive. A car has to go to crazytown to be able to handle a dual element wing. Anyway, I havent done ANY homework yet on a Zebulon rear wing. Thats just going to have to be a topic for a later date. For now, I need to focus on getting up to speed with the new splitter, keep working on sorting the new suspension (I may drop rear spring rates one more time) and try to finalize tuning as much as possible before I go to COTA in 3 weeks. Cmon CO weather, WORK WITH ME!!!  |
|
| 02-14-2021, 02:47 PM | #2359 | |
|
Colonel
5355
Rep 2,806
Posts
Drives: '09 E90 M3 - IB
Join Date: Feb 2012
Location: 93 million miles from the Sun
|
Quote:
Do you have a picture of your final results? |
|
|
Appreciate
0
|
| 02-14-2021, 04:32 PM | #2360 | ||
|
BimmerPost Supporting Vendor
4693
Rep 2,542
Posts |
Quote:
Quote:
__________________
|
||
|
Appreciate
0
|
| 02-15-2021, 02:36 PM | #2362 |
|
Private

18
Rep 85
Posts |
dogbone, from what I can see, I gather there is no "exit" through the Zebulon splitter for the oil cooler to (the low pressure zone) under the car?
If that's right, did you pull that plastic shroud behind the oil cooler that directed the air downward and out and just let it hit the radiator behind? Though if there's enough clearance beneath to the splitter surface, I can see an argument for leaving it in place so the air goes into the engine bay or wheel wells (with venting lowering pressure in each case) vs finding that removing it causes an even bigger pressure increase behind the oil cooler because of the distance from the radiator and really decreases the pressure difference through the oil cooler. After taking it on track, would love to hear a report on how your oil temps compare after that change and whether oil still cools efficiently enough, with the hood vents relieving enough pressure in the engine bay to make up for it. Context: I'm preparing my own new splitter setup after my own RaceWerkz APR one met its demise and would like to leave the bottom sealed and see if hood venting makes up for it. Would love to cheat and start with someone else's data!
__________________
E90 ///M3 ('08) Racecar build | Fire Orange | 6MT | MCS 3W w/ rear coilover | Alcon BBK | Akrapovic Ti + BW Racing X-Pipe | do88 cooling | All the aero | Solid almost everything | CF Roof | TA16 and SM-10 wheels | AiM PDM32
|
|
Appreciate
0
|
| 02-15-2021, 04:04 PM | #2363 | |
|
Colonel
5355
Rep 2,806
Posts
Drives: '09 E90 M3 - IB
Join Date: Feb 2012
Location: 93 million miles from the Sun
|
Quote:
I went off track after Turn 3 last year sideways. Was unpleasant, so that section of track is already on my radar. But the rest of the Esses are not that high speed. I'm going to be a bit more optimistic. I'm trying to get to High Plains Raceway soon to get going on sorting out the feel. The weather will be a bit more agreeable soon.
__________________
|
|
|
Appreciate
0
|
| 02-15-2021, 04:18 PM | #2364 | |
|
First Lieutenant
 620
Rep 327
Posts |
Quote:
We'll see how it works on Gabe's car along with mine at COTA next month.. Hopefully it is warmer then in Texas than it is now!
__________________
Chris
|
|
|
Appreciate
0
|
| 02-15-2021, 04:19 PM | #2365 | |
|
Colonel
5355
Rep 2,806
Posts
Drives: '09 E90 M3 - IB
Join Date: Feb 2012
Location: 93 million miles from the Sun
|
Quote:
fsmtnbiker has been running the production prototype since October. He has claimed that his heat situation is not worse with the splitter on the car. Several people seem quite focused on the plastic directional shroud. When I was at Zebulon, we looked at the situation. There's at least an inch between the bottom of the shroud and the splitter surface. It is NOT sealed up or anything like that. We both looked at it and felt that the air could escape onto the splitter surface and not be impeded going backwards. I have left the shroud as-is for the time being. I won't have any super useful oil temp data for some time because here at 5000' altitude, the car seems to be heating up faster than at sea level already, so I don't have much data here in CO. And I've only run on very cool days so far. Also, I've been having AIM Solo CAN bus issues lately, so I don't have the data hooked up all the time. (I'm trying to sort that out now.) Anyway, I'm trying to get out to the track soon. The only thing holding me back is the weather. I'm willing to do semi-exclusive bookings to get onto the pavement sooner rather than later, but the track is literally covered in snow. I emailed the track yesterday and today they responded saying they would plow it and see how it looks later in the week.......Once I can finally get out there, I will report back.
__________________
|
|
|
Appreciate
0
|
| 02-15-2021, 04:20 PM | #2366 | |
|
Colonel
5355
Rep 2,806
Posts
Drives: '09 E90 M3 - IB
Join Date: Feb 2012
Location: 93 million miles from the Sun
|
Quote:
__________________
|
|
|
Appreciate
0
|
| 02-15-2021, 04:21 PM | #2367 | |
|
Private
65
Rep 78
Posts |
Quote:
|
|
|
Appreciate
1
dogbone5354.50 |
| 02-15-2021, 07:55 PM | #2368 |
|
Lieutenant General

11586
Rep 12,726
Posts |
well does the splitter go into the same location every time (plus or minus a few millimeters)? you could build an exit duct to seal the exit pretty easily and adhere it to the top of the splitter, and use the oem seals.
__________________
Instagram; @roastbeefmike
 |
|
Appreciate
0
|
| 02-15-2021, 08:16 PM | #2369 | |
|
Colonel
5355
Rep 2,806
Posts
Drives: '09 E90 M3 - IB
Join Date: Feb 2012
Location: 93 million miles from the Sun
|
Quote:
|
|
|
Appreciate
1
roastbeef11586.00 |
| 02-15-2021, 08:49 PM | #2370 |
|
Lieutenant General
11586
Rep 12,726
Posts |
Just make a bigger flexible seal. Like an accordion. I think I missed my calling. I would love to build race cars and just think/build all day.
__________________
Instagram; @roastbeefmike
|
|
Appreciate
0
|
| 02-15-2021, 09:01 PM | #2371 | |
|
Driver
2692
Rep 2,714
Posts |
Quote:
__________________
E90M 6MT Slicktop Single Humper in need of a diet
|
|
|
Appreciate
0
|
| 02-16-2021, 12:40 AM | #2372 | |
|
Colonel
2147
Rep 2,527
Posts
Drives: 2011 M3/Porsche 992 GT3RS
Join Date: Apr 2014
Location: Bay Area, CA
iTrader: (0)
Garage List 2024 Porsche 911 GT3RS [0.00]
2021 Porsche 718 Sp ... [0.00] 2021 Mazda Miata MX-5 [0.00] 2006 BMW M3 [0.00] 2011 BMW M3 [10.00] |
Quote:
 |
|
| 02-16-2021, 08:08 AM | #2373 | |
|
Colonel
5355
Rep 2,806
Posts
Drives: '09 E90 M3 - IB
Join Date: Feb 2012
Location: 93 million miles from the Sun
|
Quote:
 |
|
|
Appreciate
1
roastbeef11586.00 |
| 02-16-2021, 03:36 PM | #2374 |
|
Colonel
5355
Rep 2,806
Posts
Drives: '09 E90 M3 - IB
Join Date: Feb 2012
Location: 93 million miles from the Sun
|
Race Ramps update: I ordered RR-TR-7. Got the ramps and tried the setup today. The car can get in the trailer with just the ramps but the front rubs the edge of the door slightly. If I put the same 1x10 wood planks on top of the ramps like I was doing with the old setup, then it clears no problem. Im quite sure that the RR-TR-10 would work without any extra stuff needed, but it was a couple hundred bucks more and its a 4 piece setup. Of course, Im dealing 4 elements anyway with the two RR-TR-7 ramps and 2 wood pieces. No big deal Im used to it. And having some wood pieces around sometimes is useful.
So, with that, I plan on leaving the splitter on full time. |
| 02-17-2021, 08:42 PM | #2375 | |
|
Retired Curmudgeon
2985
Rep 4,047
Posts |
Quote:
__________________
 '19 X3 M40 Carbon Black/Oyster, '23 Jeep Grand Cherokee L Summit, Past BMWs: '18 M550i, '18 330 GT, '16 X5 40e, '11 E90M3, '06 X5 4.4, '03 330i ZHP, '02 M3, '97 Z3 2.8, '95 M3 (2x), '94 530i (manual), '92 525i (manual), '88 M3, '87 325iS |
|
|
Appreciate
1
roastbeef11586.00 |
| 02-18-2021, 07:33 PM | #2376 |
|
Colonel
5355
Rep 2,806
Posts
Drives: '09 E90 M3 - IB
Join Date: Feb 2012
Location: 93 million miles from the Sun
|
Let's file this one under: Gurney flaps-----why not!?
During the Zebulon splitter install, Ryan took a moment to check out the fender vents that had been cut. I always laugh them off as Viper ACR style-additions to the car. But he took them seriously and suggested that if I wanted to make them more effective, I should add a gurney flap to the leading edge of the hole. Basically, the gurney flap would create a bit of a vacuum behind it which would facilitate pulling more air out of the wheel well. This could be useful with the diffuser tunnels guiding more air into the wheel well. He gave me a couple suggestions on the shapes and sizes. I decided to try a 1" flap that sits back at an angle. Today, I cut the aluminum pieces out of 90º edging. I opened the angle out to around 125º. Painted them matte black and taped them to the car with 3M double sided tape. They're on there QUITE solidly. I was worried that I was taping them to the clear bra, but it's darn solid. I was considering riveting them but I decided I didn't want to drill more holes in the fender at the moment, and I was mildly concerned that the bottom parts of the rivets would stick down towards the tires. And I didn't want to rivet upwards and have to grind the rivet on the top side......I don't know. I taped it. Of course, this is a small change and I won't notice it while driving, but-----might as well do it given everything else going on with aero! Gives the fender holes a bit more purpose. I gotta tell ya, in the paddock those fender holes get so many comments----quite a lot of them critical....for whatever reason, they just offend people......hehe Perhaps now people will accept them a bit more as being useful? Who knows....anyway, it's done. Hopefully I'll have more to report on soon. 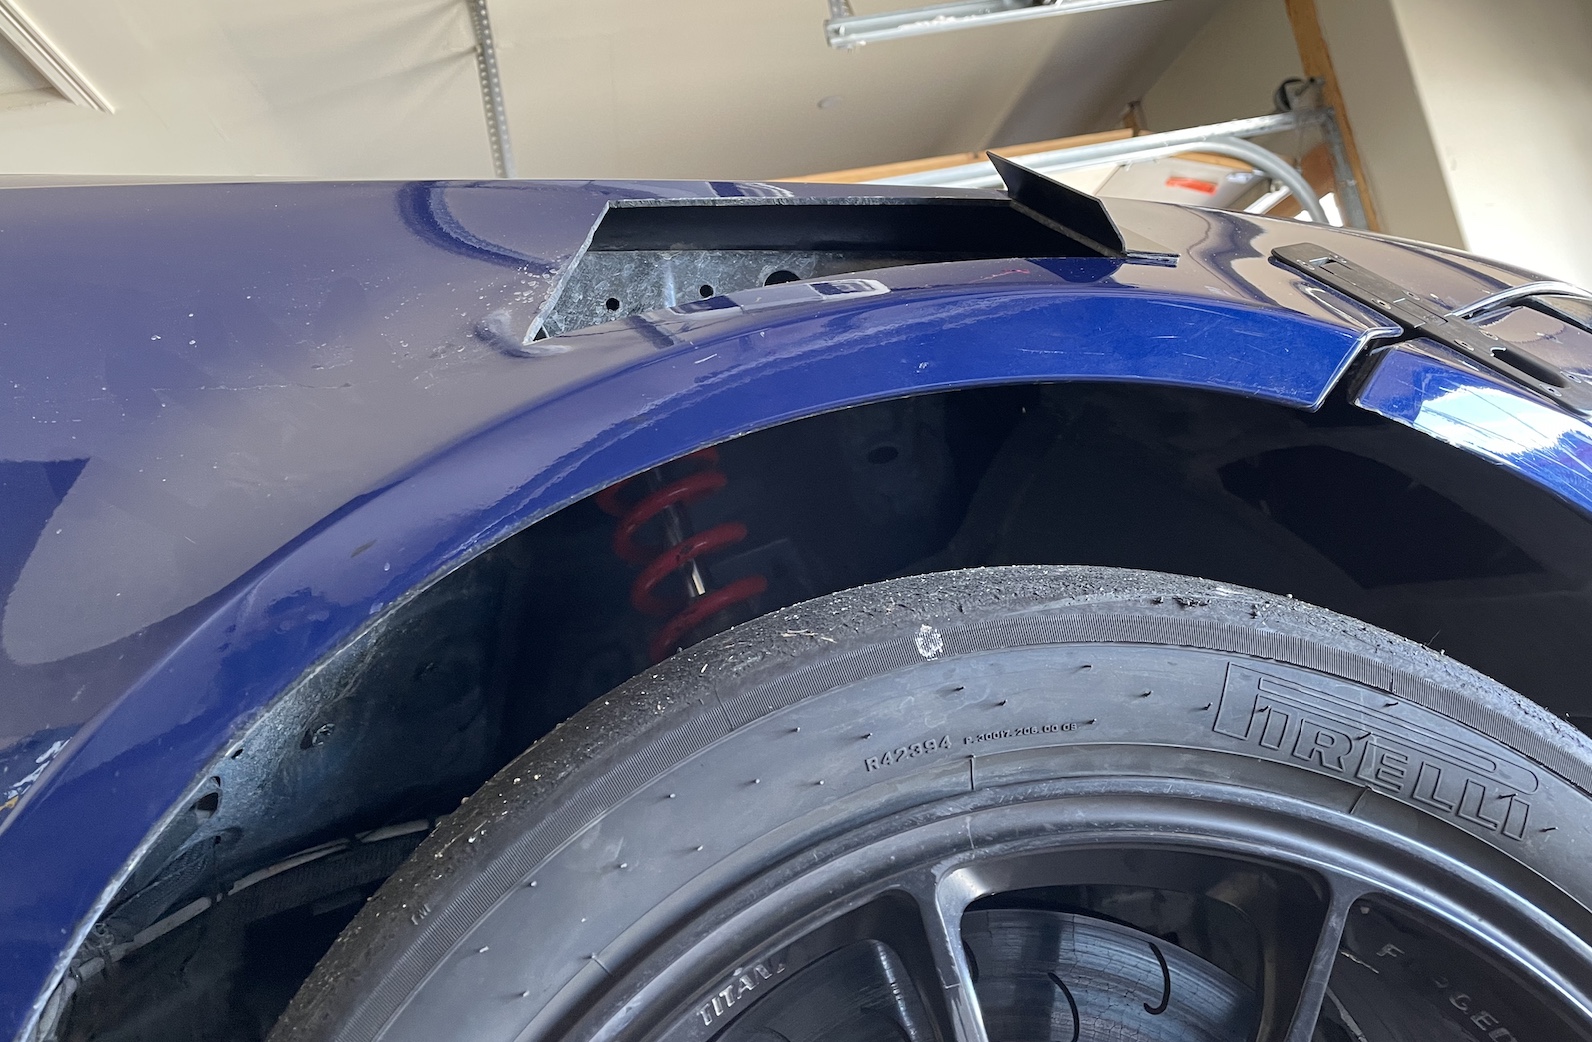 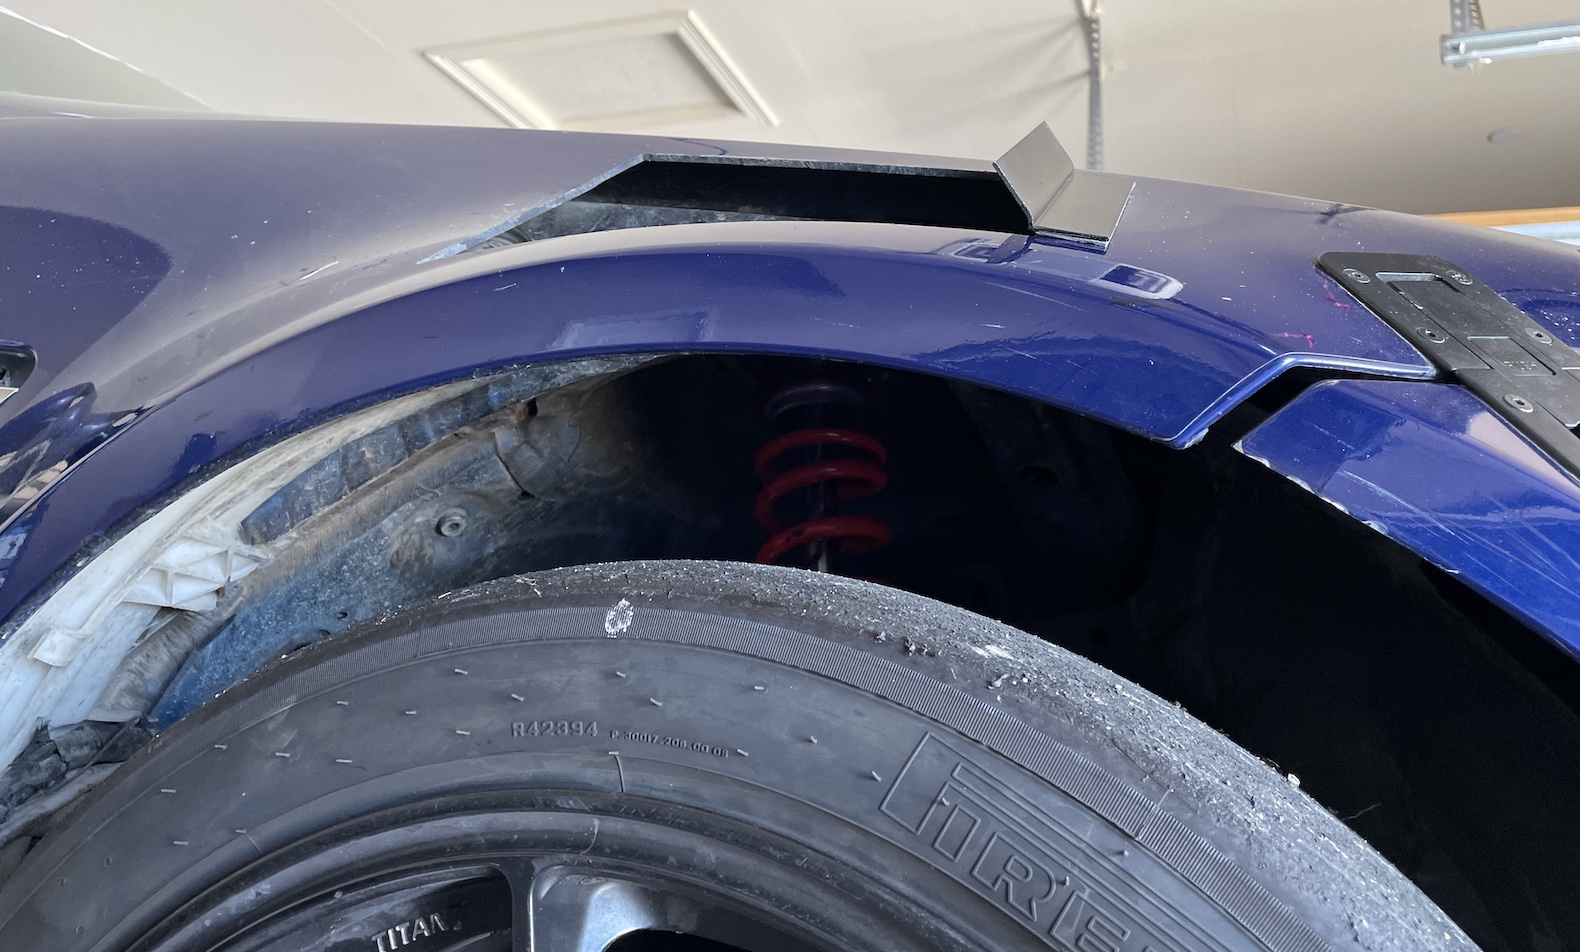 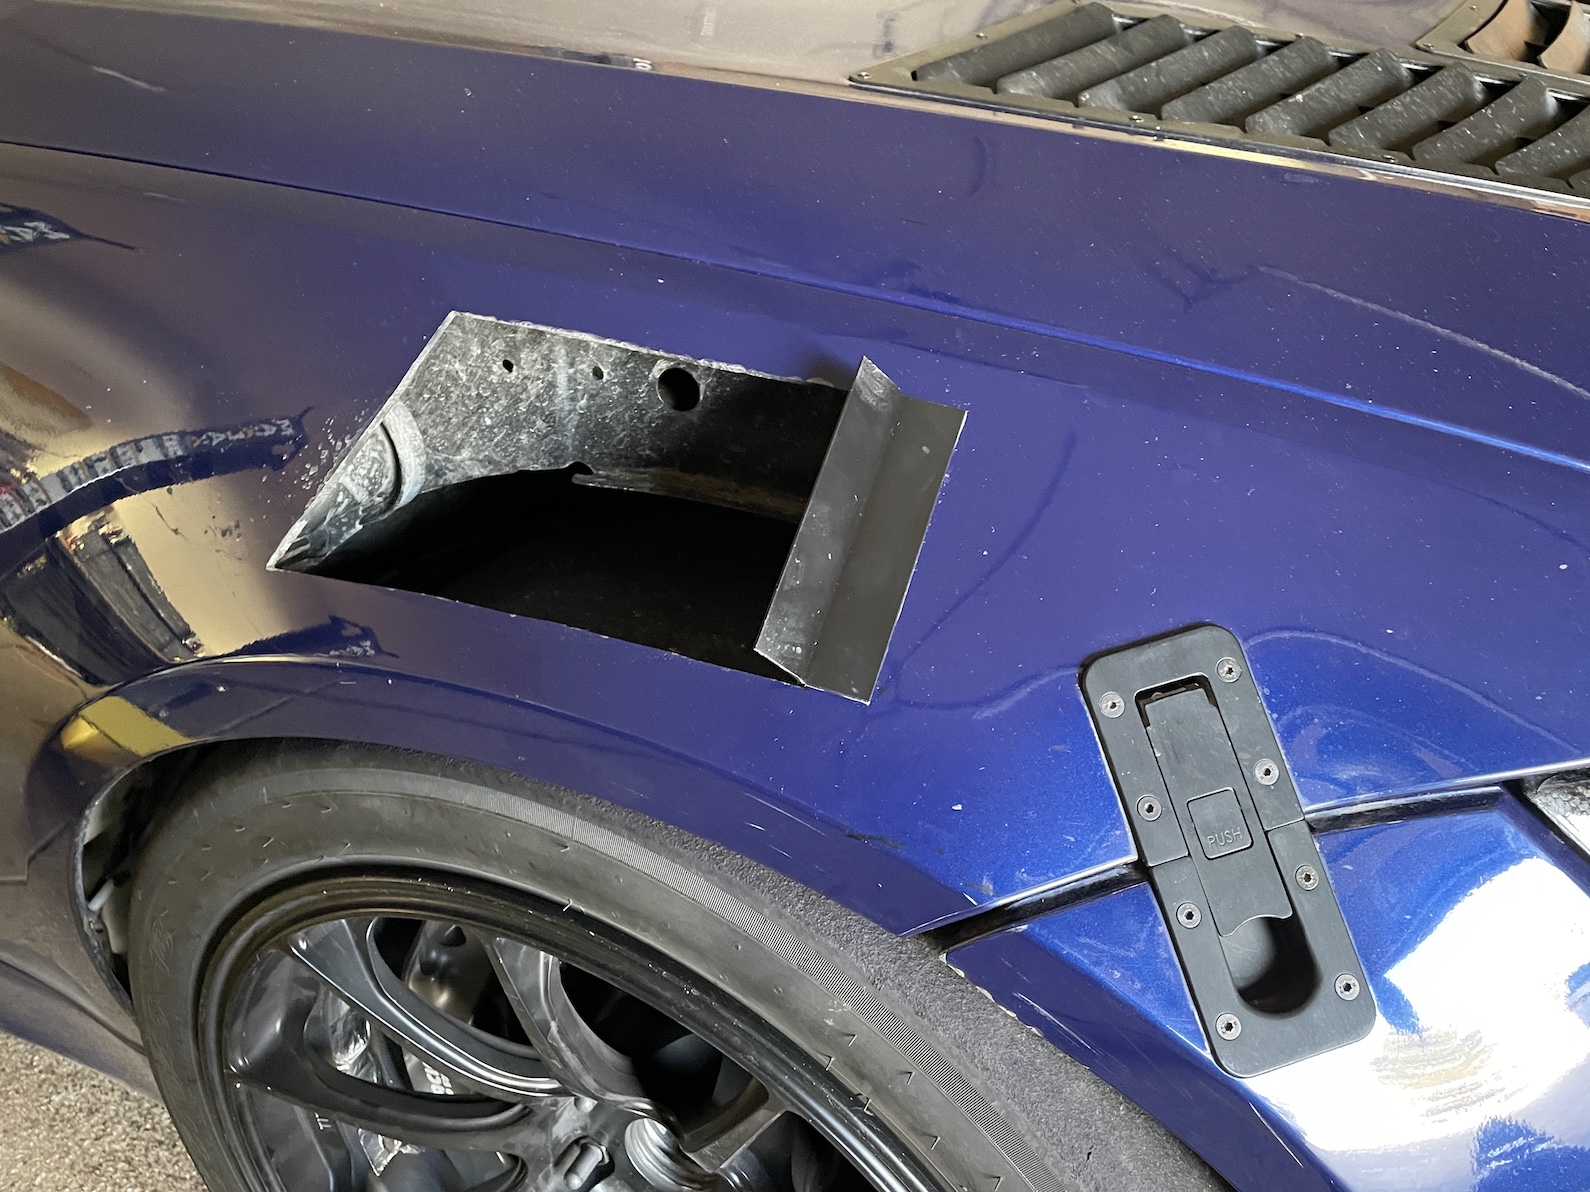 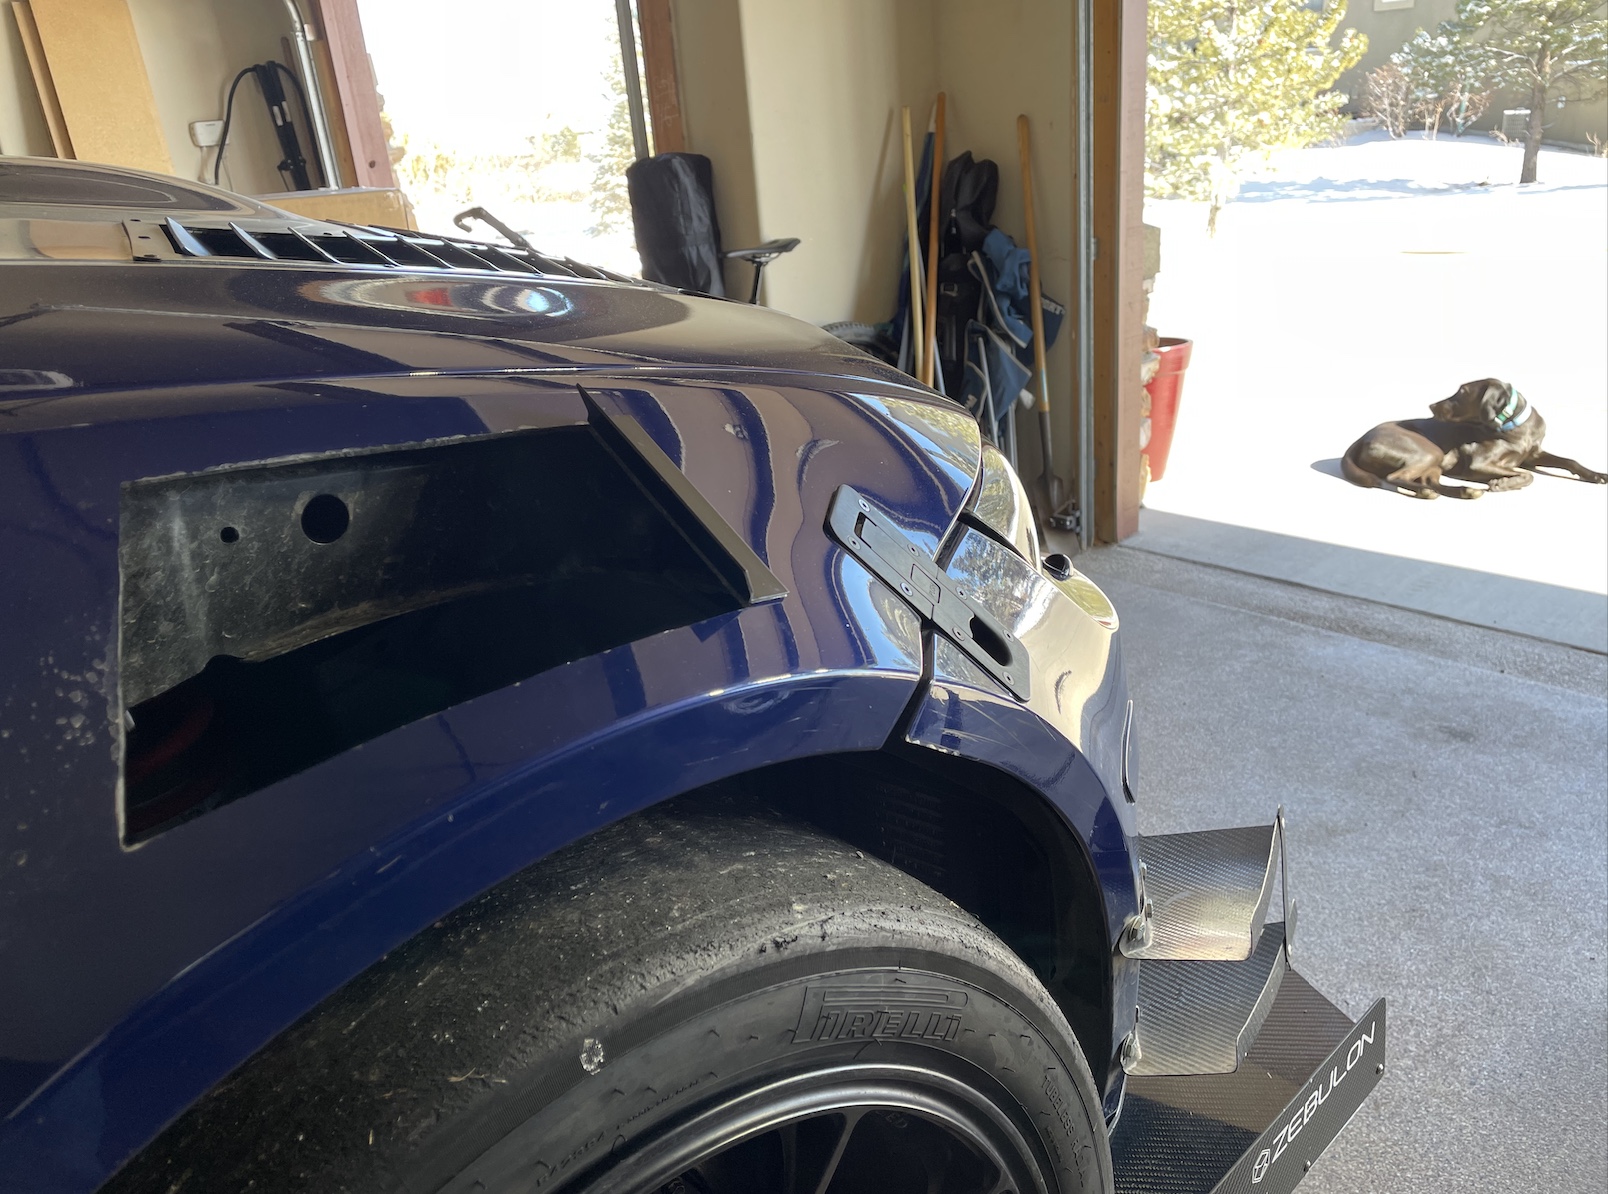
__________________
|
|
Appreciate
6
|
Post Reply |
| Bookmarks |
|
|