

 |
|
 |

|
|
|
| 05-15-2011, 07:56 PM | #1 |
|
Lieutenant
 
98
Rep 525
Posts
Drives: '21 F95 X5 M C, '11.5 E92 M3 C
Join Date: Mar 2008
Location: NYC
|
DIY: Enable Rear Fog lights (Free Mod) on E92 M3
I originally posted about this here but am officially putting my DIY here to share with M3Post members.
 Unlike a Euro-spec E9x's, the US-Spec cars do not have the rear fog lights option. Enabling the rear fog lights is an easy and free way to aid others to see you during heavy fog. This DIY involves nothing more than removing the light control switch assembly and trimming off four small tabs front the lower right button. All the electronics are already there and even the light on the dash works! IMPORTANT: Check your local laws concerning the use of the rear fog lights. Please use this feature responsibly. Do not abuse it or blind others with it! Parts
Tools Required
Before you begin: Make sure your car is completely off before disconnecting any wire harnesses from the car. To be safe, you should disconnect your battery. Step 1. Remove upper trim / ventilation duct Study the image below. The yellow circles indicate where the rear retaining pins are located. You need to basically wiggle the trim panel so that the pins from behind will work itself free. I used my trim removal tool on the bottom and top of the trim panel to work the it free. Once there's a slight gap on either side, you can use your finger tips to grab the trim and rock it free. IMPORTANT: Be careful not to damage the surrounding leather if you have the extended leather package.  Step 2. Remove light control switch assembly Study the image below. The yellow circles indicate where the rear retaining pins are located. With the upper trim removed you have access to rear inside and grab the entire assembly. Once you have a hold of the assembly, rotate your wrist to rock the assembly and the pins should release. 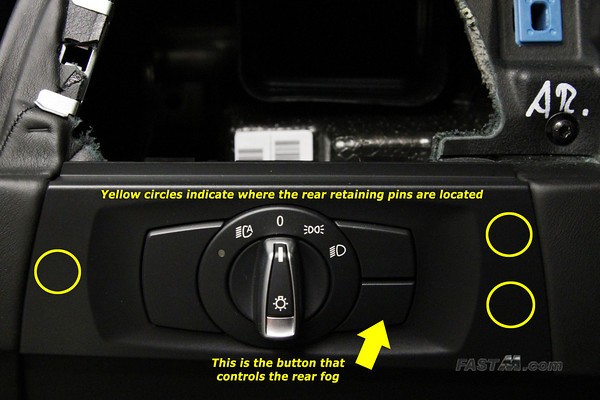 Step 3. Remove wire harness connector Removing the connector requires a two step process. The gray latch is held in place with a black tab. Simply press down on that tab then switch the gray latch down. The connector should start sliding out as you switch the gray latch. Once the latch is at a 90 degree angle the connector should be completely disconnected. 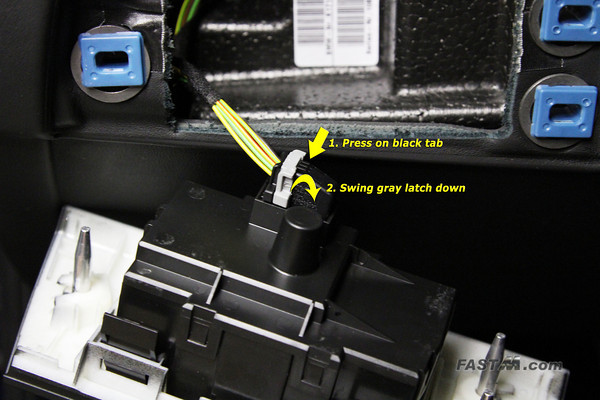 Below is an image showing the connector disconnected. 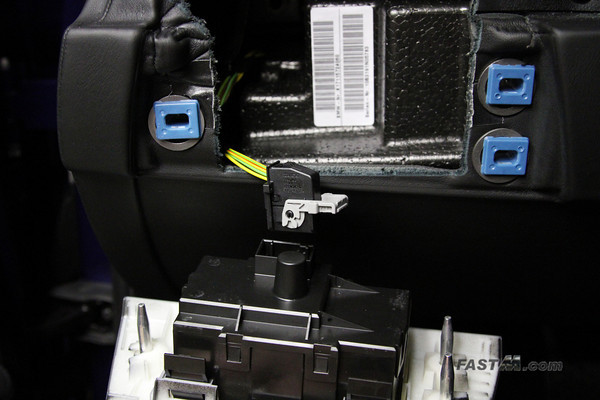 Step 4. Remove trim from light assembly Using the proper trim removal tool or a flat head screw driver, unlatch the four clips holding the light assembly to the trim plate. 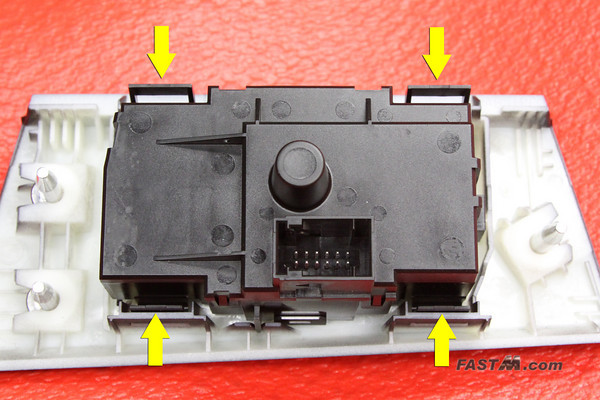 Step 5. Remove rear cover from light assembly There are 6 clips total that will need to be unlatched. Using the proper trim removal tool or flat head screw driver, unlatch the 6 clips holding the back cover in place. NOTE: Image below only shows the two clips on top. You should be able to see the other clips as you rotate the assembly. 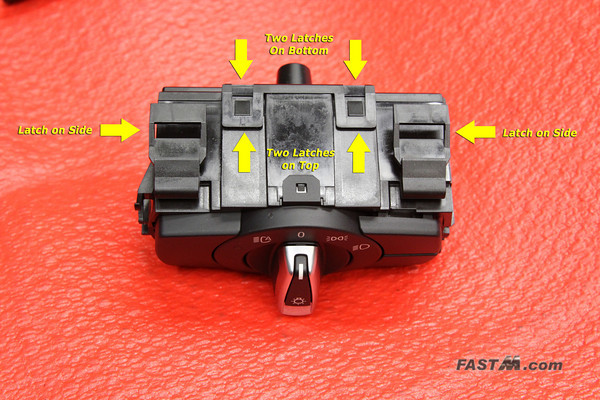 Step 6. Remove circuit board The circuit board simply lifts out. 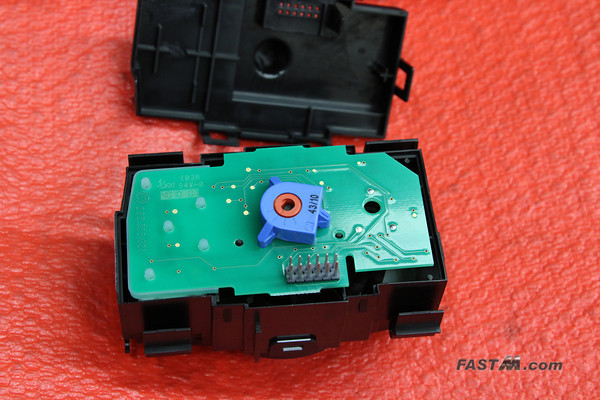 Step 7. Remove the white button extensions These white button extensions simply lift out. 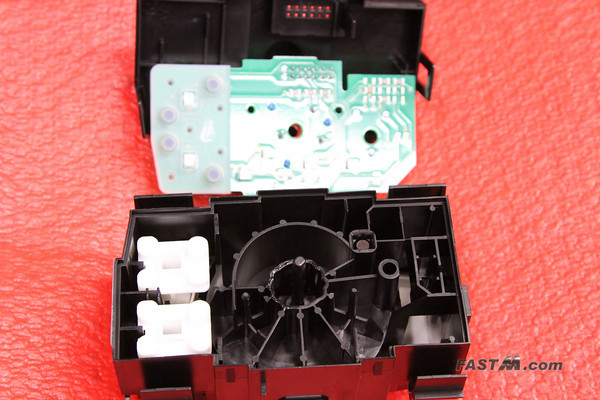 Step 8. Unlatch lower button In order to unlatch the clip holding the lower button in place, you will need a small flat head screw driver. Carefully unlatch the two black clips holding the button in place. See yellow circles below showing the black clips holding the white button in place. 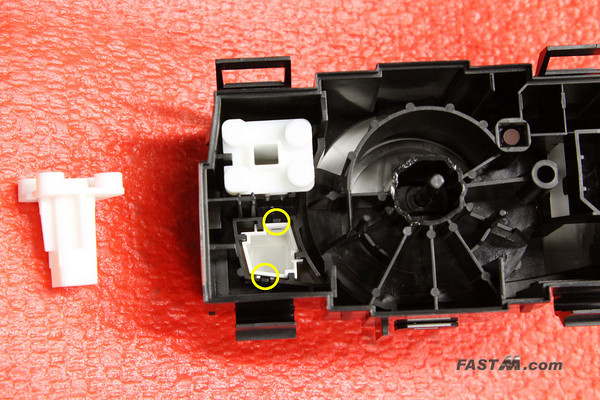 Step 9. Trim off tabs from button Notice the four little tabs around the back of the button. Carefully trim these tabs off with a sharp utility knife. These are the tabs that holds the button in place and restricts it from being functional.  Below shows the result after trimming. 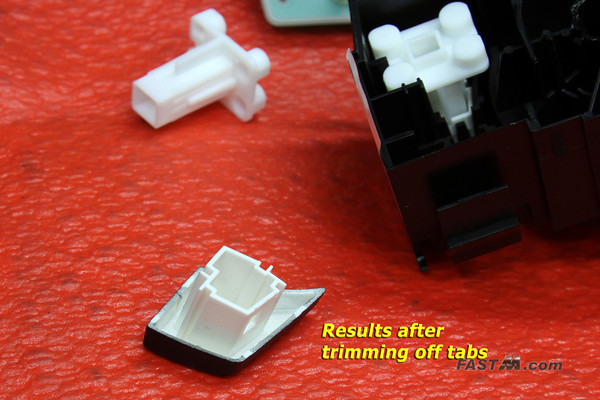 Step 10. Reinstall light control switch assembly The rest should be fairly straightforward.
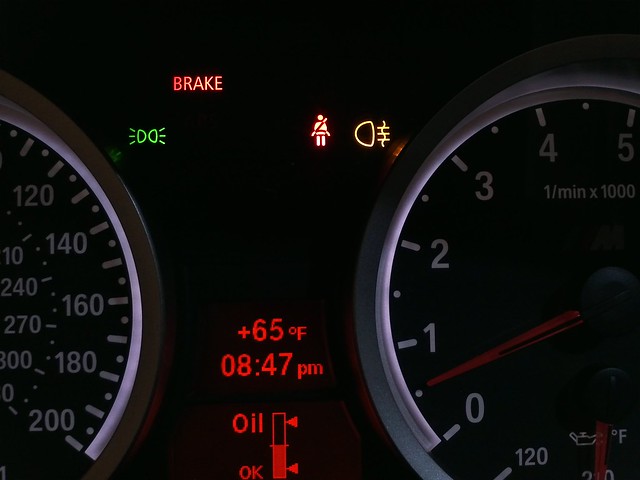
Step 11. Final inspection To activate the rear fog, simply turn on your car and press the lower right button on the light control switch. Working dash light - check! 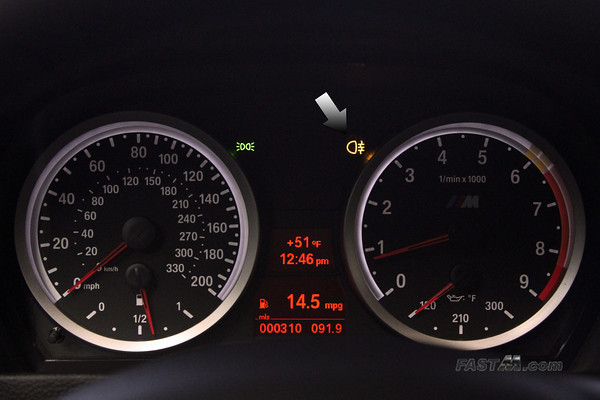 Working rear fog lights - check! 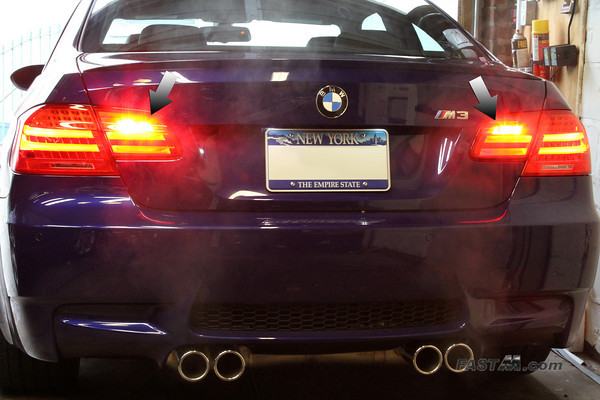 Closer inspection - check! 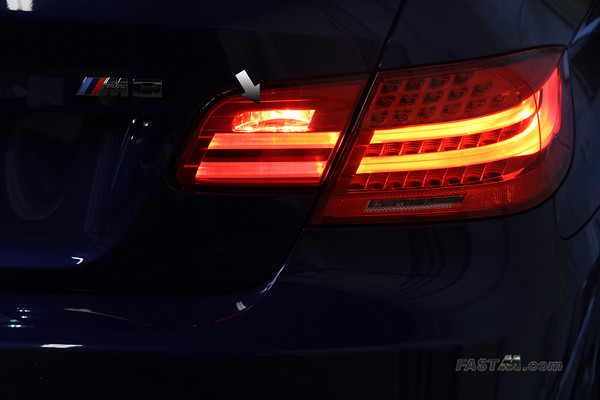 Disclaimer: Use this DIY at your own risk, I'm not responsible for any damage to your car.
__________________
 Drives: '11.5 Interlagos Blue E92 M3 Comp, '21 F95 X5 M Comp DIYs: Enable Rear Fog | Easy Side Gill Replacement | Front Grill Replacement |
| 05-31-2011, 09:33 PM | #2 |
|
Lieutenant
22
Rep 499
Posts |
Thanks for the guide brother! Just used it to enable the rear foggies on mine! Interesting note - on E90s, the light source doesn't come from the same place. It actually comes from the area right below the reverse light area.
|
|
Appreciate
0
|
| 08-11-2011, 11:59 PM | #5 |
|
Captain
79
Rep 818
Posts |
I'm so not mechanically inclined but this write up gave me the confidence to try this mod. Thanks so much!
 OFF: 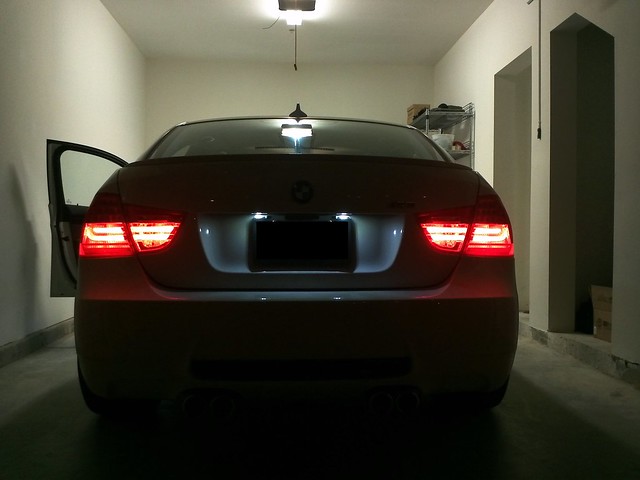 ON: 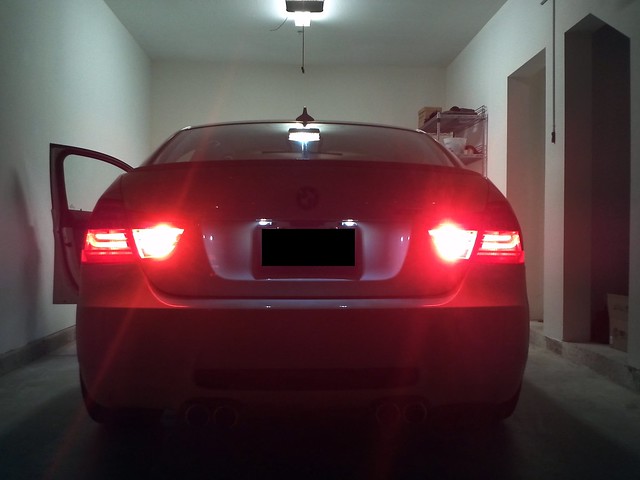
__________________
2016 F82 ZCP / 6MT / SSR Intake / Volk ZE40 18x9.5 et20 & 18x11 et34
Nitto NT01 265/40 & 305/35 / Macht Schnell Sport Competition Springs   |
|
Appreciate
0
|
| 08-14-2011, 12:19 PM | #6 |
|
Private
 
0
Rep 69
Posts |
and now only use the fog lights if the visibility is less than 50 meter due to fog!
I see too many idiots all over the world driving with the fog lights on at night when there is no fog at all. Heavy rain does not count! |
|
Appreciate
0
|
| 09-01-2011, 08:41 AM | #7 |
|
First Lieutenant
36
Rep 343
Posts
Drives: 2017 m4
Join Date: Aug 2011
Location: MA
|
worked like a charm
first time posting. wanted to say great work and thanks for saving me $130
 |
|
Appreciate
0
|
| 09-02-2011, 03:01 PM | #9 |
|
smoke if ya got 'em
1066
Rep 2,178
Posts |
you mean everything is wired up and the bulb is present yet BMW just disabled the push button in the cabin? WTF? How dumb is that. At least it's easy to enable. wow...
|
|
Appreciate
0
|
| 09-05-2011, 01:20 PM | #10 |
|
DT///M
157
Rep 1,384
Posts
Drives: 2014 F31 Touring
Join Date: Apr 2011
Location: Rocket City, AL
|
Where's the kudos button? Guess this will have to do:
 Great success!
__________________
"With great power comes great responsibility." -El-Superbeasto
Last edited by Erie Von Otto; 09-05-2011 at 01:30 PM.. |
|
Appreciate
0
|
| 09-06-2011, 08:50 PM | #11 | |
|
Lieutenant General

634
Rep 10,407
Posts |
Quote:
__________________
E92 M3 | Space Gray on Fox Red | M-DCT | CF Roof | RAC RG63 Wheels | Brembo 380mm BBK | | Vorsteiner Ti Exhaust | Matte Black Grilles/Side Gills/Rear Emblem/Mirrors | | Alekshop Back up Camera | GP Thunders | BMW Aluminum Pedals | Elite Angels | | XPEL Full Front Wrap | Hardwired V1 | Interior Xenon Light Kit | |
|
|
Appreciate
0
|
| 09-07-2011, 09:05 AM | #12 | |
|
Lieutenant Colonel
 
480
Rep 1,647
Posts |
Really! You should see how bad it rains over here not even 50 meters of visibility. Lack of visibility is not limited to fog only...
Quote:
|
|
|
Appreciate
0
|
| 09-11-2011, 01:34 PM | #13 |
|
Enlisted Member

7
Rep 33
Posts
Drives: 2011 AW E90 ZCP
Join Date: Mar 2011
Location: Redondo Beach CA
|
Thanks for the writeup. Took less than 15 minutes and worked as advertised. Any idea what the top button is for? I'm guessing front fogs if the assembly is used throughout the entire 3 series lineup.
|
|
Appreciate
0
|
| 09-11-2011, 01:52 PM | #14 |
|
USER
10
Rep 85
Posts
Drives: JB 11 E92 M3 ZCP
Join Date: Jun 2011
Location: VALLEY OF THE DOLLS CA.
|
GREAT DIY
TOOK ME 10 MINUTES
THANX  |
|
Appreciate
0
|
| 09-11-2011, 07:14 PM | #15 | |
|
Lieutenant
98
Rep 525
Posts
Drives: '21 F95 X5 M C, '11.5 E92 M3 C
Join Date: Mar 2008
Location: NYC
|
Quote:
 To answer your question on the top button, yes, that would be for the front fogs on non-M3s.
__________________
Drives: '11.5 Interlagos Blue E92 M3 Comp, '21 F95 X5 M Comp DIYs: Enable Rear Fog | Easy Side Gill Replacement | Front Grill Replacement |
|
|
Appreciate
0
|
| 09-15-2011, 04:18 PM | #16 |
|
Lieutenant

29
Rep 488
Posts |
Great writeup. Thanks for posting. Just did mine - everything works like a charm. Quick note: Step 4 isnt necessary, you can do everything without removing light switch from trim panel.
__________________
 |
|
Appreciate
0
|
| 10-25-2011, 02:02 PM | #18 |
|
Captain
160
Rep 773
Posts |
wow, that was very detailed and easy to follow DIY guide. thanks for posting. i have a feeling, i'm gonna mess something up. anyone from NJ do this?
ok, screw it. i gotta scratch this itch. went to a local Autozone for the trim remover. they didn't carry one nor did they care. so, i used old credit cards to remove the trim. took a little more than 10 mins just to take it apart. damn. everything else was smooth sailing using the good 'ol swiss army knife. thanks OP!
__________________
2008 E64 M6
2011 E92 l SSII l Fox Red - 145k and Totaled. 2012 Toyota Prius C - 145k and Totaled. 2002 Nissan Pathfinder - 301.6K and Junked. 2000 Mitsubishi Montero Sport - Rolled & Totaled. 1995 Cadillac Fleetwood - RIP. |
|
Appreciate
0
|
| 10-26-2011, 02:25 PM | #19 |
|
Private First Class
 
23
Rep 192
Posts |
Thanks for posting... Alot easier then my old 2008 335. The 2011 M included the plastic piece. The 2008 was done with modified cork from a bottle of wine. On 2nd thought the 335 might have been a little more enjoyable
. |
|
Appreciate
0
|
| 11-08-2011, 06:13 AM | #20 |
|
*_*
817
Rep 3,158
Posts |
Just did this, took a little extra effort since I have an 08 E92 (no plastic stalk/ lego piece). My method was three fold:
1) Pen cap (acts as a plastic stalk to push the custom flat surface) 2) Pen cap connects to a small cut out credit card square plate (use any old credit card) - cut two squares to fit into the space 3) Sandwich double tape between the two credit card squares, adjust thickness as needed (by adding more double tape. Trail and error until you feel the two rubber buttons are pushed by the switch. DIYs where you got to think on your feet, get creative = mad FUN! |
|
Appreciate
0
|
Post Reply |
| Bookmarks |
|
|


