

 |
|
 |

|
|
|
| 05-12-2013, 09:16 AM | #23 | |
|
First Lieutenant
 11
Rep 393
Posts |
Quote:
 I'm gravy training your setup and looking to have it completed for a cross country trip at the end of May. Much research still to do since I'm new to the Android OS. Looking forward to seeing where you mounted the internals if you get around to it...
__________________
 V1C / Bel STiR+ / Integrated mirror display / AD08r f255/35 r275/35 / IND Euro Bumper / MP Splitters / MP Steering Wheel |
|
|
Appreciate
0
|
| 05-15-2013, 01:01 PM | #25 |
|
HP addict

37
Rep 321
Posts |
subscribed, very cool project!
__________________
2008 Jerez Black Metallic E93 6MT
K&N Drop In Filter | HPA Pulley | Custom Catless Resonated X-Pipe | BPM Stage II Tune | Megan Racing Exhaust  |
|
Appreciate
0
|
| 05-17-2013, 02:44 PM | #26 |
|
Banned
825
Rep 3,387
Posts |
Since I've started this project, I've made a couple changes to address some concerns and provide for future expansion.
The plan is for the unit to be on all the time on days that I drive the car. Even though the unit is flash-based, there's a still a 20ish second or so delay that occurs from the instant the car is turned on until it everything is operational. This also allows the unit to function as a security camera setup. To meet goal, the unit requires hard wiring to the battery, so I chose to augment the electrical system. As I've done a few stereo installs over my many years, one of the tricks I picked up on was to stop messing around with amp wiring kits. I was turned on to welding cable quite by accident a few years ago when looking for positive/ground cables. For those that need add'l information, check out this place. The cable is pure copper, not the copper-over-aluminum stuff that has been appearing as of late, and it also has a rubber sleeve. And, it is *extremely* flexible, more so than anything you'll find on the market dedicated to car audio. Finally, the sleeving can take a *lot* more heat, so you don't have to worry about melting it when soldering ends to it.  I had 2 20ft 2 gauge cables lying around from a battery relocation on a previous car, as well as ends I keep around in my electronics tool kit, so I went about making some cables. I also keep a 2g into 4g distribution block on hand, and an inline fuse setup. Since this picture, the cable has been secured to the OEM harness via zip ties.  Started off with this: 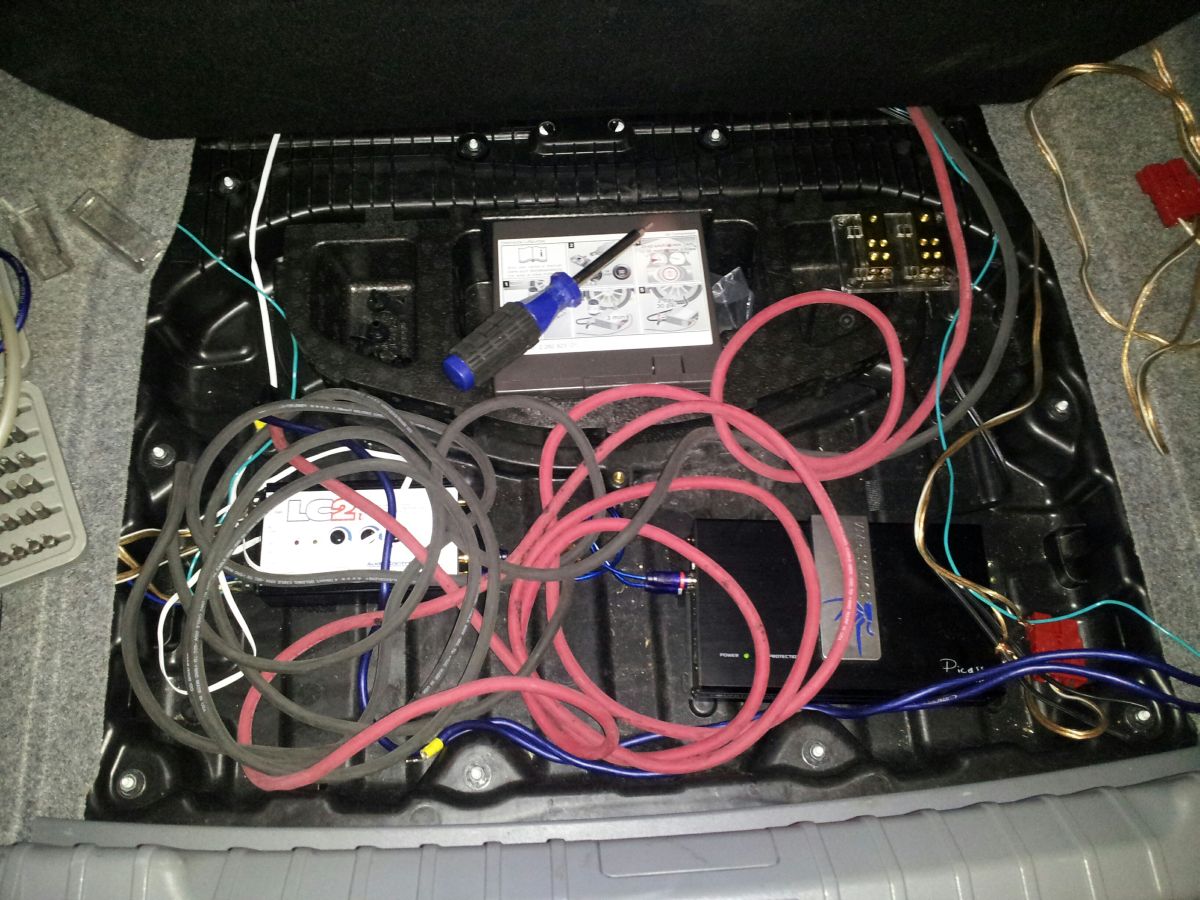 Ended up with this: 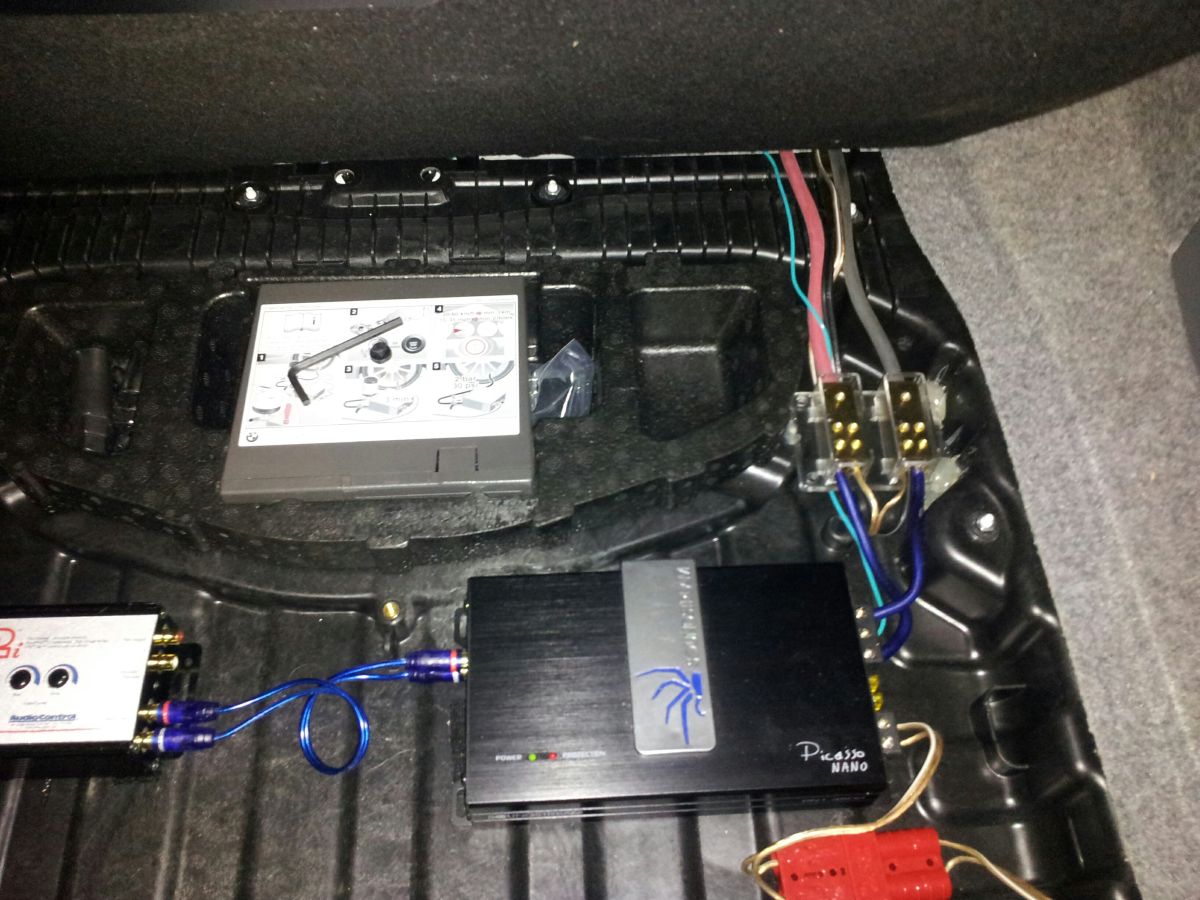 Since there really wasn't a level place in the area I wanted to mount the distribution block, I used hot glue to level and secure it. Once again, a completely reversible mod. I purchased a low wattage, small-chassised power inverter to make sure the Android stick received a good, solid signal. I specifically chose this unit b/c: a) it has an on/off switch, which could make it easy for me to reboot the system if I ever had need, and b) its diminutive size. I had it mounted under the seat for ease of access. I used the a/c outlet, but the computer was stuck in a boot loop soon after it was turned on. Since I purchased 2 of everything, I plugged in the other Android stick, and the results were the same. I then switched out the power inverter, and nothing changed. I then switched to a different a/c adapter cord....nada. When plugged into the USB port on the inverters, however, it powered on w/out an issue. Prognosis? Dirty signal from the a/c portion of the inverter. It was then I found out that the USB plug didn't turn off when the on/off switch was depressed. Coupled with the fact that I wanted a source of *at least* 2 amps (these particular Android sticks have been found to work best w/1.5 amps or more), these found their way back into the tool box. Another issue I was having is with the camera not always turning on, and with the Android stick sometimes rebooting when plugging in a USB stick to transfer music via the USB hub. After doing some research, a powered USB hub is recommended, as the peripheral devices won't always get enough power to function correctly. Only problem is, I wanted something DC, not AC. Not wanting to take the chance on spending more $ on inverters as they might not work, I sat down to rethink the power situation. Some of my criteria: -2 amp source -on/off switch under the seat -DC powered USB hub I did more research, ordered the following, and am awaiting the arrival of the last couple parts: 1) DC powered USB hub. This was the most expensive part of the setup as of now. It's made by Carnetix, is specifically designed for 12/24v systems, and will provide the power necessary for the camera and jump drive by providing +5V for all downstream devices. You can read about it here.  2) PNY 2.1A USB adapter http://www.tigerdirect.com/applicati...?EdpNo=2568867 This will provide the amperage the Android stick is looking for.  3) 12V splitter w/remote on/off switches. http://www.ebay.com/itm/230962141577...84.m1439.l2649 I'll have 2 additional ports for down the line equipment additions. It took FOREVER to find this; I didn't even know someone made these until I literally spent DAYS of searching online. It will be hardwired to the battery via the distribution block, so I'll have the on/off switch I want. 4) 30 ft of 14g cable so that I can extend wiring of the splitter as needed. I'll report back after everything arrives and I complete the install. Last edited by whats77inaname; 05-17-2013 at 06:05 PM.. |
|
Appreciate
0
|
| 05-25-2013, 02:24 PM | #27 |
|
Captain
433
Rep 855
Posts |
I am SO happy to see someone taking the android route. Whats77inaname, glad you are pioneering the way. Android is the best way to go overall..
You are doing exactly what I am about to do AndroidPC(APC)>HDMI2AV>MMI. I haven't pulled the trigger but you are inspiring me. Hope you can answer some questions for me. How is the audio quality? Any hums or buzzes? Why are you purchasing a power inverter... do you plan on having 110v devices? Converting from 12DC to 110VAC to 5-9VDC (or what ever the APC takes) seems very inefficient. What is specified as the Output of the power supply for the APC? I was worried about GPS. Thank you for explaining the BT GPS!! My biggest concern is how am I going to control this thing and have it very OEM like. I think I read if you connect a mouse to it, a pointer will show. Have you tried that? I was thinking of finding a small touchpad (like on a laptop) and integrate it right below the iDrive knob. Another option would be converting the monitor to touchscreen with this (coupled with a usb controller): http://gsmserver.com/shop/touch_pane...43_for_bmw.php A remote works but what if it falls between the seats lol? Does it have a Mic so it can be used with voice control? Here is a list of apps I've been using with my phone: CarHome Ultra, Trapster, GasBuddy, Torque w/BT2OBDII, Pandora, and of course all the Google maps/nav goodness. |
|
Appreciate
0
|
| 05-25-2013, 03:57 PM | #28 |
|
Banned
825
Rep 3,387
Posts |
1) I have a previous post about using a Samsung bluetooth headset to pair my phone to stream audio using the 3.5mm jack in the headrest. I paired the BT headset to the Android TV instead, and it works just fine. I have no sound issues, and the aforementioned post had other member's feedback regarding the sound quality....others seemed to think the quality was pretty good, as well.
2) I moved away from the power inverter. The only reason I had one was so that I could have an on/off switch for the unit under the seat. 3) Any remote you use will show a pointer, which is good. The resolution is so small, you'll grow to appreciate it. There is a touchpad on the market that seems like it would be a good fit, and honestly, I'm thinking about trying it out and mounting it on the trim piece immediately between the iDrive controller and the armrest. It's small enough, but there is a small wire coming from the side of it. If I could change the orientation of the mouse so that the wire could be positioned so that it is rear-facing, that would be ideal. I thought I had it bookmarked, but I don't. When I find it, I'll link it. 4) *lol* funny you showed the touchpanel I *do* have bookmarked. My only concern is that a) the screen would be hard to clean and b) with the resolution so tiny, and fingers being so big, a stylus would be needed. As I use it more and more, I'm really convinced a touchpad is the way to go, *especially* for zooming in/out of maps. 5) The camera I'm using has a mic, yes. Unfortunately, USB GPS receivers don't work. I still have the BU-353 from my carPC, and it's plugged in right now as I am at this moment trying to get it to work on the backup Android TV. Lack of drivers even w/UTG is prohibiting it, although it *does* power up. Tomorrow I'm putting in the new gear. I'll take pics, etc, along the way. |
|
Appreciate
0
|
| 05-30-2013, 05:51 PM | #29 |
|
Captain
433
Rep 855
Posts |
I like the BT audio idea but I am afraid I will loose connection or ill have audio latency issues (lip syncing) for movies. I'm also afraid to hard wire as it could introduce hums or buzzes.. oy. Going to try hard wire first.
I ordered an AndroidPC! http://www.geekbuying.com/item/Rikom...BT-315126.html I picked it because it has the latest 4.2, fast, and its easily rooted. The only thing I don't like is how it only has HDMI. Now, how do I get it to my car? I think I'll be ordering the MMI from modmynav so, that will be my input. The question I need to figure out is what is the "Analog RGB" input on the MMI? I prefer to use that, if possible, over composite (yellow) because its better quality. I cant find any info on it or examples of how other people used it.  Can someone help? Can someone help? |
|
Appreciate
0
|
| 05-30-2013, 06:37 PM | #30 | |
|
Captain
433
Rep 855
Posts |
Quote:
My gut feeling is that touchscreen will act like a mouse (it doesn't matter where you touch, it moves the pointer in the direction you move). If I am wrong, I highly doubt the screen will be calibrated to your touch and it certainly will not be calibrated when in PIP (not full screen). Gonna have to scrap that idea for now. Found a winner (flat enough I would be happy without modifying the trim): http://www.ergonomictouchpad.com/ Do I go normal size or large haha!  |
|
|
Appreciate
0
|
| 05-30-2013, 08:59 PM | #31 | |
|
Banned
825
Rep 3,387
Posts |
Quote:
Here's the touchpad I was referencing. No housing to remove  http://www.tablettouchpads.com/ Edit: Oh snap, same piece *lol* Thinking regular would fit better considering the width of the potential mounting location. |
|
|
Appreciate
0
|
| 06-01-2013, 02:08 PM | #32 |
|
Captain
433
Rep 855
Posts |
Man, I can not decide how to approach the connection from HDMI to the MMI.
I am bit of an audio/videophile and I don't want to settle for composite IF the RGB input will be a visible difference. I have not found any comparisons of the two. For movies and pictures I'm sure it wont make a huge difference but for text, I want it to be as sharp as possible. In a dream, I could accomplish a 1:1 signal to pixel ratio lol! What is the output resolution you have set on the android? From your pictures, it looks good but do you have any overscan on the edges? Do you ever desire a better image quality? If you are taking pictures, can you snap a close up of text (as close as you focus on)? |
|
Appreciate
0
|
| 06-01-2013, 02:37 PM | #33 |
|
Captain
433
Rep 855
Posts |
I have spent a considerable amount of time researching the RGB+Cs input on the MMI. Unfortunately, I can not find a HDMI to RGB-Cs converter. That would be too easy!
I did however find plenty of HDMI to VGA converters and found a circuit (I can build) that will convert VGA (RGB+Horizontal&vertical sync) to RGB+Cs (composite sync). Here is the circuit: http://www.epanorama.net/circuits/vga2rgbs.html All this adapting might make the picture look like crap hahahaha. |
|
Appreciate
0
|
| 06-01-2013, 09:20 PM | #34 | |
|
New Member
0
Rep 5
Posts |
Quote:
Seems to get pretty good reviews. The only issue I saw with using HDMI->Component is the HDCP copyright issue... |
|
|
Appreciate
0
|
| 06-01-2013, 11:41 PM | #35 | |
|
Captain
433
Rep 855
Posts |
Quote:
You only need to worry about HDCP if you're playing content with it. Nothing on an AndroidPC will have it that I know of. |
|
|
Appreciate
0
|
| 06-02-2013, 12:18 AM | #36 |
|
Banned
825
Rep 3,387
Posts |
I've been working on this for the past week or so, and feel pretty good about the progress, so here's an update.
1) The camera has been up for some time now. I disassembled the camera 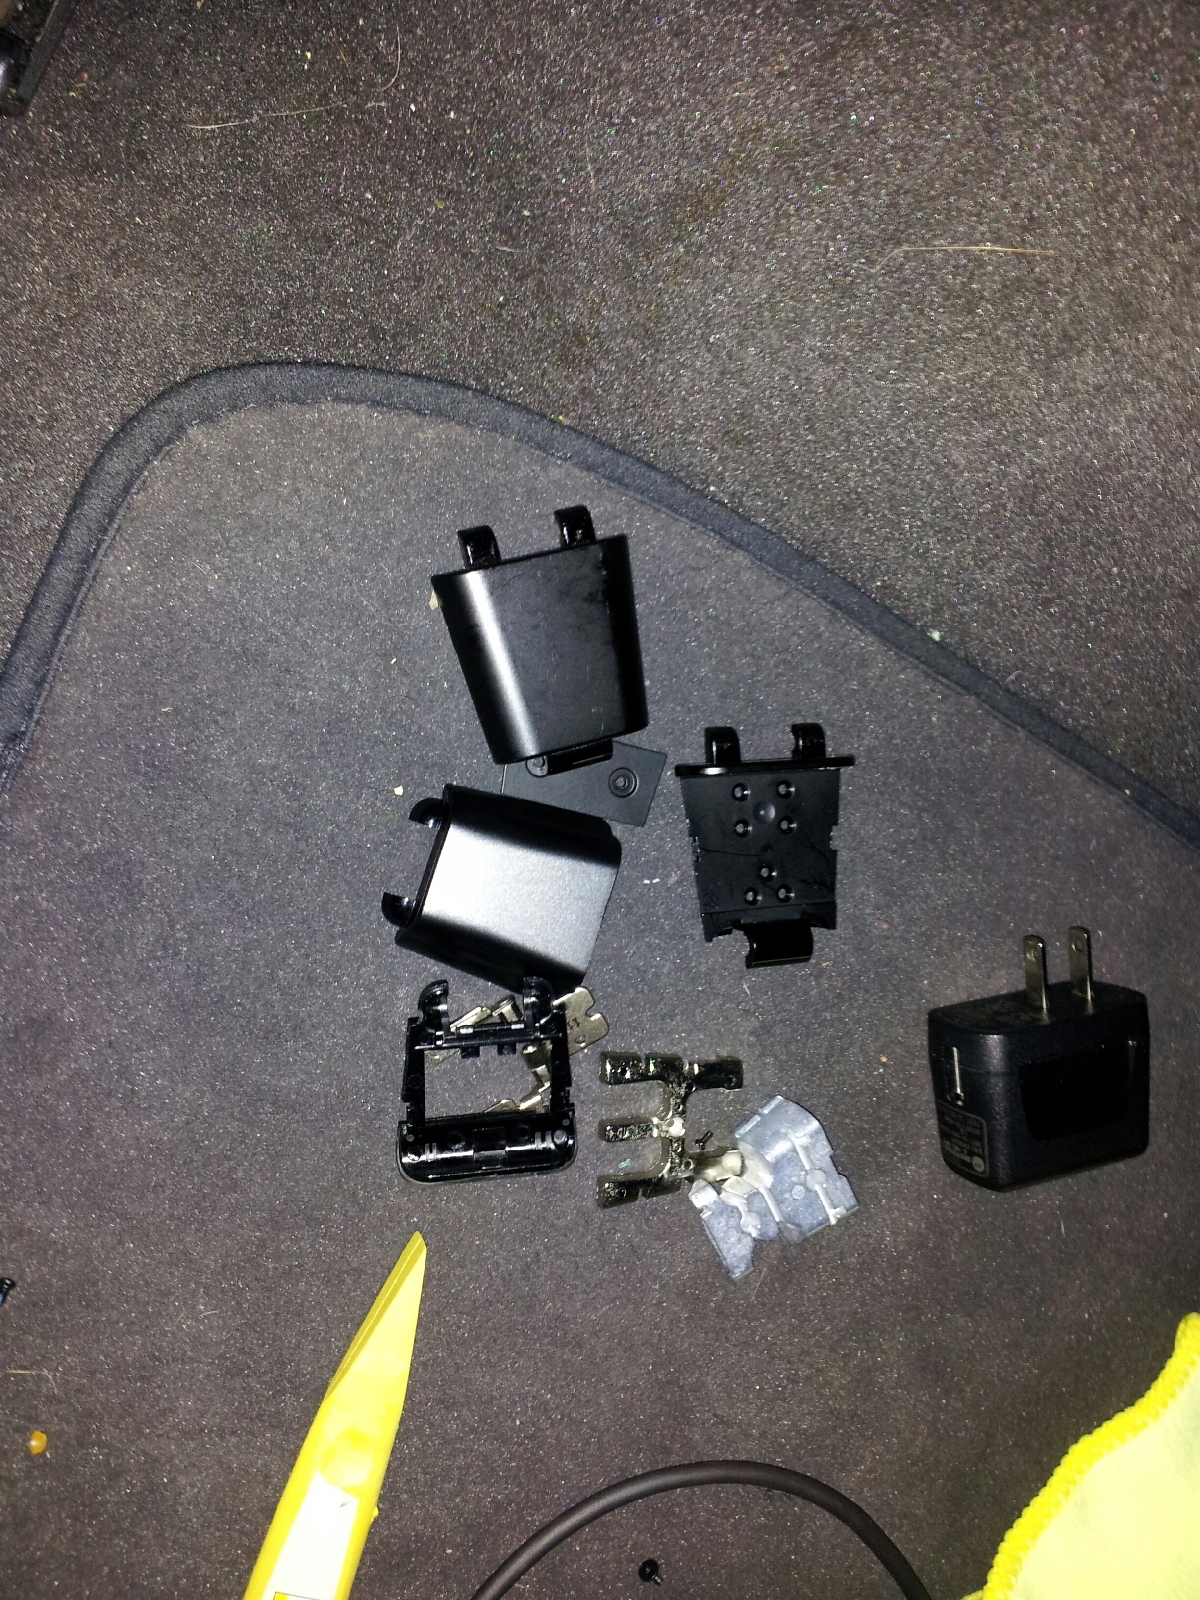 and then I disassembled the rear-view mirror plastics, and ran the wiring for the camera through it. 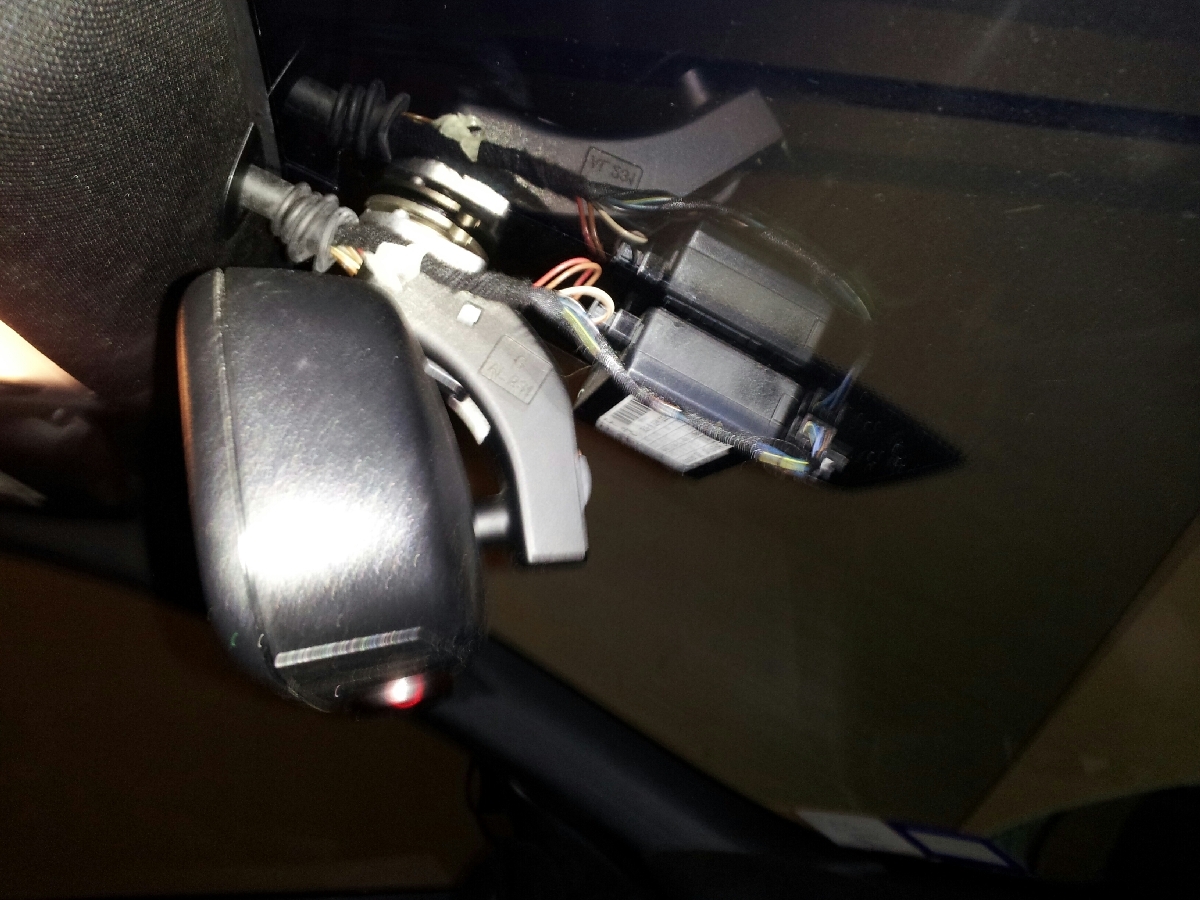 I used a silver sharpie to mark 6 holes derived from part of the internal camera bracket  and screwed in the the camera.  What it looks like outside the car when its on 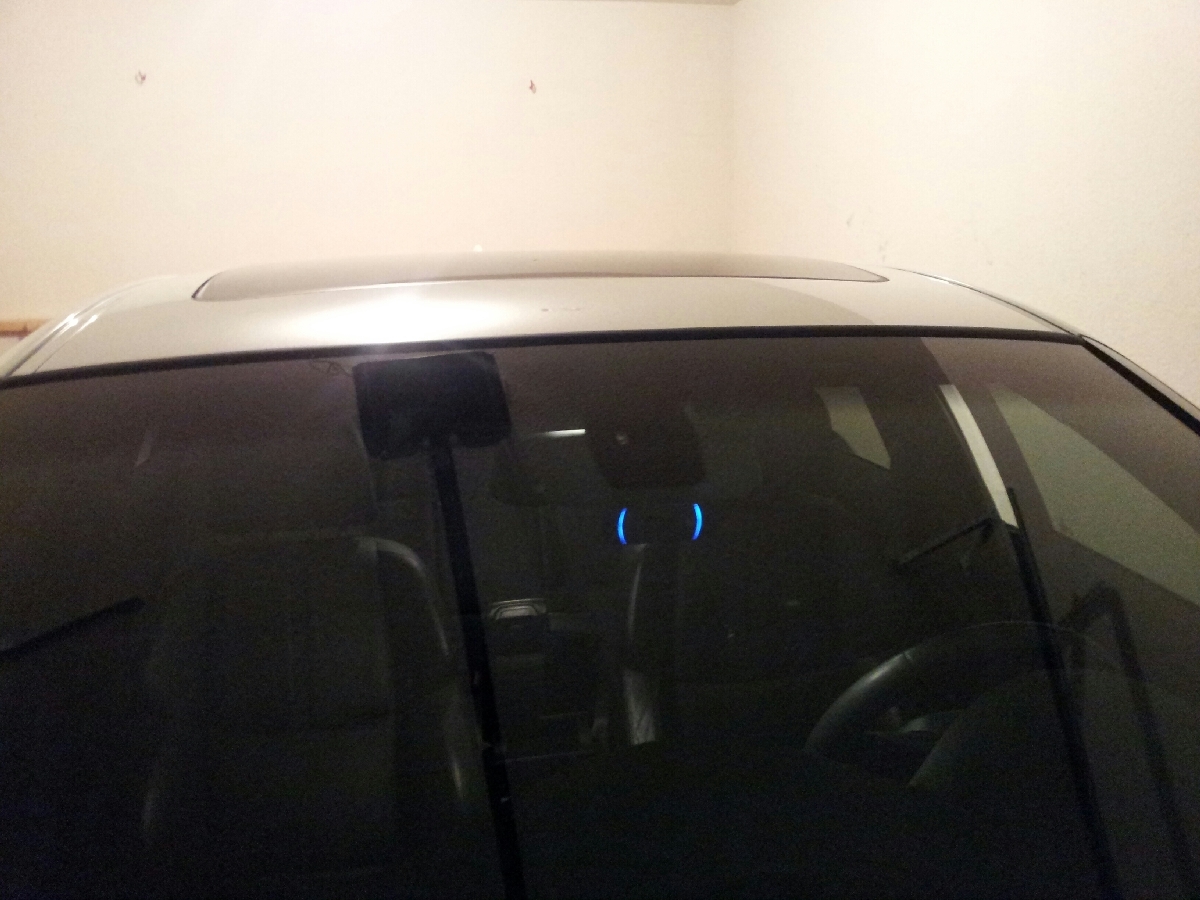 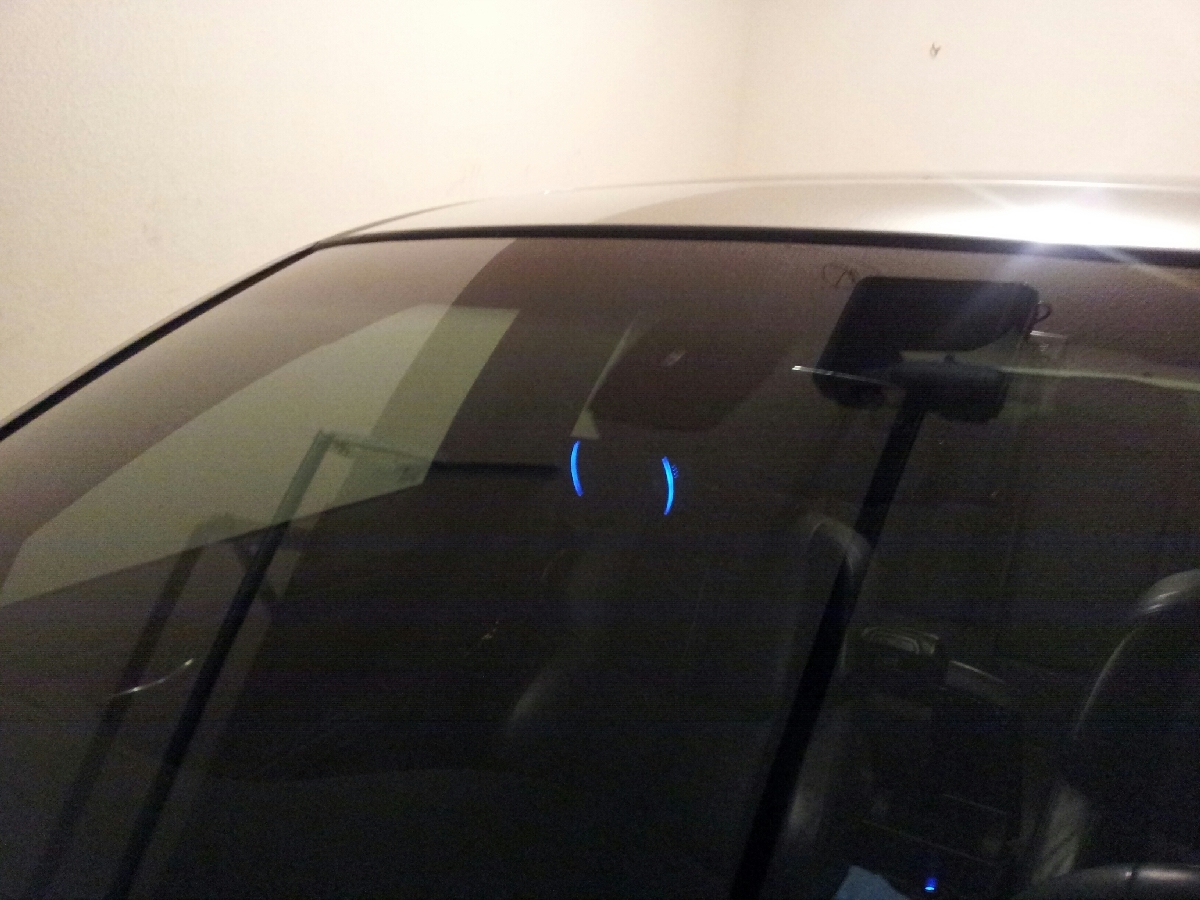 2) I decided to mount the BT GPS unit behind the rear seat, at least for now. It has an internal battery, and charges via a mini-usb port build into the unit. I decided to keep it plugged into a USB port so that it is constantly on. I ran a 15 foot USB cable up/down the pillars and plugged it into one of the 12v 2.1A USB adapters.  Don't worry, the line is pushed into the crease, so you can't see it. 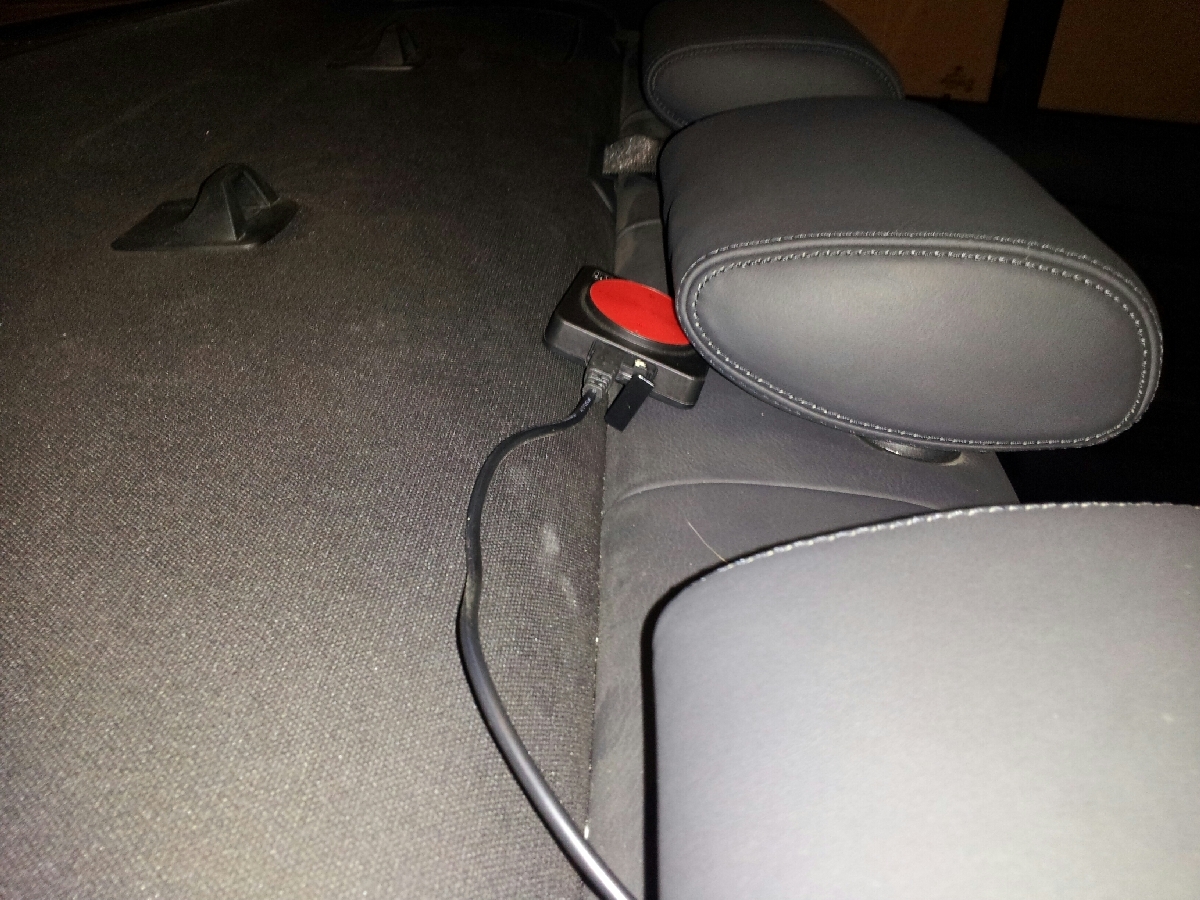 All the wiring on the floor as I got ready to start wiring everything in. Yay.  3) In case you haven't figured it out by now, everything is in the fuse box area behind the glove box. I hot-glued all the parts together to form a tower of sorts. From top to bottom: AndroidPC, 12V adapter, and the 12v USB hub.  I have Vishnu Procede, and the unit has a USB connector so that you can data log, among other things. I ran the cable into the cabin when I installed the unit. The cable only reached to the floor, so I ran 2 10ft USB extensions from the armrest to a) the Procede USB connection and b) to the USB hub. USB OTG (On The Go) allows a USB drive to be plugged into the AndroidPC so that it is seen as storage, so you can transfer files between it and the AndroidPc. This negates having to go through the glove box every time I wanted to add more music/movies. Before:  After: 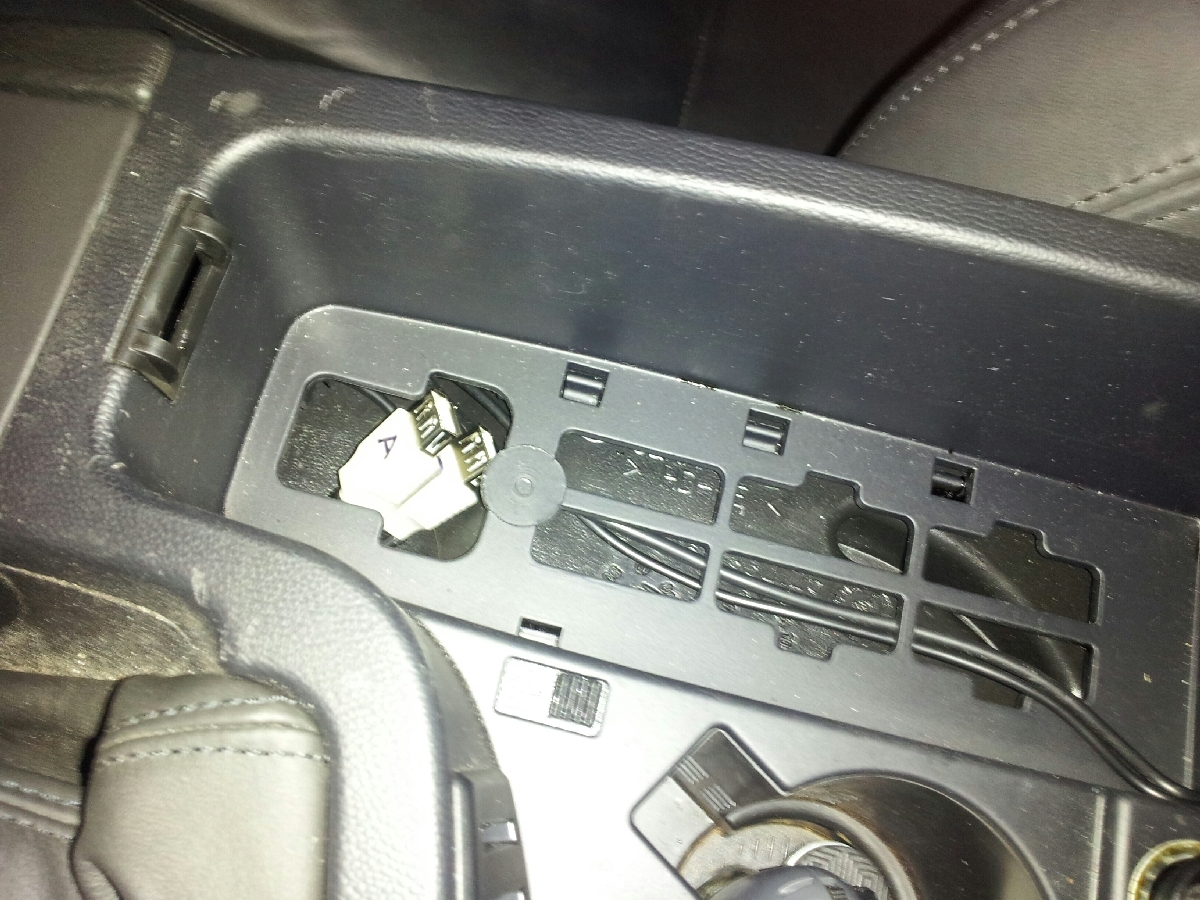 There's plenty of slack on the cables so I can simply pull them up and connect to the unit I'm needing at the time. 4) Since I had the Valentine Connection BT unit and pretty much had the dash apart, I thought I should go ahead and set that up as well.  I want to view the display via the V1 app on the AndroidPC. Looking @ the V1 wiring diagram, the V1 BT piece replaces the remote display unit in the wiring scheme. Since V1 has a LOT of work to do on the app, I wanted to run it in *conjunction* with the remote display unit. Prior to installing the V1 remote on/off unit with volume control, I found a little push button mute from a company called SafeNsound1. I purchased it, as well as their version of the V1 hard-wire connector. The only difference is that it has 2 AUX RJ-11 jacks vs the solitary one of the OEM V1 unit. They are pictured side by side below 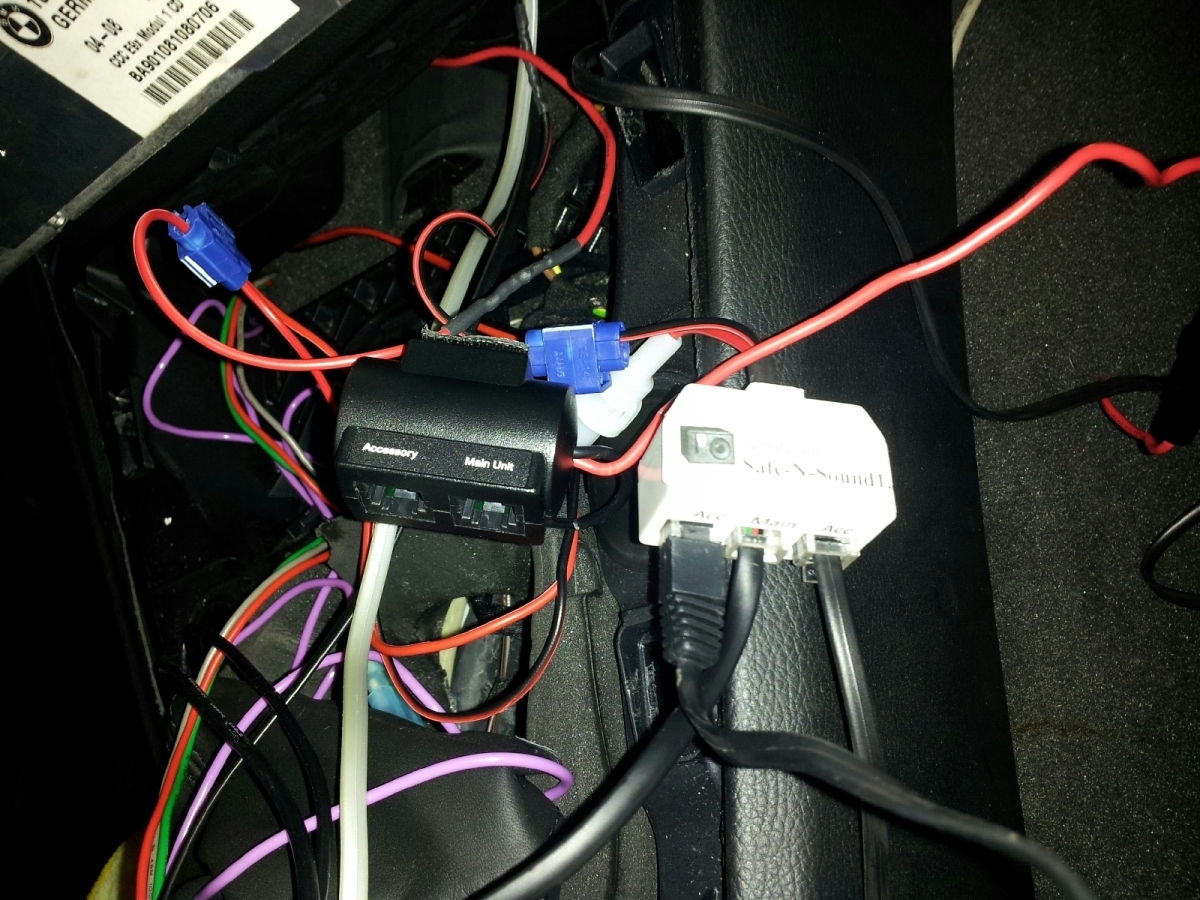 I was betting that I would be able to plug in the BT unit in the extra AUX unit and that everything would work okay. I got my spare set of hands and did some soldering 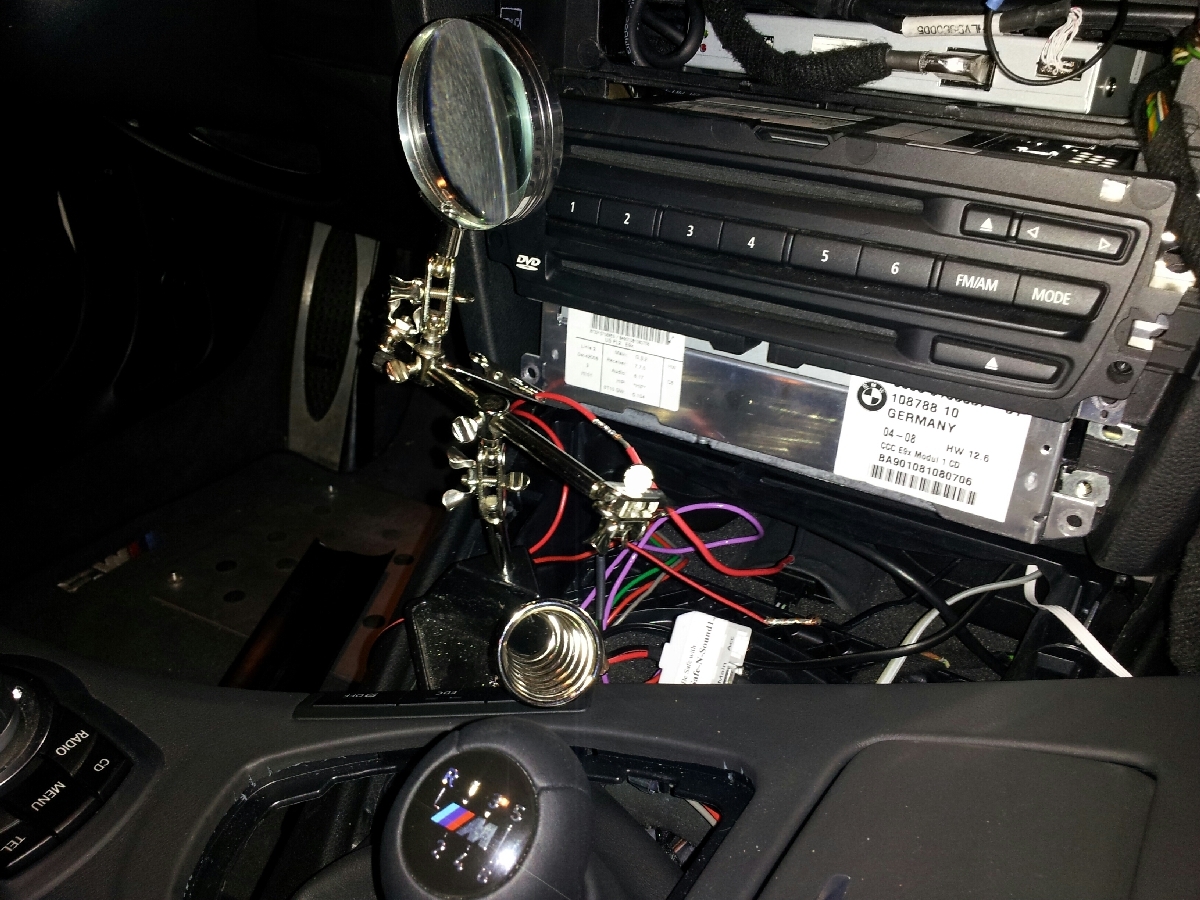 then I tested it. Flawless 5) The USB hub has 4 wires, 3 of which I used: power, ground, and remote turn on. I opened the wire jacket on the 12V splitter between actual splitter and the distribution block, and soldered the yellow lead from the USB hub to the power wire of the splitter. 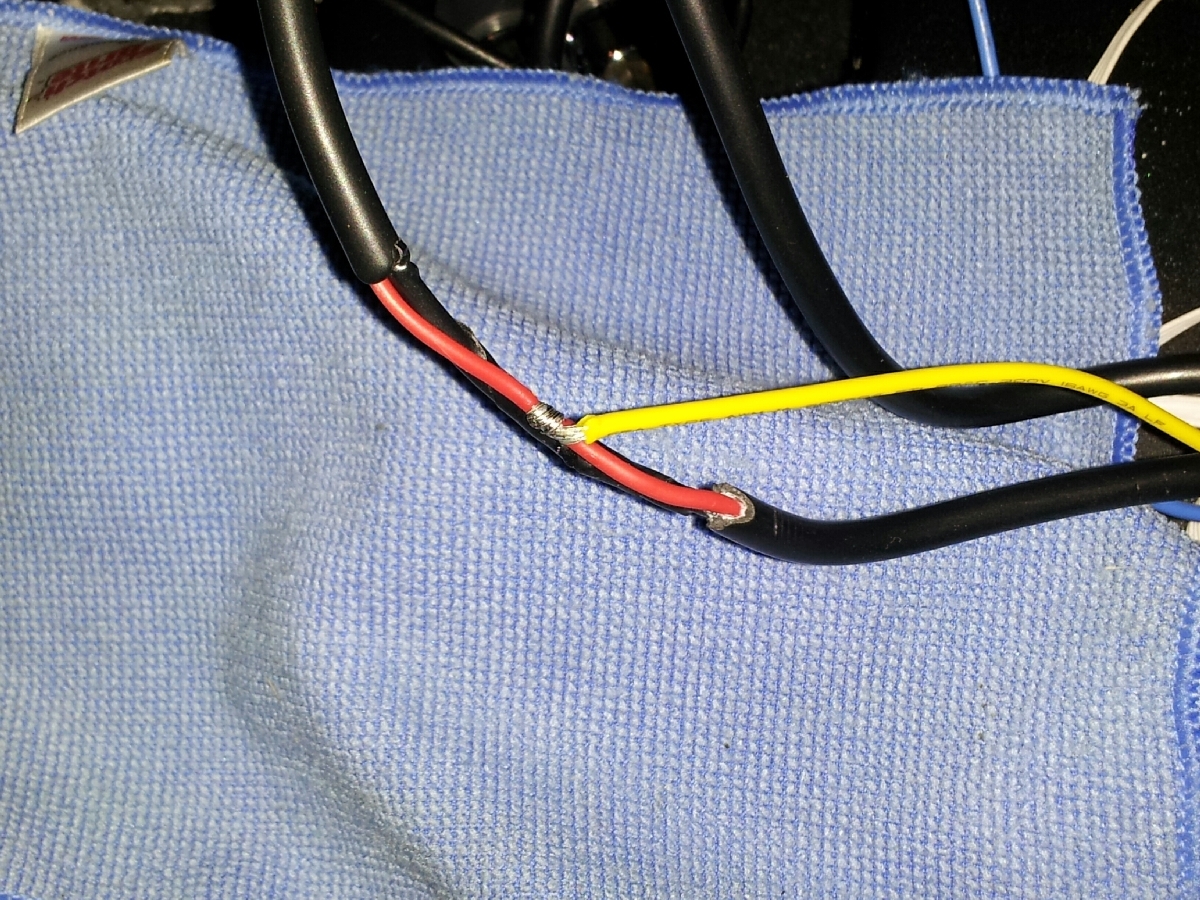 This way, I can have the setup running when the car is off if I so choose, as the power/ground wires for the USB hub are also run to the distribution block in the trunk, bypassing the rest of the car's electrical system. So, this is what everything looks like in the glove box  and with the door in place  This is where I mounted the on/off switches, using 3M VHB Heavy Duty Mounting Tape. 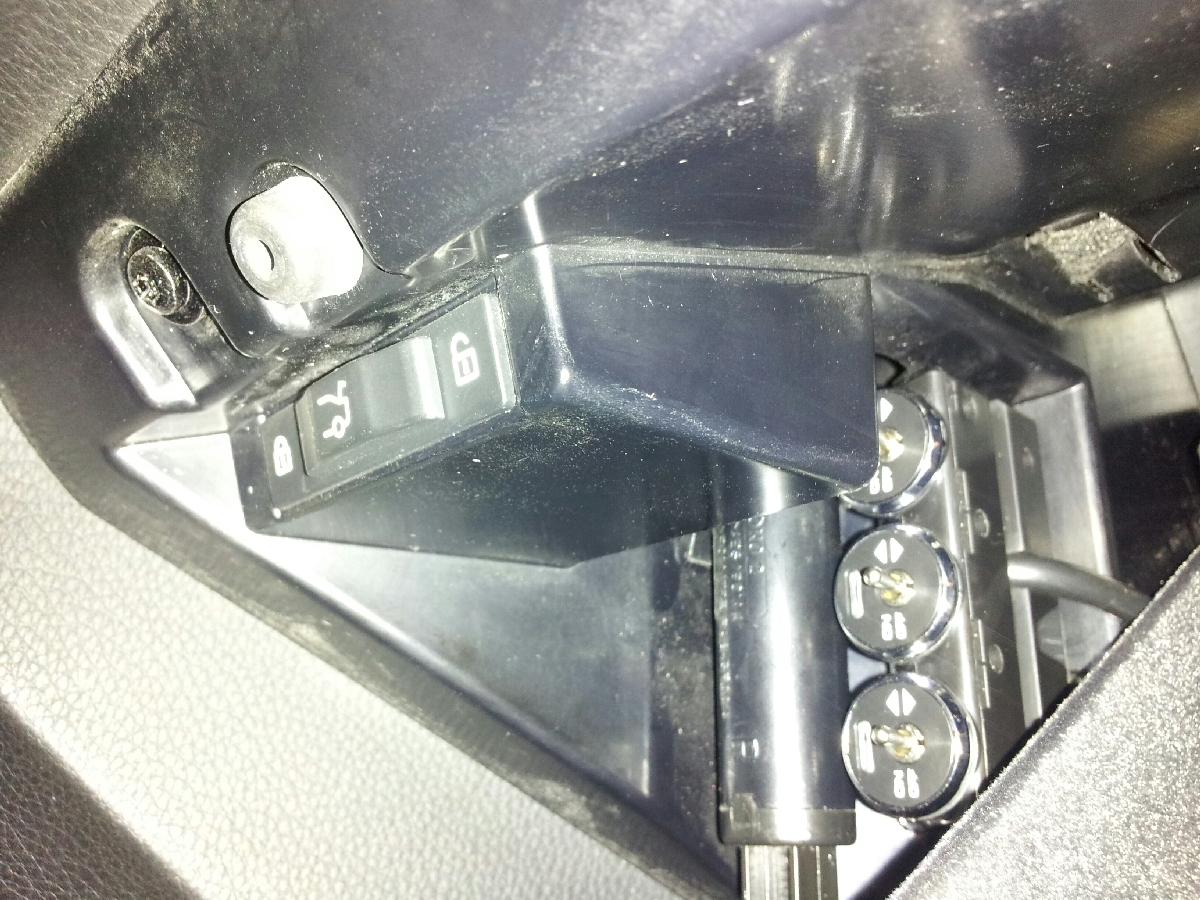 When you shut the glove box, the switches aren't visible, and the glove box opens/closes w/out an issue, and it is all easily reached from the driver's seat. In order to avoid having a wiring mess in the glove box, I purchased a bunch of 1 ft and 6" cables to attach things. Looks a lot better. There's a little "shelf" in the fuse box compartment, right above the computer "tower". The HDMI converter is located up there, as is the V1 BT unit. Almost finished now...ordered the touch pad we previously posted about, should be here next week. Last edited by whats77inaname; 06-02-2013 at 12:48 AM.. |
|
Appreciate
0
|
| 06-02-2013, 02:06 AM | #37 | |
|
Banned
825
Rep 3,387
Posts |
Quote:
No, no overscan on the edges, BUT, yes, I do wish it had better image quality. Contemplating trying to retrofit an HD screen with all of this. We'll see. And yeah, I'll get you some up close pics of the text. There are some in the videos I've shot, as well. |
|
|
Appreciate
0
|
| 06-04-2013, 05:50 PM | #38 |
|
Captain
433
Rep 855
Posts |
Very cool! Do those blue camera lights stay on all the time? Can't wait to see more pictures! I have to admit, I'm stealing ideas from you.
I received my BT gps (same as yours) today and was playing with it.. Since I haven't received my AndroidPC yet I used my old ThunderBolt and installed an app called Bluetooth GPS Provider. Is this what you're using? This thing is amazingly accurate and locks onto satellite in a few seconds even in my house (the very first time it took about a minute). I should be receiving my touchpad and AndroidPC this week and the MMI next week.. Going with hdmi to composite since I convinced myself I will not see a difference with a CCC screen. I noticed in a review that that there is an option to adjust the "zoom" which fixes any over scan. I remember hooking up a PC in 1998 and could not even see the Start menu.. Lol never again. |
|
Appreciate
0
|
| 06-06-2013, 04:05 PM | #39 |
|
Banned
825
Rep 3,387
Posts |
The blue lights are on when the camera is on, looks pretty spiffy @ night.
One of the issues I haven't been pleased about is the lack of internal battery with the AndroidPCs. Therefore, whenever I shutdown, in order to turn it back on, I have to flip the power switch associated w/that 12v socket off/on and it horks up the time (resets to 6am). Additionally, even though I've read on forums that the power draw is low, I still don't want this thing steadily killing the car's battery if I don't drive it for a few days. I determined that I need to put a battery inline to help alleviate some of these issues. I was originally looking at a car alarm backup battery, specifically the CrimeStoppers CS-412 kit. I quickly realized that it was a lead acid battery out of a UPS battery backup (think APC battery backup for your home computer). Coupled with the fact that they weigh a lot, I decided to keep searching. Requirements: -at least 5V DC, 1.5amp out -Li -DC-in compatible Found what I was looking for, once again, on eBay, for $27 shipped. http://www.ebay.com/itm/271175148537...84.m1439.l2649 It's 20,000mah, so it should have *no* problem keeping the unit running for days at a time. The AndroidPC will be plugged into the 2.1A USB out port, and the input side will be plugged into the 2.1A cigarette lighter adapter previously reserved for the AndroidPC. The AndroidPC doesn't come with a way to reboot, only shutdown. I'll pick one of these http://www.appbrain.com/search?q=reboot to handle that chore so that this way, it won't lose power anymore Hopefully everything works out. If not, it's cool, I'll have an extra battery charger for trips Last edited by whats77inaname; 06-06-2013 at 05:51 PM.. |
|
Appreciate
0
|
| 06-07-2013, 10:10 AM | #40 |
|
Banned

314
Rep 8,496
Posts |
so mobile data is being tethered through your cell phone? How about the mobile hotspot devices, can you simply just connect it to this system for data service?
|
|
Appreciate
0
|
| 06-07-2013, 02:06 PM | #41 |
|
Bored all the time
382
Rep 2,173
Posts |
I probably should have read the tread more carefully... however, did you actually replace the main screen or are you using this one over the stock one?
__________________
Current: 2014 991 Turbo RS
Past: 15 GT3, 17 R8 SC, Two 16 M4 GTSs, Two 18 GT350R's, Two 13 RS5s, 13 M3, 10 R8, 15 M4, 09 M3, 04 M3, 09 S5, 02 M3... It all started with an RX-7 (FD). |
|
Appreciate
0
|
| 06-07-2013, 06:19 PM | #42 | |
|
Captain
433
Rep 855
Posts |
Quote:
Doubt it will make any difference but there are ways to under-clock the CPU if its idle. I used to use SetCPU. Requires root and the right kernal. Just dont ask me what a kernal is haha! Do you need the GPS and HDMI converter powered on while the you are away? The GPS's battery will keep it on for a few hours so it will not have to rediscover satellite if your running into the store quick or something. Since you're already in the glove compartment, picking up switched (ignition) power will be easy. |
|
|
Appreciate
0
|
| 06-07-2013, 10:30 PM | #44 | |||
|
Banned
825
Rep 3,387
Posts |
Quote:
On the AndroidPC, MacroDroid is set so that when the wifi connects to the phone: a) poweramp will start b) the GPS BT app will start so I can connect to the BT GPS unit c) when all of this occurs, a voice says, "everything is functioning w/in normal parameters" *lol* (you can make rules that will make the device say anything you want) so I don't have to visibly check to make sure all tasks have been complete. Quote:
Quote:
Last edited by whats77inaname; 06-08-2013 at 01:05 AM.. |
|||
|
Appreciate
0
|
Post Reply |
| Bookmarks |
|
|


