

 |
|
 |

|
|
|
| 03-15-2012, 08:31 PM | #1 |
|
Captain
 
63
Rep 954
Posts |
Photo Editing Tips for Automotive photography
Hey everyone!
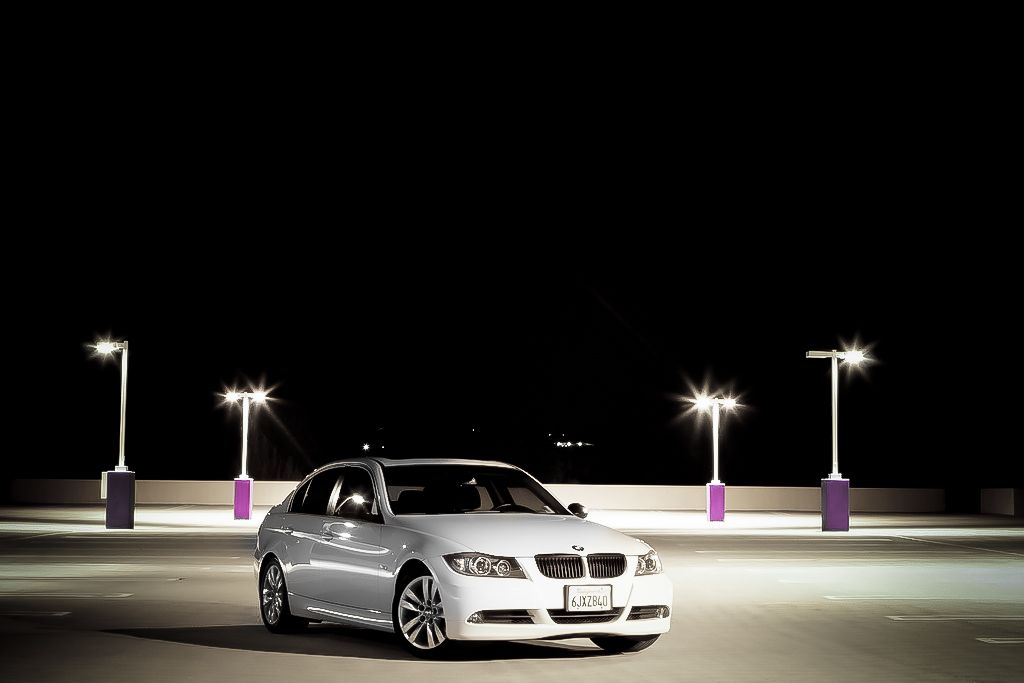
Just wanted to start a thread where we can all share our tips on how we go about editing photos of our cars. I see a lot work on here and I somewhat am a noob when it comes to editing photos of my car; I feel like it doesn't pop the way I'd like and end up just doing a B&W rendition cause the color image just has too many flaws exposed. I come with a portraiture background so how I go about editing photos if I need CS5 is different hehe I already have that on lock down but would like to learn how to edit my automobile photos What tools do you find yourself using the most (using cs5 here). A lot of the times I'm generally using levels and curve for a proper white balance and contrast for the overall image (I don't like to go over the top with these tools first since I think you need to edit each part of the car individually). other than that I use a lot of dodging and burning on a few layers and like to change the opacity of those layers to get a cleaner finish. But even with this, I guess im just not experience enough to get the sorta pop i'm looking for (thus why I just resort to B&W). Any tips? Ill provide a picture I took of my car (yup its stock sorry guys! hehe) and would like to see your rendition on how you'd edit it and know what you did/used to produce your final image. Before:  After:  I know respond to this post would take a bit of time so thank you to everything that responds
__________________
2006 E90 325i | Sports Package | 6MT | 3IM | PE | AA |
|
| 03-17-2012, 12:13 PM | #3 |
|
Colonel
 
212
Rep 2,327
Posts
Drives: a white bmw
Join Date: Aug 2008
Location: Cyprus
|
lol don't really know what i'm doing.. trial and error!! edited in Lightroom
__________________
E90post E9x photo game= 67[70-3]
COTM 06/11 http://www.e90post.com/forums/showthread.php?t=531094  My webpage. Feel free to visit My 500px |
|
Appreciate
0
|
| 03-17-2012, 04:17 PM | #4 | |
|
Captain
63
Rep 954
Posts |
Quote:
__________________
2006 E90 325i | Sports Package | 6MT | 3IM | PE | AA |
|
|
|
Appreciate
0
|
| 03-17-2012, 08:58 PM | #5 |
|
Daily Driven!
184
Rep 2,516
Posts
Drives: BMW 335i
Join Date: Jun 2011
Location: Central Illinois
|
Give me a little i'll post some up!
__________________
 |
|
Appreciate
0
|
| 03-17-2012, 09:03 PM | #6 |
|
Daily Driven!
184
Rep 2,516
Posts
Drives: BMW 335i
Join Date: Jun 2011
Location: Central Illinois
|
 Before^ 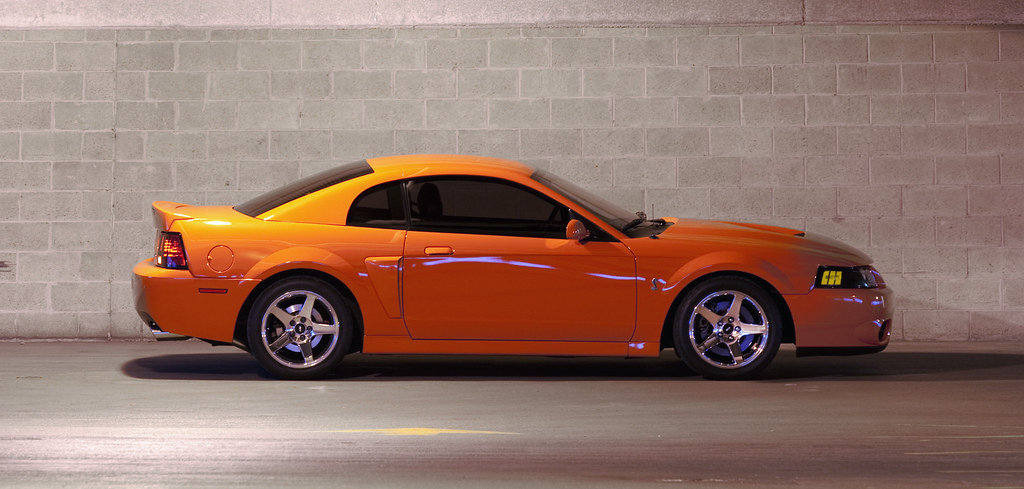 After^ Did some cropping, white balance correction, improved exposure, and sharpened it.
__________________
|
|
Appreciate
0
|
| 03-17-2012, 09:10 PM | #7 |
|
Daily Driven!
184
Rep 2,516
Posts
Drives: BMW 335i
Join Date: Jun 2011
Location: Central Illinois
|
 Before^  After^ Fixed white balance, sharpness, exposure, added a little blur in the background, stacked a photo of the hood open using layers and exposed the engine bay and some other stuff I probably forgot to mention.
__________________
|
|
Appreciate
0
|
| 03-17-2012, 09:18 PM | #8 | |
|
Captain
63
Rep 954
Posts |
Quote:
__________________
2006 E90 325i | Sports Package | 6MT | 3IM | PE | AA |
|
|
|
Appreciate
0
|
| 03-17-2012, 09:22 PM | #9 |
|
Daily Driven!
184
Rep 2,516
Posts
Drives: BMW 335i
Join Date: Jun 2011
Location: Central Illinois
|
This if for you OP lol
Before^  After^
__________________
|
|
Appreciate
0
|
| 03-18-2012, 03:46 PM | #11 | |
|
Captain
63
Rep 954
Posts |
Quote:
__________________
2006 E90 325i | Sports Package | 6MT | 3IM | PE | AA |
|
|
|
Appreciate
0
|
| 03-18-2012, 05:25 PM | #12 | |
|
Lieutenant
67
Rep 479
Posts |
Quote:
Ok, I tried again and this is about as good as I could do. I'm sure that you could do better, and if you blurred the background even more, the cloning would be harder to detect. 
__________________
 Last edited by spanner1751; 03-18-2012 at 06:06 PM.. |
|
|
Appreciate
0
|
| 03-21-2012, 05:31 PM | #13 | |
|
Captain
63
Rep 954
Posts |
Quote:
You can simply layer the two images and as long as your exposure is the same. the car itself will have the same exposure. You can start erasing the hood (be sure to change the opacity and flow of the brush so you don't get such hard edges on your brush) if you don't do this, your mistakes (no matter how careful you may be) will show and will look choppy. So I always work with w/ low percentages for both flow and opacity. You will have to erase the hood from both images (on each layer while working on photoshop). since you are workingw two layers, 1 layer will compensate for the area will have erased; in other words, when you are erasing the hood off the image layer with the engine bay exposed, you don't need to worry about erasing the image of the windshield because the layer under that (image of the hood down) will still have its windshield. at this point is a matter of balancing where to erase and playing with opacity of the layers to hide any rough edges and then you should be able to produce images like what he has.
__________________
2006 E90 325i | Sports Package | 6MT | 3IM | PE | AA |
|
|
|
Appreciate
0
|
| 03-21-2012, 05:40 PM | #14 | |
|
Brigadier General

1789
Rep 4,216
Posts |
Quote:
Thanks for the tip. I guess manual mode has to be used to keep the exposures the same between shots? For the post-processing step, I was also wondering if there was a more efficient mode of engine bay selection than manually erasing with the brush. I figure that in this image there are three layers? 1. the base pic with the hood down (hood erased)? 2. an overlay with the isolated exposedengine bay ( w ~30% transparency) 3. An overlay with the isolated hood (w ~80% transparency) - to give the lidded effect over the 'x-ray' image of the bay. I'll try that out one day. Need someplace isolated where I can take the time to get the right shots. Cool stuff.
__________________
2020 F87 M2 Competition /l\ LBB /i\ Executive Package 2013 E70 X5M /l\ Space Grey /i\ Full Silverstone Leather /l\ LED Headlights /i\ Comfort Access /l\ HUD /i\ Ventilated Seats /l\ 22" BBS SV BMW CCA Member |
|
|
Appreciate
0
|
| 03-21-2012, 05:57 PM | #15 | |
|
Captain
63
Rep 954
Posts |
Quote:
__________________
2006 E90 325i | Sports Package | 6MT | 3IM | PE | AA |
|
|
|
Appreciate
0
|
| 03-21-2012, 11:50 PM | #16 |
|
Lieutenant Colonel

116
Rep 1,528
Posts |
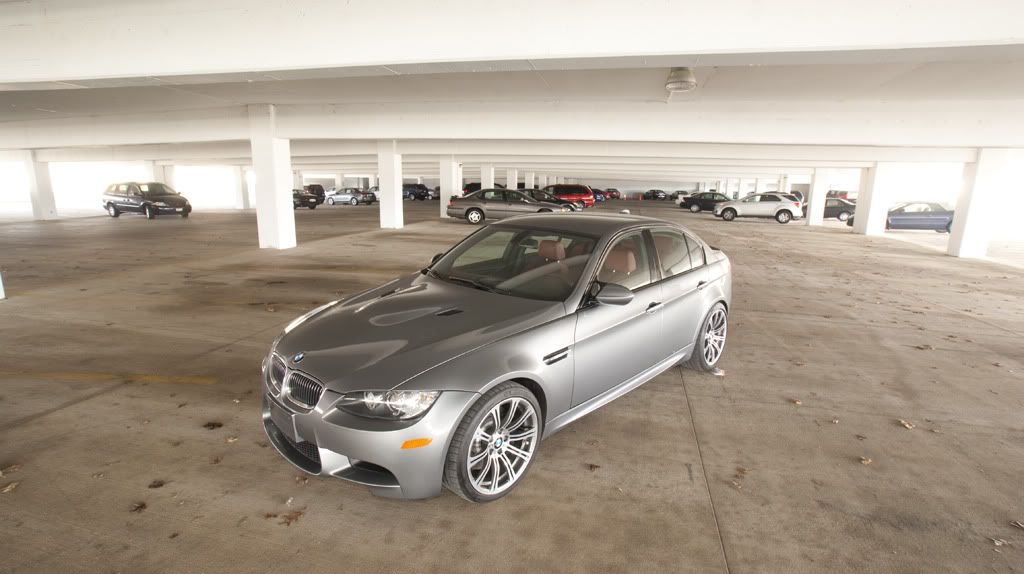
Took my shot with the M3, its pretty close to the way slow edited his shot but i have some little tweaks.
__________________
Muffler Delete/ Tien S-tech Springs / De-badged /BBS LM Reps 19"/ Nexen tires/DTM M5 Front bumper/ Injen Intake/Blacklines/M-tech Rear/Custom Muffler Tips.... More mods to come
|
|
Appreciate
0
|
| 03-22-2012, 03:32 AM | #17 | |
|
Captain
63
Rep 954
Posts |
Quote:
Can you walk us all through as so how you went about editing this? It feels like an HDR without being overdone and gimmicky. I want to find out how to process like this.
__________________
2006 E90 325i | Sports Package | 6MT | 3IM | PE | AA |
|
|
|
Appreciate
0
|
| 03-22-2012, 04:56 AM | #18 |
|
Lieutenant Colonel
116
Rep 1,528
Posts |
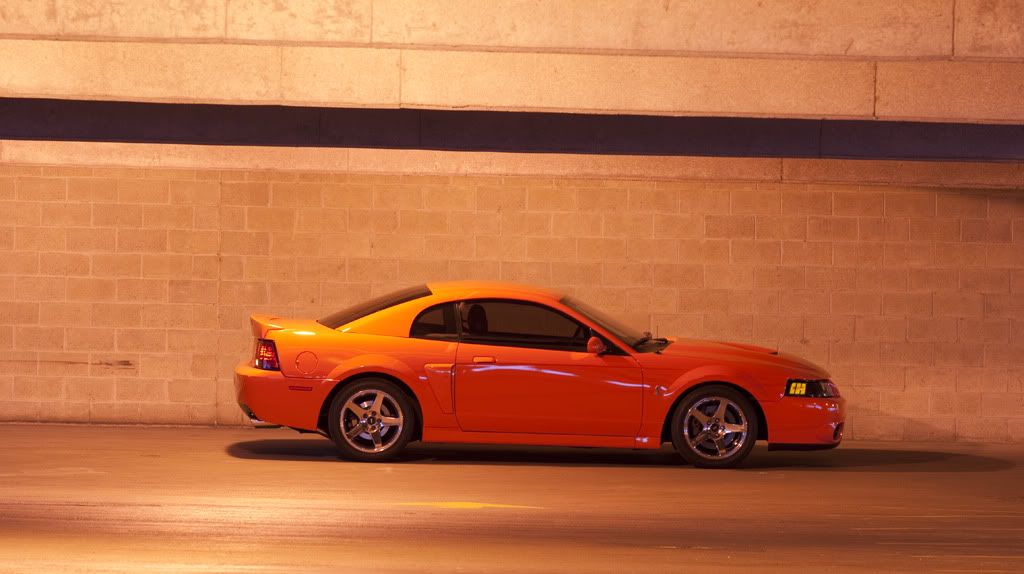
With the original photo, I had some issues with the composition. I felt that the car was sitting too low in the frame and had too much wasted space above the car. I cropped it down so you would focus more on the car and not have your eye wander around the frame. I used Lightroom's recovery slider to retain as much detail then messed with exposure to compensate for the dullness the recovery adds to the photo. I added contrast and messed with the fill light and Black clipping settings.
The photo felt a little warm so I cooled it down to suit the color of the car better. To get the texture out of the photo, I added clarity and vibrance to give it more depth. I then went and desaturated the photo so the colors in the back weren't too distracting. I boosted the highlights and lights and crushed the shadows and dark tones. Once i had all that set, I added a slight vignette to the image to focus your eye even more on the car. As for the hood, I wanted to keep the exposure of the car as balanced as possible. Having the hood darker than the rest of the car just didn't please my eyes so I bumped the exposure of the hood. Im not sure where the tiny amount of grain came from since I only rose the exposure slightly, probably due to the image being JPG rather than RAW. I did the same exposure boost to the seats just to bring out even more depth. I used the graduated filter tool to mimic a shallow depth of field. I feel I could have done better with it but it gets the job done. After looking at the photo again, I probably shouldve cropped out the left side of the frame. There is a piece of pillar in the frame that is a little out of place but o well. Hoped this helps you guys out in editing your photos. Oh and props to the photographer for taking the photo.
__________________
Muffler Delete/ Tien S-tech Springs / De-badged /BBS LM Reps 19"/ Nexen tires/DTM M5 Front bumper/ Injen Intake/Blacklines/M-tech Rear/Custom Muffler Tips.... More mods to come
|
|
Appreciate
0
|
| 03-22-2012, 12:31 PM | #19 | |
|
Captain
63
Rep 954
Posts |
Quote:
__________________
2006 E90 325i | Sports Package | 6MT | 3IM | PE | AA |
|
|
|
Appreciate
0
|
| 03-22-2012, 12:53 PM | #20 |
|
Justin Herass

333
Rep 1,205
Posts |
Heres an old shot of mine with the hood partially cropped out.
Little different style then totally cropping the hood out. I find it flows better. I was just doing a test shot so i didnt care if the car was dirty or not. 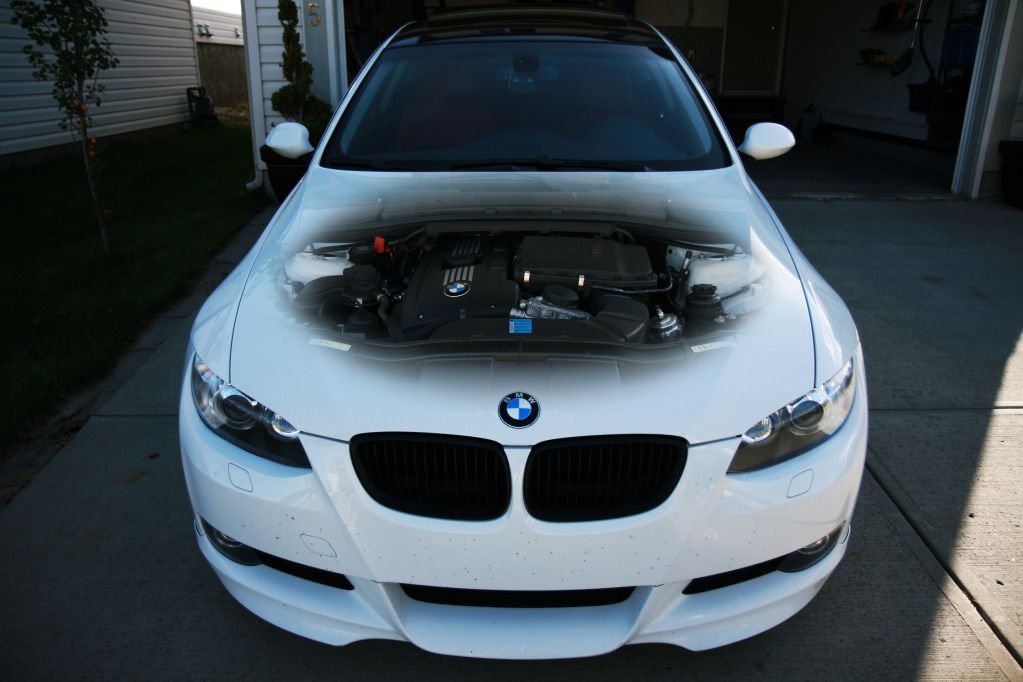
__________________
|
|
Appreciate
0
|
| 03-22-2012, 02:00 PM | #21 |
|
is probably out riding.
6058
Rep 2,294
Posts |
Same technique, different direction....
 
__________________
"There is no greater tyranny than that which is perpetrated under the shield of the law and in the name of justice. -Charles de Secondat"
 |
|
Appreciate
0
|
| 03-22-2012, 02:03 PM | #22 | |
|
Captain
63
Rep 954
Posts |
Quote:
What i like best about your edit is that you made the door transparent all the way to the edge (showing as much as the driver seat as possible). On top of that, you still keep details of your door visible; very nice edit for what you were trying to do. Now just work on composition and get a nice shoot in ^_^
__________________
2006 E90 325i | Sports Package | 6MT | 3IM | PE | AA |
Last edited by spacemonkey1112; 03-22-2012 at 02:09 PM.. |
|
|
Appreciate
0
|
Post Reply |
| Bookmarks |
| Thread Tools | Search this Thread |
|
|


