

 |
|
 |

|
|
|
| 09-26-2012, 10:37 PM | #67 |
|
Banned

842
Rep 3,387
Posts |
I picked up 2 sets of trim tools @ Harbor Freight. I used these 2 tools from each set and had both sides done in ~5 mins. I used the yellow one to work the end, and the blue one to work out the top clips, then pulled up a bit, then done. No marring/scratching of the paint, and as you can see, no broken ends.
Last edited by whats77inaname; 09-27-2012 at 09:46 AM.. |
|
Appreciate
0
|
| 10-07-2012, 10:56 PM | #68 |
|
Captain
 22
Rep 631
Posts |
Had attempted to remove these twice now with no luck...
Like the others have mentioned... I cant seem to get enough leverage and force to pry them out with the screwdriver method... Luckily I havent scratched or dented anything with my double masking tape protection *touch wood* Can anyone confirm if: 1) The gorilla tape method only works on E92? 2) Is the entire mesh piece removable (w/ zip tie method), if yes; Will I be able to unclip the side grill from that point? Thanks! |
|
Appreciate
0
|
| 11-03-2012, 01:42 PM | #69 |
|
Gone Fishin
7345
Rep 12,131
Posts |
I was able to do this today on my E90 in about 10 minutes total. Took really sticky packing tape and stuck 2-3 pieces on the old gills just on the chrome part. Made sure the tape was stuck all the way together at point of contact. Pulled while pressing up a little and both popped out pretty easily.
 |
|
Appreciate
0
|
| 05-28-2013, 02:55 PM | #70 |
|
Enlisted Member
 1
Rep 35
Posts |
Are there any pics of people using the zip tie method? Likely going to be trying this in the next week or so, and am interested in which method to use.
|
|
Appreciate
0
|
| 06-04-2013, 06:46 AM | #74 |
|
Lieutenant
146
Rep 409
Posts |
I just finished this mod. What a PITA. I consider myself fairly adept at DIY too.
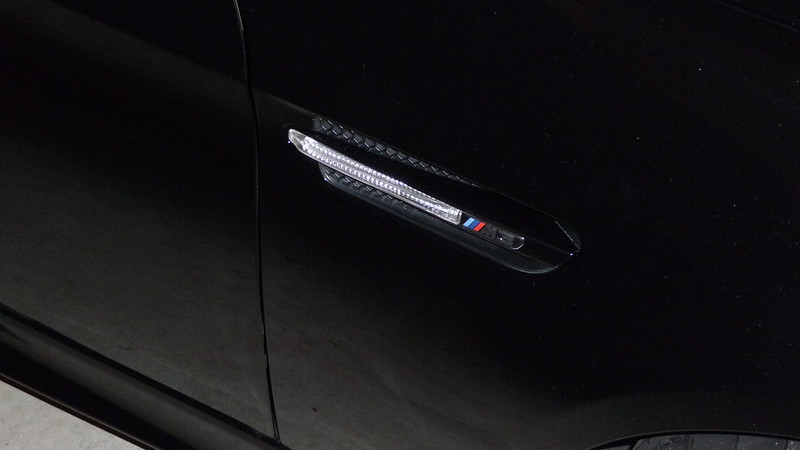
The problem is the plastic for the black honeycomb mesh is very soft and flexible. The tabs on the chrome/OEM gills are very rigid. You can squeeze the tabs together all you want from front or from behind inside the fender, and the honeycomb just gives with them. I was unable to remove the stock gills, even from behind with the washer tank completely removed, without breaking several chrome tabs. It is a bummer such a simple thing works this way. Also, I got my side gills from IND. In case it's not obvious to others, in order to get the badges to fit properly flush, you need to sand or grind down the flat vertical end. IND uses one of the aftermarket/generic matte black gills and they are not exact copies of the OEM ones. The stock ///M badges do not fit.
__________________
Jon Maddux
coupenut.blogspot.com x5nut.blogspot.com 16 X5d | 08 M3 Sedan | 06 M Coupe | 01 M coupe | 99 M coupe |
|
Appreciate
0
|
| 06-04-2013, 02:00 PM | #75 | |
|
Captain
40
Rep 824
Posts |
Quote:
|
|
|
Appreciate
0
|
| 06-04-2013, 10:22 PM | #76 |
|
Ninja
413
Rep 4,020
Posts |
Honestly I think is the "best" way to do it...more labor intensive, but less frustration and possible chance or paint damage..
http://www.m3post.com/forums/showthr...side+gills+e90
__________________
2019 AW G30 530e l ZPP l ZMP l ZDH
Retired: 2016 F80 M3, 2012 E90 M3, 2008 535i |
|
Appreciate
0
|
| 06-04-2013, 11:40 PM | #77 | |
|
Banned
842
Rep 3,387
Posts |
Quote:
 |
|
|
Appreciate
0
|
| 06-04-2013, 11:51 PM | #78 | |
|
Ninja
413
Rep 4,020
Posts |
Quote:
__________________
2019 AW G30 530e l ZPP l ZMP l ZDH
Retired: 2016 F80 M3, 2012 E90 M3, 2008 535i |
|
|
Appreciate
0
|
| 06-05-2013, 12:08 AM | #79 | |
|
Banned
842
Rep 3,387
Posts |
Quote:
|
|
|
Appreciate
0
|
| 06-05-2013, 11:16 AM | #80 | |
|
Lieutenant
146
Rep 409
Posts |
Quote:
That is the way I did it. It is the "least crappy" way to do it for sure.
__________________
Jon Maddux
coupenut.blogspot.com x5nut.blogspot.com 16 X5d | 08 M3 Sedan | 06 M Coupe | 01 M coupe | 99 M coupe |
|
|
Appreciate
0
|
| 04-14-2014, 07:08 PM | #82 |
|
Fo Shizzle

77
Rep 500
Posts |
My driver's side was such a pain that I had to use vice grips to pull it out. Nonetheless, I got it out and installed the BMW black chrome gills along with IND tinted side lights.
|
|
Appreciate
0
|
| 07-04-2014, 10:20 AM | #83 |
|
Lieutenant
21
Rep 542
Posts |
Just did it on my E90--a bit of pucker factor a few times, but using a taped up *small/thin* screwdriver & the Harbor Freight trim tools, I was able to get them done w/ microscopic paint 'disturbance' on the driver's side where I pried it from the back.
The stockers both 'popped' out as I worked them out--thankfully w/o broken tabs. Many thanks to the OP & other suggestions in the thread!
__________________
* '11 E71 X6 M MCB
* '16 Z51 M7 C7 Corvette--SCCA Solo/DE Weapon * '90 Corvette ZR-1 (Fast) |
|
Appreciate
0
|
| 11-09-2014, 05:46 PM | #84 | |
|
New Member
3
Rep 12
Posts |
Quote:
|
|
|
Appreciate
0
|
| 11-17-2014, 07:54 PM | #85 |
|
Major

471
Rep 1,318
Posts |
Great write up! I just got mine from iND and was looking for the lighting assembly! So you just unscrew the old one and replace it into the new purchased one?
|
|
Appreciate
0
|
| 02-02-2015, 11:27 PM | #87 |
|
Private First Class

27
Rep 162
Posts |
I read all the posts here. When it came time to do mine it was a difficult job. I ruined a set of pry tools in the process....but better that then my paint. In the end, prying one of the ends out far enough to slip some weed wacker line around the grill followed by a hard yank did the trick for me.
Fingers hurt like hell afterwards.... |
|
Appreciate
0
|
| 02-16-2015, 03:18 AM | #88 |
|
997.1TT
1017
Rep 1,672
Posts |
Anyone know where to get the side grill in black that aren't $300+?
I really want to get rid of the chrome so my side grills match my front hood grills (gloss black) but the only ones I have seen are expensive and I am not paying $300+ for a piece of plastic. I prefer one that doesn't include new LED's, just one that replaces the chrome with gloss black, includes the ///M emblem and reuses the old LED strip. |
|
Appreciate
0
|
Post Reply |
| Bookmarks |
|
|


