



 |
|
 |

|
|
|
| 02-10-2021, 07:15 PM | #2334 | |
|
First Lieutenant
 621
Rep 327
Posts |
Quote:
One more thing to add to the list... 
__________________
Chris
|
|
|
Appreciate
1
Bartledoo2708.00 |
| 02-10-2021, 07:23 PM | #2335 | |
|
Driver

2708
Rep 2,715
Posts |
Quote:
__________________
E90M 6MT Slicktop Single Humper in need of a diet
|
|
|
Appreciate
0
|
| 02-10-2021, 07:29 PM | #2336 | |
|
First Lieutenant
621
Rep 327
Posts |
Quote:
__________________
Chris
|
|
|
Appreciate
0
|
| 02-10-2021, 07:59 PM | #2337 |
|
///M Powered for Life

12760
Rep 11,154
Posts |
Very impressive Mr Bone! and thank you fsmtnbiker for helping develop and bring this to market!
I look forward to your track impressions! -6F sounds great for the supercharger! |
|
Appreciate
0
|
| 02-10-2021, 08:20 PM | #2338 | ||
|
Lieutenant General
 

11865
Rep 12,880
Posts |
Quote:
__________________
Instagram; @roastbeefmike
|
||
|
Appreciate
0
|
| 02-10-2021, 08:23 PM | #2339 | |
|
Driver
2708
Rep 2,715
Posts |
Quote:
__________________
E90M 6MT Slicktop Single Humper in need of a diet
|
|
|
Appreciate
1
roastbeef11864.50 |
| 02-11-2021, 05:12 AM | #2340 |
|
Second Lieutenant

360
Rep 259
Posts |
I love that interior door panel, what brand are they?
__________________
Instagram: @m_rochen
Alpinemss Tuned | Tecnocraft E9X ///M3 Envy™ Intake System | MS Pulleys | Akrapovic Evolution Exhaust | Ohlins Road&track| BBK Brembo 6p Front & Brembo 4p Rear| H&R Stabilisator| Solid subframe bushings| full spherical bushings| Recaro pole position |
|
Appreciate
0
|
| 02-11-2021, 06:28 AM | #2341 |
|
Major General

3086
Rep 6,812
Posts
Drives: GT3 Cup, X7, G80 M3
Join Date: Jan 2009
Location: Wisconsin - Instagram - @slicer_m
|
Motorsport 24
__________________
Past BMW's: E36M3, E46M3, E90M3, E92M3(x2), i3, F31 330i Touring, F87 M2CS, F97 X3M, G05 X5, Fall-Line E46 with S65 Swap
Current BMW's: G07 X7, G80 M3 (LSB on Tartufo) Race Car: Porsche 992 GT3 CUP INSTAGRAM - @Slicer_M |
|
Appreciate
1
Rochen_00359.50 |
| 02-12-2021, 05:20 PM | #2342 |
|
Colonel
 
5576
Rep 2,866
Posts
Drives: '09 E90 M3 - IB
Join Date: Feb 2012
Location: 93 million miles from the Sun
|
Installation of the Zebulon splitter:
The E9x M3 splitter will arrive pre-drilled with countersunk holes. Do not drill random holes into the splitter! The splitter is about an inch thick. The whole thing is around 6-7 pounds. Inside the splitter, there are 4 strategically placed high density wood hard points (bonds to the layup very well) which are used for mounting and to spread the loads generated through the splitter effectively. These points are set for the mount points used in this procedure but for Zebulon's builds, can be moved anywhere a customer would like to mount from. Also inside the splitter at each side are Inserts to provide mounting points for the end fences and skid plates. The toughest task of the installation is the mounting of the aluminum brackets to the crash beam. After watching the install, here is how I would suggest mounting the splitter: Jack up the entire front of the car onto jack stands. 1. Remove the two front-most oil pan skid plate bolts and replace them with the provided bolts. They look like this. 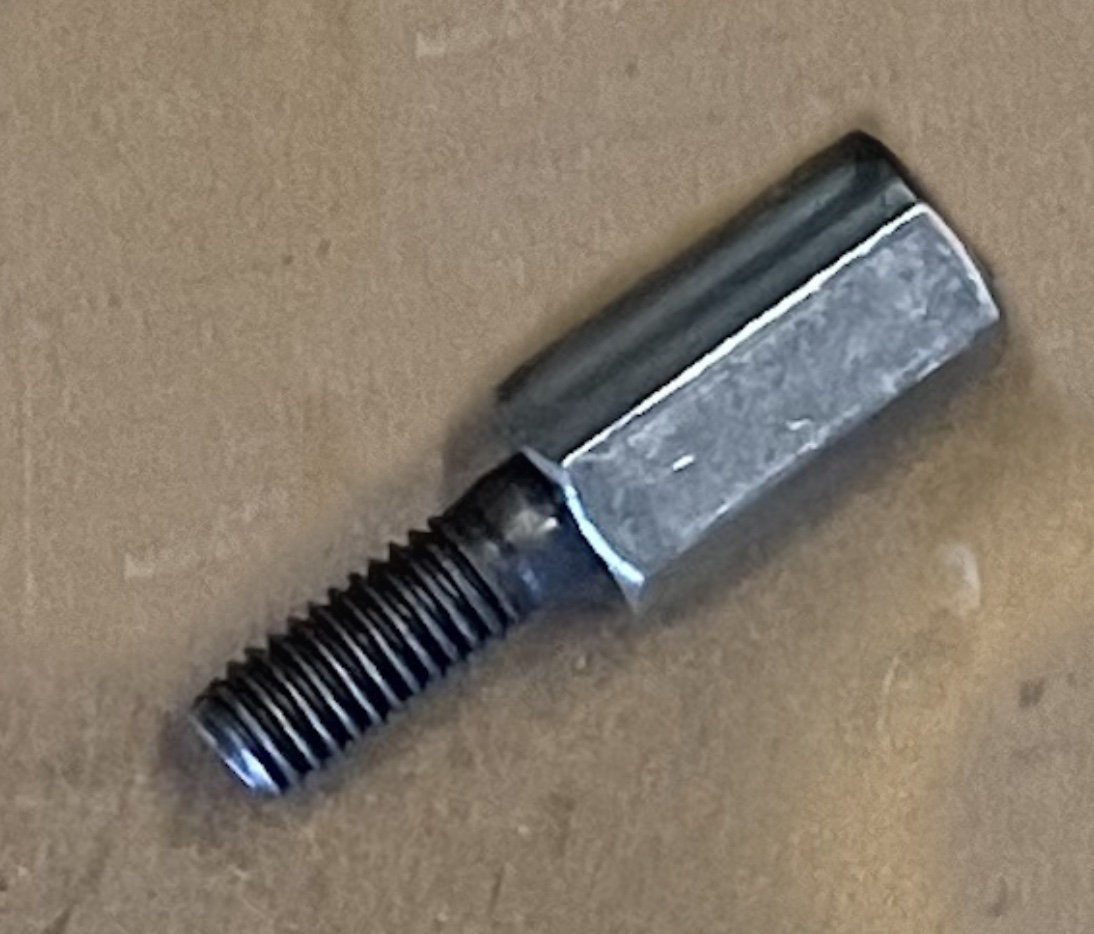 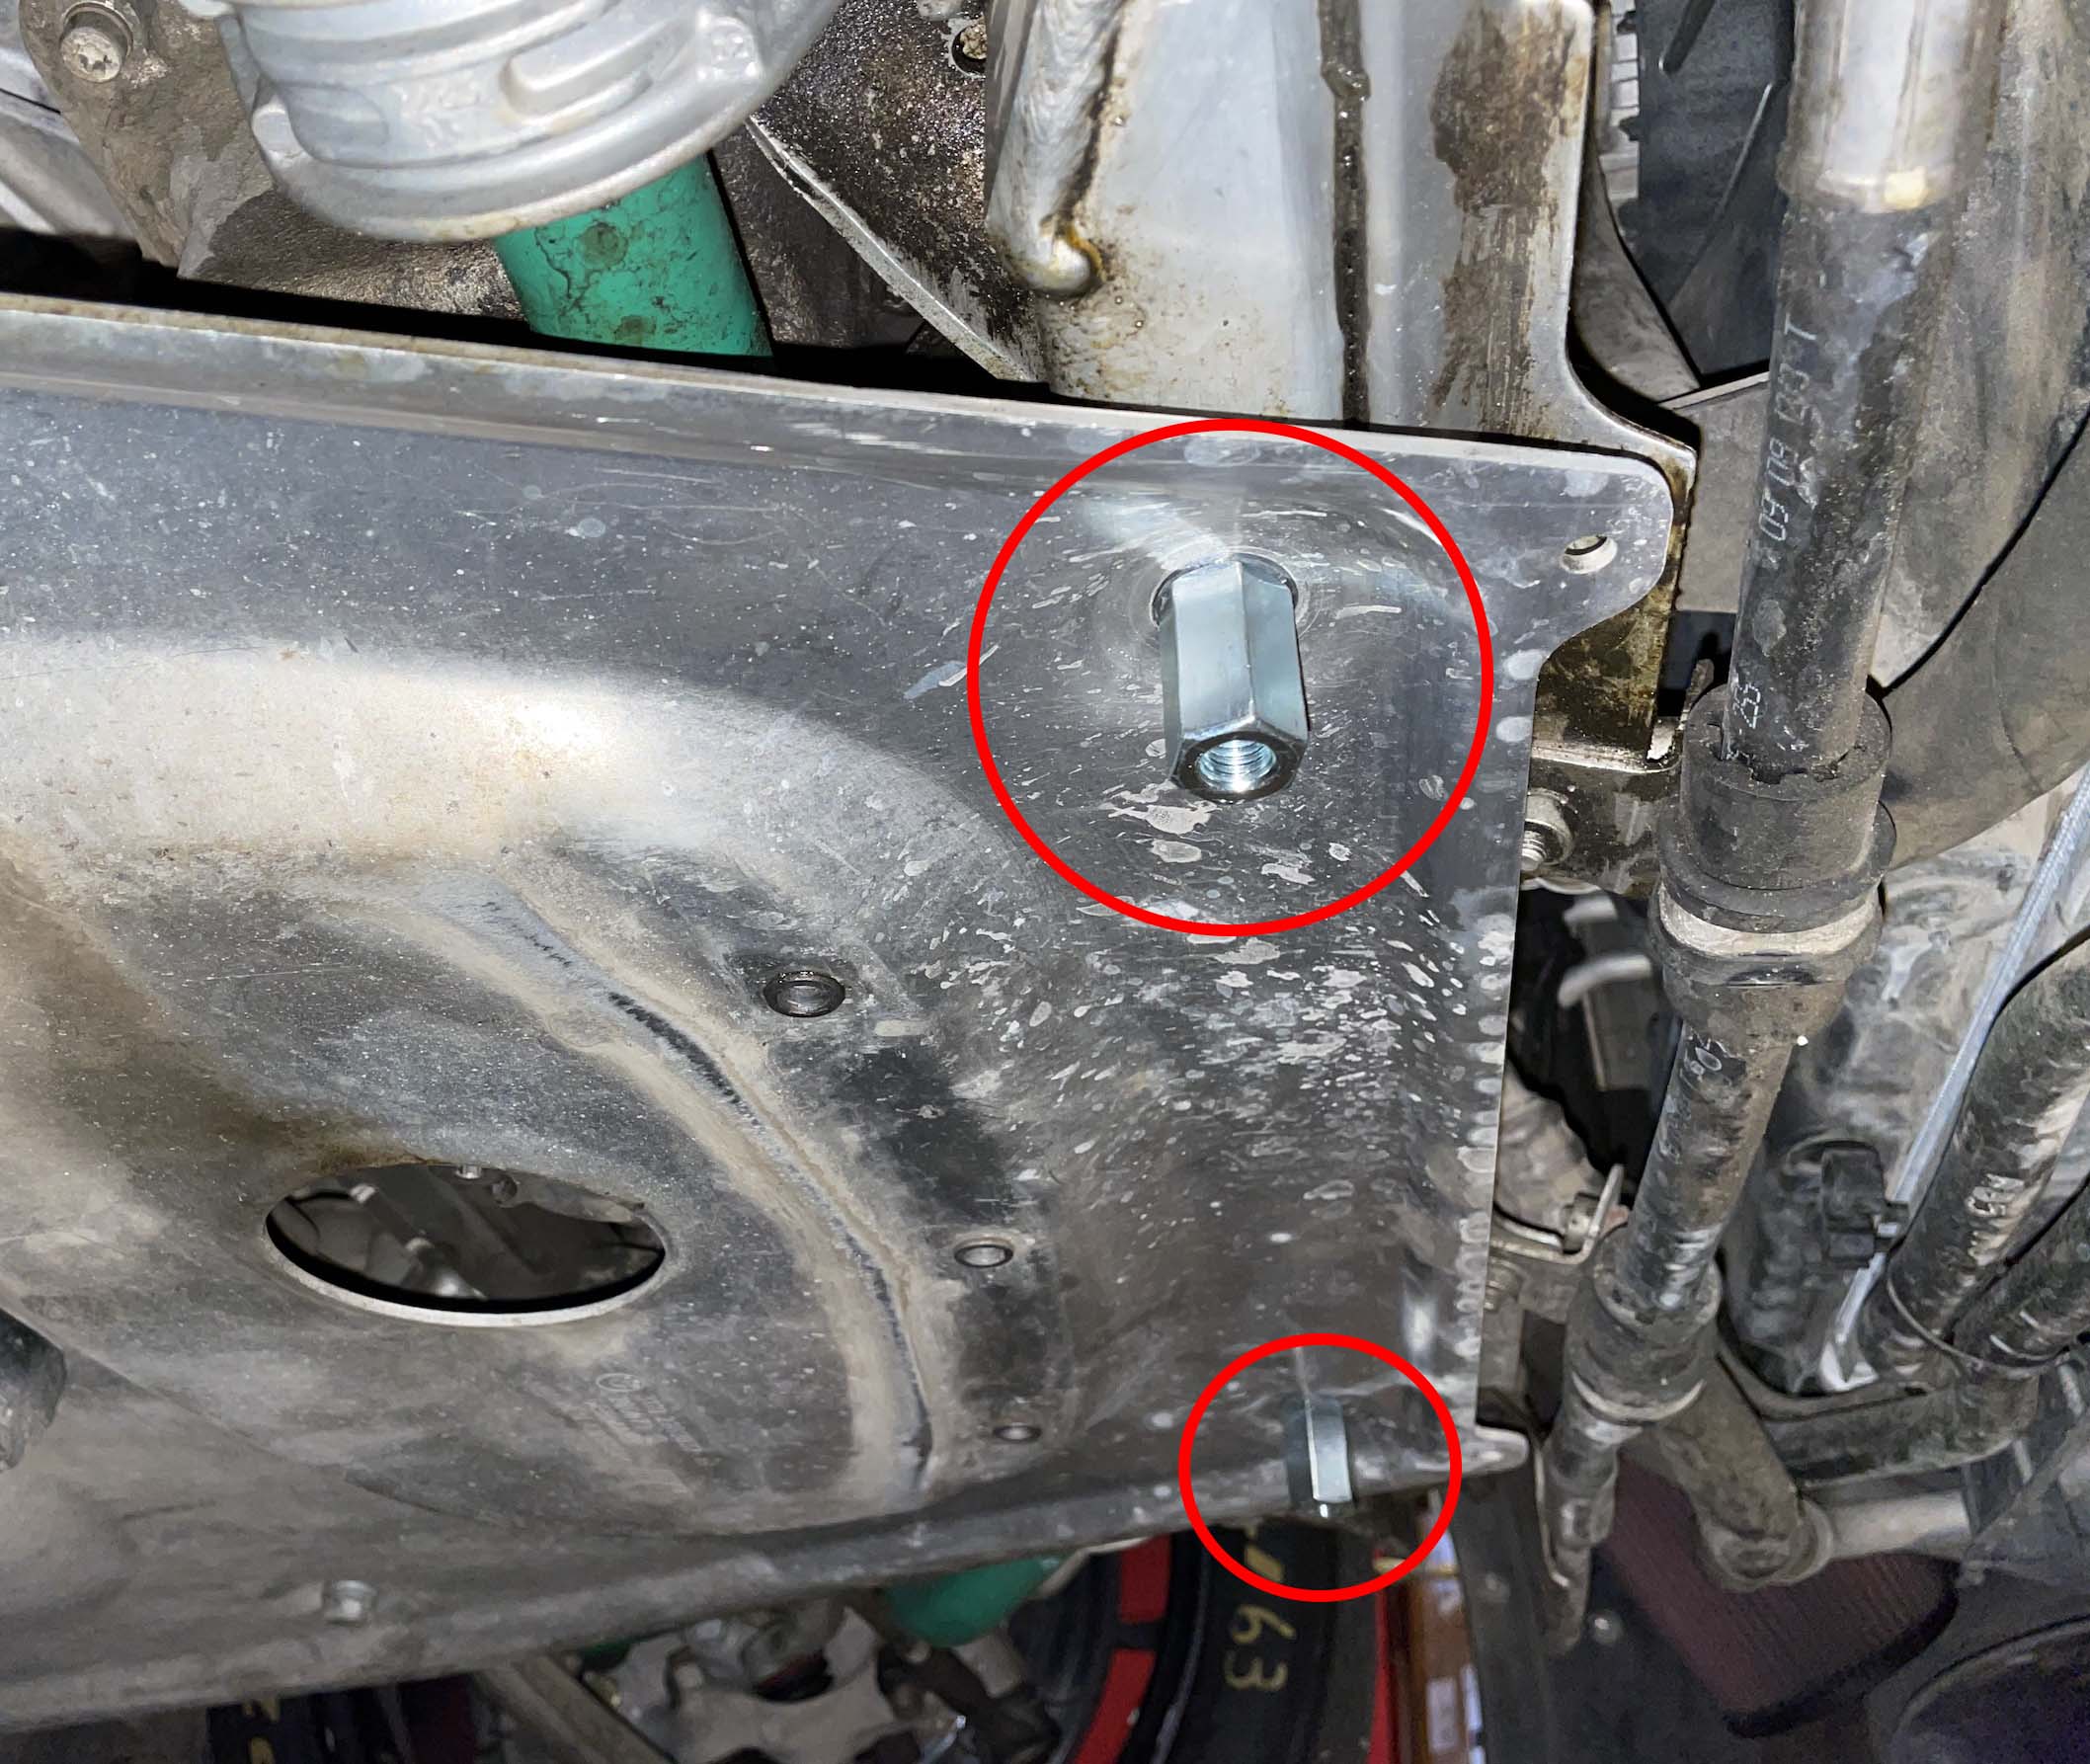 These piggy-back bolts/spacers serve two purposes: A. They’re a spacer to help set the height of the rear of the splitter because the splitter sits up against them. The height set by these bolts/spacers allows the splitter to clear all the hoses and other stuff under the car. You can’t go any shorter (higher) than what these bolts set because then the splitter would be hitting stuff under the car. B. They are the rear screw-in points for the splitter because the bolts that go through the rear of the splitter screw into the bottom of these piggyback bolts. If you wanted to lower the rear of the splitter, you could put washers between the bolt and the skid plate. Later, once the angle has been set, these two bolts should be red loctited into place. 2. Attach the two T-brackets onto the splitter with the 4 provided bolts and nyloc nuts. These two brackets are the front mounting points on the splitter. Later in the installation process, they will connect to the gas shocks once you have drilled them with a mounting hole in the desired location. The vertical portion of the T-brackets will arrive to the customer undrilled as shown in the picture. Since each car is slightly different, the user will have to find the proper place to drill the vertical part of the bracket. 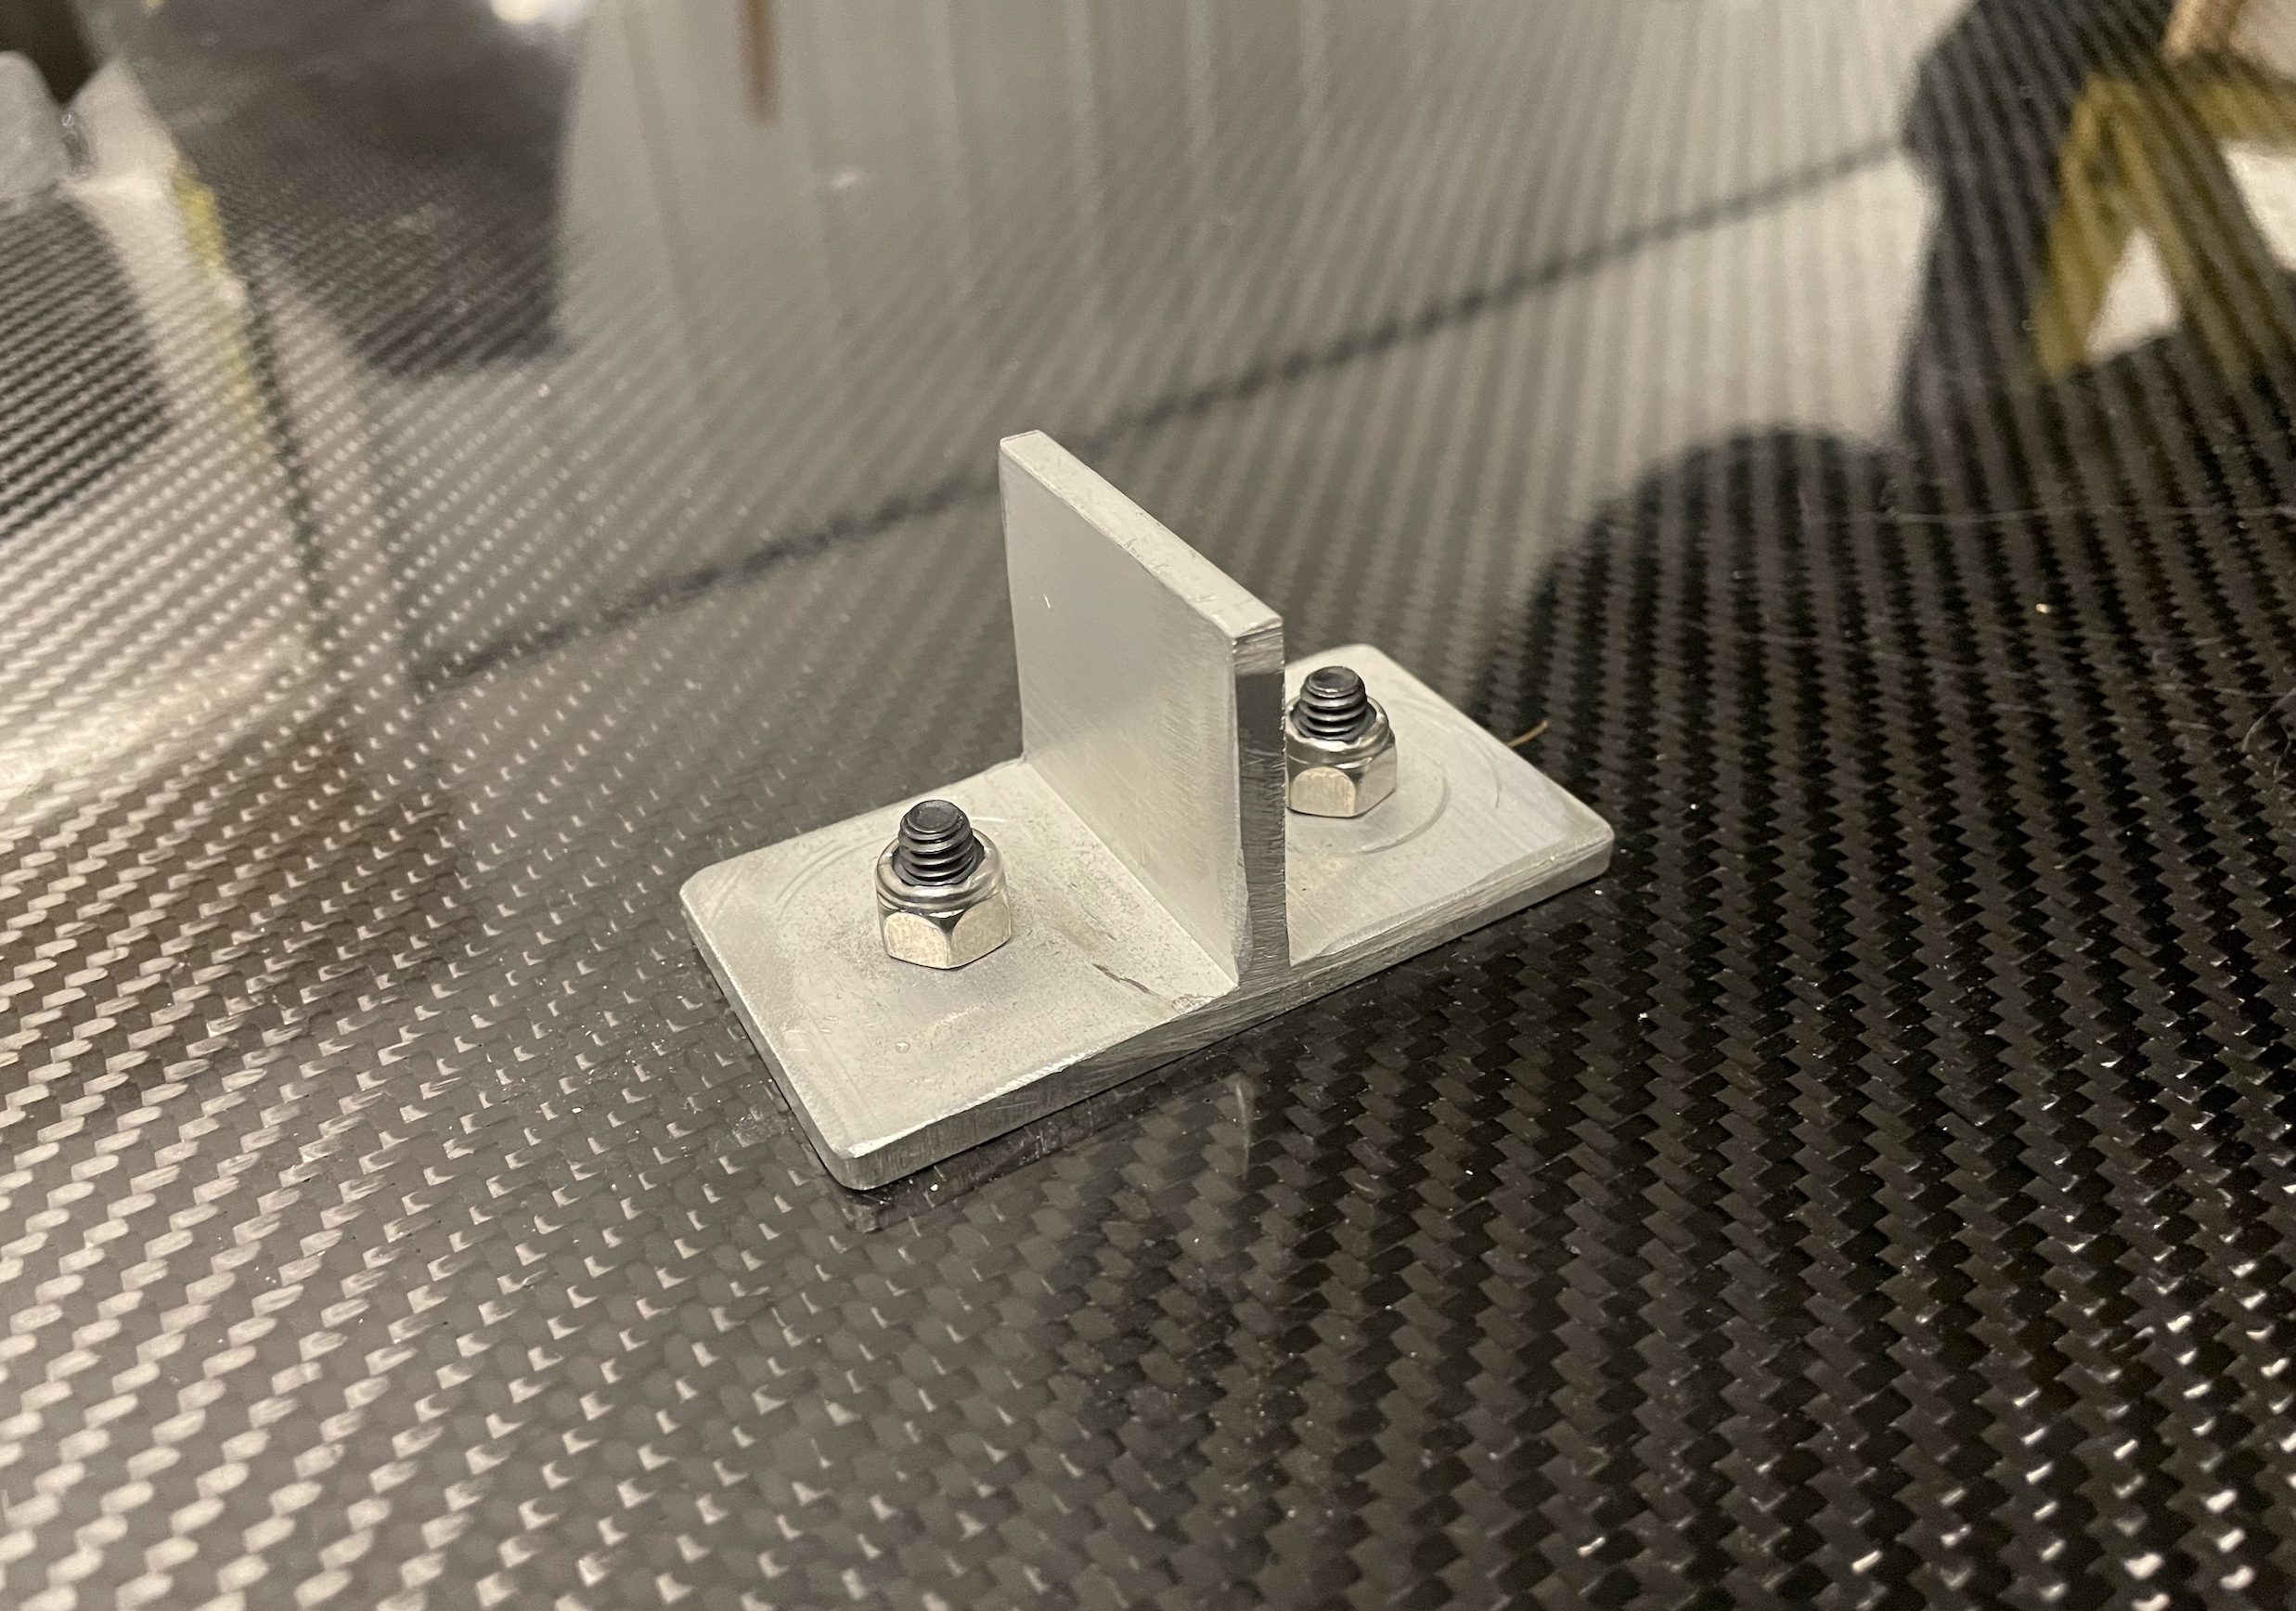 3. Attach splitter to the car via the rear mounting points. If you’re on jack stands, the easiest way to do this is to get under the car on your back. Ryan started on the driver side and threaded the first bolt and turned it just a couple threads in. Do not tighten this first bolt until the second one has been attached. While supporting the splitter, he then moved to the passenger side and threaded that bolt. Once both bolts are connected, you go back and forth between the two bolts several times to bring the tightness up. Once the two screws are tight, the splitter can sit there and support itself with just those two screws. You shouldn’t go insane with the tightness on the screws, but they should be "Gutentight" on final installation. The more you tighten these rear screws, the less downward angle you get during fitment so don't go too tight, just beyond snug is good for now. Don’t stress about the angle yet: The angle you get from these rear screws is just to get into the ballpark. The final angle is set by where you will place the holes in the front T-brackets. Once the Front mounts are done, you can tighten the back bolts more (and blue loctite them if you want). In this pic, the splitter is only being supported by the rear two bolts—nothing else.  The holes in the splitter are countersunk so all the big bolts sit flush on the bottom side. 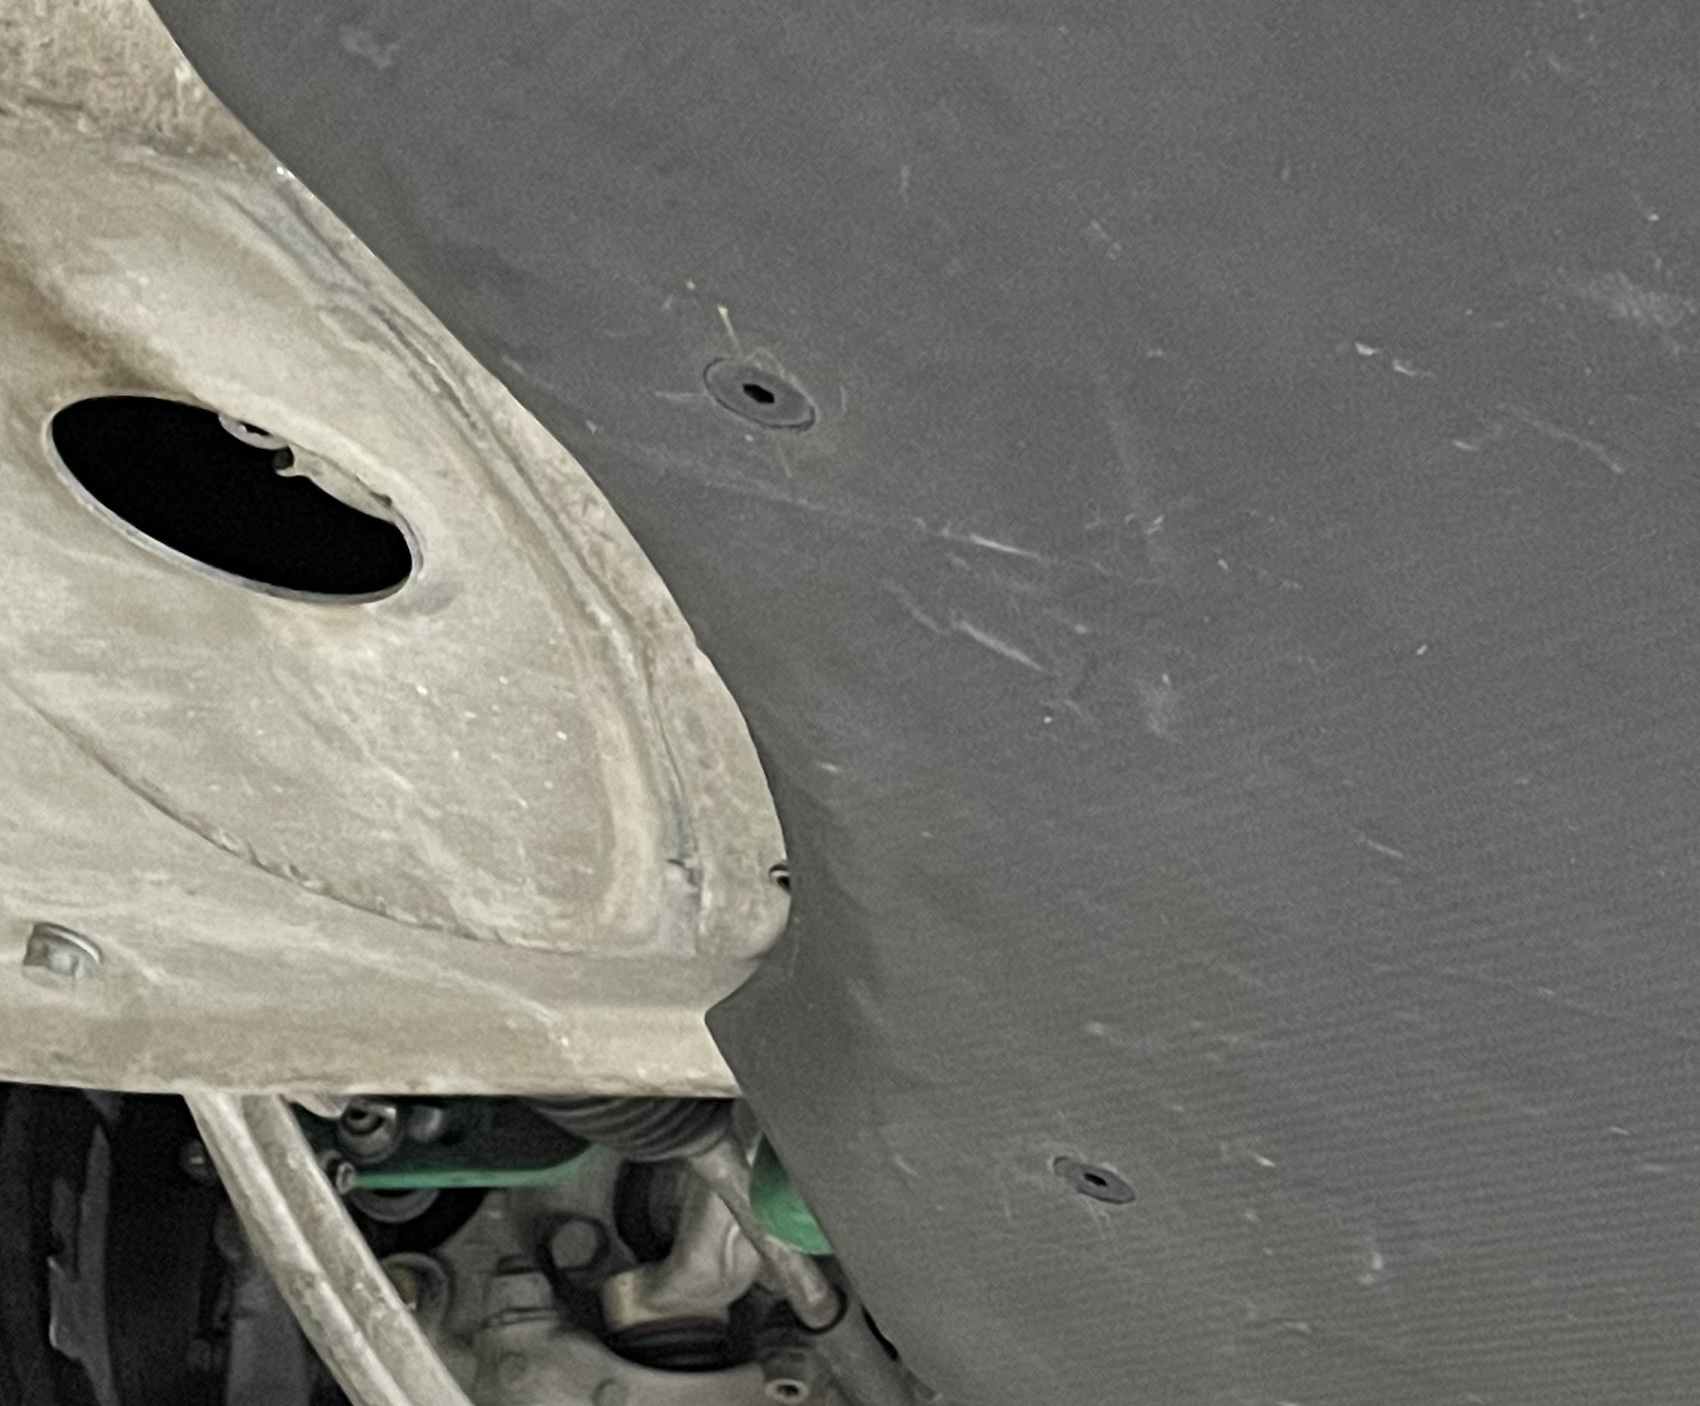 4. Lower the car to the floor and roll it several feet in both directions to settle the suspension. 5. Check angle and height of the splitter. It should be in the ballpark because of the piggyback bolts that were used. The ideal situation would be that the bottom of the nose of the splitter is around 3 inches from the ground and the angle should be around -2º (The nose should be pointing down by 2º) The angle target is -1 º to -3 º depending on downforce levels required, and you can drill different holes in the T-Bracket for adjustment if you choose to. Ryan was using a digital angle finder. I tried checking it with my iPhone and got almost the exact same results. If the overall splitter sits too high off the ground, you could add washers in the rear between the piggyback bolts and the oil pan skid plate, or you could lower the car. If it’s too low, your only option is to raise the front of the car. On my particular car, we did not need to make any changes to the height or angle. Everything looked good. If you need to make adjustments, you will need to repeat steps 4 and 5 until you get into the desired range. Once you’ve determined the height is final, the next time the car is raised, remove the splitter and then remove the piggyback bolts from the skid plate. Red loctite the piggyback bolts into the skid plate and re-attach the splitter via the two rear bolts. If you aren’t planning on removing the splitter very often, you can also put blue loctite on the bolts that go through the splitter into the piggyback bolts. 6. Raise the car back onto the jack stands. (Do the red loctite thing now.) 7. Crash beam aluminum brackets. Two aluminum brackets need to be placed directly above the vertical part of the T-brackets. Zebulon will deliver 2 crash beam brackets that are shaped to fit between all the stuff in the front bumper area. These brackets will have all necessary holes pre-drilled including the mounting hole for the gas shock. You will want the gas shock mounting hole of the crash beam bracket to vertically line up with the vertical part of the T-bracket. It doesn’t have to be precise to the micro-milimeter. It just needs to allow the gas shock to generally be inline with the T-bracket. All these do is take vertical loading. Both of my gas shocks are at slight angles. You may need to temporarily remove the air ducts to install the brackets. We didn’t during my install. The crash beam is not an overly friendly place to be drilling and installing brackets. The ideal places for the brackets present some challenges. On the driver side, you may need to drill within the crash beam’s waffle pattern which is very tight when you go to secure the nuts. On the passenger side, you might need to clear some bracing, but you can place the brackets where you prefer to help you drill and bolt them on as you wish. You will be drilling 4 holes in the crash beam total. Use the brackets as templates on where to drill. Check out the pix below. 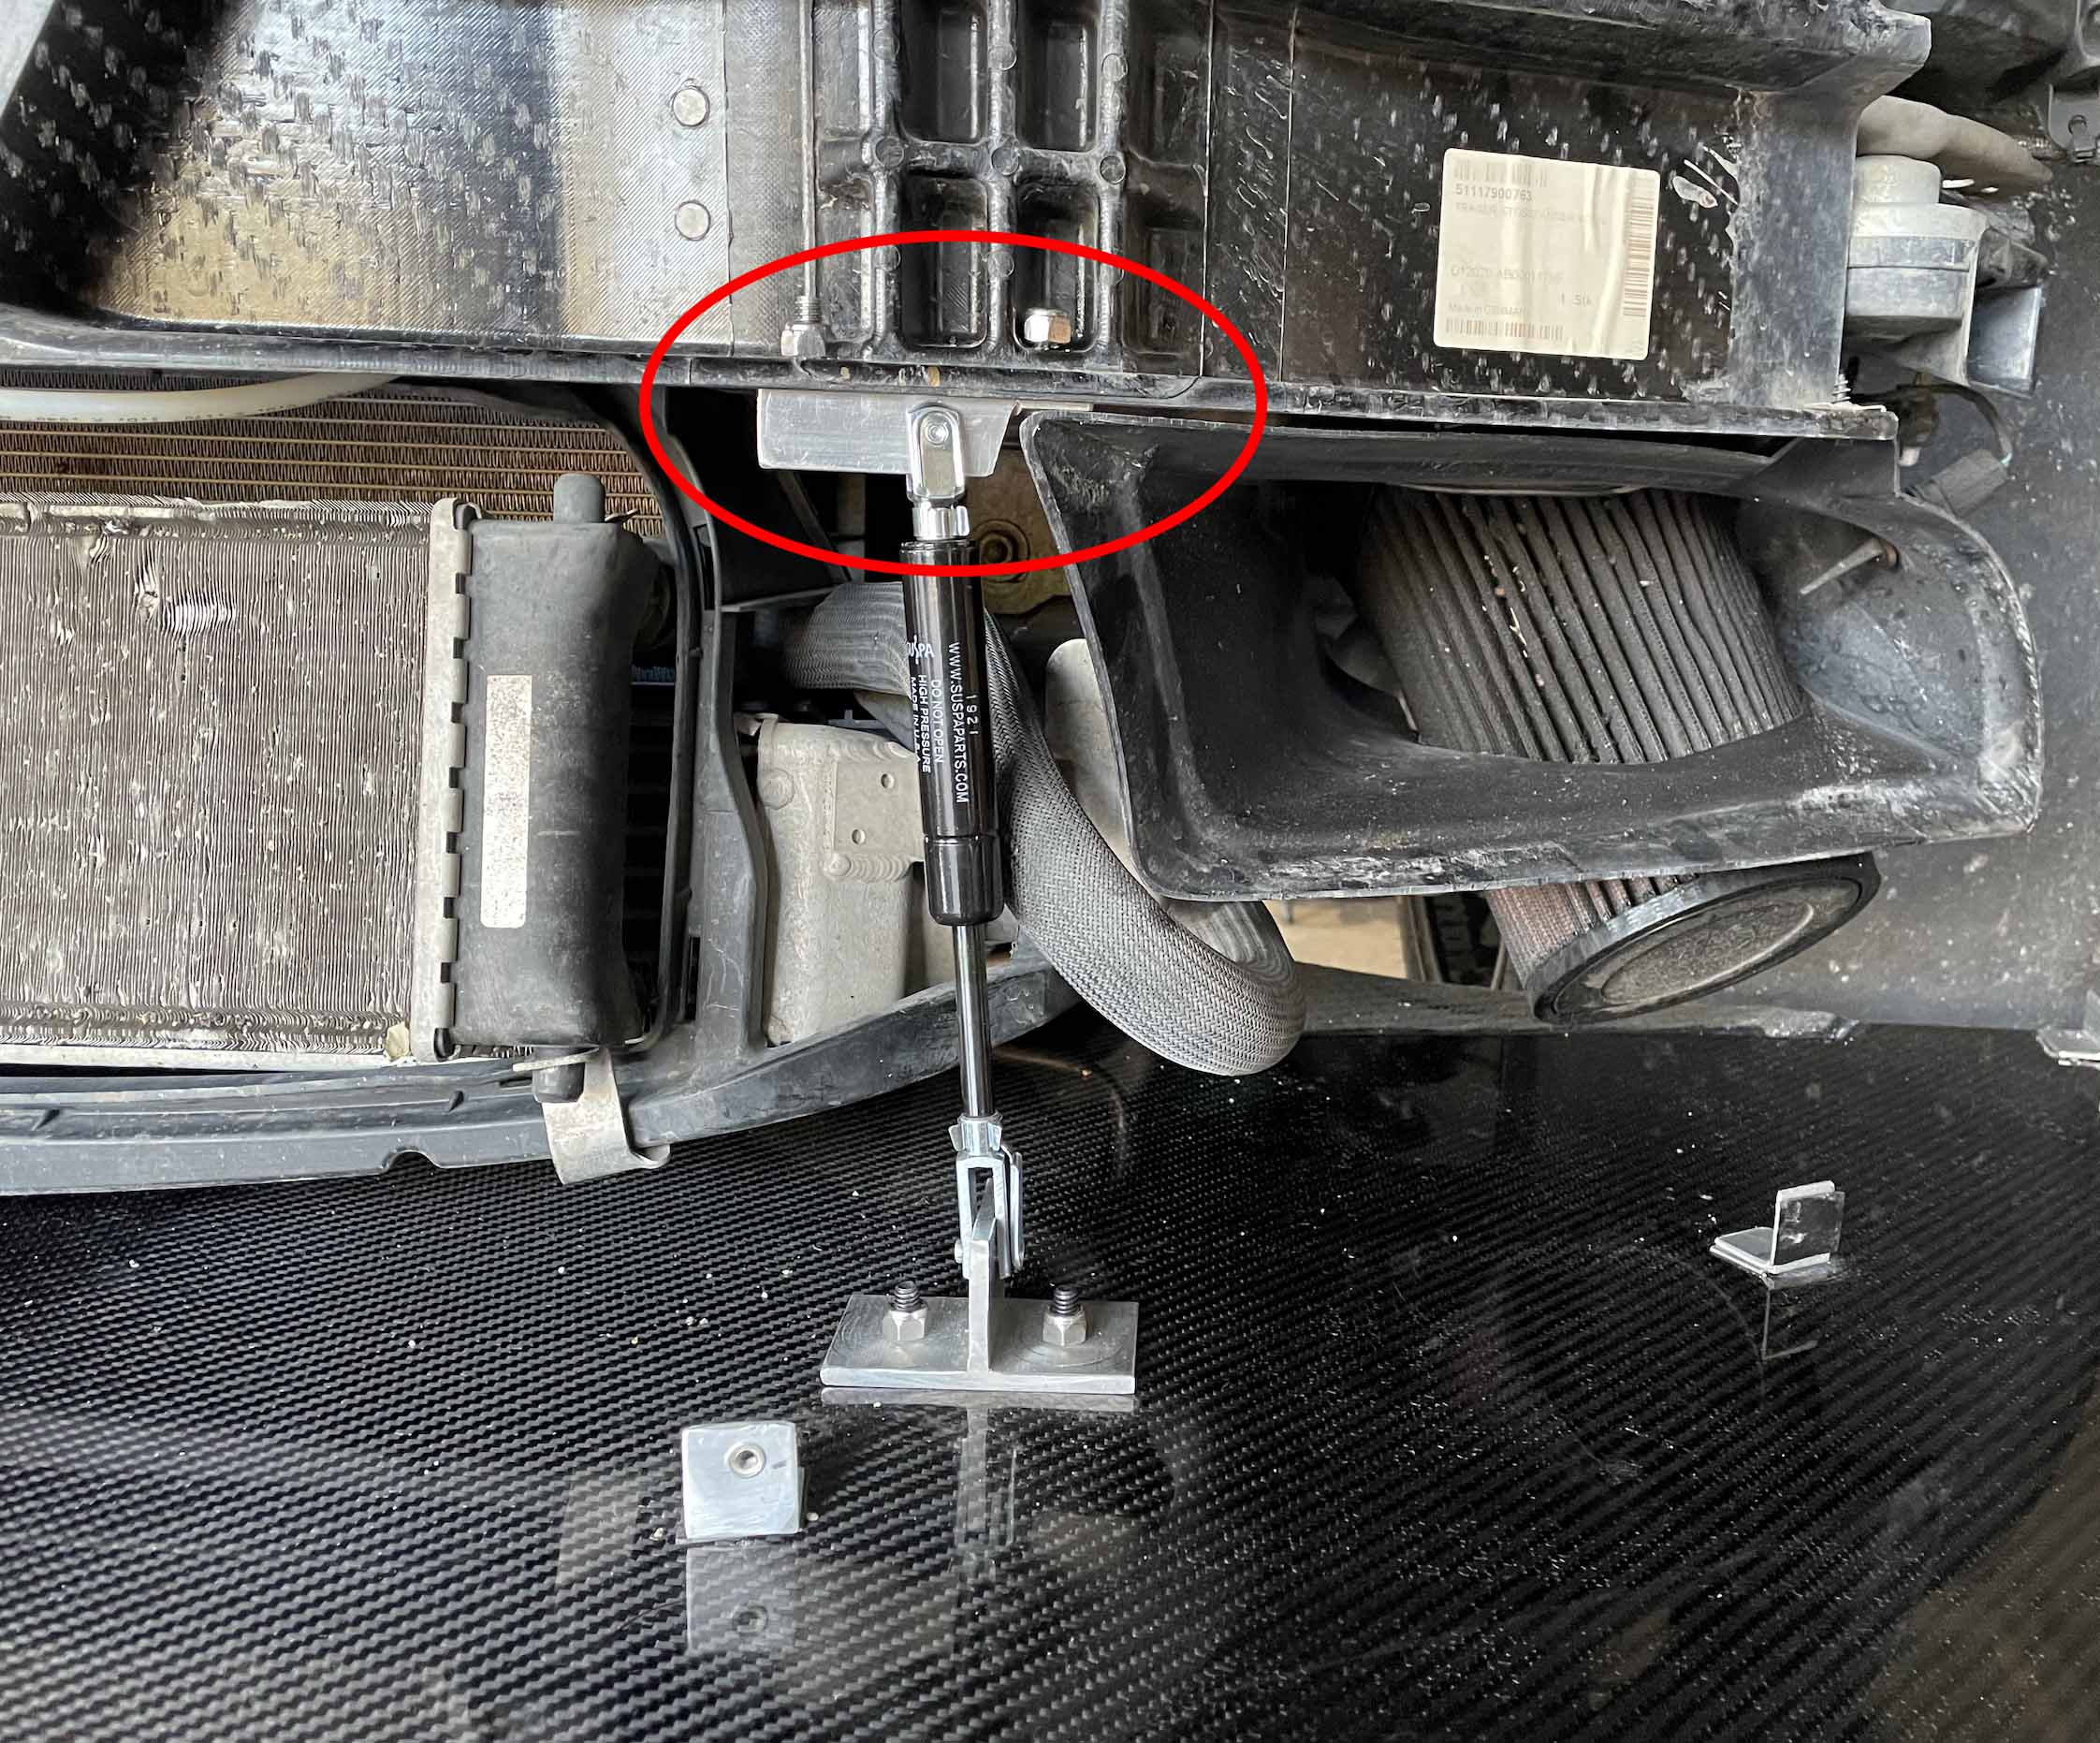 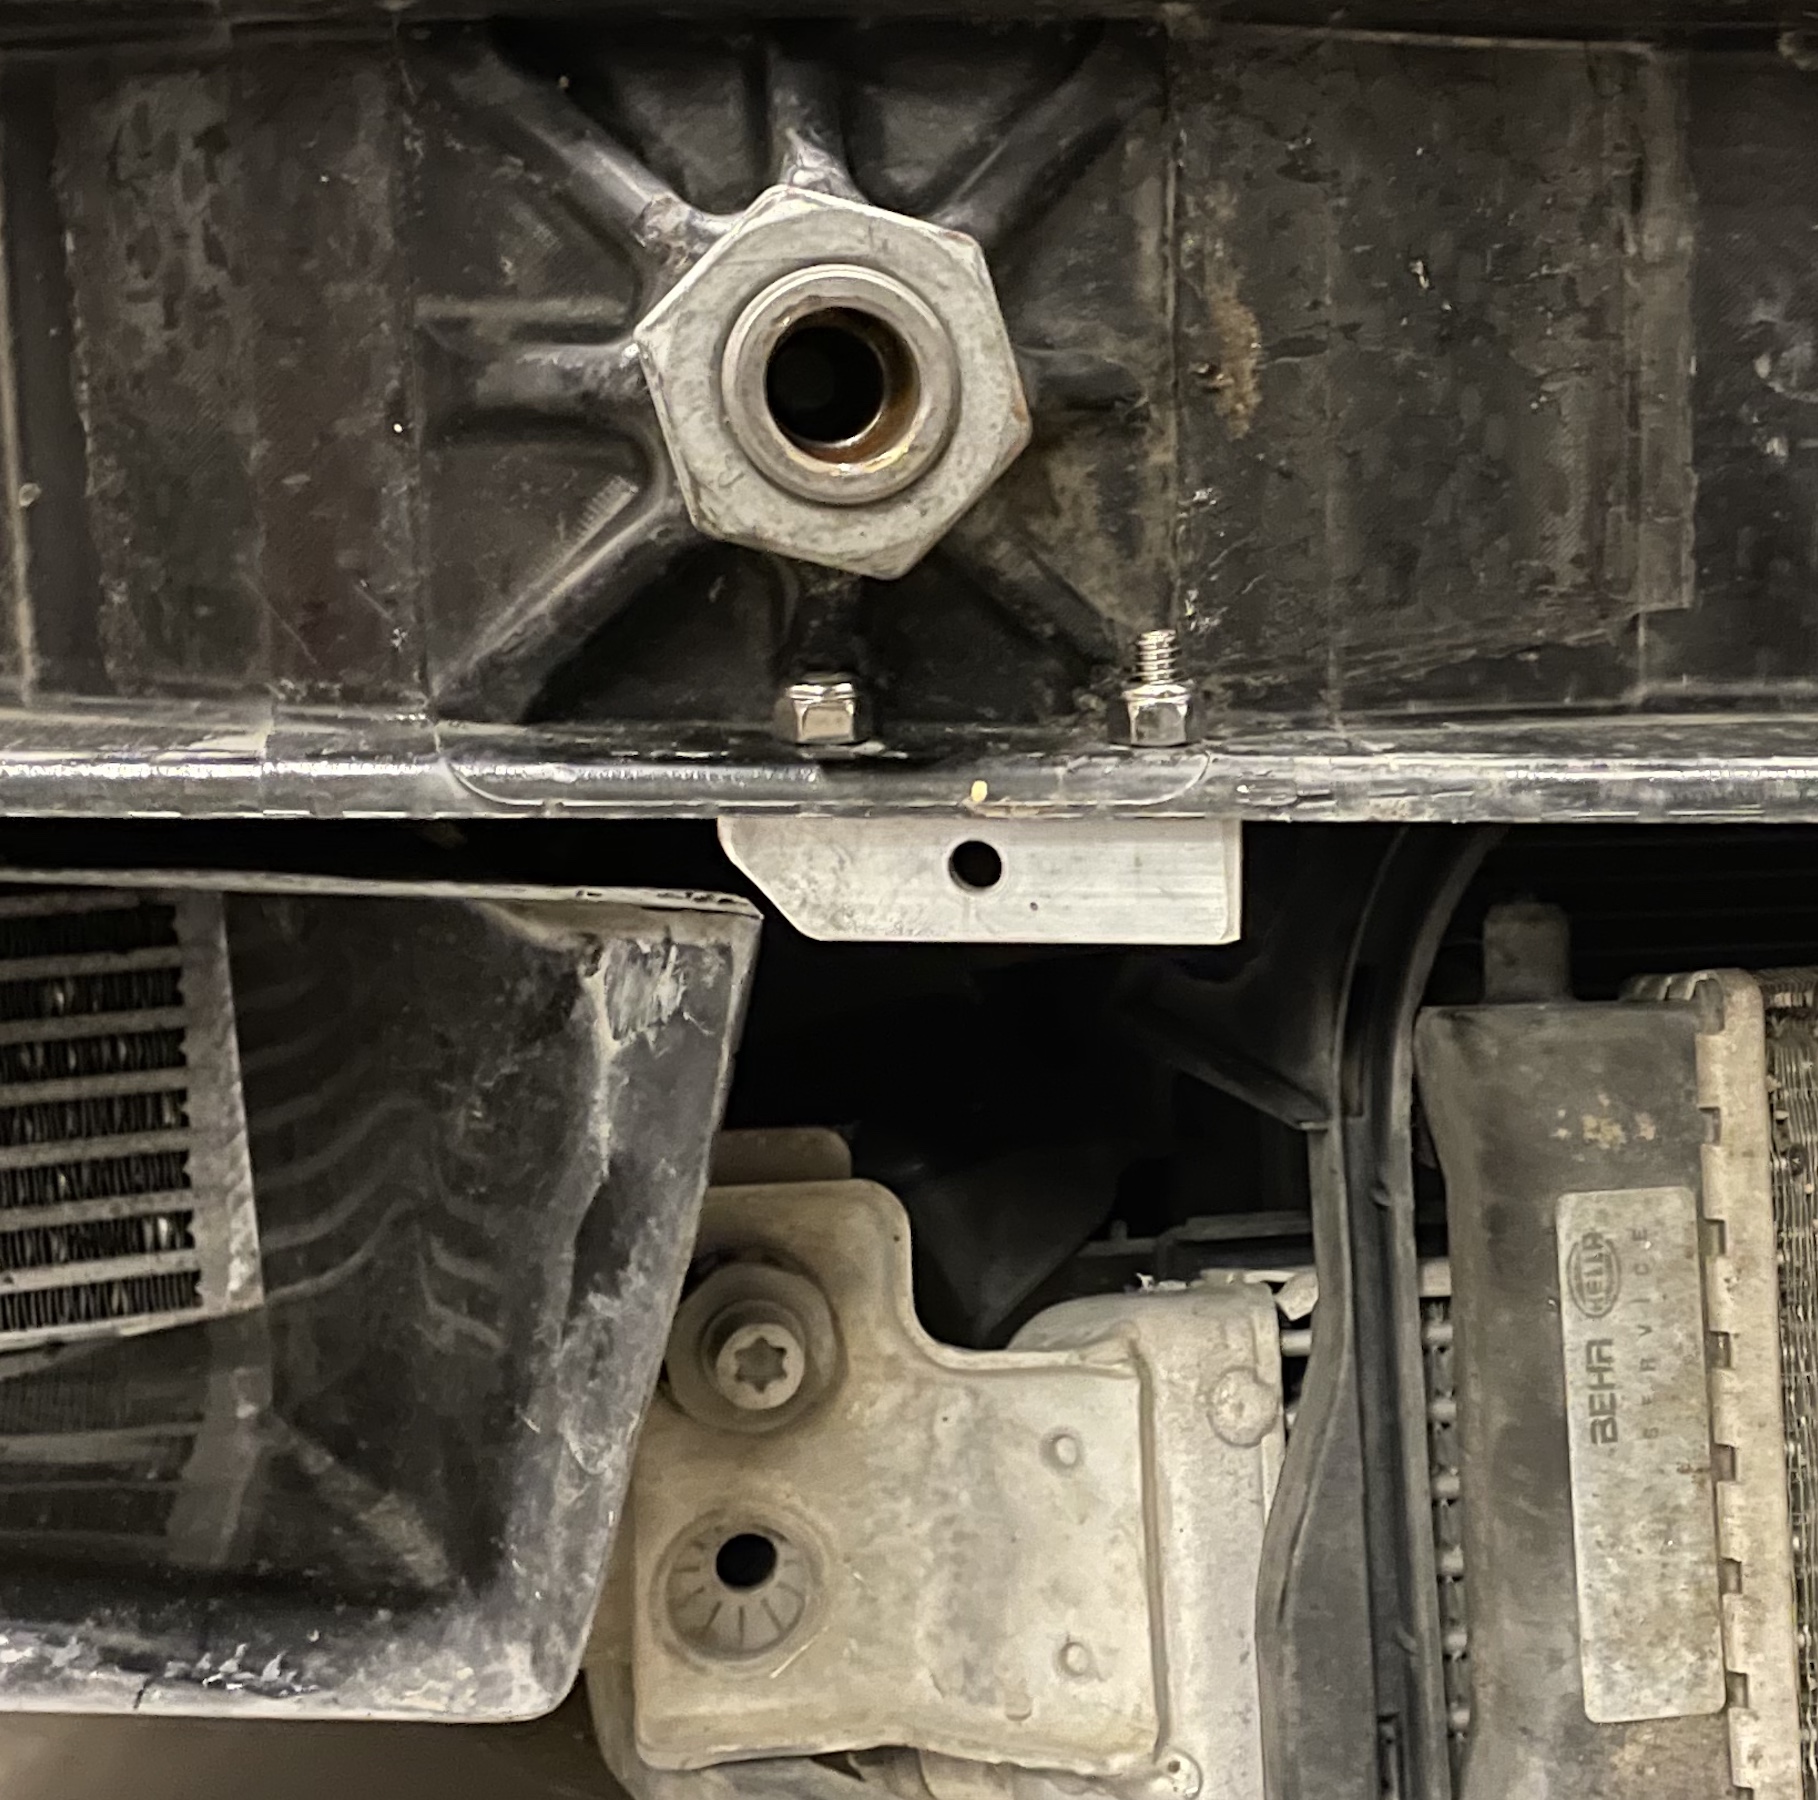 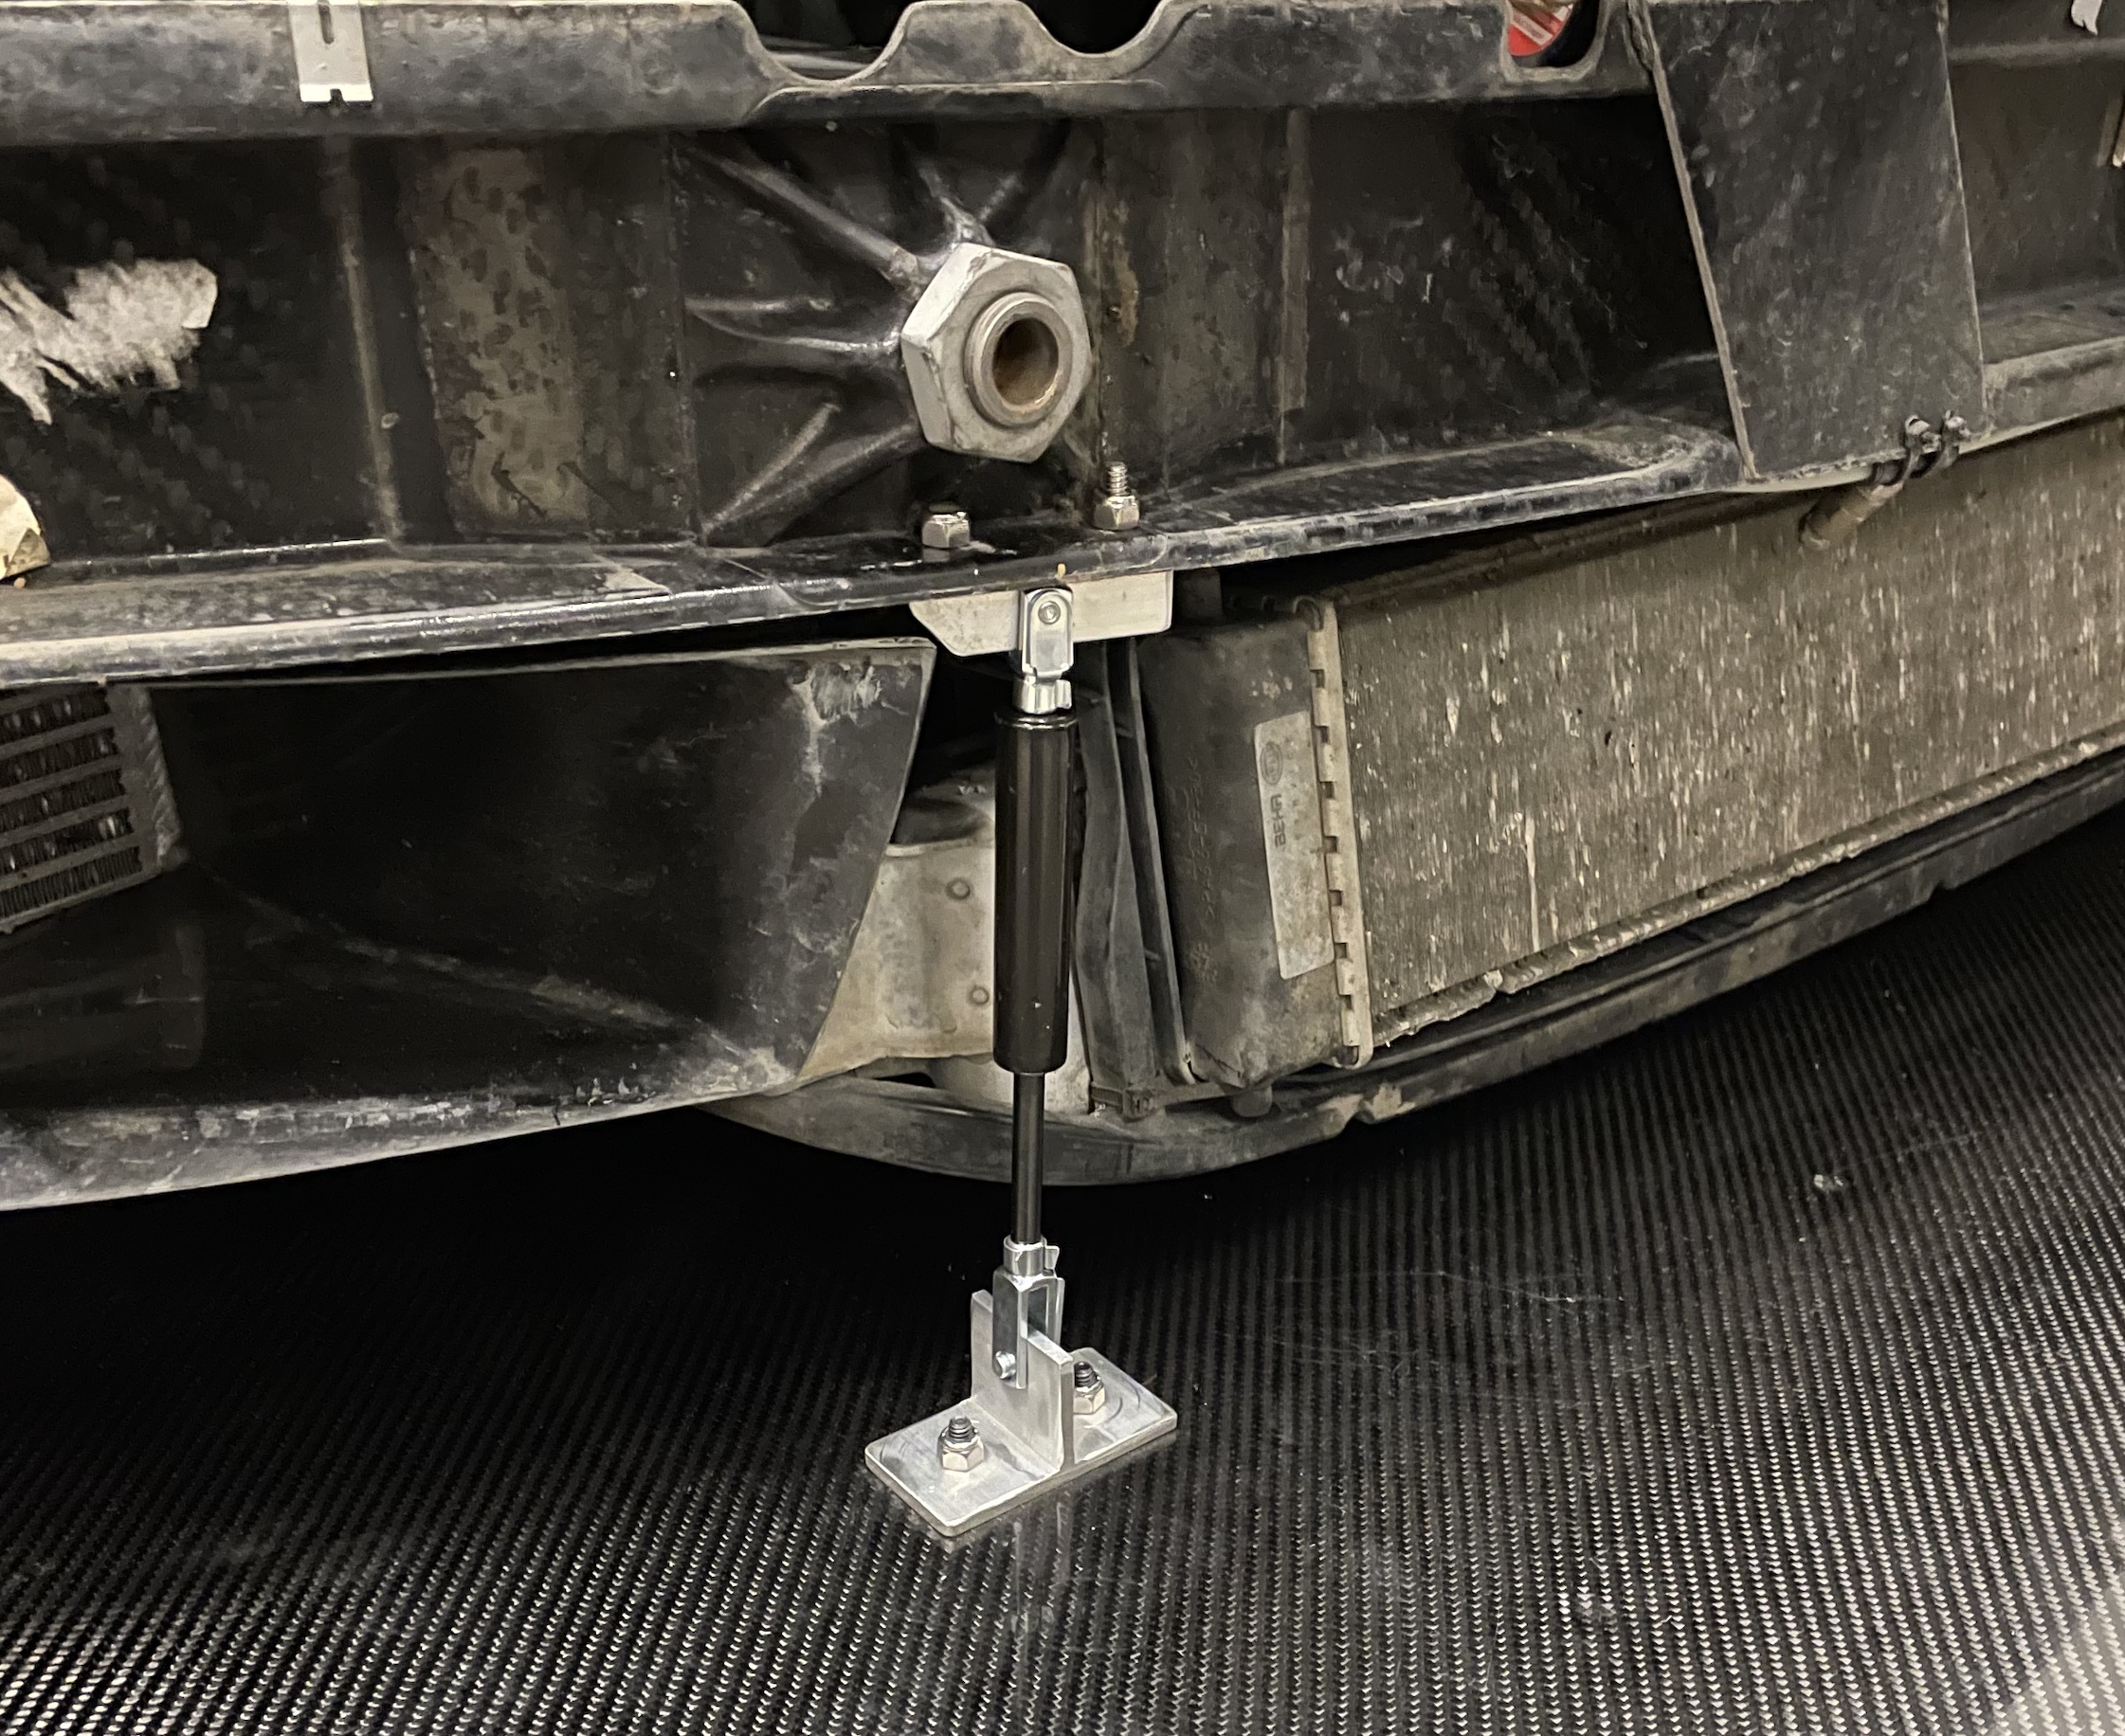 8. Attach the gas shocks to the crash beam bracket holes using the pin/rotating latch combo pieces. (The 3 pictures in step 10 show how, after you’ve inserted the pin, the latch rotates into place and clips onto the rod.) The gas shocks should hang down over the vertical portion of the T-brackets. 9. Lower the car to the floor and roll it several feet in both directions to settle the suspension. 10. In this step, we will determine the final angle of the splitter, then on the T-bracket, we’ll mark and drill the mounting point for the bottom connector of the gas shock. Place your angle finder on the splitter. A good starting angle is -2º. If it is pointing down more than -2º and you don't want more, you will need to raise the nose by propping up the splitter. If the angle is pointing up and is less than -2º (or what your target is), then the nose needs to be lowered, etc. Typically, it should not take a ton of movement to get to the desired angle. My splitter at this point was at -1.8º. Ryan adjusted it to -2º and drilled the required holes in the T brackets. During this process, the lower gas shock mount should fall right onto the vertical portion of the T-bracket. You want to place the gas shock vertically over the T-bracket and mark where the hole needs to be drilled. Be careful not to lean on the splitter in any way during the measuring process so that you don’t change the angle, or put support underneath the splitter so it won't deflect as you mark your holes. Once you’ve measured a hole, drill it right away. Don’t worry about measuring for the second bracket until the first one is drilled. Once you’ve drilled the first hole put the pin and latch in place to lock that side down. For the second bracket, make sure the angle finder is still showing -2º. Mark the hole, drill it and put the pin and latch. Here’s how the pin and latch work: You stick the pin through and then rotate the latch onto the rod so that it snaps onto the rod. 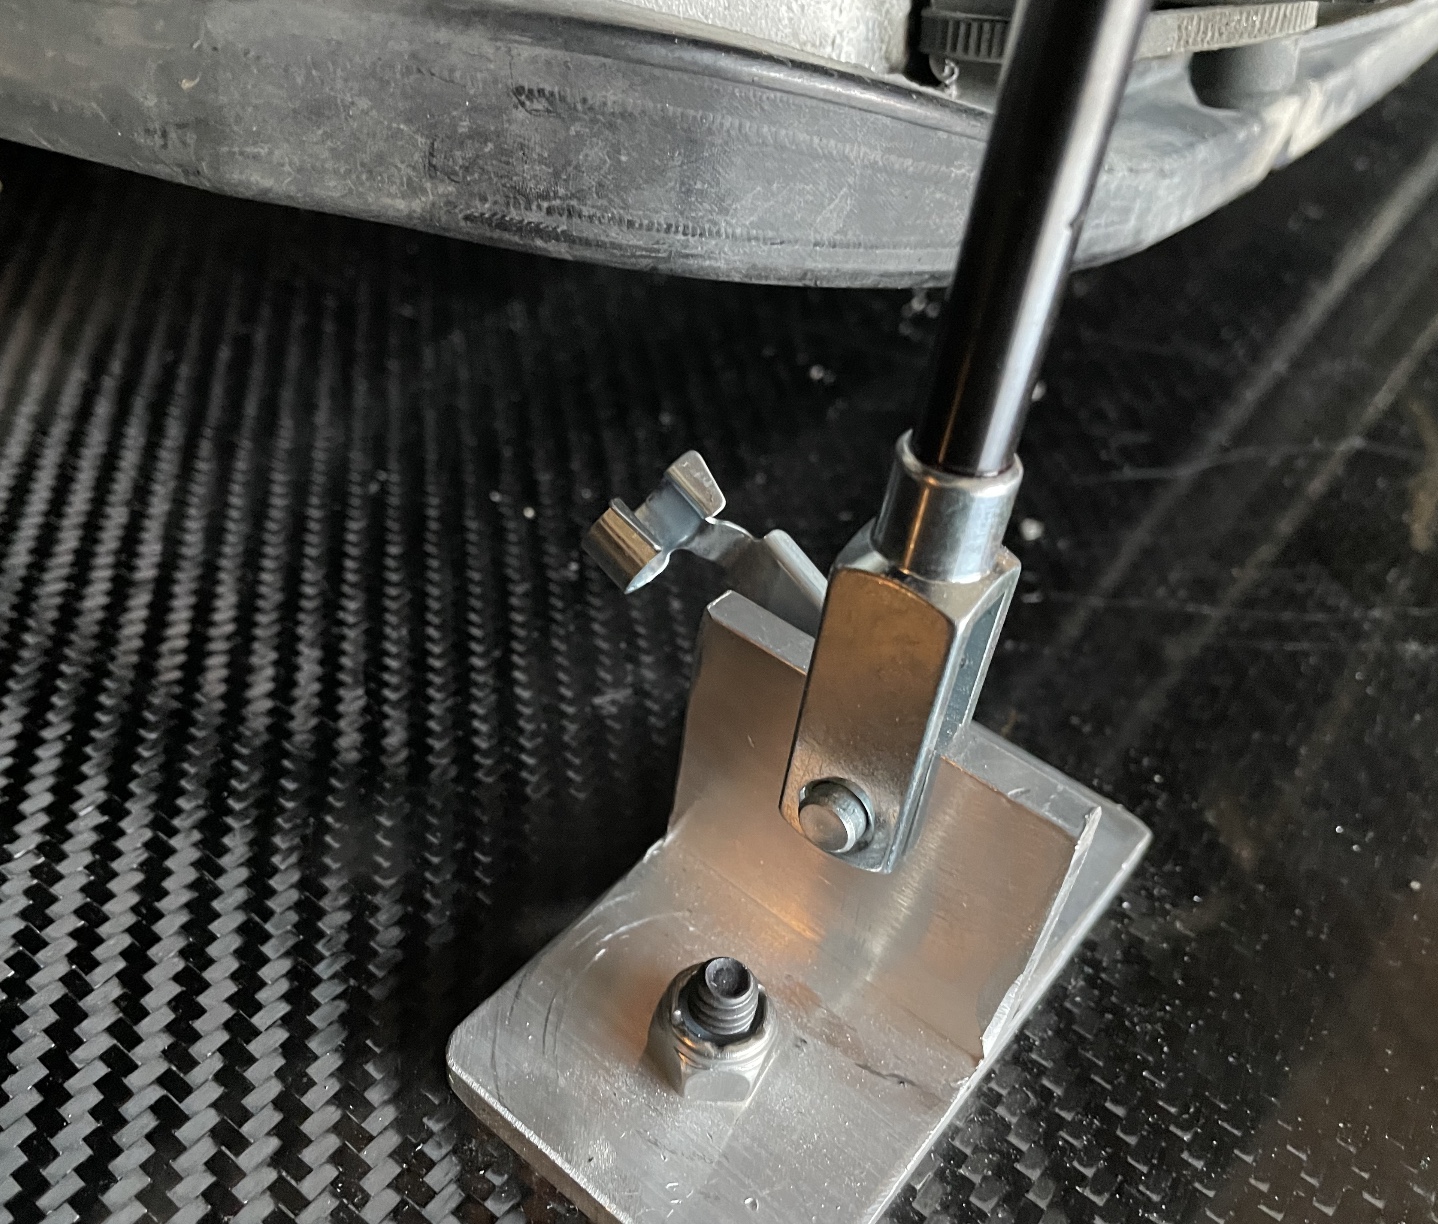 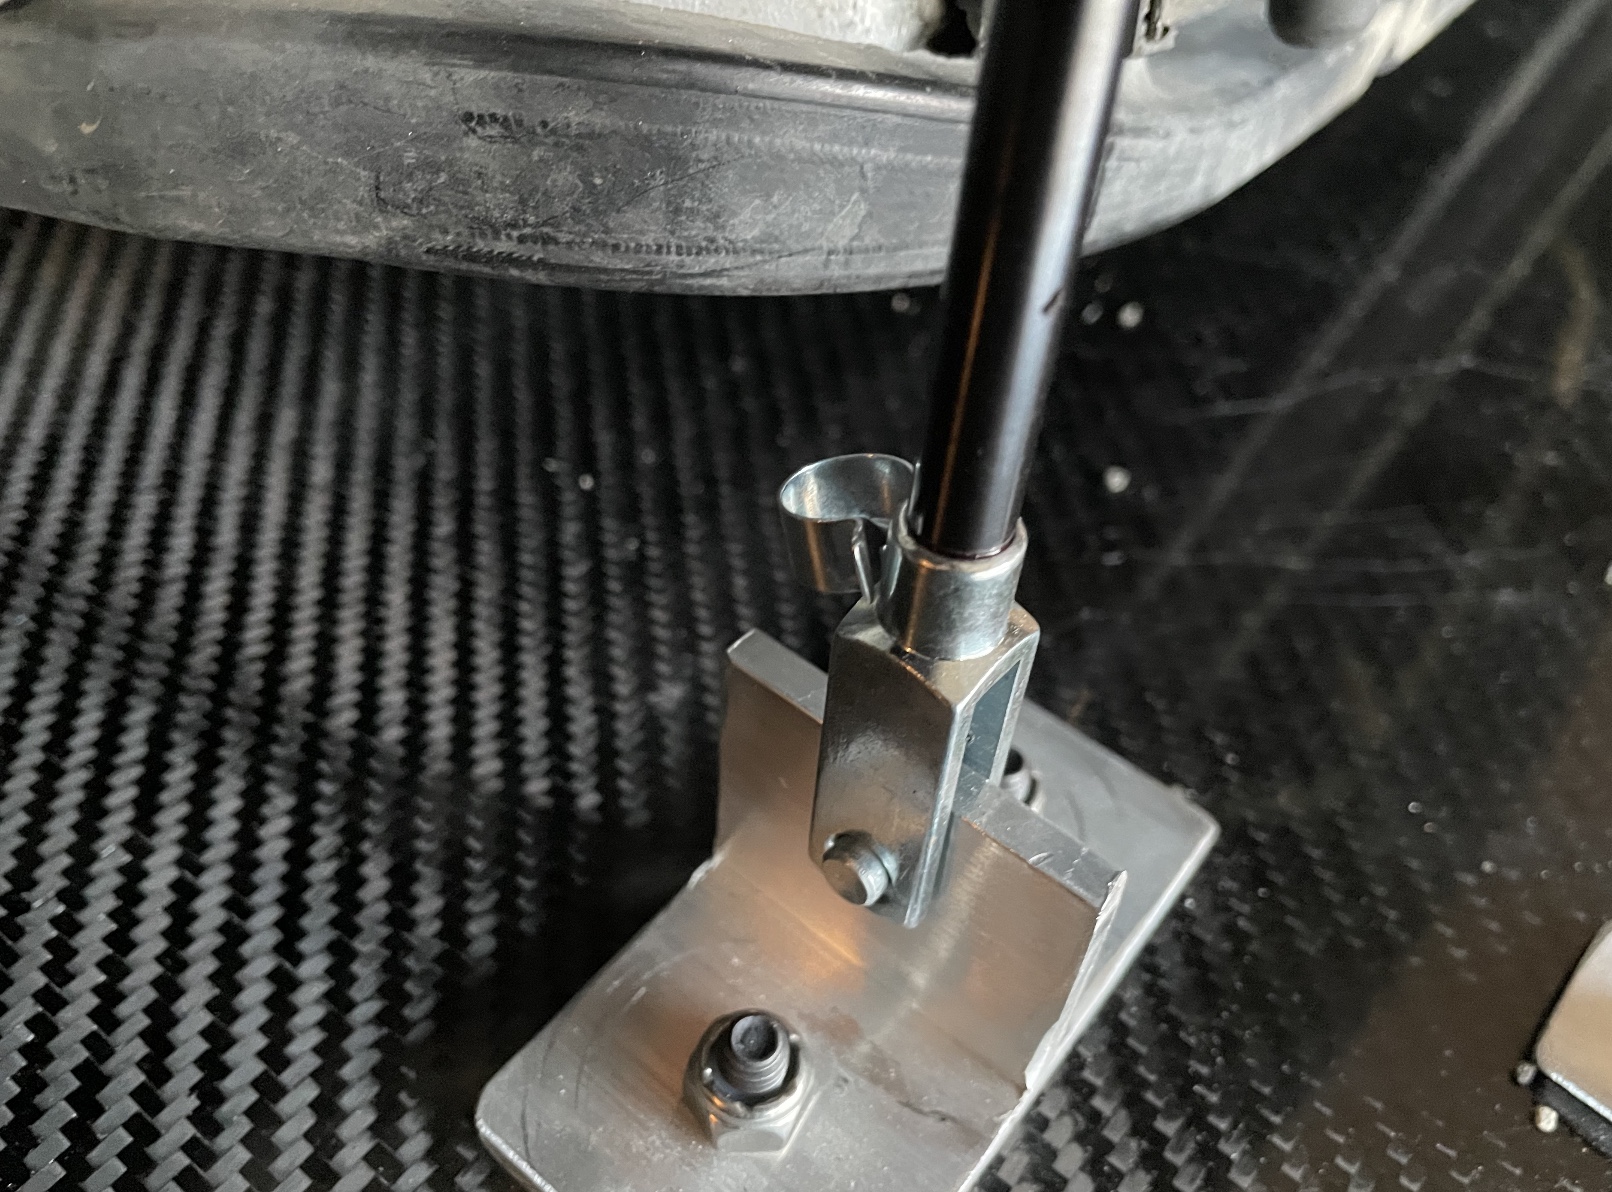 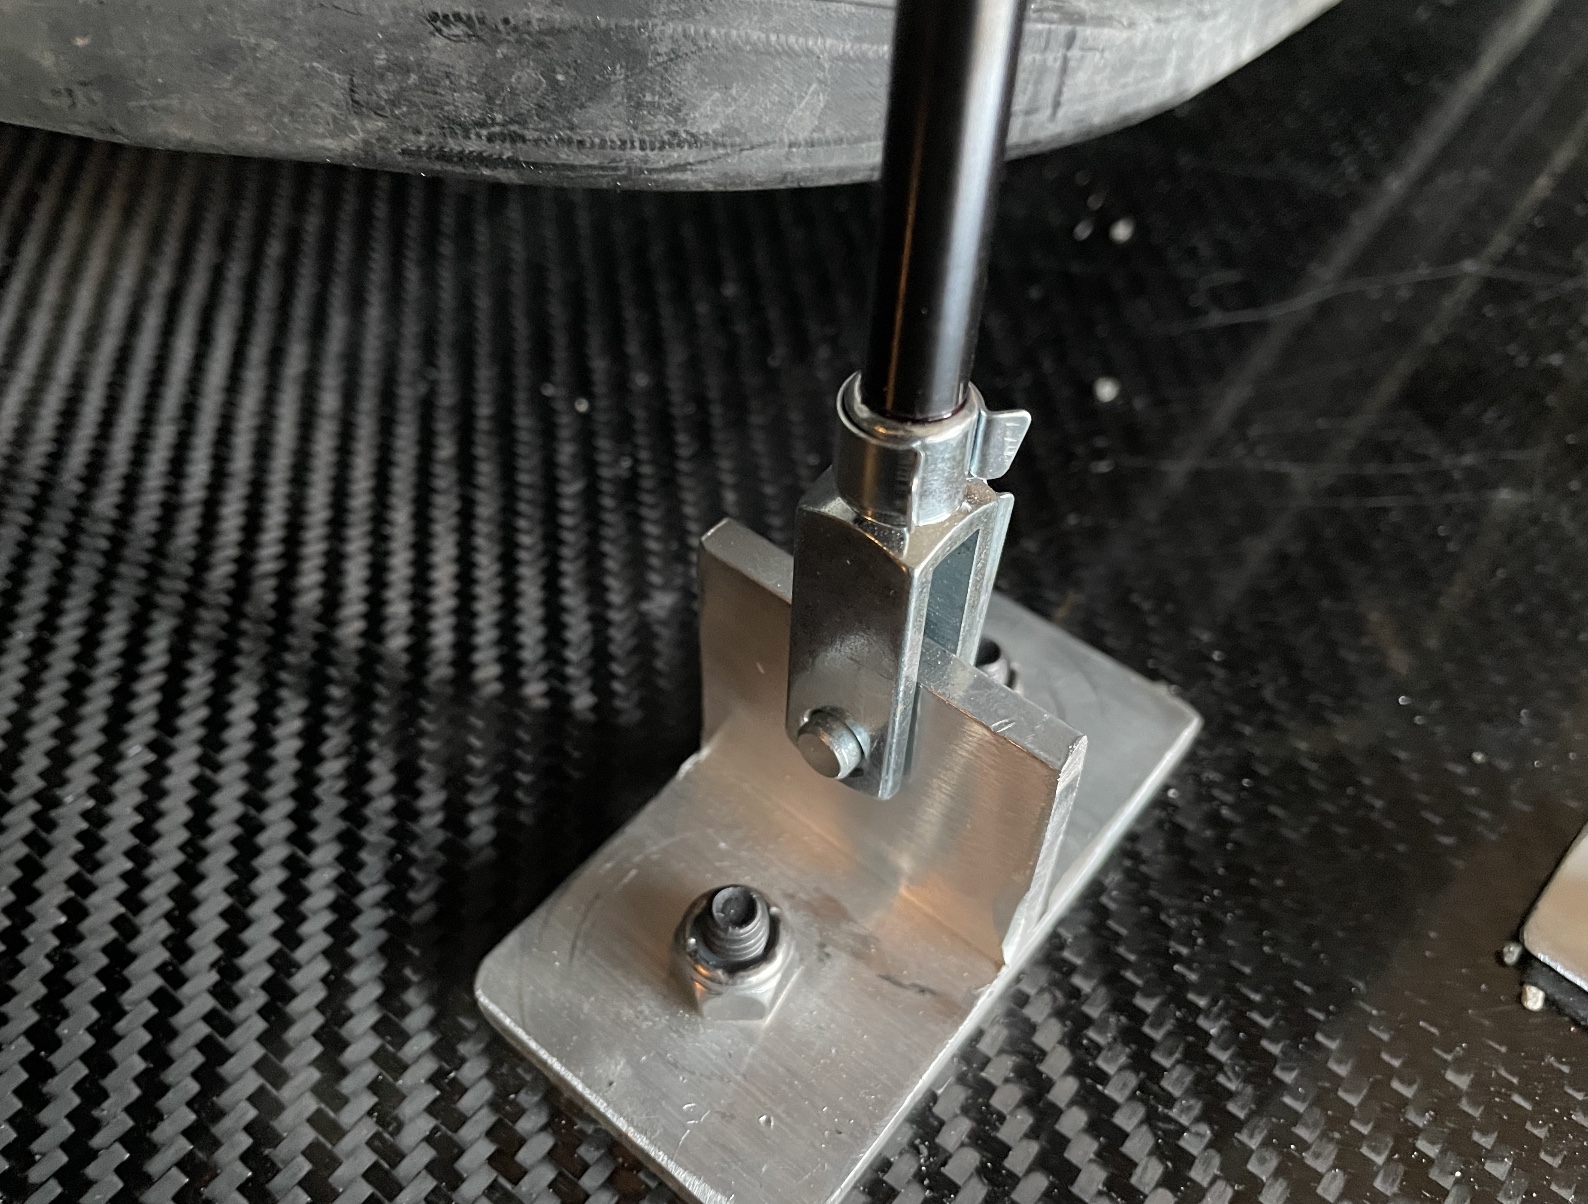 Now go back and fully tighten the rear bolts. The splitter is now fully installed from a structural standpoint. You can stand on it if you like. It will look like this: 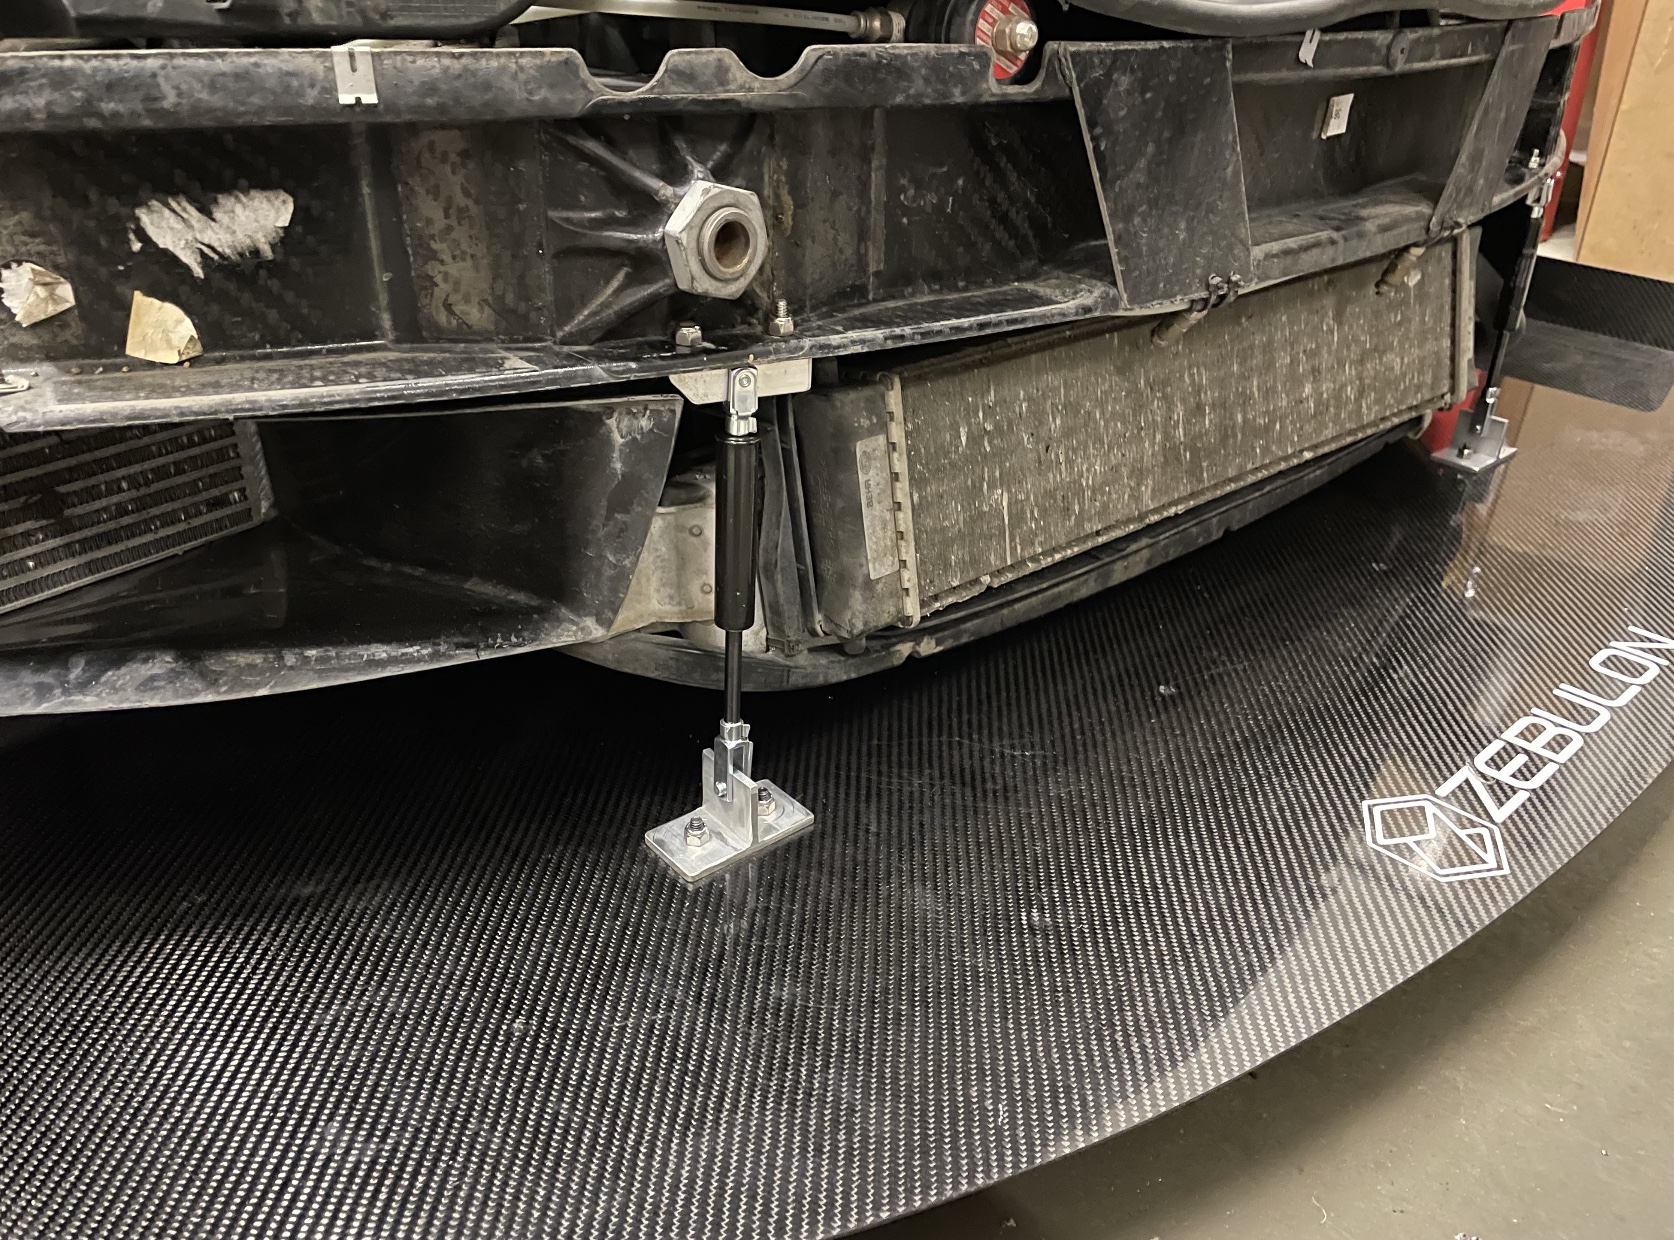 11. The bumper needs to have two notches cut out of it so that it fits around the gas shock rods. There’s no science here. You just need to line up the bumper with the rods and mark where the rods would contact it. I suggest cutting wider and even more towards the front than what you see in the pic. (I’m probably going to make the notch larger.) The reason is that, if you want to remove the splitter without removing the bumper, you need to be able to get your fingers in there to release the pin/latch that’s on the gas shock rod. If the notch is too small, you can’t get in there and the bumper would need to be removed. You won’t see any of this notching because it will be behind the air dam you make. 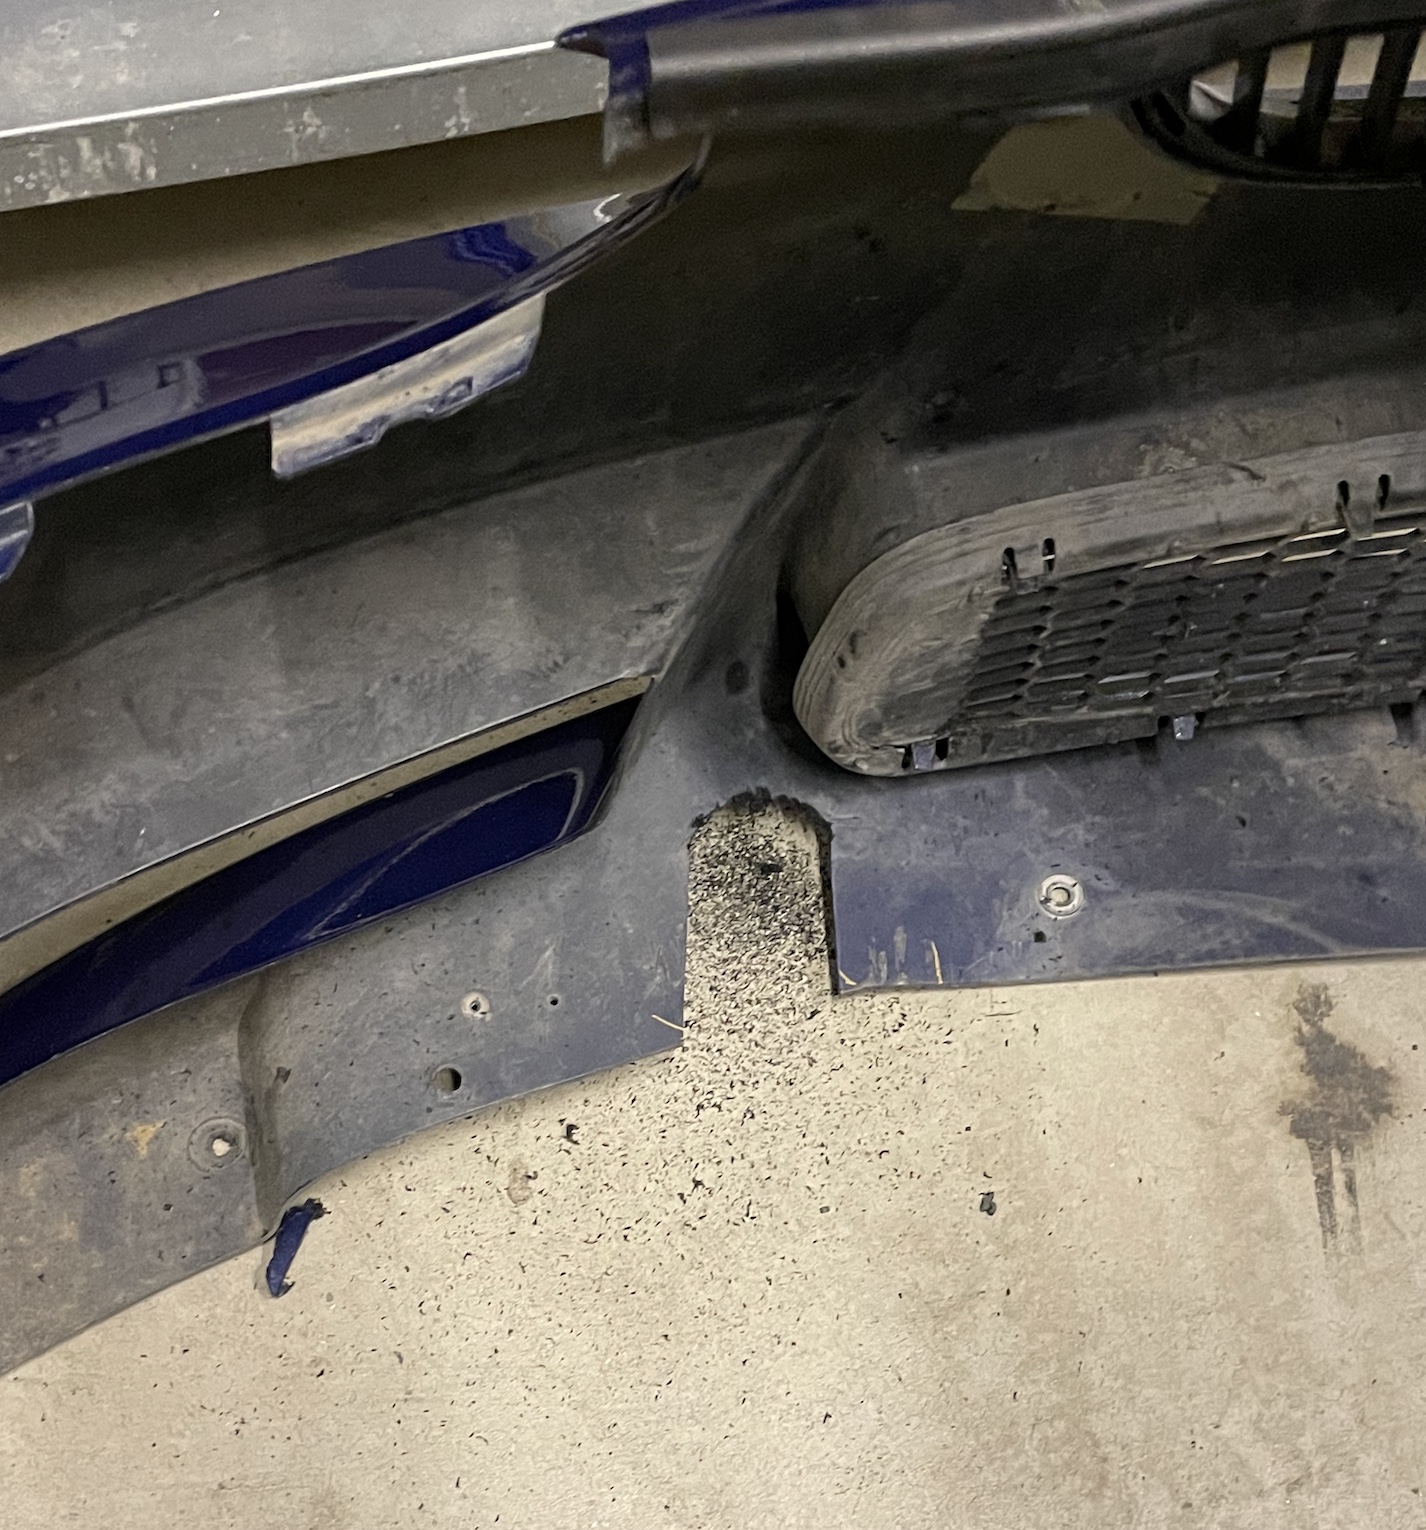 Here’s how it looks with splitter installed and the bumper connected after being notched. 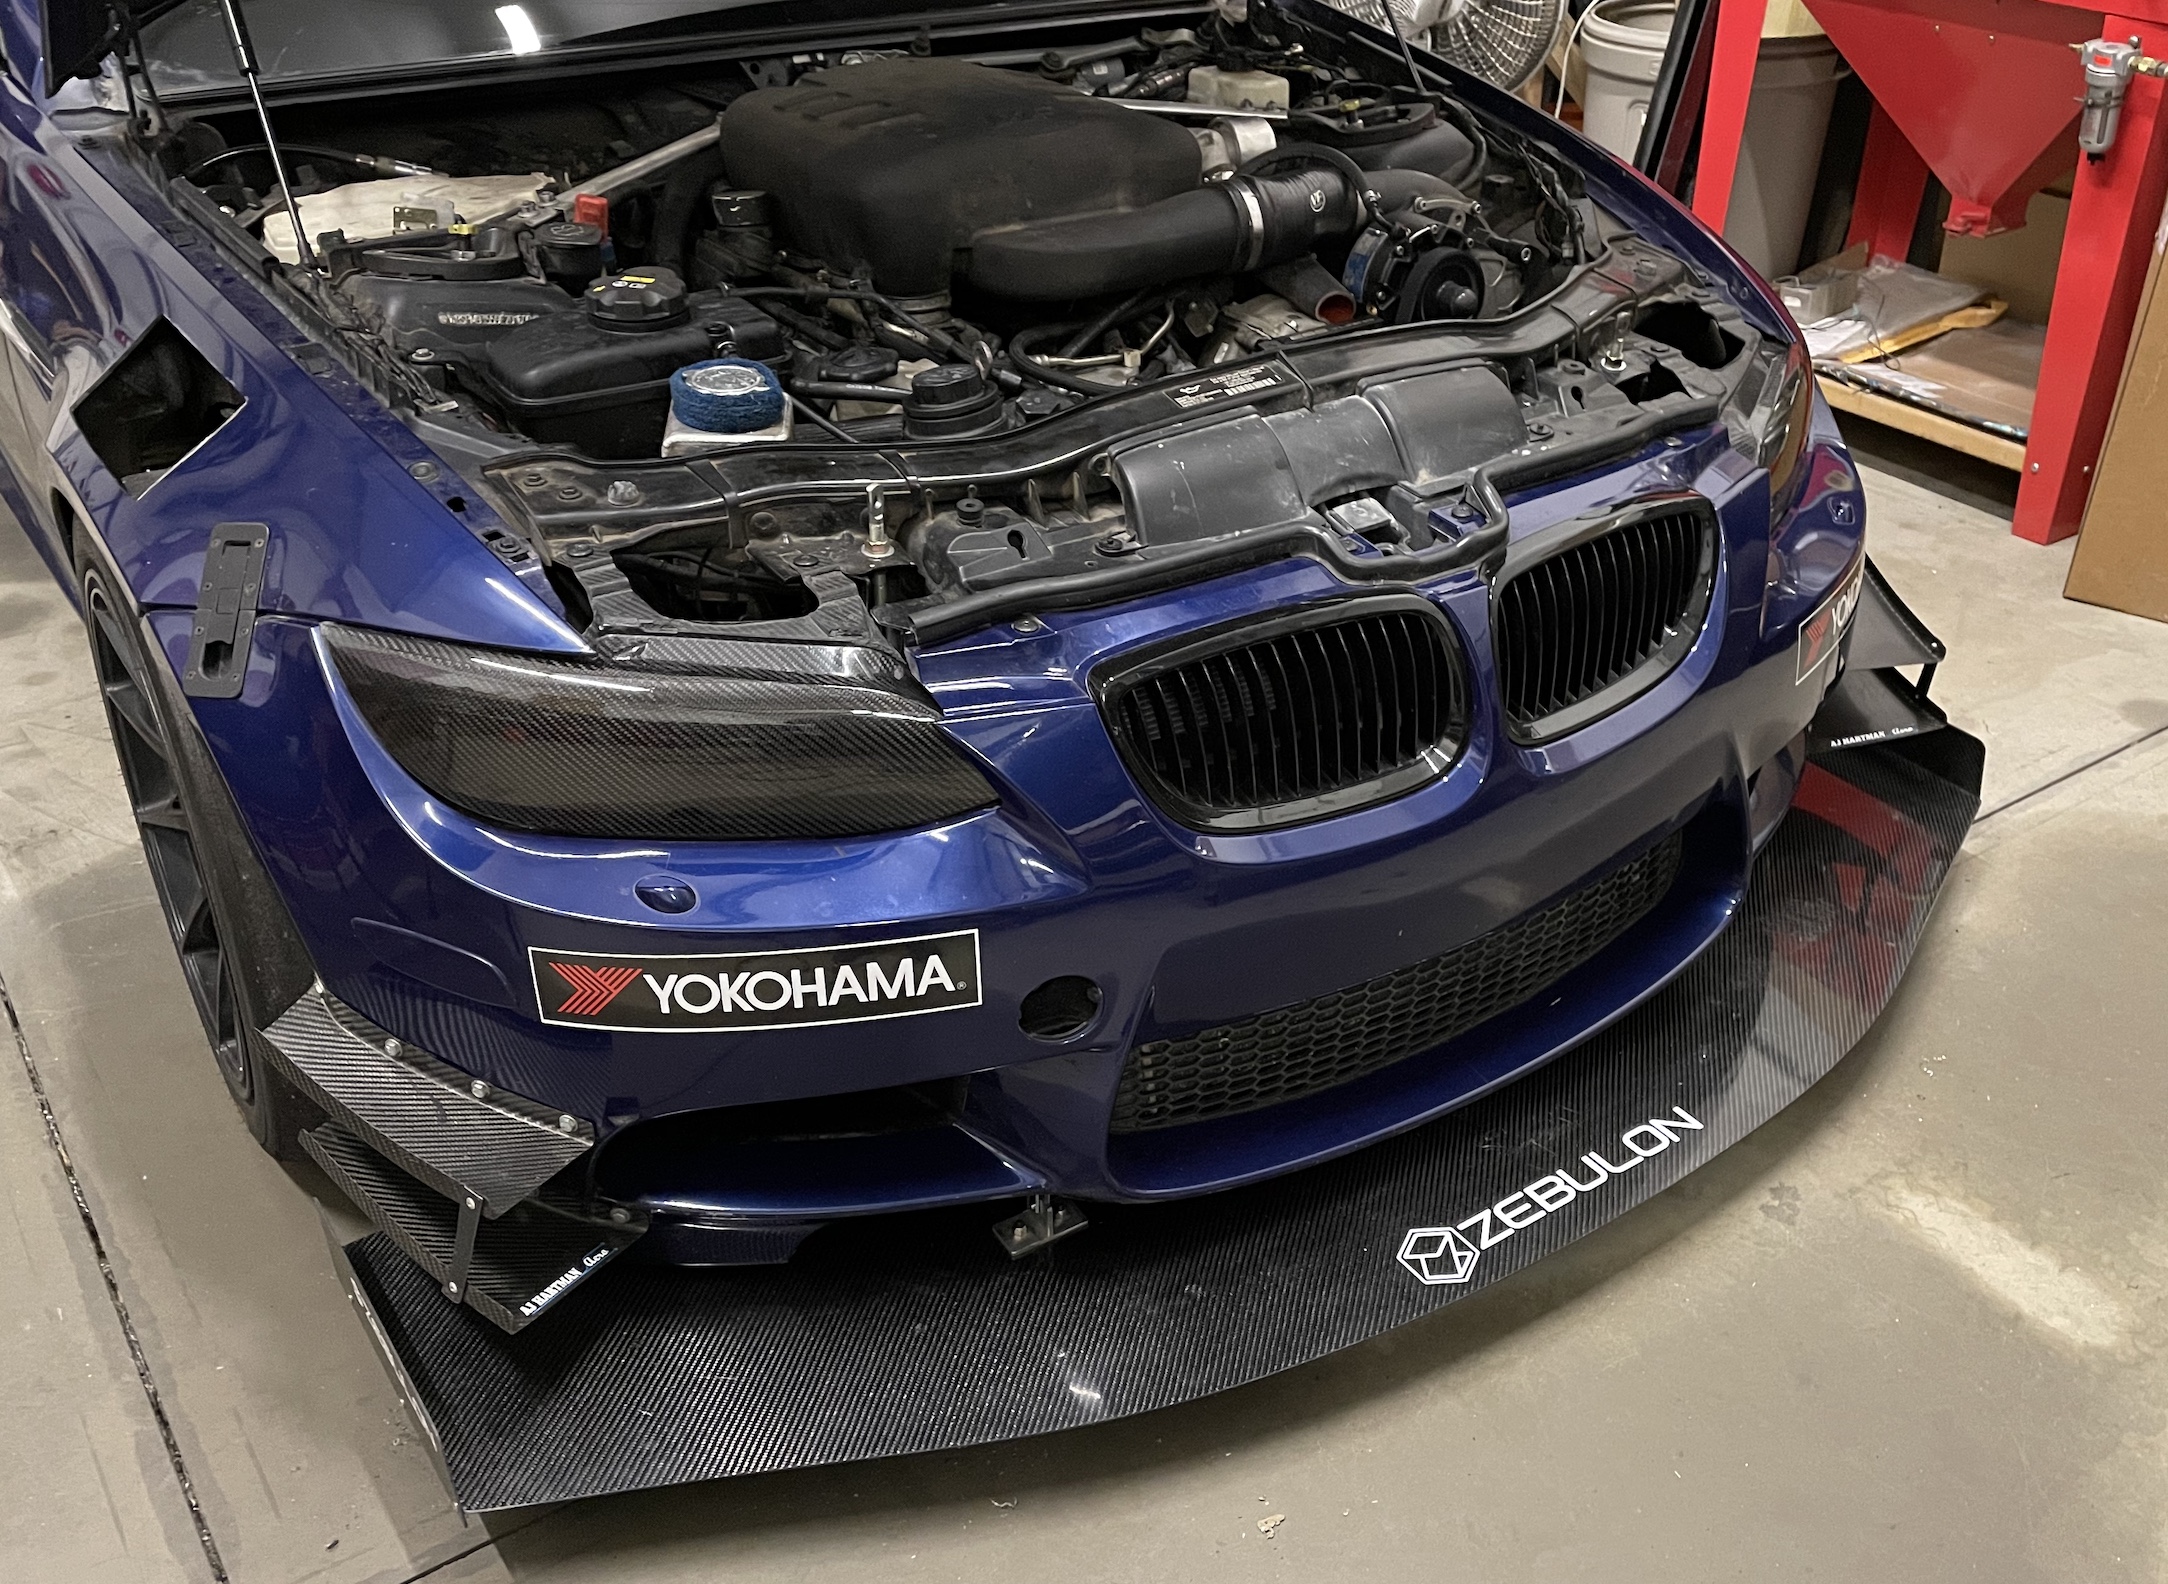 12. Last step: Air dam. Air dams will likely be different across all installations. If you are interested, Ryan can provide a kit for this but typically, this is up to the end user. Again, Ryan strongly recommends against drilling holes in the splitter. You can double-stick tape or bond your air dam brackets to the splitter. Here’s what I ultimately did for the air dam to end up with this result: 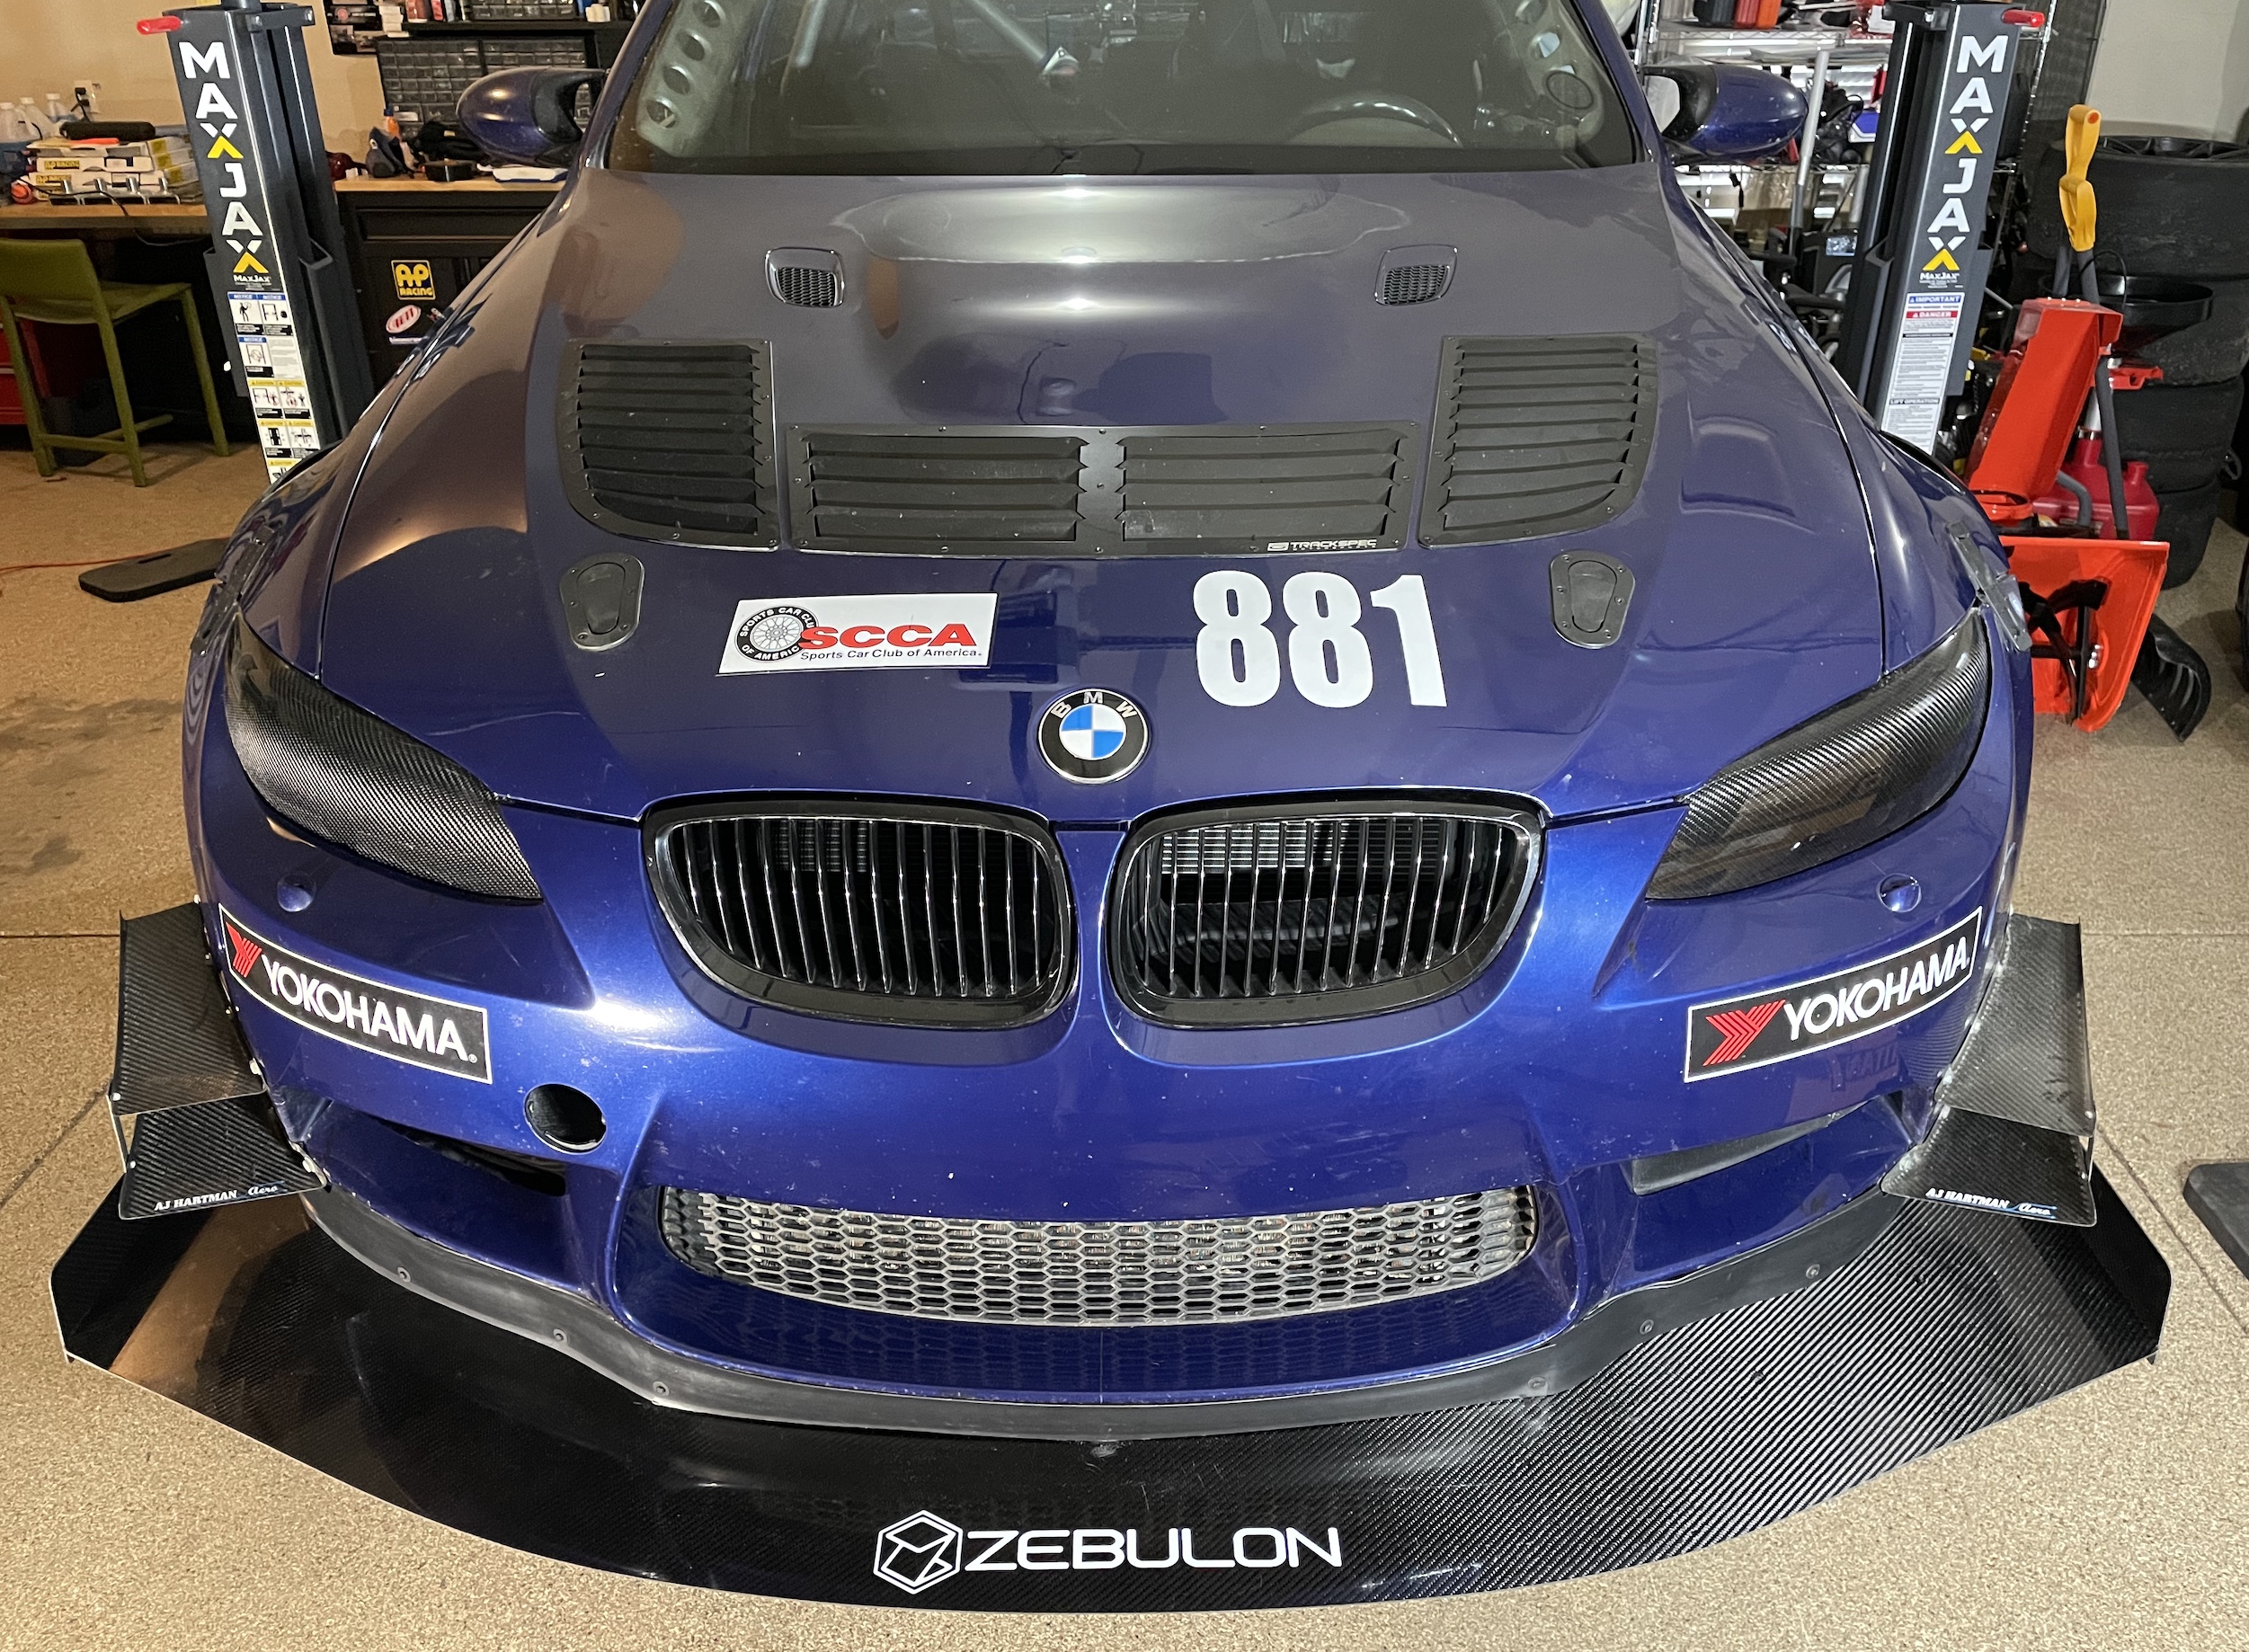 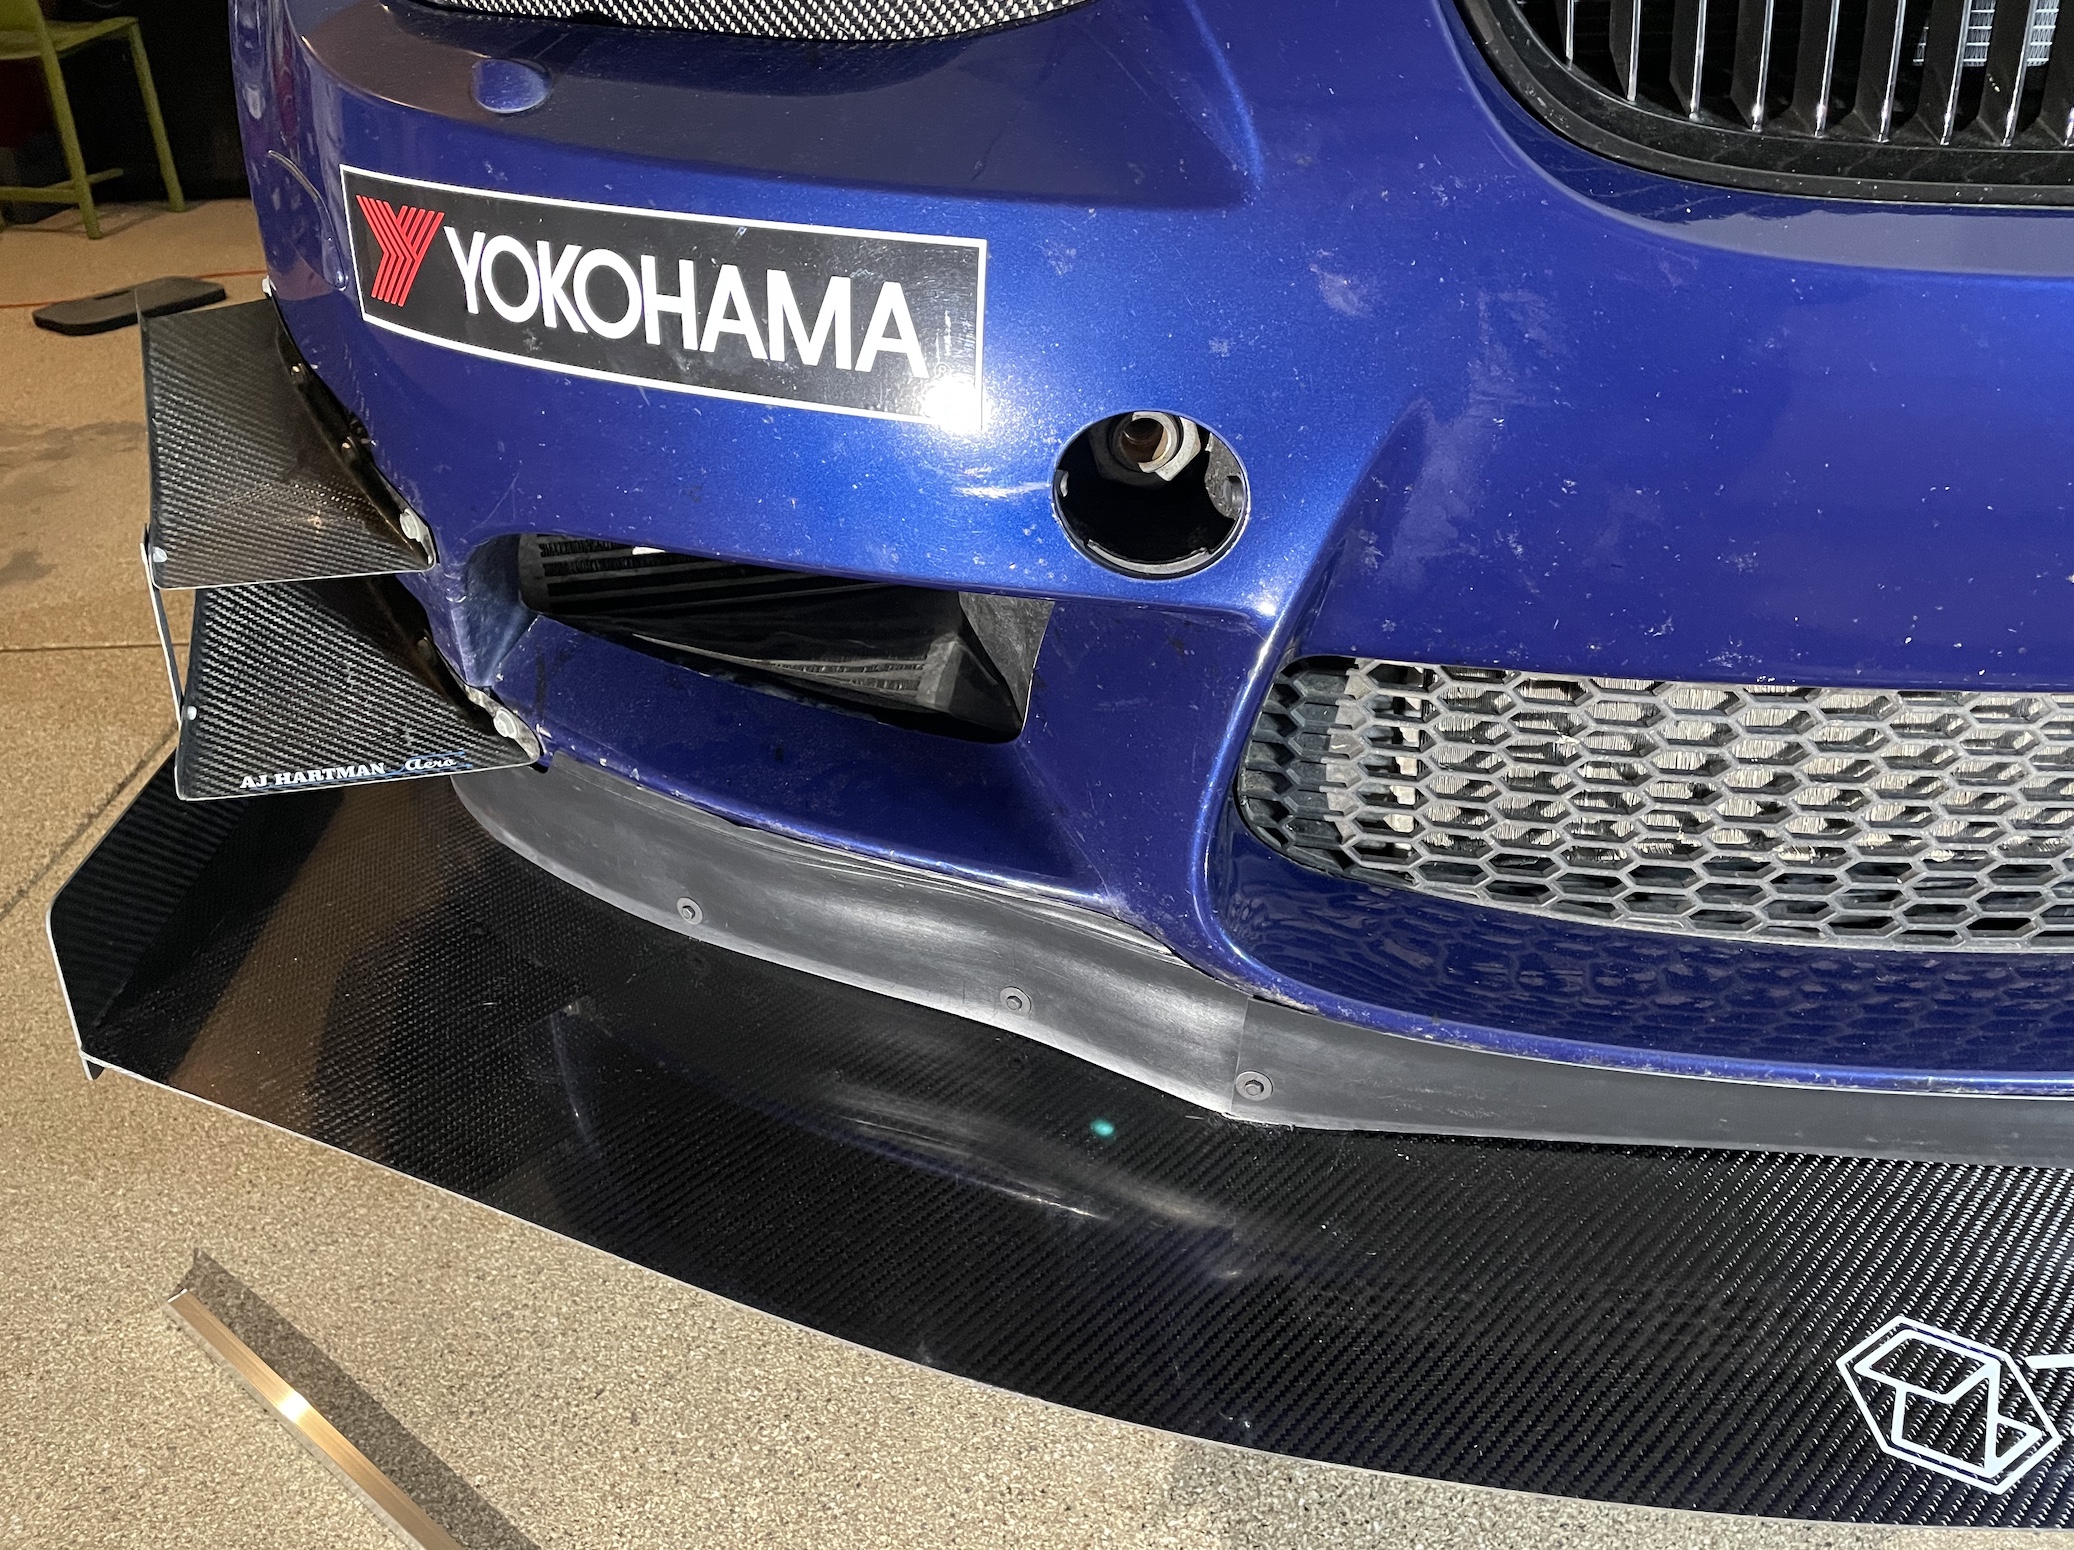 The air dam is a garden/landscape edging plastic material. It’s easy to cut into the shape you want. This air dam is not a super hi tech solution. But what’s nice about it is that the soft plastic material will survive if the splitter needs to deflect upwards. And it’s cheap to replace if necessary. I used 8 aluminum brackets (4 per side) that were taped with 3M double-sided tape to the splitter and were screwed into the air dam. The brackets are 1”x1” aluminum cut into 1” pieces and then a hole is drilled for the c-clip and screw. I got the c-clips and screws from NAPA Auto parts (part #'s 665-2081, 665-1333). This is what the brackets, c-clips and screws look like: 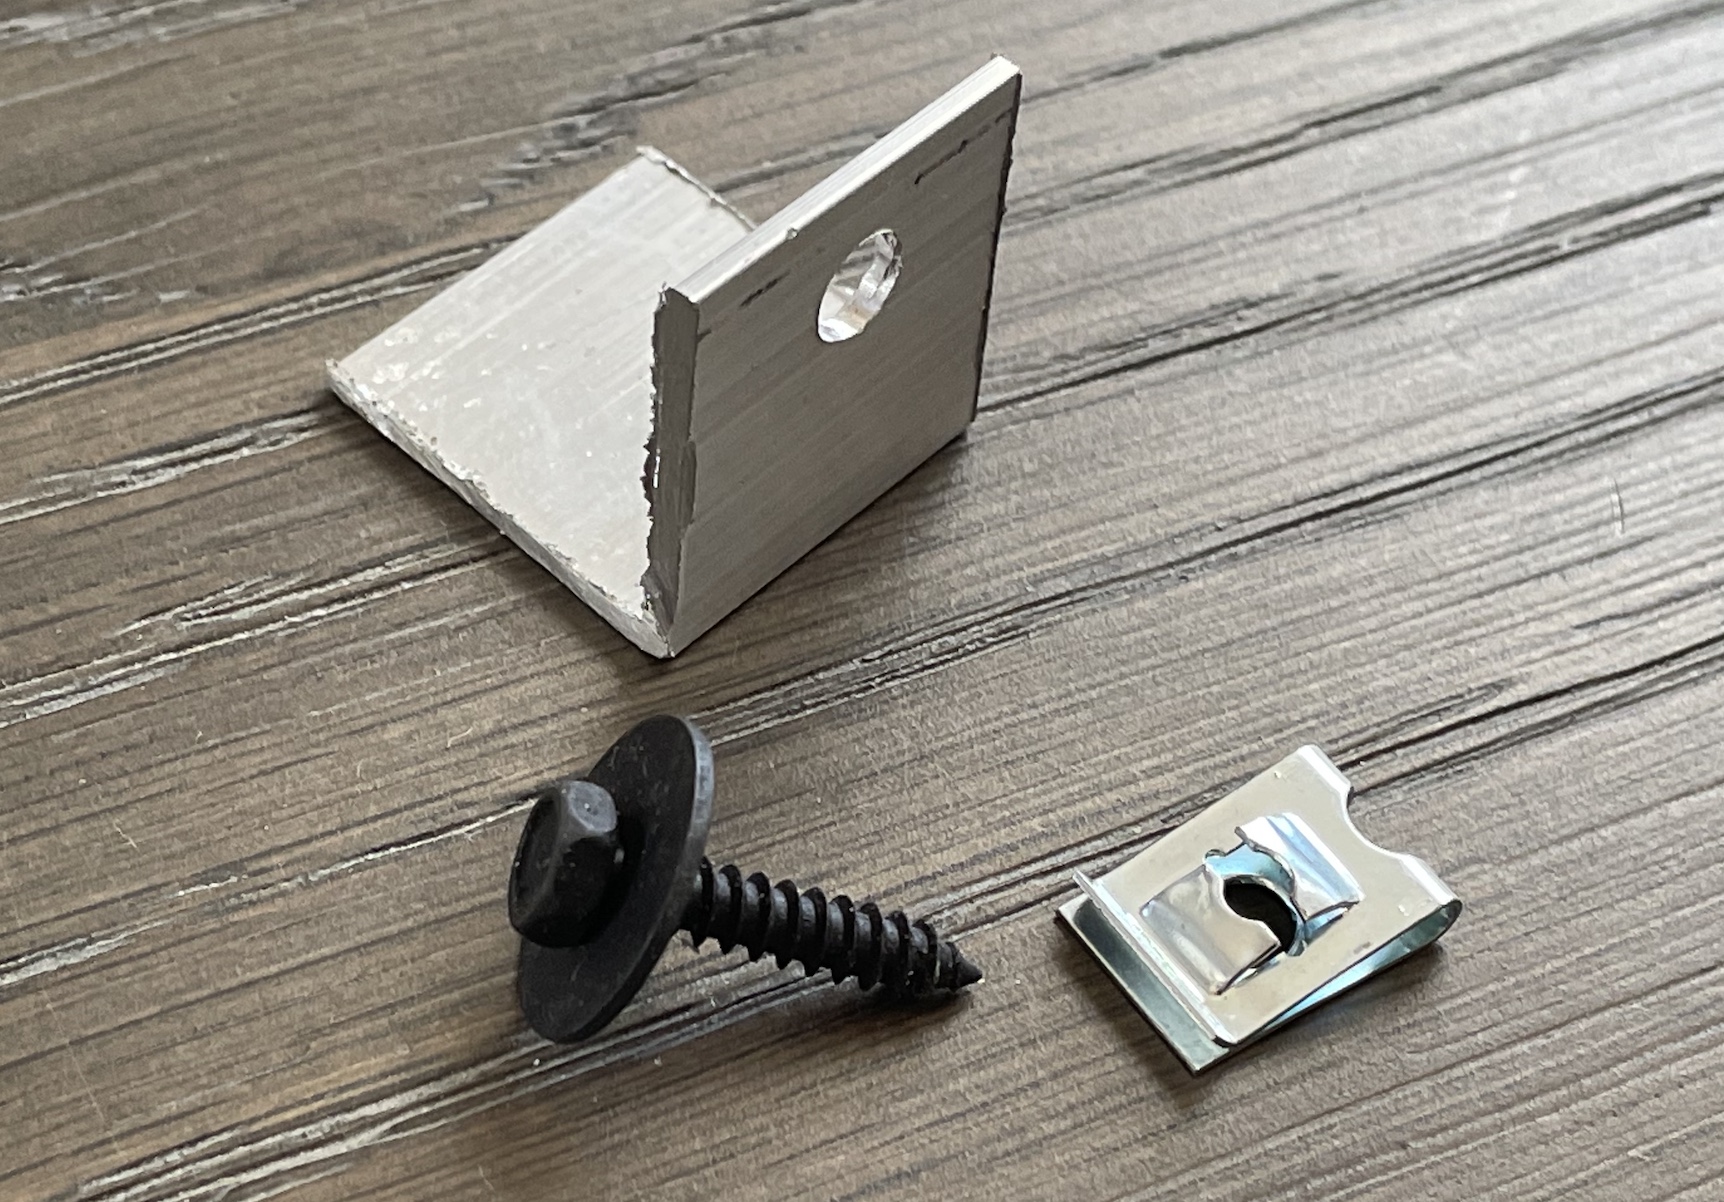 A 9th bracket is in the center of the car at the nose to provide guidance to the air dam. It’s taped to the splitter but does not have a screw in it. During the install, the angle of this bracket was changed to more effectively contact the air dam. 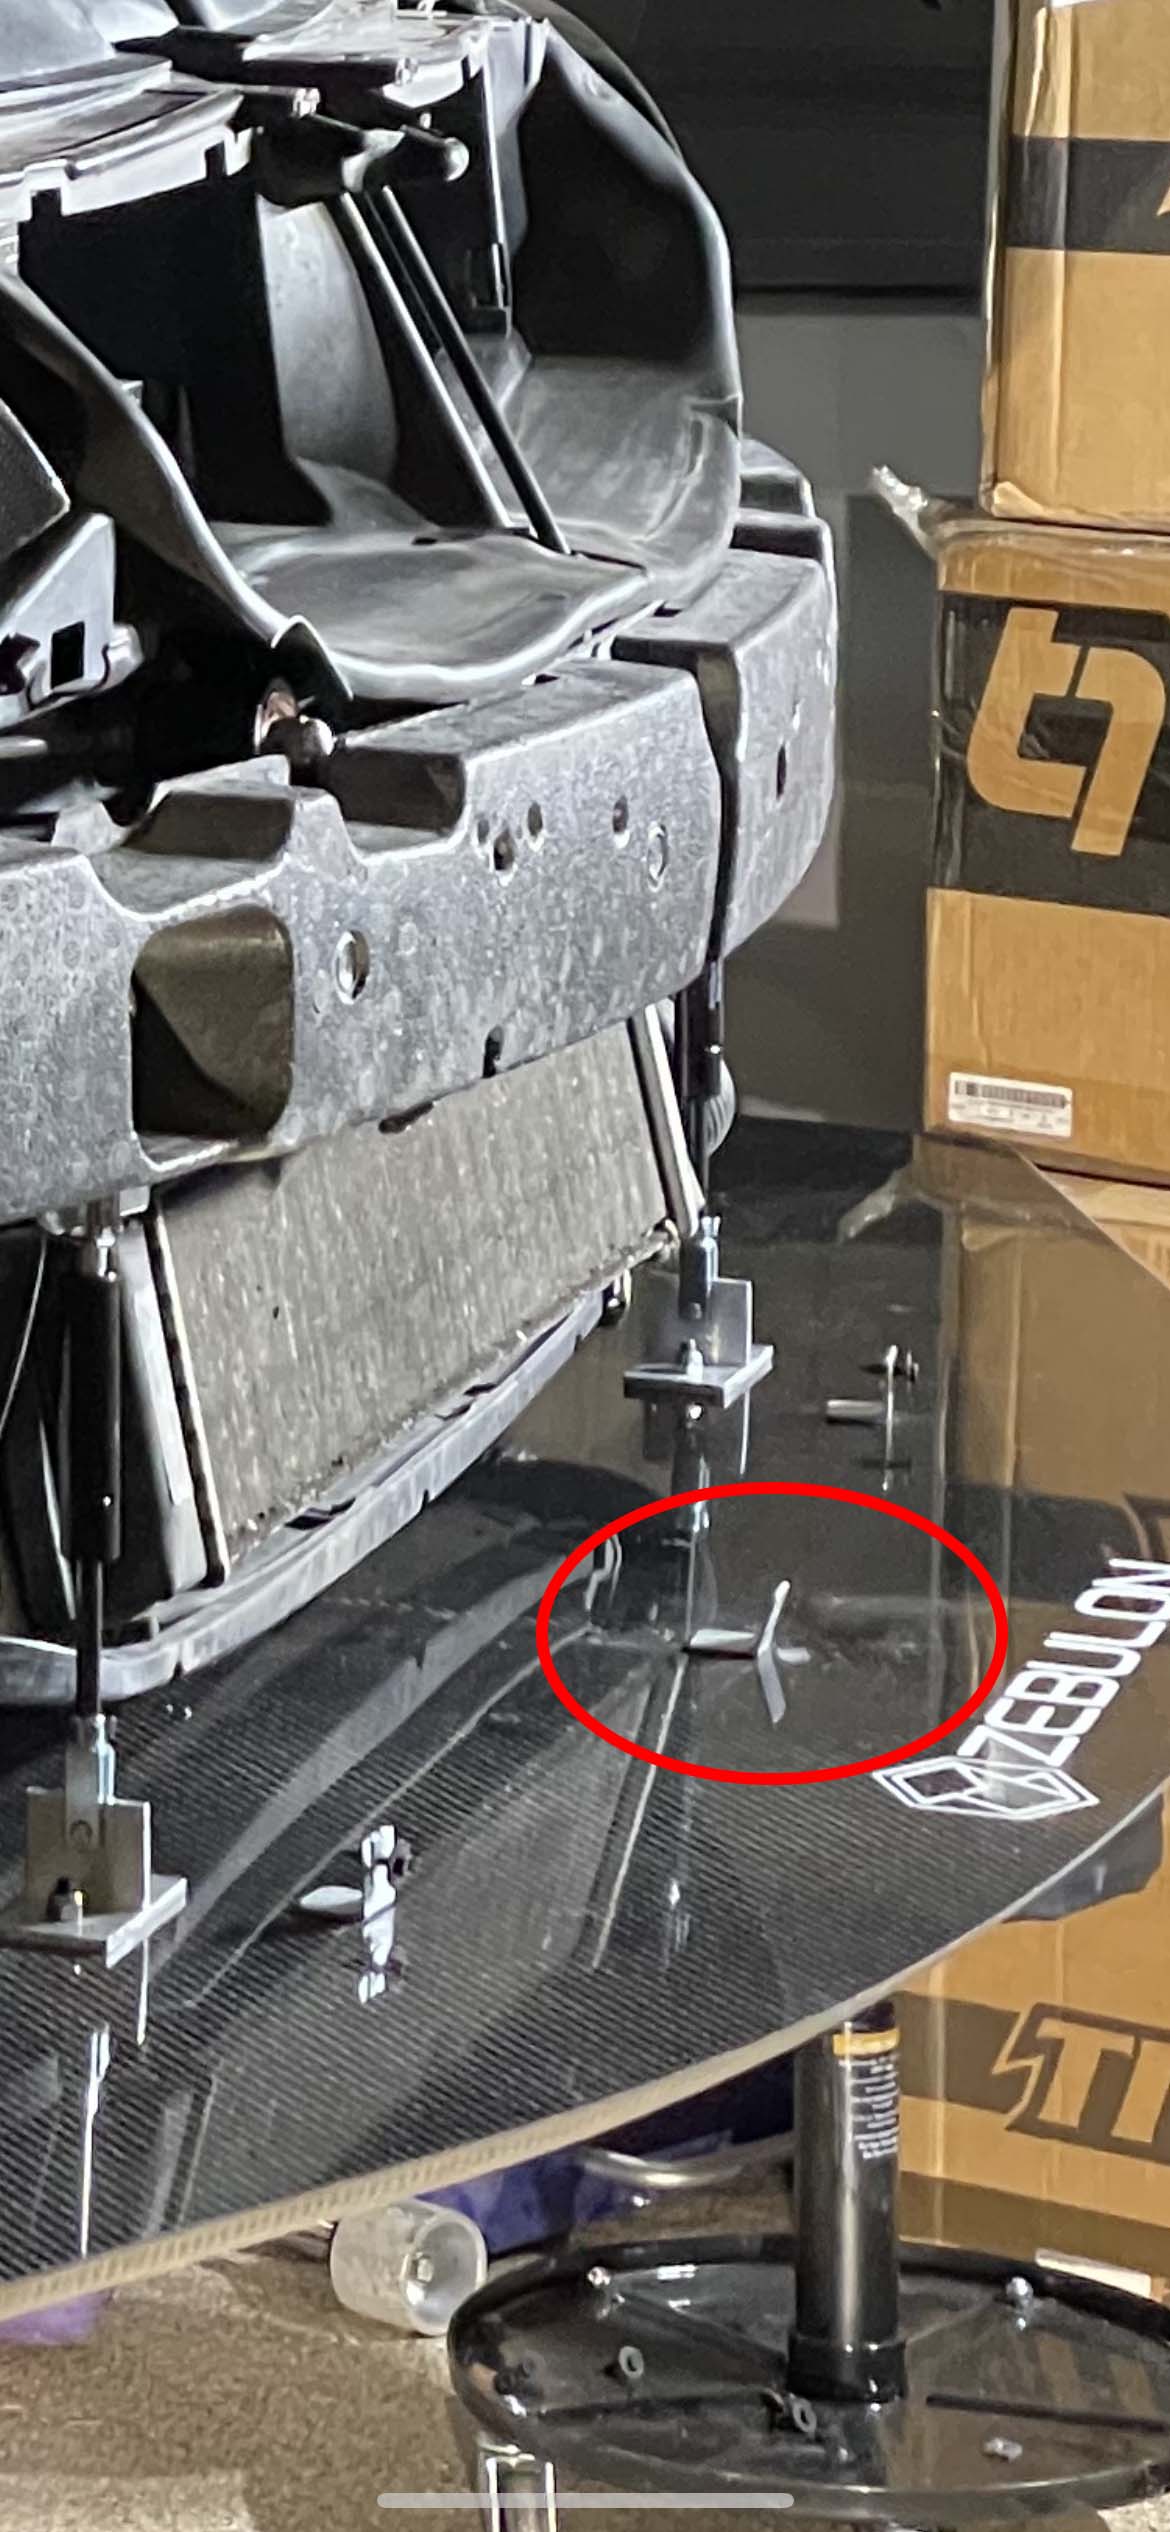 As far as placement of the brackets on the splitter, you just need to follow the lines of the bumper and experiment a bit with the locations. For me, 4 brackets was the right number that allowed the air dam to sit mostly flush with the bumper. So, there ya have it. A chassis mounted splitter for the E9x M3 platform! PS. I sent this write-up to Ryan prior to posting it and he was cool with it.
__________________
Last edited by dogbone; 02-14-2021 at 08:15 AM.. |
|
Appreciate
7
|
| 02-12-2021, 05:57 PM | #2344 | |
|
Colonel
5576
Rep 2,866
Posts
Drives: '09 E90 M3 - IB
Join Date: Feb 2012
Location: 93 million miles from the Sun
|
Quote:
Most of Ryan's clients tell him where to put the mounting blocks of wood inside the splitter and do the drilling themselves. But he's trying to make it a bit more accessible for us non-engineers.
__________________
|
|
|
Appreciate
0
|
| 02-12-2021, 08:40 PM | #2346 |
|
Lieutenant General
11865
Rep 12,880
Posts |
great write-up, thanks. are those little struts proprietary to zebulon, or are they some off the shelf part for something? i like that they can be forced up if needed, but are essentially bottomed out to provide solid downward support.
__________________
Instagram; @roastbeefmike
|
|
Appreciate
0
|
| 02-12-2021, 08:57 PM | #2347 | |
|
Colonel
5576
Rep 2,866
Posts
Drives: '09 E90 M3 - IB
Join Date: Feb 2012
Location: 93 million miles from the Sun
|
Quote:
__________________
|
|
|
Appreciate
1
roastbeef11864.50 |
| 02-12-2021, 10:53 PM | #2349 |
|
Lieutenant General
11865
Rep 12,880
Posts |
one of the things i've only thought about is constructing a long "bag" sort of tube and injecting it with expanding foam, then stuffing the bag into spaces like between the bumper and splitter. then, remove the bag, shave it to fit, paint it, and just secure it with some tape or mild adhesive.
i can't remember the source at the moment, but i also read that sealing the area between the hood and windshield also yields a significant aero advantage.
__________________
Instagram; @roastbeefmike
|
|
Appreciate
0
|
| 02-12-2021, 11:01 PM | #2350 | |
|
Colonel
5576
Rep 2,866
Posts
Drives: '09 E90 M3 - IB
Join Date: Feb 2012
Location: 93 million miles from the Sun
|
Quote:
__________________
|
|
|
Appreciate
1
roastbeef11864.50 |
| 02-12-2021, 11:21 PM | #2351 |
|
Lieutenant General
11865
Rep 12,880
Posts |
i got the idea from foam kits designed to fill in racing seats while the driver is sitting in it. it remains pretty flexible, not sure how much "squish" it would have before getting over stressed. i bet you could sandwich it in there and it would stay put.
__________________
Instagram; @roastbeefmike
|
|
Appreciate
1
DRLane4387.50 |
| 02-13-2021, 08:53 AM | #2352 |

5159
Rep 2,695
Posts |
Great write up dogbone and big thanks to you and fsmtnbiker for working with Zebulon to bring a good aero option to this platform!
How long do you think it will take you to take the splitter off? I know you are talking about getting longer ramps for loading/unloading - still thinking you can do it without having to take the splitter off? How about strapping it down to the trailer with it on? So you have 3” ground clearance to the bottom of the splitter and the splitter is about 1” thick. Did you adjust your ride height from what you previously ran to get to 3” or were you running closer to 4” with the APR splitter? Love the air dam - ingenious  |
|
Appreciate
0
|
| 02-13-2021, 09:55 AM | #2353 | |
|
Brigadier General

4388
Rep 3,635
Posts |
Quote:
__________________
Not a Doctor, those are just my initials.
|
|
|
Appreciate
1
OG Shark5158.50 |
| 02-13-2021, 10:36 AM | #2354 | |
|
5159
Rep 2,695
Posts |
Quote:
|
|
|
Appreciate
0
|
Post Reply |
| Bookmarks |
| Thread Tools | |
|
|





