PART 2: OS GIKEN SUPERLOCK VS. STOCK M3 DIFFERENTIAL - CHARTS AND ANALYSIS
In Part 2, we'll look at some charts I've captured from AIM's Race Studio 2 software to compare the behavior of the OS Giken Super Lock versus the Stock M3 differential. As I mentioned before, finding data on differentials is virtually impossible---especially finding data that's specific to our E9x M3, so I'm doing my best to shed some light on the topic with the tools I have----an AIM Solo DL. I'm not an expert, but I've learned quite a bit over the last couple months.
Most of the following charts show data from 2 laps at Buttonwillow 13CW.
-The fastest lap I've ever run with the Stock diff. 1:49.02. This is my current PR.
-The fastest lap I've run so far with the OS Giken Super Lock diff (OSG). 1:49.21
Buttonwillow is a good place for this kind of analysis because it has a little of everything---tight turns, wide rounders, blind turns, top-of-hill turns, dog legs, decreasing radius sweepers, tall berms, short berms, berm hopping, elevation change, mild Esses, good pavement, bad pavement…..you name it, it's pretty much there at Buttonwillow.
Obviously, it's important to use similar lap times because we're trying to see how the diffs are reacting under similar driver input. A diff would react quite different if you were snoozing your way around a track versus hammering on it.
It's worth noting that the 1:49.2 lap has a glaring driving mistake in it---I did not take the Off-Ramp corner correctly and it cost me a 1:48….ah well…. We'll look at that mistake below. Since that is a very important corner---perhaps the toughest on the track---I will be showing two other examples of that corner later.
For setup, it's also worth mentioning that the 1:49.02 with Stock diff was done at 55º F. The 1:49.2 with OSG was done at 68º F. My opinion is that 52-58ºF are the perfect conditions for setting new personal bests. The engine pulls like crazy and the track surface is warm enough to allow the tires good grip. When it's a little warmer, the track might be even better for the tires, but as you cross 60º F, the engine doesn't pull as hard. And when it's below 50º, the engine loves it and pulls like a superhero, but the pavement gets a bit sketchy.
The questions we'll be trying to answer are:
-Does the OSG lock on acceleration as promised?
-Does the OSG lock quickly on acceleration?
-Does the OSG lock on initial braking?
-Is the OSG open when entering a corner?
-Can you actually see the performance characteristic of the OSG looking any different than the Stock unit?
-Does the stock unit lock on acceleration?
-Does the stock unit lock quickly?
Things to look for in the charts:
-Looking at the speeds of the rear wheels, we can get a sense of how a differential is acting under driver input.
-Looking at the gas pedal position along with the spinning wheels can tell us how quickly or slowly the rear wheels are responding to the driver's gas pedal input. The diff controls that behavior.
-Looking at the brake pedal position along with the spinning wheels can shed light on if there's any locking on deceleration.
-Spikes in the wheel speed of one wheel over another usually means the differential is staying open. When you see a spike, it's important to look at the gas pedal position. There are times you want the wheel to be free to spin it's own speed. Other times, you don't. But in general, with a performance oriented diff, you would like to see less spiking when on the gas because that means the diff is reacting quickly to your gas pedal press and transferring power where you want it. If you're on the gas and you see spiking on the inside wheel, it means power is being wasted, and having one wheel spinning up over another tends to give the car a destabilized feeling. Remember, the ultimate goal is to have a predictable car----a car that responds in a predictable way to all your inputs every time. That's how you build confidence.
Each Data Set is presented in 3 charts:
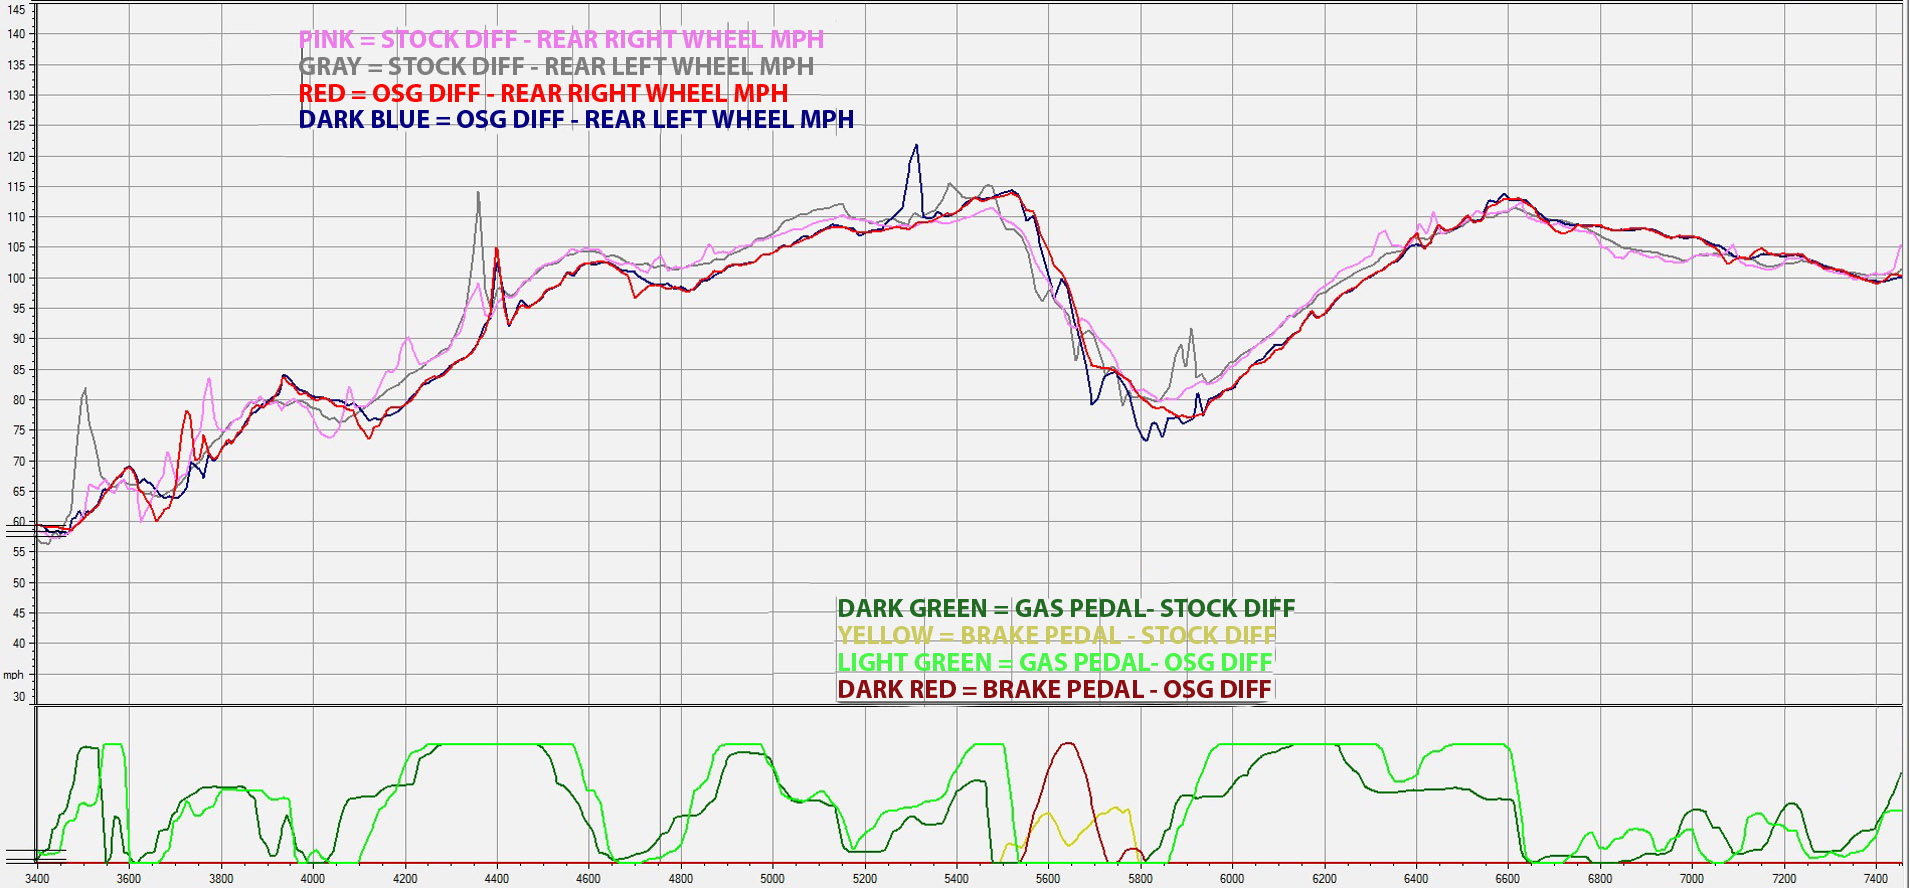
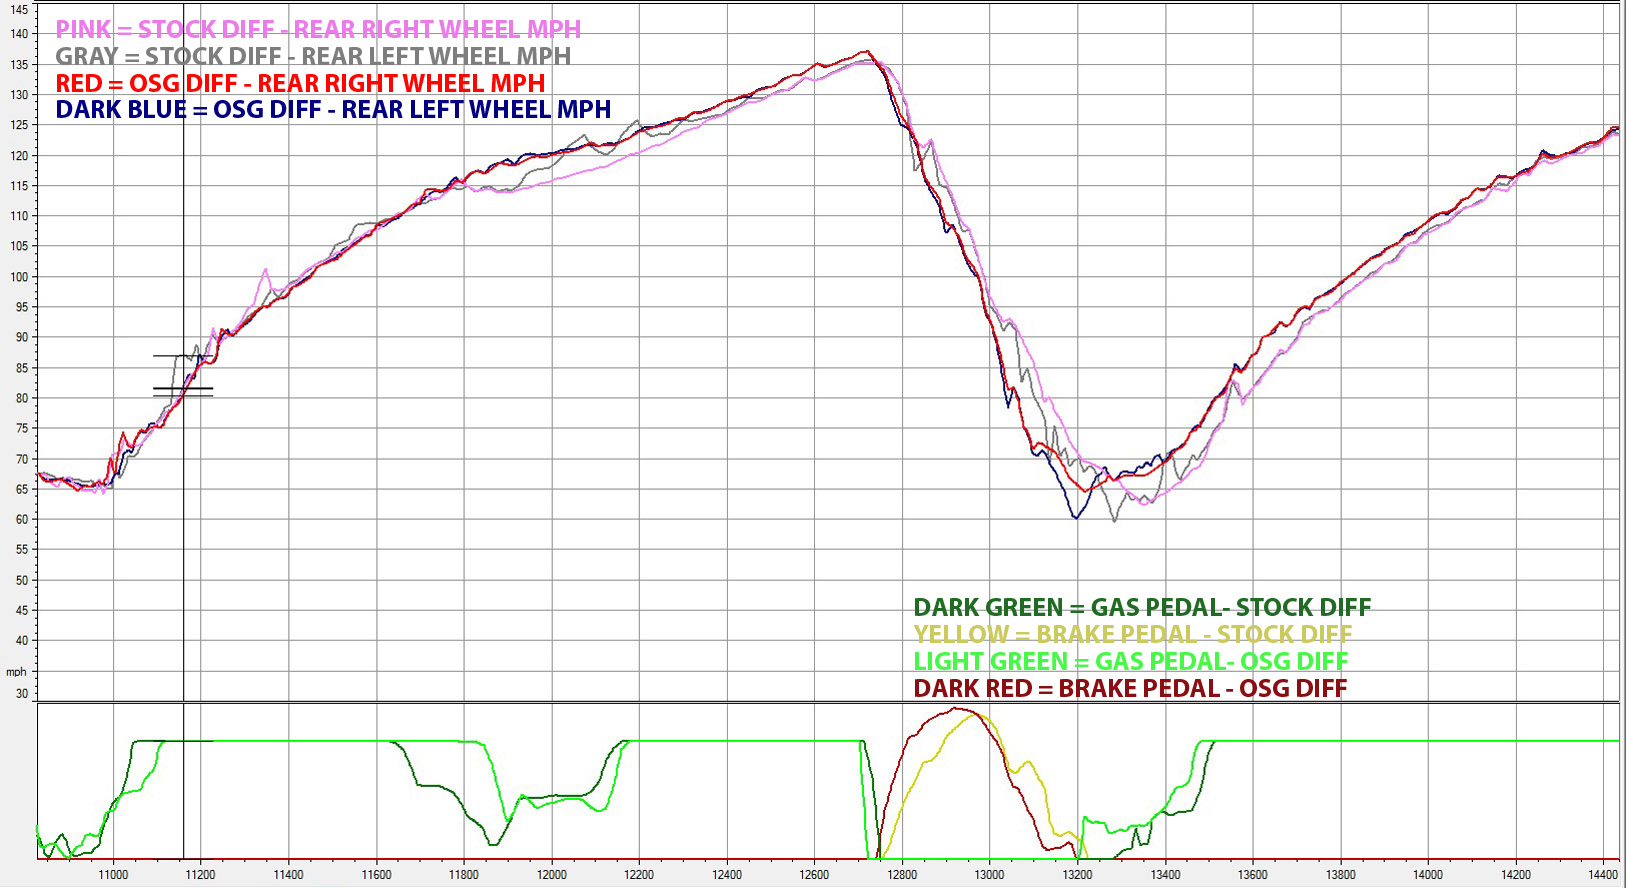
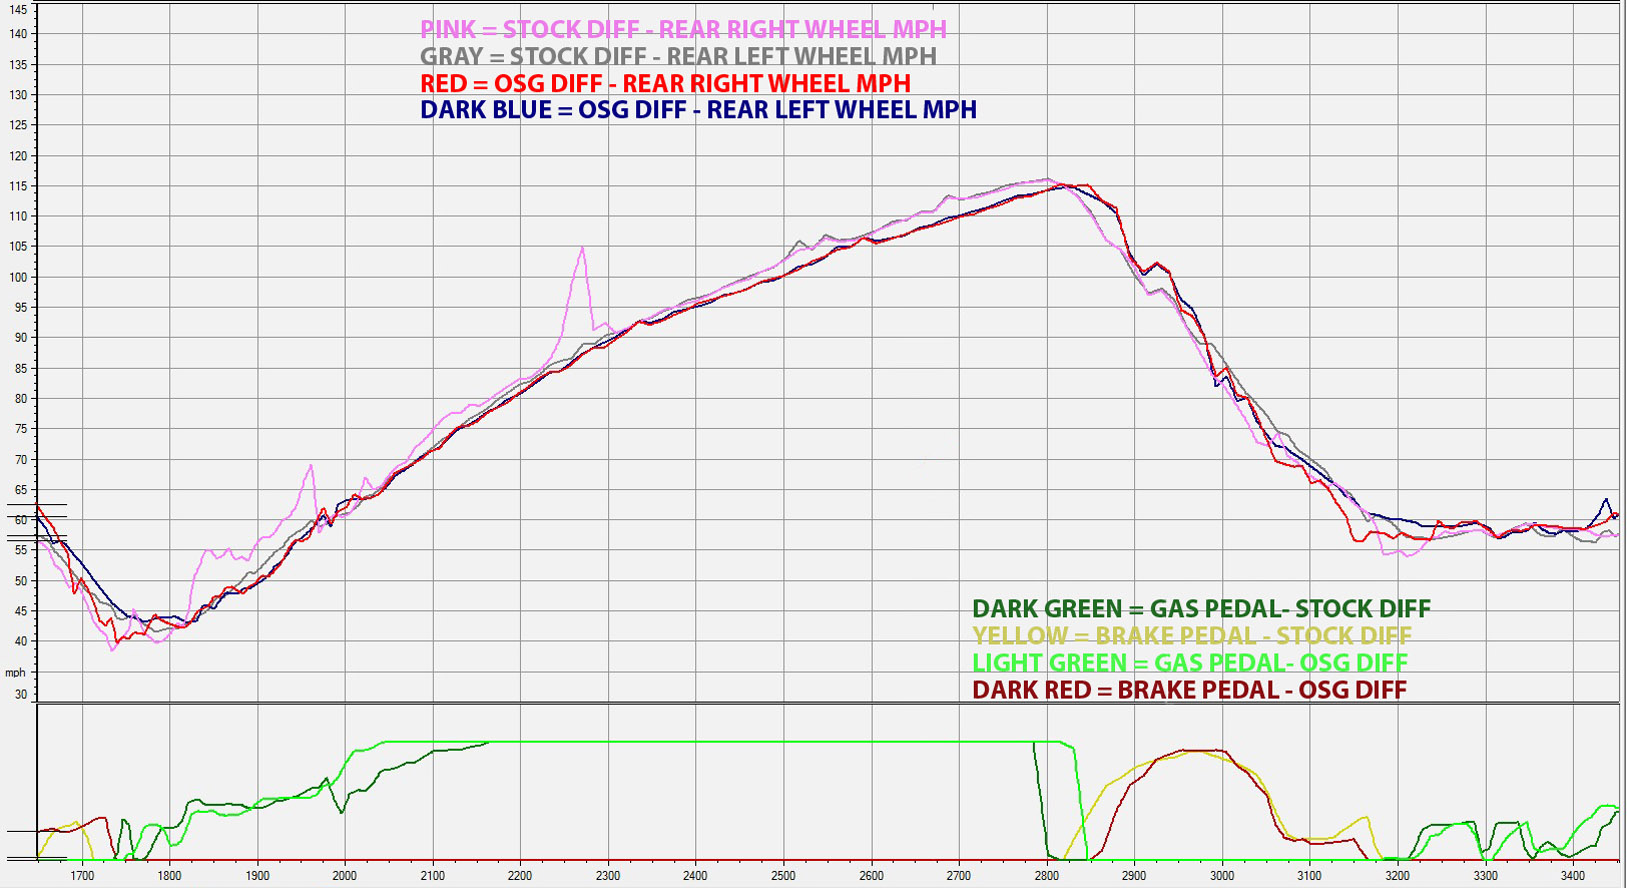
Chart 1: Both OSG and Stock Diffs overlaid on top of each other for comparison.
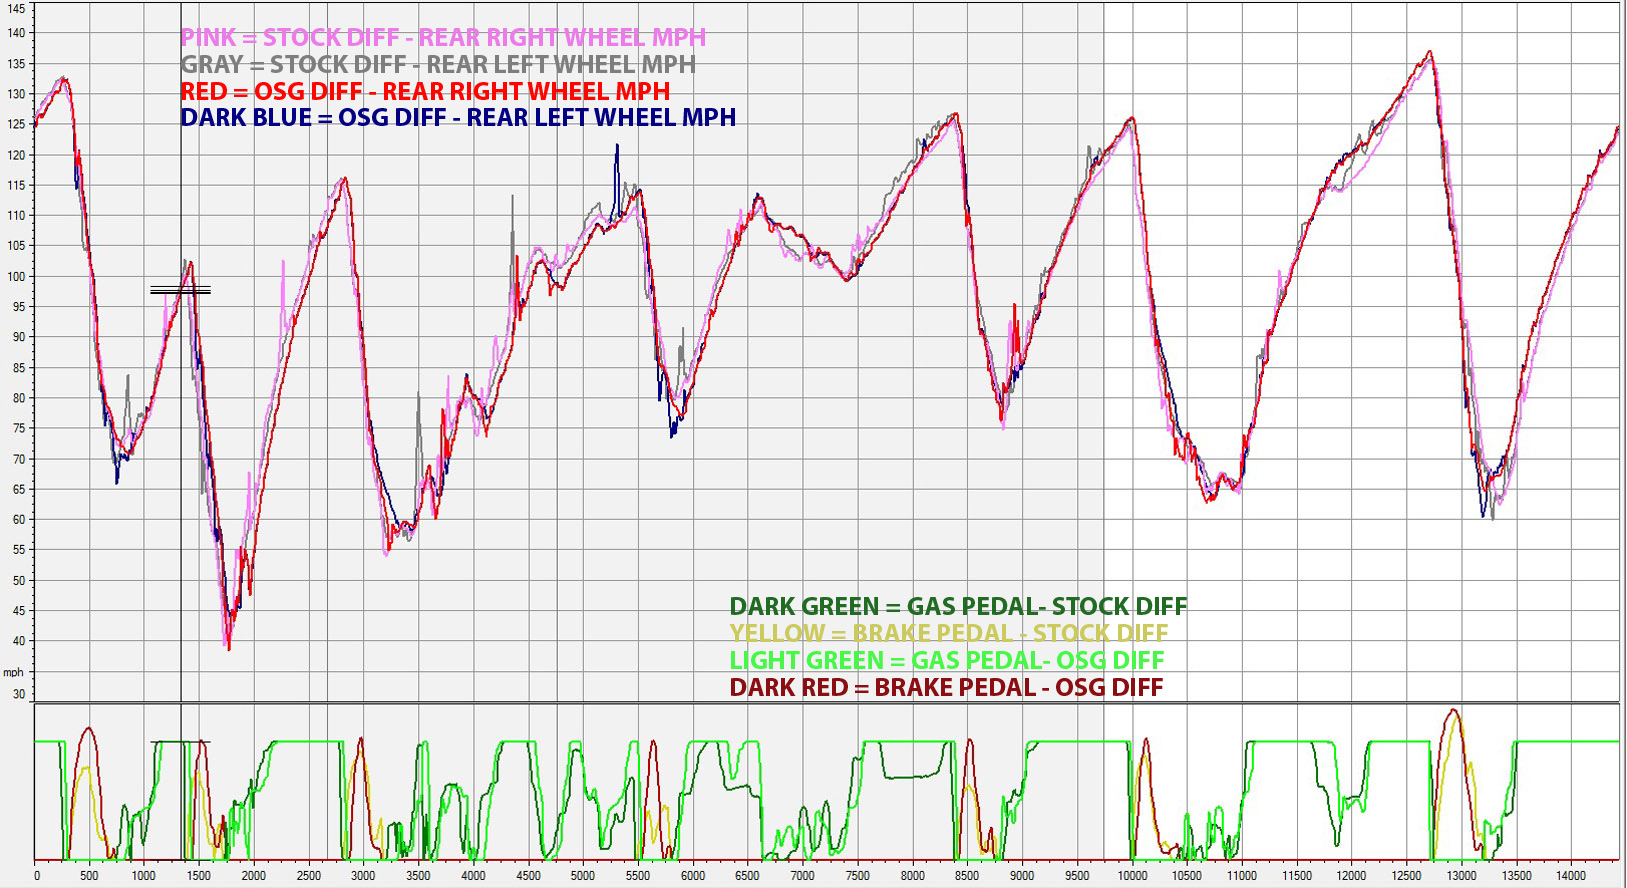
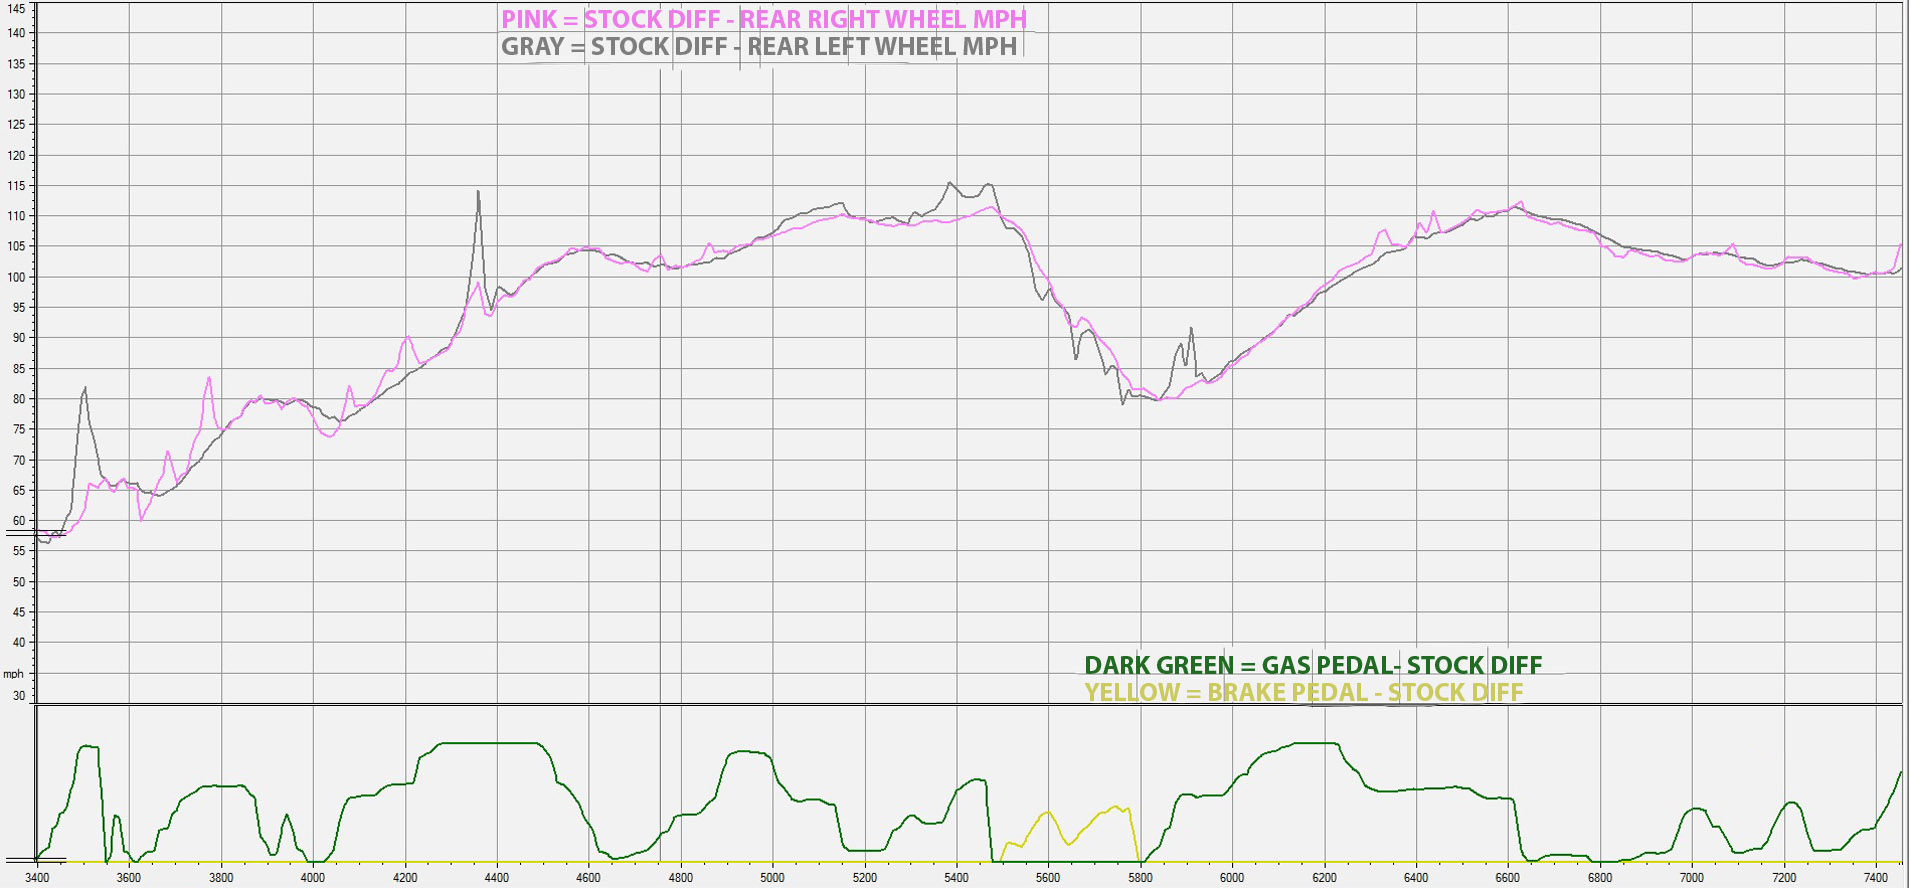
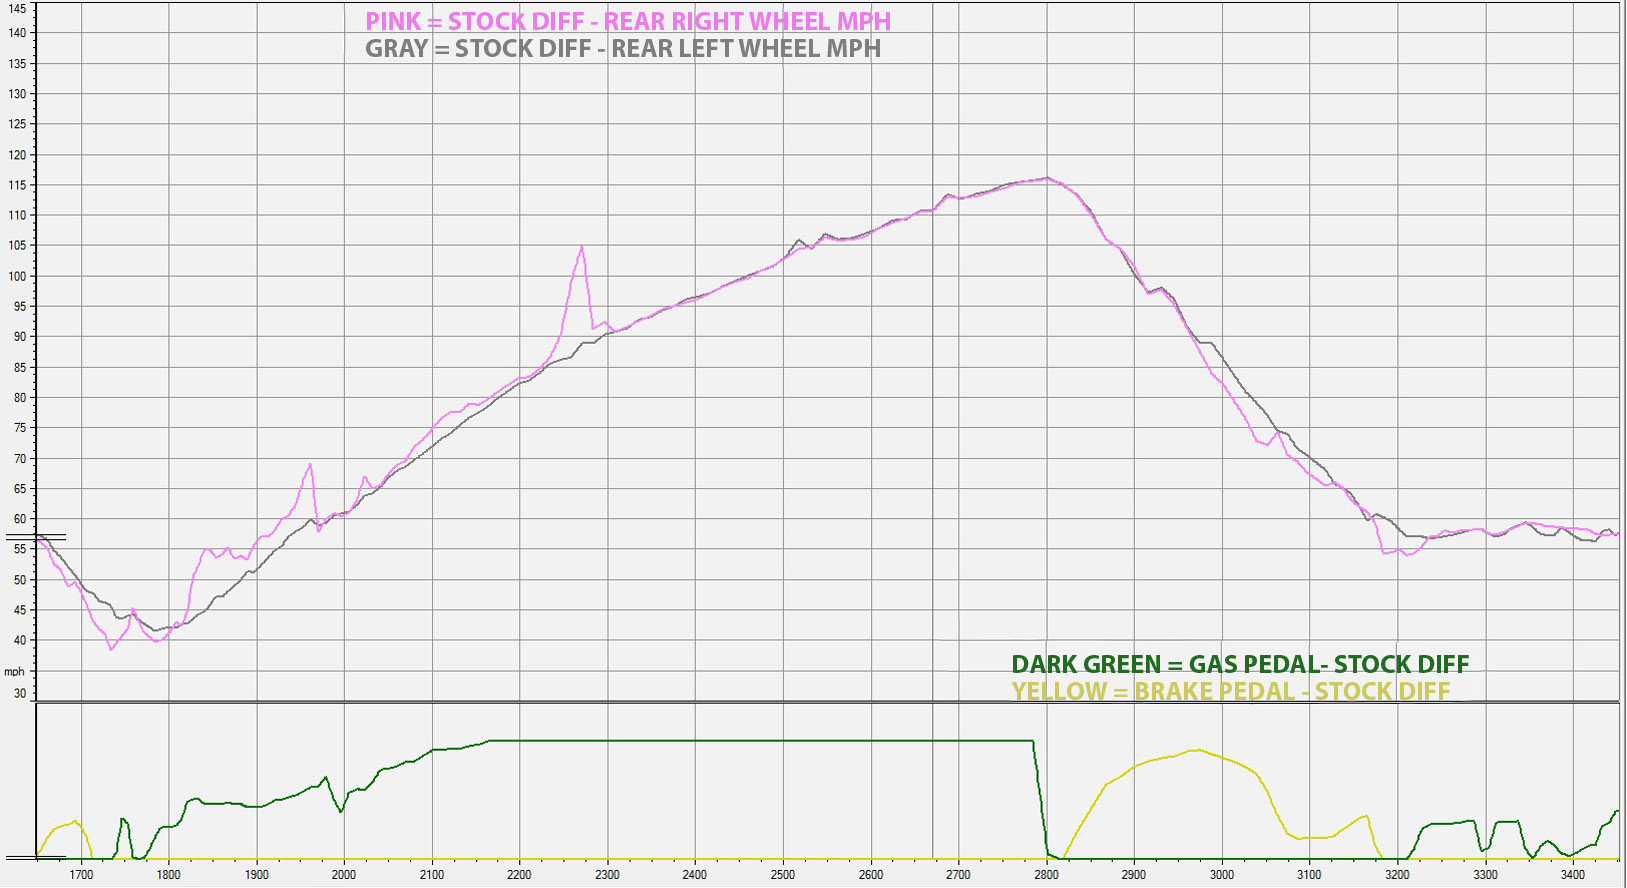
Chart 2: Stock diff by itself for an isolated view.
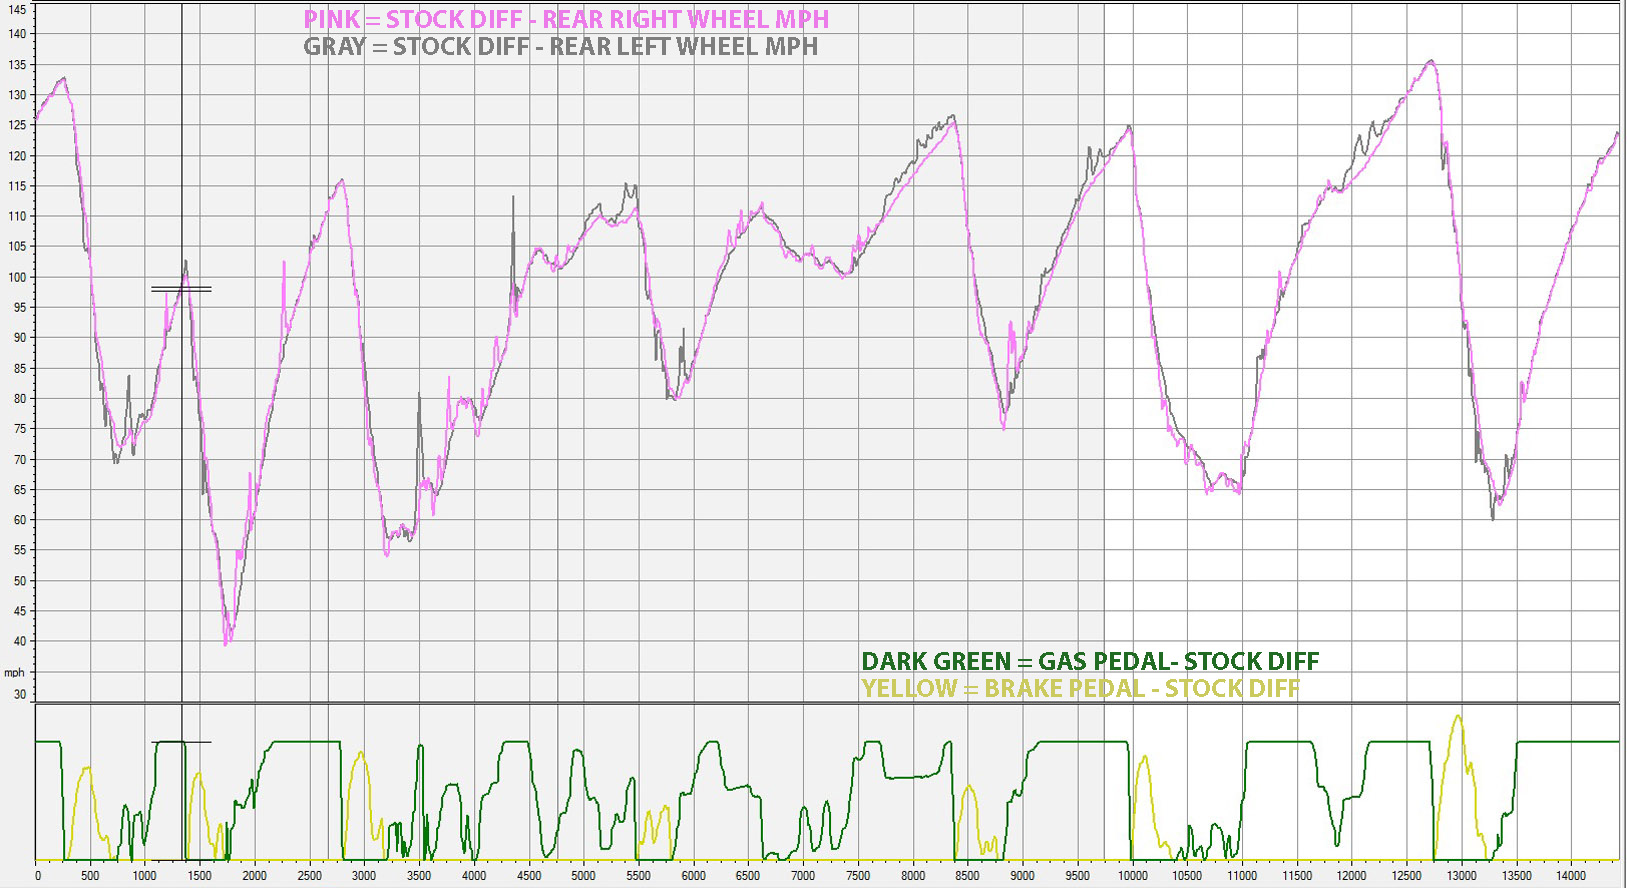
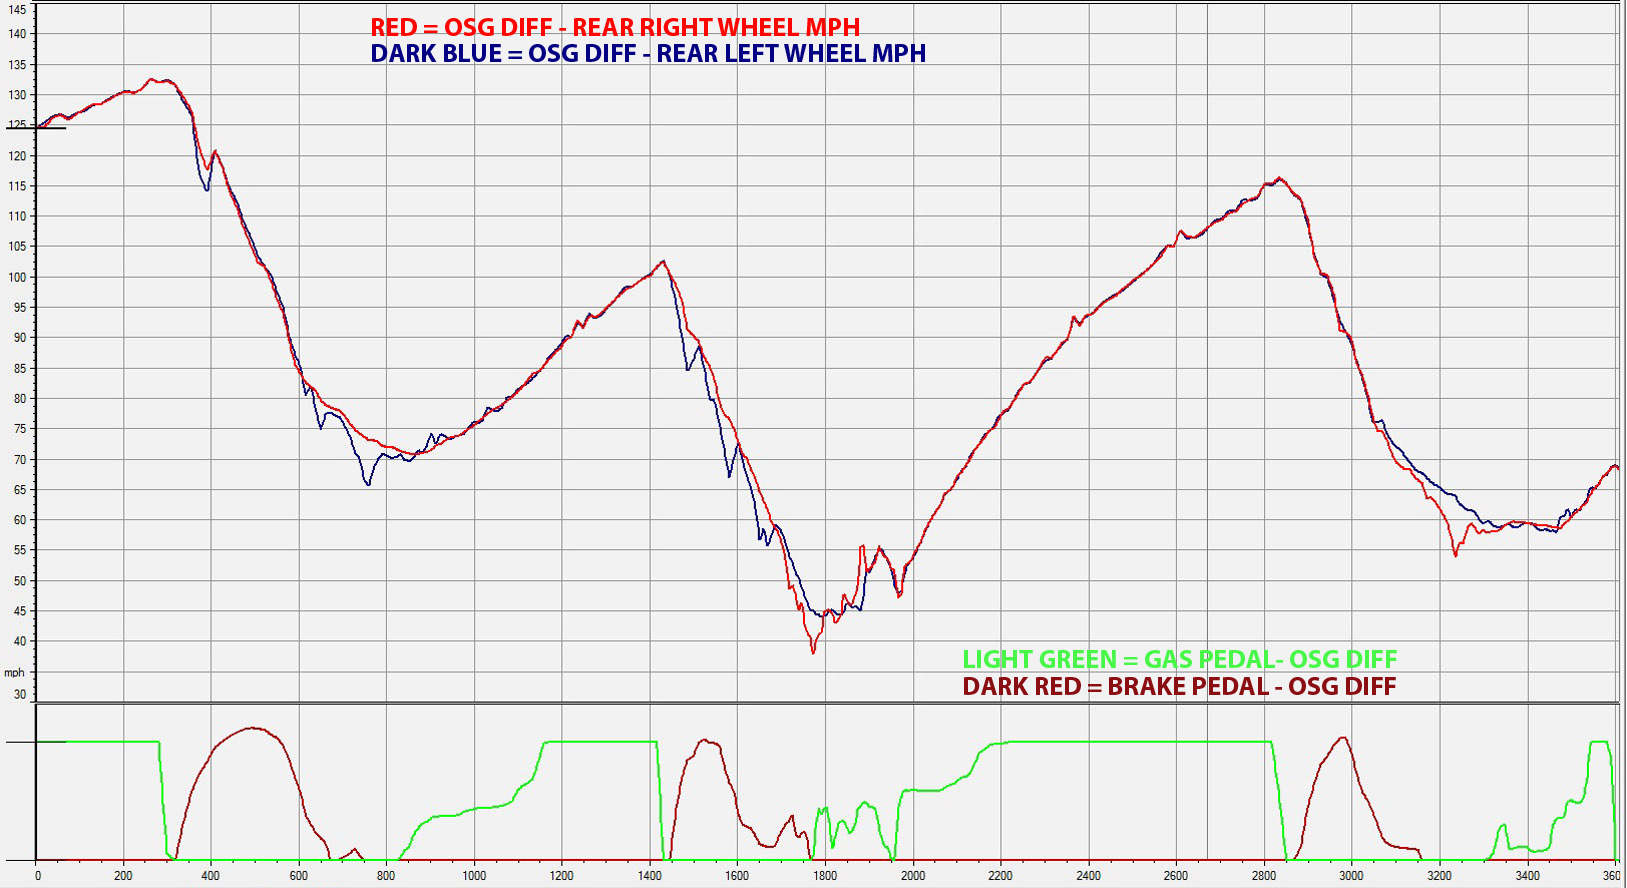
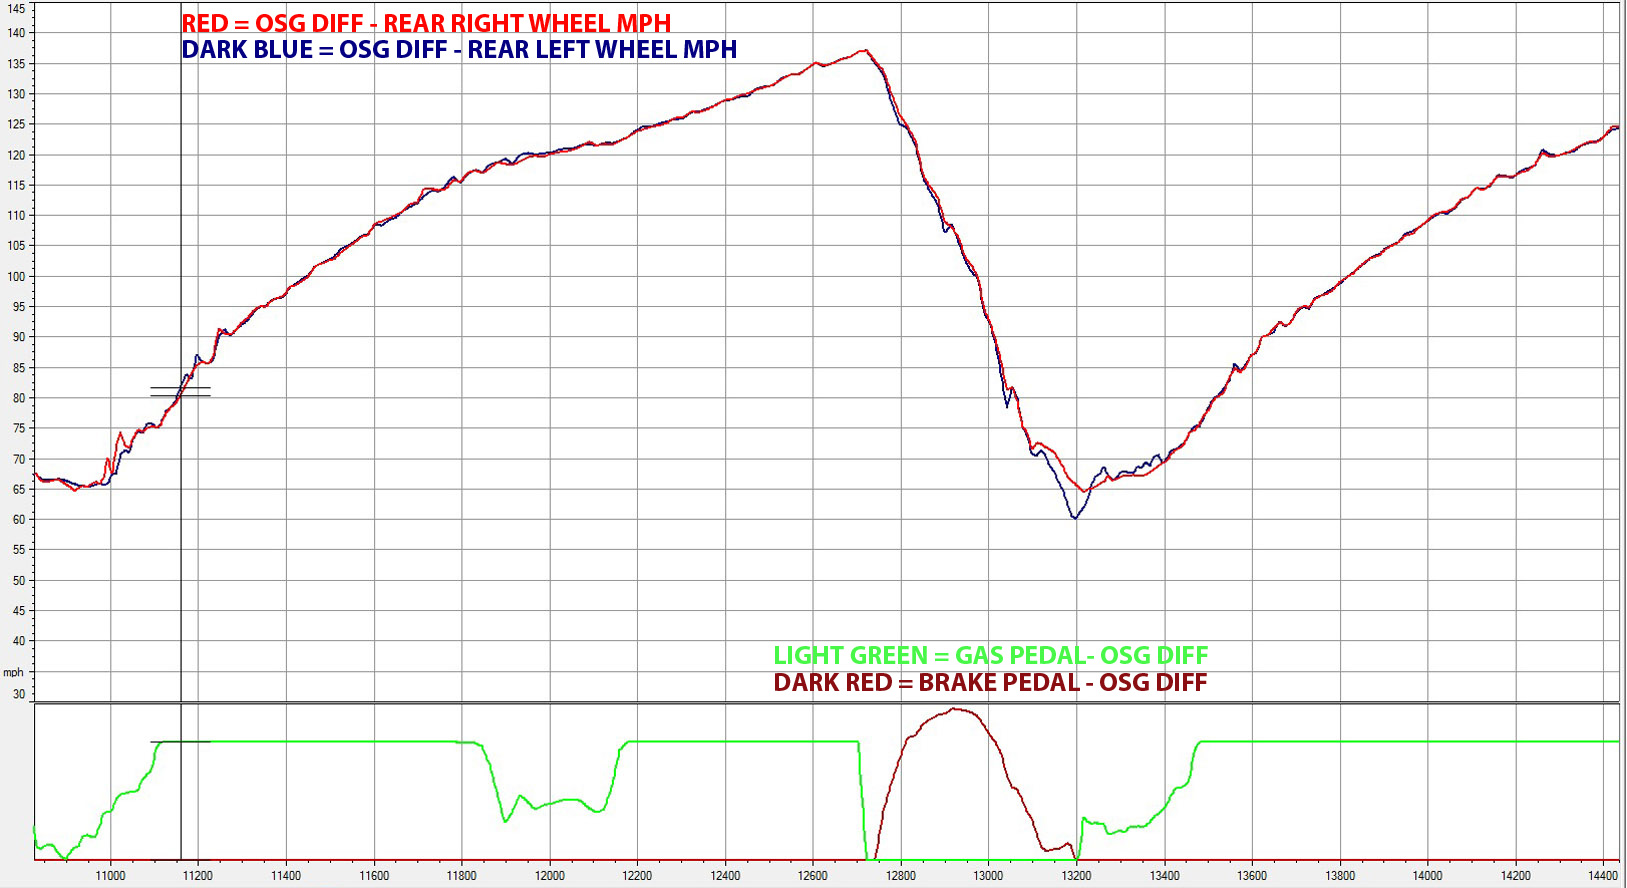
Chart 3: OSG diff by itself for an isolated view.
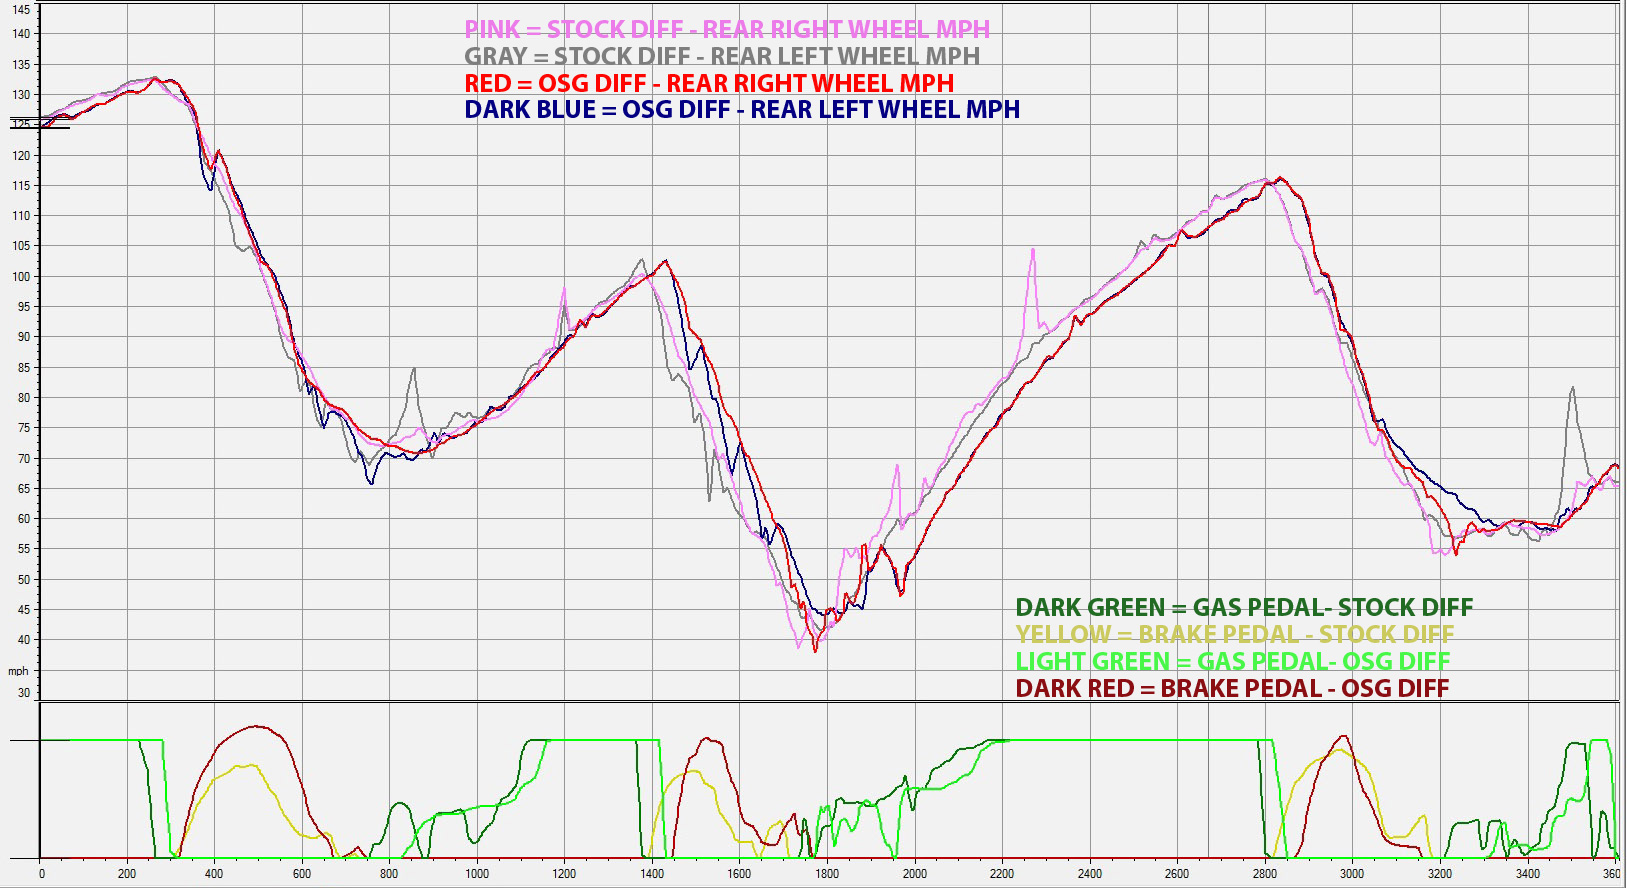
Each picture has a legend on it, so you know what all the colored lines are. The data will be the MPH of each rear wheel, along with the gas pedal and brake pedal positions. The numbers at the bottom of the pictures show how many feet down the track we are from the Start line.
The first Data Set will look at a zoom-out of the entire track with both laps. Looking at an entire lap all at once doesn't offer much detail, but you'll see from the overview if one diff looks smoother than the other. Then, we'll zoom in and look in closer detail at the whole track to see what's going on. After that, we'll look at a couple examples of the Off Ramp corner to see the OSG's behavior.
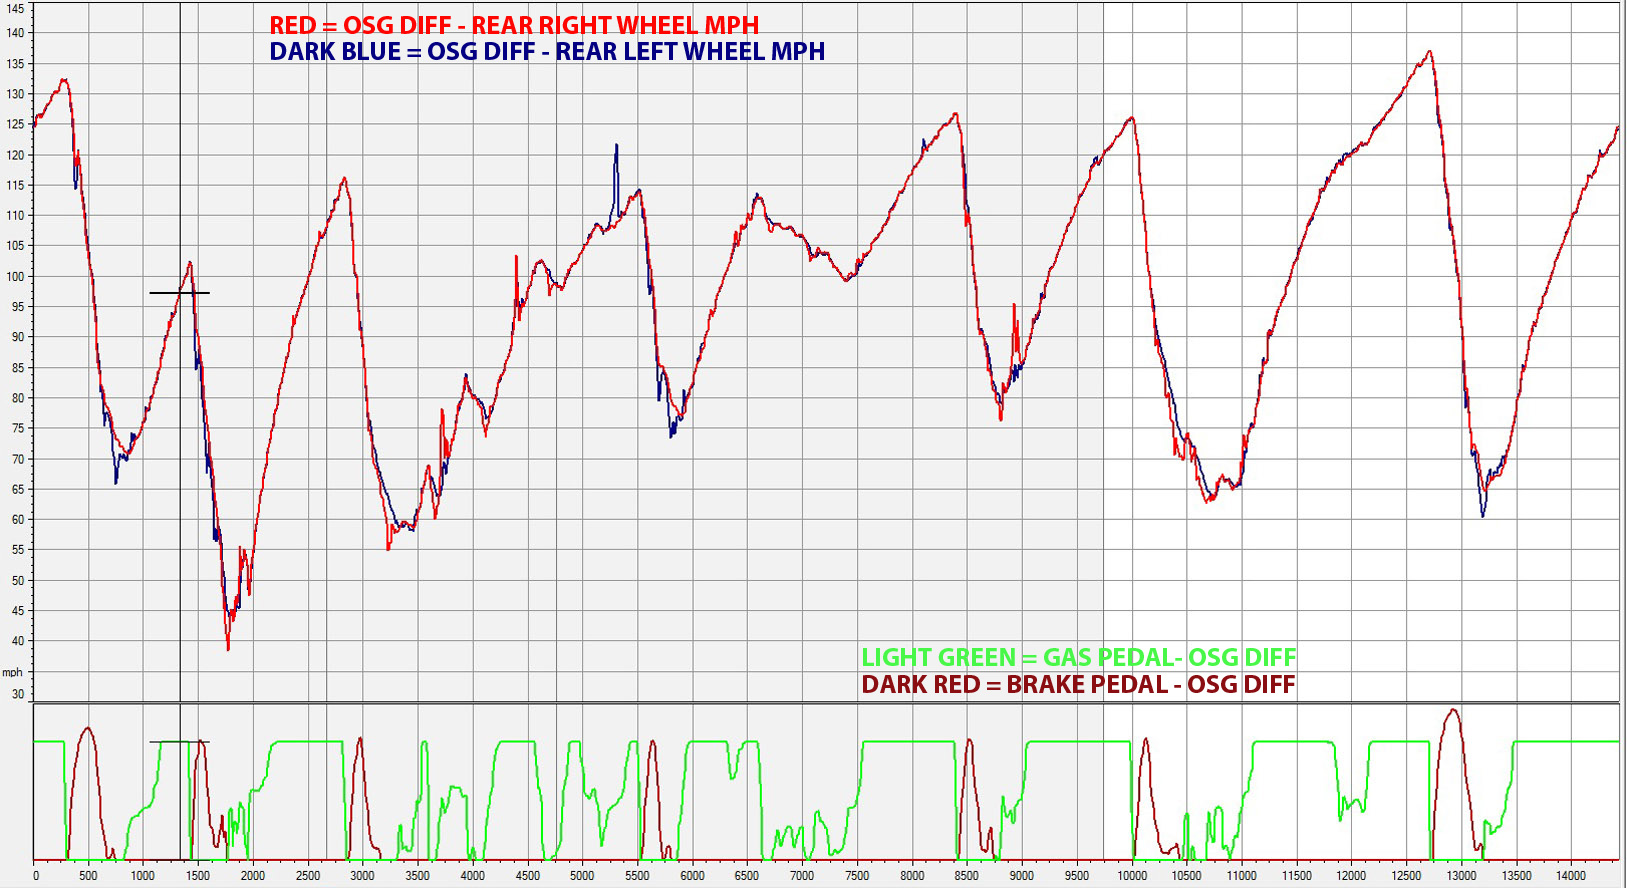
For people not familiar with Buttonwillow, I've created a track profile map that has some numerical markings indicating the number of feet down the track the corners are. This is so you can get a sense of what the corners look like, which direction they go, etc. The track profile comes from my AIM Solo DL. I wanted to show the line driven instead of a map of the track. If you're on a computer, I suggest dragging the track profile to your desktop and opening it separately from your browser so you can see where you are on the track based on the number of feet at the bottom of each chart.
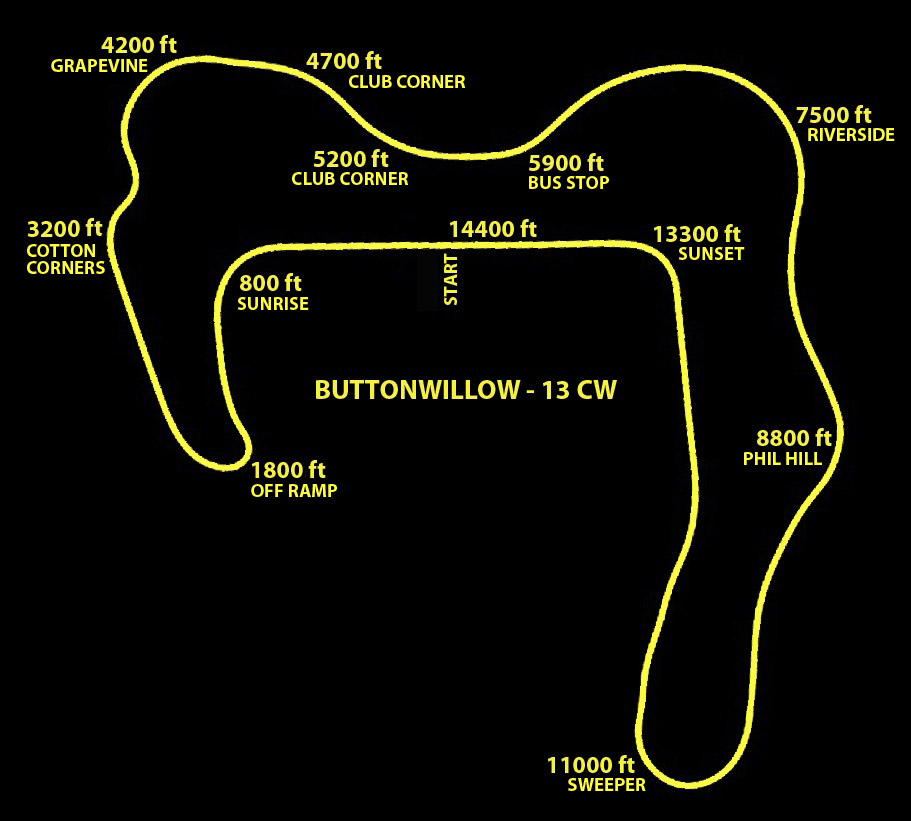
Data Set #1: Full Lap: Again, it's hard to see much detail here, but if you look at the overall lines, most the time you can barely see the Dark Blue line under the Red line because the OSG wheels are working together in a more controlled way. The Pink and Gray lines of the Stock diff are frequently spiking and seem to be doing their own things often times. The OSG wheels are much smoother/less spiky and less jagged than the Stock unit. A spike on the wheel spin is generally not a good attribute. This means the power is being applied to the inner wheel and is generally being wasted. On Chart 2, the Gray line in particular seems to really spike away from the Pink line many times. On Chart 3, there's quite a bit less spiking. Ok, no need to dwell here. Let's start zooming in on the next data sets.
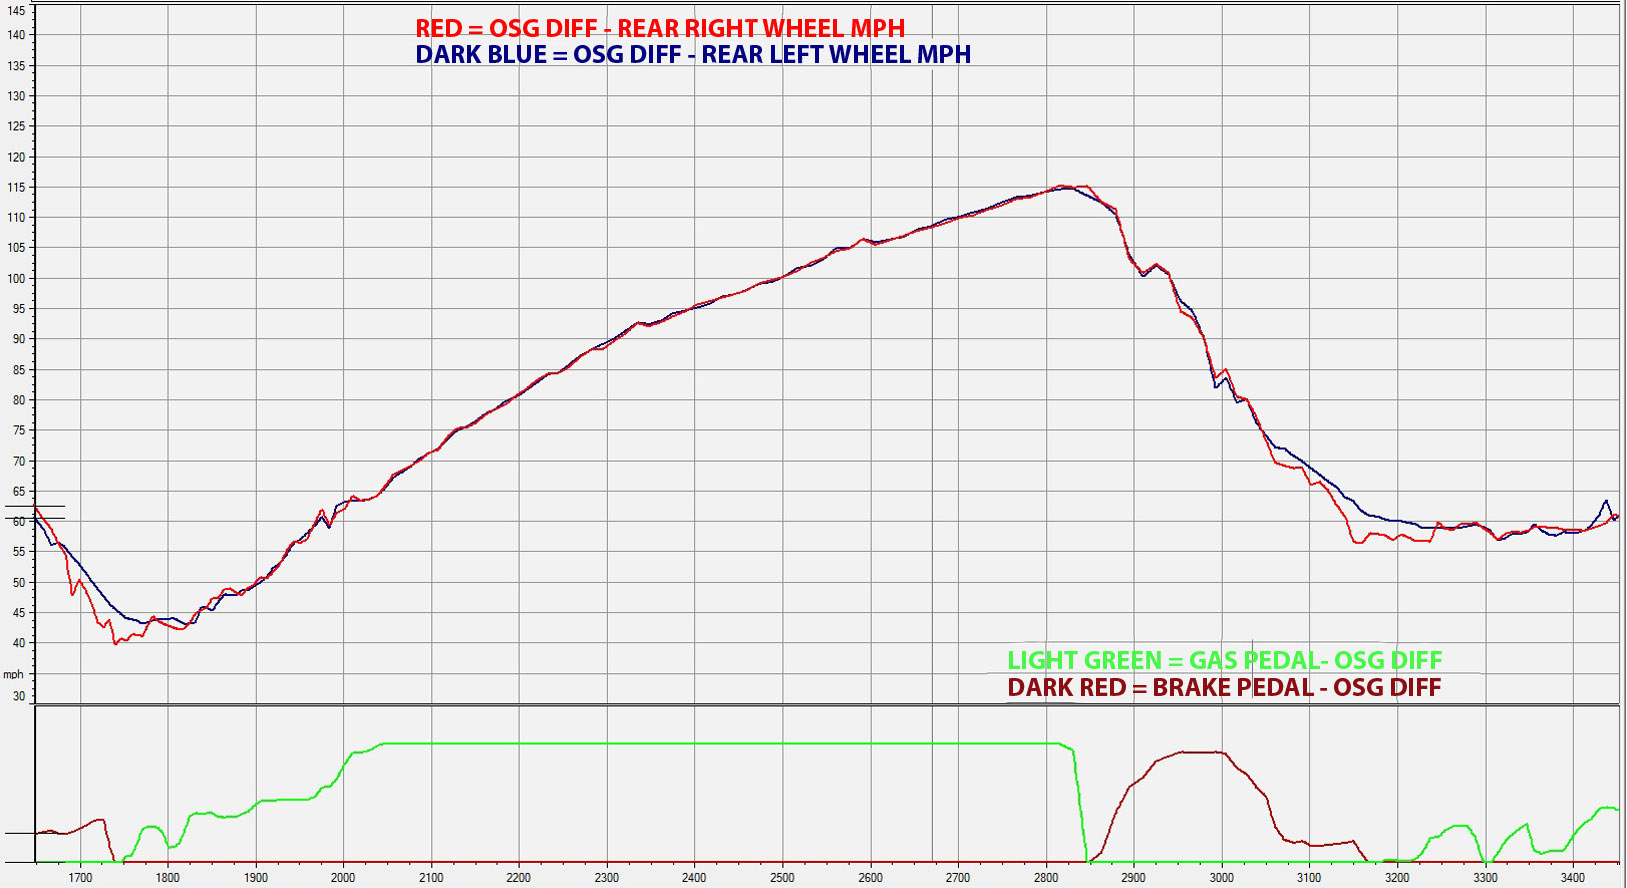
Data Set #2: From 0 ft to 3600 ft: - Sunrise and Off Ramp - At 800 ft, we have entered Turn 1 - Sunrise, a Left turn. On the stock diff, you can see a spin up of the inside Left Wheel on the Gray line. And it lasts for around 100 ft. The right wheel (the loaded wheel) spins up a little bit and then reduces. I'm going to guess that I felt the outside wheel because I completely let off the gas. Let's talk about predictability here. You have one wheel that has significantly spun up over the other. The car is probably wanting to tend sideways in this moment. It's a little tough to say because I get on the berm on this corner and the berm makes things a little funky. As I mentioned before, corners are very dynamic. When things start spinning their own speeds separately, it's harder to gauge what the car is going to do. Looking at Chart 3, the OSG shows no such spin up while achieving the same speeds. You can see I get on the gas and the Left wheel spins up just a little and then the diff locks and the wheels move in unison until I get off the gas for Off Ramp. I would say that the OSG is giving a more predictable result in this corner.
At 1800 ft, I enter Off Ramp, a very sharp right turn that goes up hill and as you go up, it's a little bit off camber. The pavement is not in great condition on this corner. Because it's such a sharp turn that goes up hill, cars REALLY load up in that corner and the pavement gets hammered something awful. The track owner has temporarily patched it with concrete and some odd top coat that's getting destroyed and it's not fantastic. From Chart 2 with the Stock unit, we can see that there are two Pink (right wheel) spin ups--one of them fairly long. The car is leaning hard on the left side. I get on the gas, the unweighted right wheel starts spinning, and it spins for 150+ ft. I'm not sure the stock diff ever really locked much here because I backed off the gas pedal a bit, and that's probably what brought the spinning wheel under control. But then under full throttle, the right wheel spun up again as I crested the hill. It doesn't seem like a lot of lock was happening here. And if it did, it was taking a while for it to catch up.
Looking at Chart 3, Off Ramp is the spot in the lap where I mess up with the OSG. I got on the gas a bit too much too quickly. The Red line (Right wheel) starts rising, but the Blue Line (Left wheel) follows very quickly. The OSG diff is locking quickly here, and it was a bit too much gas, so the car started sliding. I've gone beyond the tire's grip limit. You can see I completely let off the gas, got the car back, and then I got back on it. Ugh, I lost quite a bit of time here---and it was still a 1:49.2. Basically, this demonstrates that I have not fully re-learned how to modulate the gas pedal with the new diff. When I'm pushing hard, the new diff is transferring power to the loaded wheel more quickly than I'm used to. I need to continue to learn to use less gas pedal on initial gas press so as not to overwhelm the tires. The OSG tech I spoke to mentioned this would be the case. A positive side effect of this is that I can get to the grip limit of the tire with less gas pedal press, which is easier on the engine. People say that you're driving less "ham fisted" like this----not having to mash the gas and really push the car around to get what you want is considered better.
Another question to look at is: Is the OSG diff remaining open on corner entry? The answer is Yes. In Chart 3, we have three opportunities to look at. At 750 ft, we can see the Dark Blue Line of the Left Wheel slows down more than the Right as we're entering the corner. The diff is open. At 1750, the Red Line of the Right Wheel slows down more than the left as we enter the right turn. The Diff is open. At 3250, the Red Line RIght Wheel slows more than the left on the right turn entry to Cotton Corners. The diff is open. So, the OSG diff has remained open on each corner entry on the first three turns after significant brake presses.
And we can ask, is the OSG locking on initial brake press? The answer looks to be yes on Turns 1 and 3. Off Ramp is a bad place to ask that question. The track is so wavy, and there's a berm and there's a dip in the pavement right where you want to brake. That spot is just a super challenging spot. You probably don't want the wheels blindly locked going into Off Ramp because you're not really braking in a perfectly straight line. Off Ramp is just a tough corner. I'm not sure there's any perfect single way through there. You just make the best of it and get the heck out of there as fast as you can.

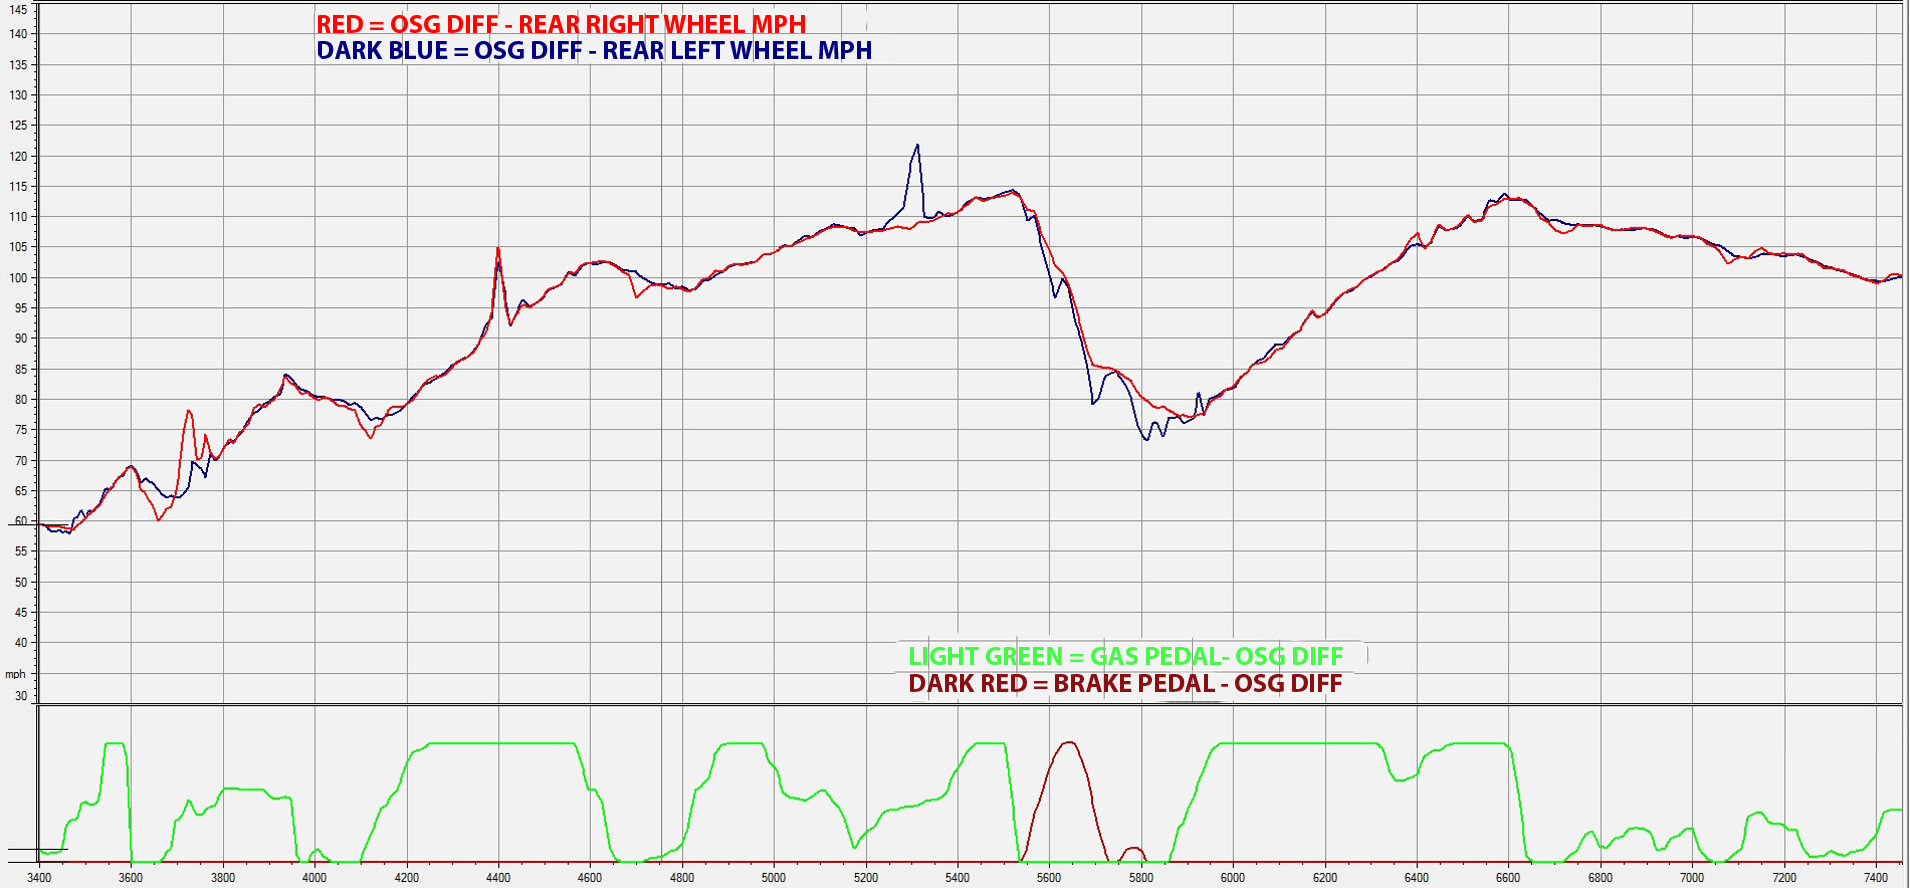
Data Set #3: 3400 ft to 7400 ft - Cotton Corners and Bus Stop - We've entered Cotton Corners and now at 3400 ft, I press the gas as I'm taking a left turn to go up a short hill. With the Stock unit, as I press the gas, the left wheel spins up. The OSG locks quickly and the wheels move in unison. At 3700 ft, I crest the hill and both the Stock unit and the OSG spin up because I jump off the berm on the right side.
Around 4400 feet, we have an interesting moment. The track is straight at this point, but there's a mild hump in the track. In both laps, I'm 100% on throttle. As I go over the hump, the Stock unit spins up the Left wheel dramatically. With the OSG, BOTH wheels spin up very similarly. The OSG is locked and keeps the wheels together. This is good for stability.
At 5300, the OSG has a spike on the left wheel. I am rounding left and I'm not very hard on the gas, so the diff is not locked here, and I'm in 5th gear not making a ton of torque. There is a berm on the left side as you round this bend. It's interesting to see how easily the wheel can still spin up when the diff is open..
At 5900 ft, I'm going around Bus Stop. The Stock unit spins up the inside wheel. I hesitated with the gas and the wheels sorted themselves out. With the OSG, I pressed the gas quite dramatically after Bus Stop and the diff locked very quickly. Looking at the comparison, I'd say I over-braked for Bus Stop on my OSG lap……..blah…..
I want to take a moment and look at a couple driving techniques on this part of the track. On the Stock diff, I did this section from Cotton Corners to the entrance of Riverside (3400 - 6600 ft) pretty well----EXCEPT for one tiny mistake that cost me 0.2 seconds and probably cost me a 1:48. At 3600 ft, I've turned left to go up the hill of Cotton Corners. I get on the gas quickly. And again at 4000 ft, I get on the gas early. Those two gas presses really setup the next 1000 ft. You can see the Pink and Gray lines stay consistently above the Red and Dark blue lines from 4000 to 5200 ft. That's a pretty long stretch of the track to have such an advantage. It all comes from getting on the gas early. However at 5500 ft, I lightly tapped the brake pedal earlier than I should have. You can see that little yellow tap right at 5500 ft. That silly little tap cost me 0.2 seconds. It's an earlier tap than any other fast lap I've ever driven there…….In fact, that whole brake press going into Bus Stop was not so great. Compare that to the brake press of the OSG that was much better form. Although, like I said earlier, I believe I am over-braking with the OSG. In fact, I think I've been over-braking a lot at most corners since the aero went on the car. Ah----so many things to learn!!!
Another thing to look at is the speeds going towards the apex of Riverside at 6800 ft. Lately, I have been trying to keep as much speed up as possible as I'm rounding Riverside. On Chart 1, comparing the OSG lap to the Stock lap, you can see the two laps are driven differently. My gas press at 5900 ft is much more confident on the OSG lap---you can see the light green line of the gas pedal is much more aggressive. And the net result is that I am able to achieve noticeably higher speeds from 6800-7200 ft. Anyway, the OSG looks pretty composed through this Riverside section and clearly I'm pushing fairly hard here.
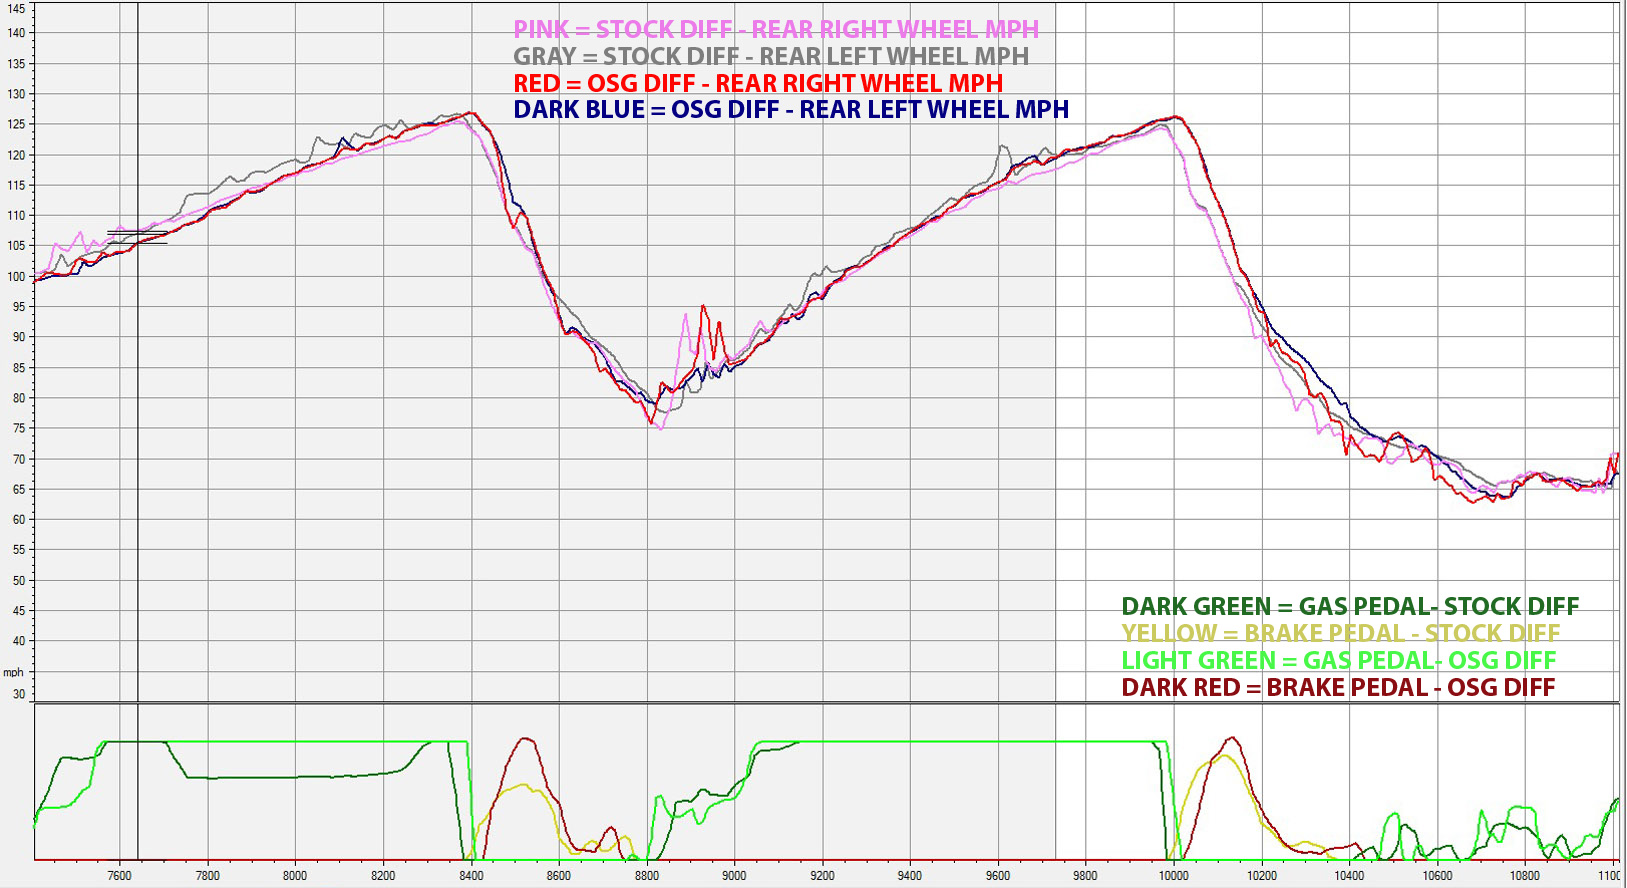
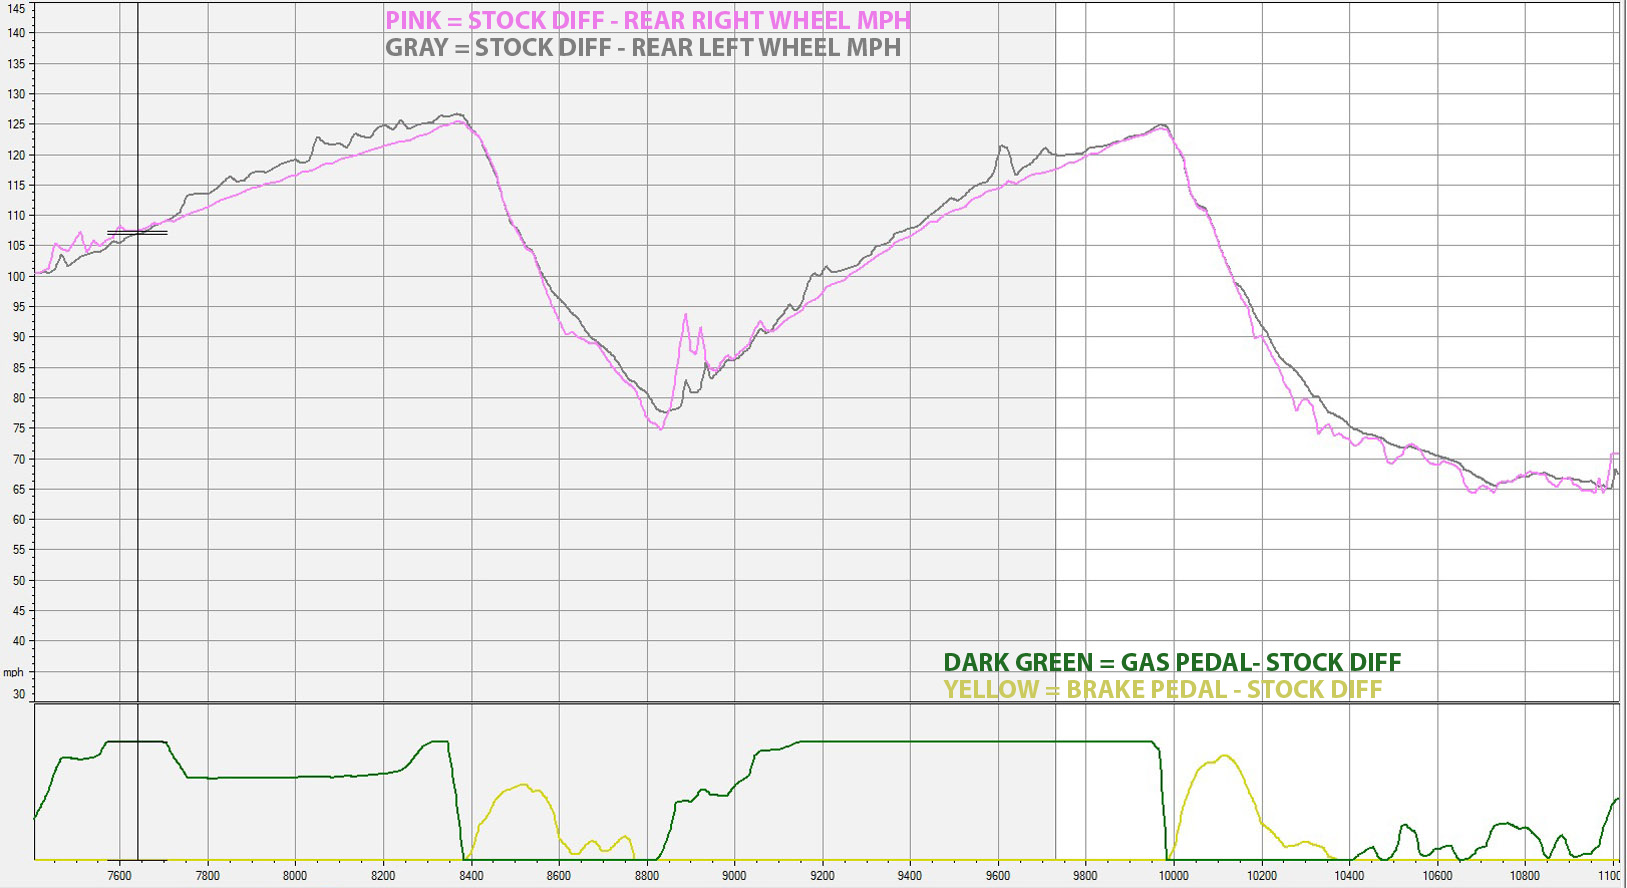
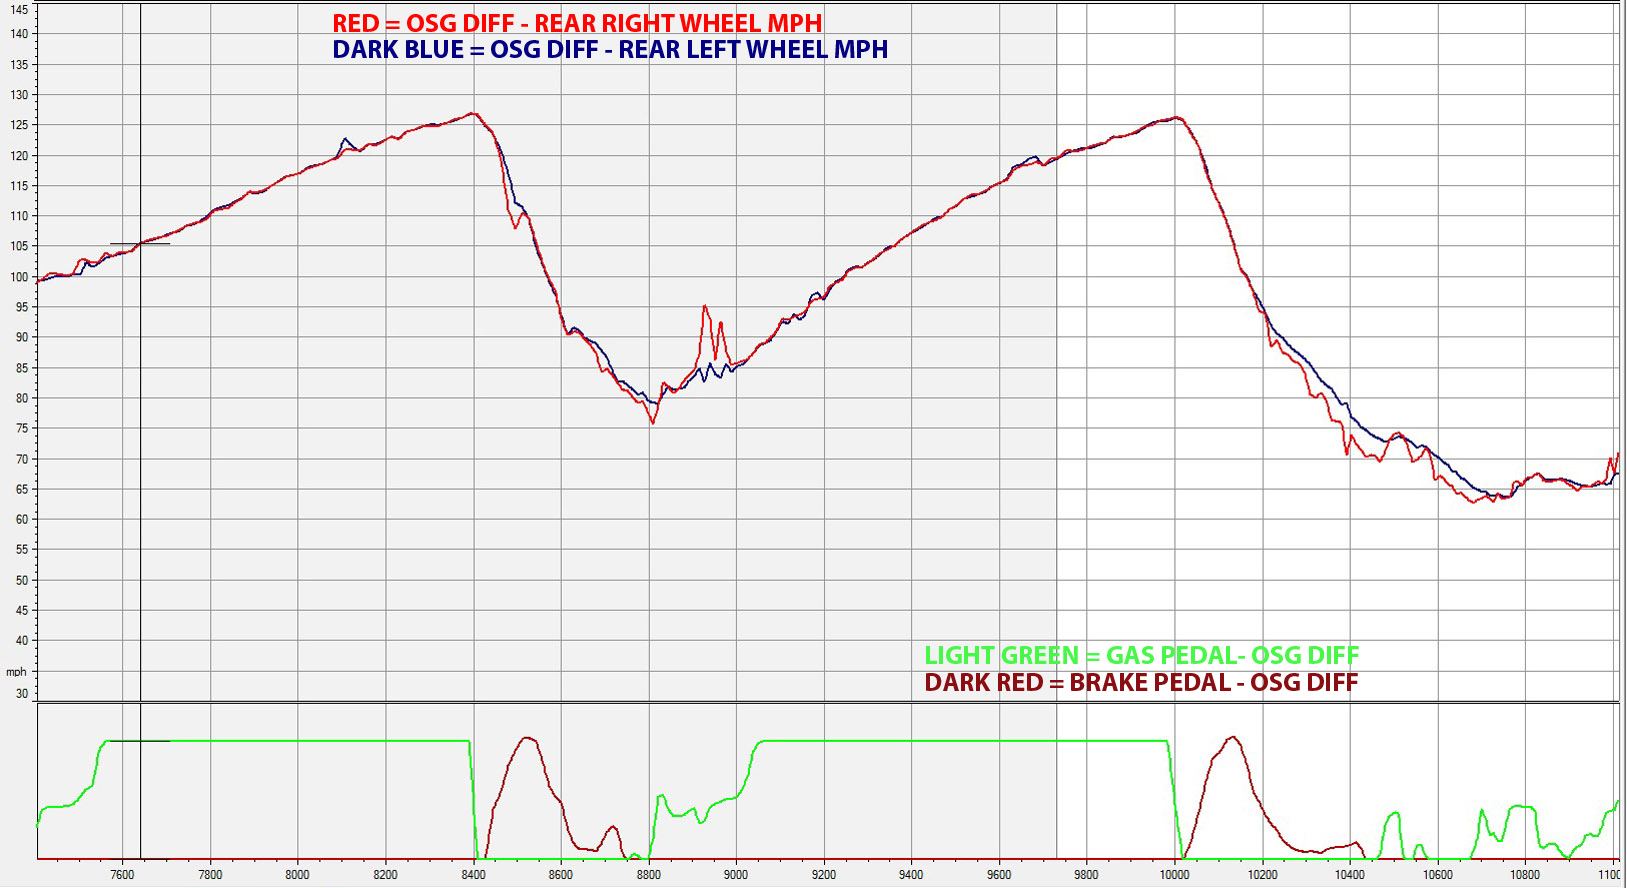
Data Set #4: 7500 to 11000 ft - Exit of Riverside, Phil Hill and Sweeper. The Exit of Riverside goes towards a dog-leg left and then up to Phil Hill. This is a very dynamic time for the Stock unit. Between 7500 and 8400 ft, one wheel or the other is looking jagged and uneven compared to the other as I'm going from a right bend to a left bend. The OSG wheels look controlled through the same section, and it's worth noting with the OSG that I'm full throttle from the exit of Riverside to the braking point of Phil Hill. So there was plenty of opportunity for the OSG to look bad here, but it looks very composed. Both laps have spikes as I crest Phil Hill. No surprises there.
And again at 9100, the left wheel on the Stock unit seems to be doing it's own thing for about 700 ft, whereas the OSG seems more predictable all the way into Sweeper.
As far as braking with the OSG, at 8400 ft, I press the brake. Right before this moment, the Red and Dark Blue lines were separating as I wasn't on the gas and the unit was not locked. But then I press the brake and you can see at the max point of the brake press, the wheels quickly start moving in unison. The diff is locking here on brake press. But then as the brake pressure reduces, the Red and Blue lines separate again as I turn right into Phil Hill. So, the diff was open as I let off the gas, then I hit the brake it locked the axle for a bit, and then it opened again as the brake pressure reduced and I turned right to go over the blind hilltop of Phil Hill. It's also worth noting that the locking force on braking isn't blindly strong because at 10000 ft when I brake to go into Sweeper, the axle doesn't really stay locked. This is good because I need to get into the right turn of Sweeper and the OSG is not getting in my way. I will tell you from a "feel" standpoint, the braking feels GREAT now going into Sweeper. Very noticeable change in feel.
Data Set #5: 11000 to 14400 Finish line - Exit Sweeper, Esses and Sunset - The Stock unit is continuing to look a bit like the Wild West here. As I go up the Esses at 11000 ft, mild steering movements left and right are required. You can see the Stock diff responding by allowing each wheel to spin up a bit as I steer left and right. The OSG hammers through there without any drama. And I stayed on the gas quite confidently through the end of the Esses. You can see from the stock diff that I let off the gas much earlier. For some reason, I'm feeling more comfortable through this section on the OSG. Is it the diff? You decide!

At 12700 ft, going into Sunset, the braking looks very nice with the OSG on a VERY hard brake press. The rear wheels seem very much together until I enter the final corner and they drift apart. So the diff locked on braking but was open for turn in, and then locked again quickly as I got on the gas for the final run up to the line.
Sunset is a spot where I think we can see the effect of the cooler temperatures. I slowed down less with OSG, got on the gas sooner with the OSG, accelerated cleanly with the OSG, got to full throttle sooner with the OSG, but you can see by the finish line, the wheels from both laps were going the same speed. The cooler air definitely has an effect.

Data Set #6: Another Off Ramp - Different OSG lap to see a better comparison. I found another lap with the OSG where I didn't mess up the corner. The speeds from both laps are very similar. In this comparison, you can see with the OSG, as soon as I press the gas, the red line rises to meet the blue and then they basically stay together the whole way to Cotton Corners. Here again on the straight section of 2300-2800 ft, you can see the cooler air temperatures allowing the Stock unit lap to out accelerate the warmer temp lap with the OSG. They start with the same acceleration curve, but at 2300 ft the cooler lap starts to walk away.
Data Set #7: One more example in Off Ramp
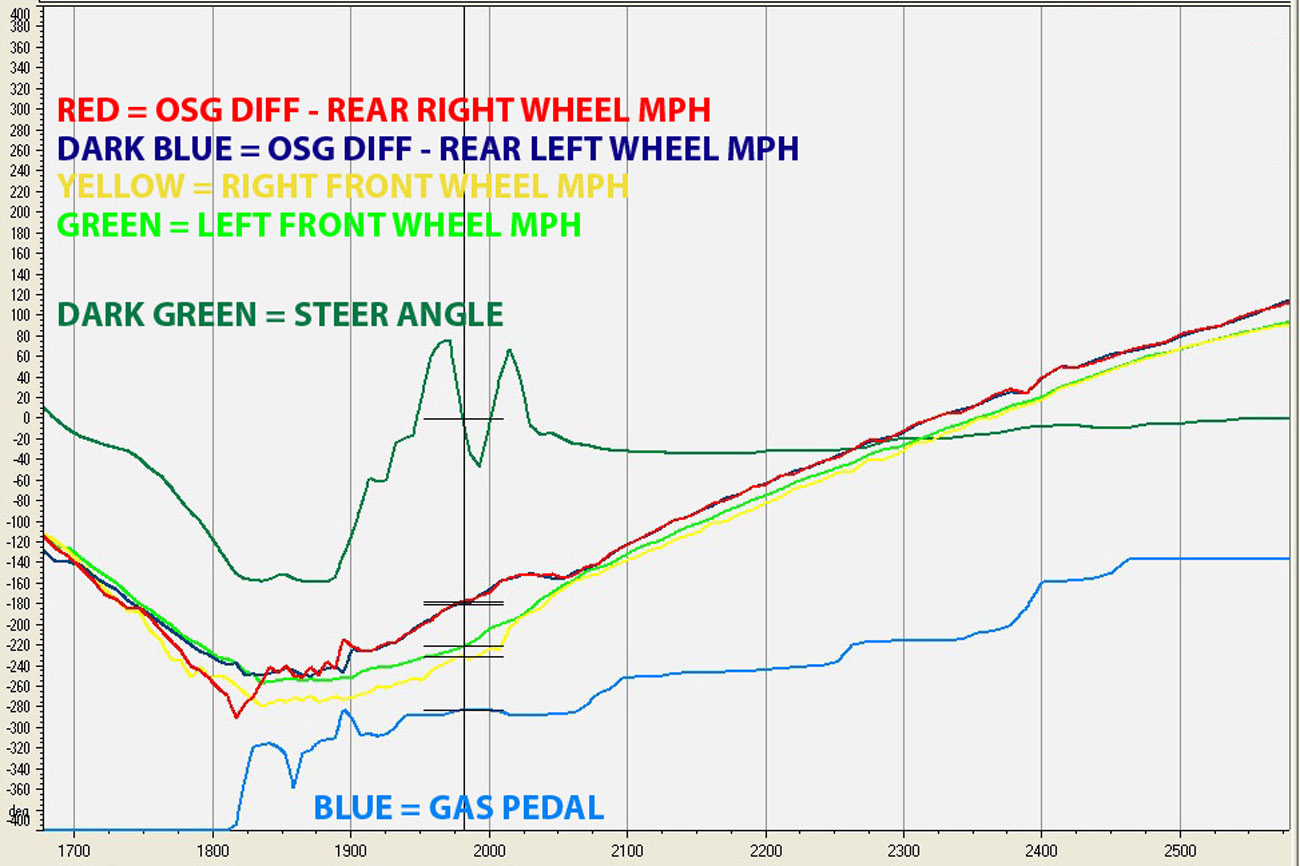
So we're looking at Off Ramp again. This time it's just the OSG---and we're looking at what happens when the steering wheel is turned and the gas pedal is pressed and how the wheels react to all that. This chart will add the front wheels MPH and steering wheel position.
As I enter Off Ramp, all the wheels are spinning about the same. We can see all 4 wheel lines bunched up together at the left of the chart. The steering angle at the left of the chart is very near 0º. At 1700 ft, I turn the wheel to the right (dark green line moves downward). As I do that, we can see the Red and Yellow lines (both right wheels) fall away from the Blue and Green lines (left wheels), and they fall away more as I turn the wheel more. This makes sense because Off Ramp is a sharp right turn and if the diff is open in this moment, which it seems to be, then the right wheels will move slower than the left wheels as you go around the corner. Everything seems good so far. The diff is open, which allows the rear right wheel to slow, and this allows me to dive into that corner.
Then just after 1800 feet, the Blue line at the bottom shows that I get on the gas. Immediately, you can see the Red Line (Rear Right Wheel) begin to rise. But it doesn't spike. It rises to the level of the dark Blue line (Rear Left Wheel) and then for the most part, the Red and Blue Lines basically match each other, except for when I give one more jab at the gas at 1900 feet where the right wheel jumps a little bit and then settles back in with the left wheel immediately.
With that little extra touch of the gas at 1900 feet, it starts to get a bit more interesting. The Rear wheels (Red and Blue) start to both rise significantly above the Front Wheels (Yellow and Green). The rear wheels are spinning at up to 8 MPH faster than the front wheels. The car is now starting to go sideways because the uphill is a bit off camber there. You can see at 1950 feet, I had already been straightening the steering wheel, but then you can see the steering angle line move upwards (left). This is me counter steering the slide that is starting. You can see I stayed on the gas during this moment (Light Blue line at the bottom stays fairly consistent). At 2050 feet, the rear wheels are no longer spinning faster than the fronts. I return the steering angle back to straight and I continue down the track.
So, this was a relatively aggressive Off Ramp turn and hill climb. I pressed enough gas to break traction and counter steered appropriately to be able to stay on the gas and keep the car going forward. What's nice to see here is that there were no weird speed spikes---even with breaking traction. The locking was quick and the car was predictable.
In Part 3, I'll wrap up with my conclusions and some final thoughts.