BMW M3 Forum (E90 E92)

BMW Garage BMW Meets Register Today's Posts


Go Back   M3Post - BMW M3 Forum > E90/E92 M3 Technical Topics > Suspension | Brakes | Chassis
 
BPM
Post Reply
 
Thread Tools Search this Thread
      12-06-2008, 10:33 AM   #23
GregW / Oregon
Commander-In-Chief
2107
Rep
8,913
Posts

Drives: 2023 M2 Coupe, 2020 GLE 450
Join Date: Nov 2005
Location: Lake Oswego, OR

iTrader: (3)

Garage List
BBKs

Quote:
Originally Posted by BarryC View Post
So it seems that a front only 355MM BBK setup would be more than adequate for track performance especially in an HPDE environment. Personally I'd be happy if someone came out with a caliper setup that used the OEM rotors as I agree $7-$8k for a BBK is ridiculous.
Good comments. Rotora makes a 4 piston caliper that Evosport sells for $2,615, for the stock E46 M3 rotors . Maybe they will produce a 6 piston for the E92.

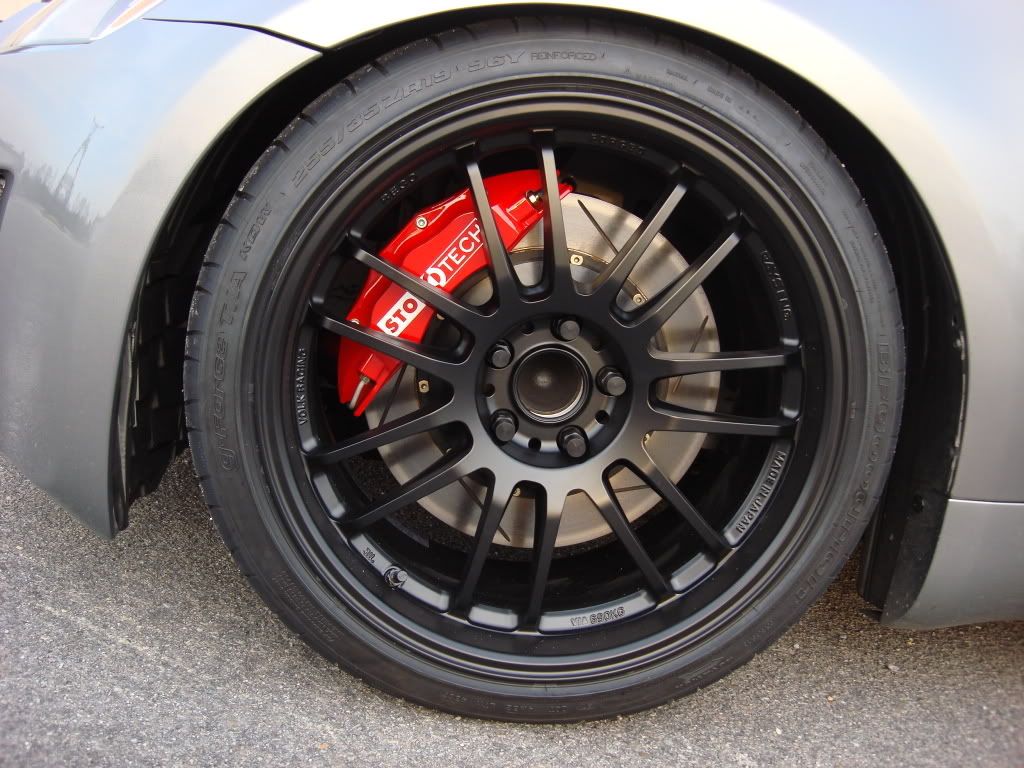
Edit: Just confirmed by Brad at Evosport, Rotora WILL have 6 piston forged calipers for the OEM rotors. More info available Monday. Brad will put together pre-release pricing

Group 5 Motorsport is another dealer. This is not the kit, but an example:


This is an owners report of a Rotora BBK on his E36 M3 race car:

http://www.bimmerfest.com/forums/showthread.php?t=70399
__________________

Greg Lake Oswego, Oregon, USA
2023 M2 Coupe - Brooklyn Grey/Cognac/CF, 6MT; 2020 MB GLE 450

Last edited by GregW / Oregon; 12-06-2008 at 12:03 PM..
Appreciate 0
      12-06-2008, 11:44 AM   #24
BarryC
Major
United_States
121
Rep
1,198
Posts

Drives: '15 M3
Join Date: May 2007
Location: Kernersville NC

iTrader: (12)

Quote:
Originally Posted by GregW / Oregon View Post
Good comments. Rotara makes a 4 piston caliper that Evosport sells for $2,615, for the stock E46 M3 rotors . Maybe they will produce a 6 piston for the E92.

Edit: Just confirmed by Brad at Evosport, Rotara WILL have 6 piston forged calipers for the OEM rotors. More info available Monday.
I was hoping this might be the case! Thanks Greg!

BC
__________________
'15 M3, '16 911 Turbo S Cab
Appreciate 0
      12-08-2008, 10:53 AM   #25
Mickb
Private First Class
13
Rep
137
Posts

Drives: AW/FR E92 M3 DCT
Join Date: Apr 2008
Location: Ireland

iTrader: (0)

Quote:
Originally Posted by Gary_C View Post
Just for the record my name is Gary Cogis and I work for Race Technologies, the High Performance representative for Brembo, and distributor of the aftermarket BBK's for North America.
.
.
The performance and function of this caliper grossly outweighs the perceived difficulty to remove the caliper for pad changes. I will agree that it is not as quick and easy as an open top caliper, but it is also much simpler and quicker than an OEM sliding caliper and also on par with calipers that require removal of a bolt in bridge. Again, this was a conscious engineering decision based on providing optimum performance. If ease of pad changes is a strong requirement we do offer a stainless steed stud kit to replace the bracket bolts for those of you who track your car regularly. This does help to simplify the process a bit more by having studs to line up the caliper and also makes it more difficult to accidentally cross thread or strip a bracket when changing pads. I have personally changed pads on nearly ever caliper design in use today, and the time it takes for removal of 2 additional bolts is less than the time it typically takes to spread the pistons to the full open position. You can do this task as you lift the caliper off of the disc.
(we will have an instructional video on changing pads in a monobloc caliper very soon)
Gary

As the OP of this thread can I just thank you for taking the time out to respond to this post.

I appreciate that the monobloc caliper & pad design may have many performance advantages and do not dispute anything you say. I just want to take issue with the piece above.

Firstly I agree with the fact that pad changes with this caliper are simpler and quicker than OEM. However, I disagree that it is on a par with calipers with a bolt on bridge.

Stoptech calipers for example require the removal of two bolts, remove bridge, remove pads, spread pistons, insert new pads, replace bolt, tighten two bridge bolts. Done.

The monoblocs required removal of the caliper mounting bolts, lifting the caliper from the assembly, removal of the pad retaining pins and the spring etc.

How can this be on a par with the stoptechs, especially when you are at a track event and the whole brake assembly is running at several hundred degrees of temperature.

My biggest issue with this is that it forces you to start a track event knowing with certainty that you have sufficient pad material left to last the entire day. This has led to me having to replace part worn pads where I am not sure of this point, thus costing me more overall than a caliper with a bolt on bridge.

I must caveat this with saying that I look forward to your instructional video, and perhaps there are shortcuts of which I am not aware which might change my opinion.

Once again, can I thank you for your response and say that I am thrilled with the performance of the brakes. Its just that I feel this pad change issue prevents them from being the ultimate track set up for the enthusiast.

I would also be very interested to have more information about the stud kit you refer to, as I do track the car regularly (having done 6 events since July....and this is not the busy part of the year over here)

Best regards

Mick
Appreciate 0
      12-08-2008, 02:32 PM   #26
Gary_C
Private First Class
13
Rep
101
Posts

Drives: Anything with Brembo's
Join Date: Oct 2007
Location: So Cal

iTrader: (0)

Hey Mick,

Thanks for the response.

While it may have sounded like I was disputing that there was an issue, we do appreciate constructive feed back and definitely take it into consideration with future products. It may also have been that I am biased with significant practice since the majority of our top level race calipers are a similar design, and I have a lot of experience with our new Gran Turismo monobloc design.

As for tips on changing the pads (since the video is not yet on our website) here's a couple things I make sure I have/do every time:

1) A good pair of mechanics gloves are a must have.
After approximately 15-20 minutes of cooling, you should be able to handle the caliper with no issues at all. This could be the time period while you get your car up in the air and the wheels off, plus a brief period checking the time sheets from the last session, or grabbing and chugging a cool drink.

2) Have the appropriate tools ready at hand.
- Medium length ratchet already loaded with the appropriate allen tool.
- Small center punch for tapping out the pins.
- Small (6") ball-peen hammer for tapping the center punch.
- Good quality torque wrench for properly torquing the caliper bolts.

3) Remove the pins and spring plate first, before removing the caliper

For comparisons sake:
- Removing the pins from either style caliper takes the same amount of time and effort.
- Loosening the bolts the caliper take the same amount of time as removing the bolts that attach the bolt in bridge
- I believe spreading the pistons on the monobloc caliper is quicker since you can "twist" the caliper as you lift it off of the disc to spread them to full open position.


The stud kit we developed simply allows you to slide the caliper into the correct position and torque it down with (2) jet nuts on top. This is a change from having to hold the caliper in place while you try to line up the (2) bolts. The difference is that it is very difficult to accidentally strip the bracket as we have had people do when they are in a hurry and impatient. It only cuts about 2 or 3 minutes from the complete job, but when you are rushing to get ready for your next session, every little bit helps.
Appreciate 0
      12-08-2008, 03:21 PM   #27
consolidated
Lieutenant Colonel
consolidated's Avatar
205
Rep
1,864
Posts

Drives: F80 M3
Join Date: Jun 2007
Location: Texas

iTrader: (2)

Garage List
Gary C, when can we buy the stud kit? I'd want it for a Cayman.
Appreciate 0
      12-08-2008, 03:47 PM   #28
Gary_C
Private First Class
13
Rep
101
Posts

Drives: Anything with Brembo's
Join Date: Oct 2007
Location: So Cal

iTrader: (0)

The stud kit is available as you read this.
It's available through any Authorized Brembo dealer.
(we do not actually sell product)

Where did you purchase your brake kit?

Stud kit Part #: 1905577
It will include 4 permanent studs, 4 washers, 4 jet nuts.
Retail $155 (kit)

The jet nuts are one time use only.

Jet nut Part #: MS7
Retail $7.95 (each)

I recommend ordering a set of (4) extra jet nuts to keep with your spare pads.
It does add to the cost of the kit and the jet nuts become a consumable item, but remember, this is only for people who are interested in faster pad changes with less risk of stripping a bracket.
If you are careful and use recommended torque specs you will be just fine with the original supplied bolt set.
Appreciate 0
      12-08-2008, 10:46 PM   #29
OC ///M
Dr. Octagon
OC ///M's Avatar
United_States
260
Rep
1,919
Posts

Drives: Moonstone e92 M3
Join Date: Feb 2007
Location: South County

iTrader: (0)

I have updated my post from back in May with a link to this information. Thanks again for posting this:

Quote:
Hey guys,

Just for the record my name is Gary Cogis and I work for Race Technologies, the High Performance representative for Brembo, and distributor of the aftermarket BBK's for North America.

I was forwarded this thread from a few of our authorized dealers who are sponsors of this board and felt it was important to be able to address many of the issues mentioned in this thread. I thought it may be useful to explain the selection process, and purpose, for the components used in the Brembo BBK's along with Brembo's criteria for brake design to better understand what you accomplish and gain with the Brembo upgrade.

The brake system engineered specifically for the new M3 uses a 380x34mm 2pc. fully floating disc with a 6-piston Monobloc caliper for the front, and a 380x28mm 2pc. fully floating disc with a 4-piston Monobloc caliper for the rear. You can thank BMW personally for the need to utilize a 380x34mm disc in the front brake system.

One of the main purposes of a performance oriented BBK is to increase heat capacity of the system for repeatable braking performance with maximum fade resistance. The benefit of using a 2pc disc with an aluminum hat is to also reduce unsprung and rotational weight at the same time as increasing the overall diameter of the disc. The overall diameter, thickness, and annulus (swept area) of the OEM disc is such that the available 355mm discs would not have been a significant enough increase (and in some cases a decrease) of heat capacity, therefore not being an appropriate choice for the purpose of improving performance. We are well aware of the desire to run 18" wheels and tires for high performance track use and examined many disc options before selecting this disc.

As with any Brembo brake kit, the design criteria is based on achieving a beneficial improvement in performance and longevity while not compromising safety or driveability. Aesthetics is not one of the initial design criterias, but a byproduct of following the design cues from our professional racing products and adding a variety of colors. If we could have provided a 355mm (14") option while achieving the desired performance improvement and better wheel fitment we absolutely would have.

While we are on the topic of wheel fitment, there are a number of popular 18" wheels that do clear the Brembo BBK. Many popular wheel manufacturers are also coming to us directly to be proactive and ensure that future wheels designs will reflect the popularity of larger BBKs. Currently there are wheels from HRE, Volk Racing, CCW and a few others that work perfectly without spacers. As the horsepower of high performance production vehicles increases and the cars do not get any lighter, disc diameters will need to increase to provide the necessary heat sink to handle the job of converting gross amounts of kinetic energy into heat. A good, but unfortunate example of this is the new Nissan Skyline GTR. Has anyone taken a look at the size of the OEM brakes on that car?

The second issue I wanted to address is the use of a Monobloc caliper, specifically with an integral bridge. There have been many discussions and viewpoints about the difference between monobloc vs. 2pc. calipers, forged vs. cast, bolt in bridge vs. fixed. There are even charts that try to describe the stiffness of a variety of caliper to try and tie that into a performance advantage. The bottom line is that there is no such combination that stands out as being better than another. The quality and performance of a given caliper design is more a result of the engineering, development, fatigue and performance testing that goes into the development of the than the actual manufacturing process or materials used.

The design of the new 6-piston monobloc caliper is a direct result of their experience at the top levels of racing combined with experience in OEM manufacturing to yield a caliper that has been tested and proven to offer an impressive combination of structural rigidity for it's given size and weight. The result is a lightweight, stiff, and responsive caliper that offers unmatched quality and longevity in this market. It is truly the closest thing to a full motorsports caliper that has ever been offered to the aftermarket, and done so at a price point that is also unheard of for monobloc performance.

The performance and function of this caliper grossly outweighs the perceived difficulty to remove the caliper for pad changes. I will agree that it is not as quick and easy as an open top caliper, but it is also much simpler and quicker than an OEM sliding caliper and also on par with calipers that require removal of a bolt in bridge. Again, this was a conscious engineering decision based on providing optimum performance. If ease of pad changes is a strong requirement we do offer a stainless steed stud kit to replace the bracket bolts for those of you who track your car regularly. This does help to simplify the process a bit more by having studs to line up the caliper and also makes it more difficult to accidentally cross thread or strip a bracket when changing pads. I have personally changed pads on nearly ever caliper design in use today, and the time it takes for removal of 2 additional bolts is less than the time it typically takes to spread the pistons to the full open position. You can do this task as you lift the caliper off of the disc.
(we will have an instructional video on changing pads in a monobloc caliper very soon)

This brings us to the topic of pads. As with any new pad shape it will take the aftermarket suppliers a while to realize the demand and in turn provide a product to fill the void. The great thing is that these pad manufacturers have already recognized the popularity of the Brembo systems and will respond much quicker than they would for an off brand or OEM production pad shape. There are currently pads available from Ferodo, Pagid, Porterfield, Hawk, Performance Friction, Cobalt Friction, and Carbotech. As the volume and supply increases, the cost for some of these higher end options will also come down. I have a good feeling that by next summer there will not be a popular pad compound that will not be available.

The only way to have sped up this process would have been to create a caliper around an existing popular pad shape. While we have done this in the past, and this is also common practice for many other aftermarket brake kit suppliers, the Brembo engineers again looked towards improving the performance of the system in any way they could. The choice to create a new and unique pad shape was based on creating the ability to combine two very beneficial design traits. This was a combination of a short annulus pad which increases the effective radius (a factor for creating a desired brake torque based on the leverage point, measured from the center of the hub to the center of the pad) and an increase in swept area and pad volume (which directly contributes to improved longevity of both the discs and pads).

The point I'm trying to convey is that with Brembo form definitely follows function. Any of the systems characteristics that have been mentioned in this thread are consciously decided upon based on achieving a level of performance that exceeds that of the OEM system, as well as the vast majority of other aftermarket products available. There may be systems out there with the ability for faster pad swaps, or that use a pad shape that is more readily available today, and there may eventually be one that packages small enough to fit under nearly every 18" wheel, but before you can get excited by those individual benefits you really need to examine what the actual trade off is. If there's anything I learned with my experience over the past 6 years there is always a trade off. The benefit with Brembo is that the trade off never gets in the way of quality, performance, or safety.
__________________
OC ///M

2013 E92 M3 Individual
Sold: 2011 E92 M3 SSII | Sold: 2008 E92 M3 SSII | Into a Wall: 2008 E92 M3 SSII | Sold: 2007 E92 335i JB
Appreciate 0
      12-09-2008, 02:37 AM   #30
Mickb
Private First Class
13
Rep
137
Posts

Drives: AW/FR E92 M3 DCT
Join Date: Apr 2008
Location: Ireland

iTrader: (0)

Quote:
Originally Posted by Gary_C View Post
Hey Mick,

Thanks for the response.

While it may have sounded like I was disputing that there was an issue, we do appreciate constructive feed back and definitely take it into consideration with future products. It may also have been that I am biased with significant practice since the majority of our top level race calipers are a similar design, and I have a lot of experience with our new Gran Turismo monobloc design.

As for tips on changing the pads (since the video is not yet on our website) here's a couple things I make sure I have/do every time:

1) A good pair of mechanics gloves are a must have.
After approximately 15-20 minutes of cooling, you should be able to handle the caliper with no issues at all. This could be the time period while you get your car up in the air and the wheels off, plus a brief period checking the time sheets from the last session, or grabbing and chugging a cool drink.

2) Have the appropriate tools ready at hand.
- Medium length ratchet already loaded with the appropriate allen tool.
- Small center punch for tapping out the pins.
- Small (6") ball-peen hammer for tapping the center punch.
- Good quality torque wrench for properly torquing the caliper bolts.

3) Remove the pins and spring plate first, before removing the caliper

For comparisons sake:
- Removing the pins from either style caliper takes the same amount of time and effort.
- Loosening the bolts the caliper take the same amount of time as removing the bolts that attach the bolt in bridge
- I believe spreading the pistons on the monobloc caliper is quicker since you can "twist" the caliper as you lift it off of the disc to spread them to full open position.


The stud kit we developed simply allows you to slide the caliper into the correct position and torque it down with (2) jet nuts on top. This is a change from having to hold the caliper in place while you try to line up the (2) bolts. The difference is that it is very difficult to accidentally strip the bracket as we have had people do when they are in a hurry and impatient. It only cuts about 2 or 3 minutes from the complete job, but when you are rushing to get ready for your next session, every little bit helps.
GAry

Thanks for this. I follow the exact procedure you have listed above.

The bit I have found the most fiddly though is re-inserting the pads, pins and spring plate. COuld you tell me how you do this?

i.e. do you try to reassemble all of the above while the caliper is off the rotor, or just loose fit the pads, try to re-position the calliper on the rotor, and only then insert the spring plate and pins? I have found the pressure of the spring plate makes the forward most pin kinda hard to locate while the caliper is off the rotor, and while its on I can't seem to get the pad holes to line up right.

I am sure this will be answered in the video though

Mick
Appreciate 0
      12-12-2008, 10:49 AM   #31
HP Autosport
Supreme Allied Commander
United_States
3816
Rep
54,319
Posts

Drives: F80 M3
Join Date: Mar 2007
Location: Santa Barbara, AP, Brembo, GIAC, Koni, Ohlins, Performance Friction, www.hpautosport.com

iTrader: (36)

Quote:
Originally Posted by Mickb View Post
Lads

Just thought I would offer some notes for those people thinking of "upgrading" to an aftermarket BBK. My experience is with Brembo although people should check this with any manufacturers.

Problem: front pad changes are a caliper-off (or at least significant caliper loosening) job. Combined with the fact that they don't fit under any currently available 18" rim (to the best of my knowledge), this is a significant drawback for track use.

I wish I had known this before I had bought it.

My last car (E46 m3) I had a stoptech kit, with a removable caliper bridge that allowed for easy quick swapping of pads. Just undo the bridge bolt, lop it off, take out old pads, put in new ones, replace bridge and you are done. You could do a corner in a couple of minutes easy.

The monobloc brembos do not allow for this and the retaining pins are quite fiddly as well, even when time is not of the essence. This is a bit of a pita, since it means I am having to discard used pads that I think won't last a whole track day. I just can't risk the fact that they might wear down before the day is over and I will find myself unable to change them.

I suppose its possible, but I really wouldn't want to be loosening the caliper bolts and trying to handle the calipers when they are 1000 degrees.

Mick

PS I am not faulting brembo quality or anything, just thought people should be aware of this.

PPS if I am talking through my arse and I have in dunce like fashion missed an easy way to change pads on these things please let me know.

You are right on the monoblock caliper removal for the pad change. The caliper must come completely off to remove the pads. Can be a pain in the rear when you are in a hurry!
Appreciate 0
      12-16-2008, 08:53 PM   #32
Gary_C
Private First Class
13
Rep
101
Posts

Drives: Anything with Brembo's
Join Date: Oct 2007
Location: So Cal

iTrader: (0)

Quote:
Originally Posted by Mickb View Post
GAry

Thanks for this. I follow the exact procedure you have listed above.

The bit I have found the most fiddly though is re-inserting the pads, pins and spring plate. COuld you tell me how you do this?

i.e. do you try to reassemble all of the above while the caliper is off the rotor, or just loose fit the pads, try to re-position the calliper on the rotor, and only then insert the spring plate and pins? I have found the pressure of the spring plate makes the forward most pin kinda hard to locate while the caliper is off the rotor, and while its on I can't seem to get the pad holes to line up right.

I am sure this will be answered in the video though

Mick
Hey Mick,

Just got back into town...

My process is to insert the new pads, the first pin, then set the spring plate in place. I'll then insert the second pin as far as I can with just my hands, but I do this UNDER the tab of the spring plate, only to hold the pads in place.

After that I'll place the caliper back onto the bracket and torque it down.
THEN I finalize the position of the spring plate and re-inserting the second pin in the proper place.
It's much easier to slide the second pin in and holding down the force of the spring plate while the caliper is mounted to the car.


Here's another TIP I should have offered earlier (but forgot about) for track guys. The spring plate is NOT mandatory. It's used for noise issues such as squeal and pad "chatter", and as a second safety mechanism just incase you forget to press the pin in all the way.

When I'm at a track event I usually don't even reuse the spring plate. Without the spring plate you will have to be meticulous and make sure the pins are snug and pressed back as far as they can go. If you forget to do this the pins can back out.

Obviously with the spring plate in place the pin cannot come out on it's own. That is the second safety mechanism I was talking about. I'm sure you'll agree that WITHOUT the extra work of the spring plate this is an incredibly SIMPLE procedure. I guess I could have mentioned that sooner.

Last edited by Gary_C; 12-17-2008 at 09:35 AM..
Appreciate 0
      01-11-2009, 04:20 PM   #33
Gary_C
Private First Class
13
Rep
101
Posts

Drives: Anything with Brembo's
Join Date: Oct 2007
Location: So Cal

iTrader: (0)

Quote:
Originally Posted by Mickb View Post
Gary

Thanks for this. I follow the exact procedure you have listed above.

The bit I have found the most fiddly though is re-inserting the pads, pins and spring plate. COuld you tell me how you do this?

i.e. do you try to reassemble all of the above while the caliper is off the rotor, or just loose fit the pads, try to re-position the calliper on the rotor, and only then insert the spring plate and pins? I have found the pressure of the spring plate makes the forward most pin kinda hard to locate while the caliper is off the rotor, and while its on I can't seem to get the pad holes to line up right.

I am sure this will be answered in the video though

Mick
Hey Mick,

Here's a portion of that video clip I promised.

Replacing Brembo Pads - 6piston Monobloc


It's incomplete right now, just the video and caption portion without audio.
The audio file will be added soon, but I figured you'd be able to make use of what I have so far since you have already done the swap yourself a couple times.

The key is in the pattern for removing the pins, and how to manage around the spring plate. It's obviously easier on a table vs. on the car, but when I timed myself on the car it only added a minute and a half or so.

This week, I'll shoot a clip of the install on a car, in REAL TIME, no editing. One shot from start to finish.

Hope this helps!

Gary - - - -

Last edited by Gary_C; 02-25-2009 at 02:31 PM..
Appreciate 0
      02-11-2009, 04:48 PM   #34
consolidated
Lieutenant Colonel
consolidated's Avatar
205
Rep
1,864
Posts

Drives: F80 M3
Join Date: Jun 2007
Location: Texas

iTrader: (2)

Garage List
I just got the stud mounting kit for the Brembo kit and it looks like it's going to be a much quicker and simpler process to remove the calipers. Kit looks racy. Thanks for the help Gary.
Appreciate 0
      02-12-2009, 09:07 AM   #35
graider
Colonel
graider's Avatar
35
Rep
2,406
Posts

Drives: py/kiwi e46 m3
Join Date: Aug 2007
Location: toronto

iTrader: (0)

Quote:
Originally Posted by eagletangogreen View Post
I have notice this from Brembo BBK for a while now, and thats one of the biggest reasons I went with the stoptech 6pots, like on my Z. These calipers cleared Volk RE30 with 6pistons up front >> something Brembo is on the arse for, not to mention that the stoptech customer support and price is second to none (Buy America) LOL! Also you can buy a used BBK from the 350Z forum and just buy the brackets to mount them on your M and save BIG$$$$.

Cheers!

if i buy a stoptech bbk from the z or g forum, where do i buy the bracket to fit on the m?
Appreciate 0
      02-12-2009, 10:01 AM   #36
GregW / Oregon
Commander-In-Chief
2107
Rep
8,913
Posts

Drives: 2023 M2 Coupe, 2020 GLE 450
Join Date: Nov 2005
Location: Lake Oswego, OR

iTrader: (3)

Garage List
Stoptech

Quote:
Originally Posted by graider View Post
if i buy a stoptech bbk from the z or g forum, where do i buy the bracket to fit on the m?
http://www.zeckhausen.com/products.htm
__________________

Greg Lake Oswego, Oregon, USA
2023 M2 Coupe - Brooklyn Grey/Cognac/CF, 6MT; 2020 MB GLE 450
Appreciate 0
      02-12-2009, 05:26 PM   #37
badfish
Major
badfish's Avatar
100
Rep
1,035
Posts

Drives: E92 AW M3
Join Date: Feb 2008
Location: SoCal

iTrader: (0)

Garage List
2008 M3  [0.00]
Quote:
Originally Posted by graider View Post
if i buy a stoptech bbk from the z or g forum, where do i buy the bracket to fit on the m?
Keep in mind this probably will not be the same caliper that is spec'd for the E92 M3. Call Stoptech to find out what other applications the E92 M3 calipers are used for if you want an exact match.
__________________
Appreciate 0
      02-13-2009, 04:39 PM   #38
Gary_C
Private First Class
13
Rep
101
Posts

Drives: Anything with Brembo's
Join Date: Oct 2007
Location: So Cal

iTrader: (0)

Besides brackets, the rotor hat/bell will not match nor will the brake line, and as someone else already mentioned, you'll have to verify piston diameters. The money you save buying a used kit, will be spent purchasing the rest of the parts to make it fit the ///M car. You're better off waiting for a used ///M kit to become available , or shop around for better discount on a new kit.
Appreciate 0
      02-17-2009, 05:18 AM   #39
Mickb
Private First Class
13
Rep
137
Posts

Drives: AW/FR E92 M3 DCT
Join Date: Apr 2008
Location: Ireland

iTrader: (0)

Consolidated,

Any chance of some pics of that stud mounting kit on the car and how it makes things easier? I'm finding it hard to visualise but it sounds like exactly what I'm looking for.

Gary

Thanks for that vid and sorry I didn't respond sooner.

It basically confirms that I have been doing everything right at least. I am interested in the "on car" version, however, as as lot of the steps are far easier when the rotor is off the car. You don't have to worry about the brake lines, the orientation of the caliper is not to the top, and I have found tapping in the pins from the back is fiddly due to wheel arch intrusion.

I believe the point is proved that the stoptech calipers have easier pad changes, although with the stud kit I think I can get these brembos down to acceptable levels.

I would love to see the stud kit in action. Any downsides?

Incidentally Gary, what track pads do you recommend for the M3? When I got my kit (8 months ago) there wasn't much choice and I got porterfield race pads which I wasn't too impressed with.

Also, when ordering pads, what is the caliper code/size for the brembos for the M3?

Appreciate any help.

Mick
Appreciate 0
Post Reply

Bookmarks


Posting Rules
You may not post new threads
You may not post replies
You may not post attachments
You may not edit your posts

BB code is On
Smilies are On
[IMG] code is On
HTML code is Off


All times are GMT -5. The time now is 09:59 PM.


m3post
Powered by vBulletin® Version 3.8.11
Copyright ©2000 - 2024, vBulletin Solutions Inc.
1Addicts.com, BIMMERPOST.com, E90Post.com, F30Post.com, M3Post.com, ZPost.com, 5Post.com, 6Post.com, 7Post.com, XBimmers.com logo and trademark are properties of BIMMERPOST