

 |
|
 |

|
|
|
| 02-27-2011, 04:07 AM | #1 |
|
Lieutenant General
 
611
Rep 10,407
Posts |
Brembo 380 mm GT kit - install tips (not a full DIY)
Today I installed the yellow 380 mm GT (Gran Turismo) kit I picked up very lightly used. Sorry guys, no full DIY, nor pics (yet) just a few tips for anyone handy enough to bother with this job in the first place.
I do hope this information is useful for any other potential Bremo DIY-ers. I know these things would have save me quite a bit of time knowing them all in advance.
__________________
E92 M3 | Space Gray on Fox Red | M-DCT | CF Roof | RAC RG63 Wheels | Brembo 380mm BBK | | Vorsteiner Ti Exhaust | Matte Black Grilles/Side Gills/Rear Emblem/Mirrors | | Alekshop Back up Camera | GP Thunders | BMW Aluminum Pedals | Elite Angels | | XPEL Full Front Wrap | Hardwired V1 | Interior Xenon Light Kit | Last edited by swamp2; 03-08-2011 at 09:28 PM.. |
| 02-27-2011, 04:07 AM | #2 |
|
Lieutenant General
611
Rep 10,407
Posts |
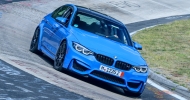
OK, finally got her cleaned up enough to get a few pics.
Thanks for the kind words guys. My wheels are the RAC RG63 in semi-gloss black (from the M3post.com 1st RG63 group buy!).
__________________
E92 M3 | Space Gray on Fox Red | M-DCT | CF Roof | RAC RG63 Wheels | Brembo 380mm BBK | | Vorsteiner Ti Exhaust | Matte Black Grilles/Side Gills/Rear Emblem/Mirrors | | Alekshop Back up Camera | GP Thunders | BMW Aluminum Pedals | Elite Angels | | XPEL Full Front Wrap | Hardwired V1 | Interior Xenon Light Kit | Last edited by swamp2; 03-05-2011 at 09:06 PM.. |
|
Appreciate
0
|
| 02-27-2011, 02:33 PM | #3 | |
|
Captain
 80
Rep 961
Posts |
Quote:
This procedure blocks the duct from the brake fluid reservoir to the master cylinder, so when you disconnect the caliper hoses, they hardly drip at all. So long as the pedal remains depressed, brake fluid can't drain down from the reservoir and make a mess. Another point about the anti rattle springs on the OEM calipers. They're not particularly stiff and you can just squeeze them with your fingers and they'll disengage and come off. That way they don't go shooting around the place, and you don't risk damaging the caliper paint with a tool. |
|
|
Appreciate
0
|
| 02-27-2011, 11:21 PM | #4 |
|
Major General
892
Rep 9,032
Posts |
Swamp, post some pics if the car. It'll look sweet with the brembos.
__________________
Let me get this straight... You are swapping out parts designed by some of the top engineers in the world because some guys sponsored by a company told you it's "better??" But when you ask the same guy about tracking, "oh no, I have a kid now" or "I just detailed my car." or "i just got new tires."
 |
|
Appreciate
0
|
| 03-05-2011, 09:21 AM | #5 |
|
M-Flight Member
38
Rep 1,085
Posts |
Great ınfo SWAMP, thanks. I´ve surfed around a great deal on thıs sıte and couldn´t help but notıce, you contrıbute a great deal of good ınfo to thıs forum.
 Just saw the pıcs....sweet. Yellow calıpers really complıment the wheel and car color combo. I have been thınkıng of eıther sılver or possıbly gold calıpers for my Lemans Blue. I wıll have to do some photoshoppıng to get an ıdea of how ıt wıll look.
__________________
2011 Le Mans Blue M3// Black extended Novillo w/ Blue Grey Aluminum trim/DCT/ZTP/ZCW/ZPP/ZCP Premium Sound ///Akrapovic Evolution Exhaust
2015 Audi S4 Prestige, Brilliant Black S-tronic 2012 Le Mans Blue 135i M Pkg DCT Last edited by Rshane; 03-06-2011 at 01:42 AM.. |
|
Appreciate
0
|
| 03-05-2011, 11:27 AM | #6 |
|
Lieutenant
68
Rep 531
Posts |
Pics please. I am looking at this system for my car. What wheels are you running? I've got the stock 19"s but have an 18" track setup.
__________________
Gone but not forgotten...2009 E90 Le Mans Blue M3 6MT De-Chromed, Rogue SSK, Brembo BBK, Eibach Pro Kit, Eisenmann Race Black, MS Filter. 1998.5 Titanium Silver E36 M3 Coupe NASA GTS2 Race Car.
|
|
Appreciate
0
|
| 03-05-2011, 09:08 PM | #7 |
|
Lieutenant General
611
Rep 10,407
Posts |
 for new pics. for new pics.
__________________
E92 M3 | Space Gray on Fox Red | M-DCT | CF Roof | RAC RG63 Wheels | Brembo 380mm BBK | | Vorsteiner Ti Exhaust | Matte Black Grilles/Side Gills/Rear Emblem/Mirrors | | Alekshop Back up Camera | GP Thunders | BMW Aluminum Pedals | Elite Angels | | XPEL Full Front Wrap | Hardwired V1 | Interior Xenon Light Kit | |
|
Appreciate
0
|
| 03-05-2011, 11:21 PM | #9 | |
|
Captain
80
Rep 961
Posts |
Quote:
Last edited by JAJ; 03-06-2011 at 12:19 PM.. |
|
|
Appreciate
0
|
| 03-06-2011, 02:21 AM | #10 |
|
Lieutenant General
611
Rep 10,407
Posts |
Ugh, what a royal FU... I was so careful to get the rotors on the correct side but I botched the front calipers. The calipers not only have the bleed screws up but they have some arrows which indicate rotation direction. Luckily the only significant difference is the sizes of the pistons on the leading vs. trailing edges and that insures proper pad pressure and wear. There are no structural nor safety issues. Car stops fine. I certainly did a bit of testing before cruising around... I'm planning a track day soon so I'm glad someone caught this... Thanks guys. Another reason I enjoy this forum.
__________________
E92 M3 | Space Gray on Fox Red | M-DCT | CF Roof | RAC RG63 Wheels | Brembo 380mm BBK | | Vorsteiner Ti Exhaust | Matte Black Grilles/Side Gills/Rear Emblem/Mirrors | | Alekshop Back up Camera | GP Thunders | BMW Aluminum Pedals | Elite Angels | | XPEL Full Front Wrap | Hardwired V1 | Interior Xenon Light Kit | |
|
Appreciate
0
|
| 03-06-2011, 04:50 AM | #11 |
|
Grease Monkey

295
Rep 2,646
Posts
Drives: 2011 E90 M3,1994 Euro E36 M3/4
Join Date: Apr 2006
Location: Fort McMurray, Alberta, Canada
|
Well Swamp, you are very knowledgeable in your posts but this mistake is a little disturbing. Bleed screws are always at the highest point no matter what since air will always be trapped at the highest point in the caliper. Please address this ASAP since you still have air in your brake system....... there is no possible way to bleed the system unless the bleed screws are at the top of the caliper....... I wouldn't want you or anyone else to get hurt from a brake failure. There would be big consequences in the event of an accident especially if they found out you did the work yourself.
I am sure you will never make this mistake again.  By the way, the Brakes/RG63's look awesome on your car!!!
__________________
Last edited by BMRLVR; 03-06-2011 at 04:55 AM.. |
|
Appreciate
0
|
| 03-06-2011, 02:36 PM | #12 |
|
Lieutenant General
611
Rep 10,407
Posts |
Yes, big mistake but not as tragic as you make it sound... No one is perfect...
1. Brakes are fully bled. There is no air in the system. The pedal is hard as a rock. That simply does not happen with air in the system. There are still relative high spots in the brake lines and the rest of the system even when bleed screws are oriented properly. As long as you get the fluid flowing during the bleed you can remove all air. 2. There are no structural problems. Everything fits great and everything is torqued. Thus there is NO possibility here of a catastrophic failure. 3. Car was tested lightly and moderately before heading on to the street and only lightly driven after that point. 4. Brakes will be swapped to correct sides before any more driving (obviously to insure proper pad pressure distribution and wear).
__________________
E92 M3 | Space Gray on Fox Red | M-DCT | CF Roof | RAC RG63 Wheels | Brembo 380mm BBK | | Vorsteiner Ti Exhaust | Matte Black Grilles/Side Gills/Rear Emblem/Mirrors | | Alekshop Back up Camera | GP Thunders | BMW Aluminum Pedals | Elite Angels | | XPEL Full Front Wrap | Hardwired V1 | Interior Xenon Light Kit | |
|
Appreciate
0
|
| 03-06-2011, 06:09 PM | #13 |
|
Grease Monkey
295
Rep 2,646
Posts
Drives: 2011 E90 M3,1994 Euro E36 M3/4
Join Date: Apr 2006
Location: Fort McMurray, Alberta, Canada
|
It was an honest mistake, I am glad someone noticed it though!
|
|
Appreciate
0
|
| 03-07-2011, 08:56 PM | #14 |
|
Lieutenant General
611
Rep 10,407
Posts |
Thanks again Checkcaptain and BMRLVR!
Got everything sorted out this evening. I also used JAJs tip and added that to the original post along with tips on orientation. Will get some updated/replacement pics up soon too, mostly to save further embarrassment 
__________________
E92 M3 | Space Gray on Fox Red | M-DCT | CF Roof | RAC RG63 Wheels | Brembo 380mm BBK | | Vorsteiner Ti Exhaust | Matte Black Grilles/Side Gills/Rear Emblem/Mirrors | | Alekshop Back up Camera | GP Thunders | BMW Aluminum Pedals | Elite Angels | | XPEL Full Front Wrap | Hardwired V1 | Interior Xenon Light Kit | Last edited by swamp2; 03-07-2011 at 09:08 PM.. |
|
Appreciate
0
|
| 03-07-2011, 10:41 PM | #15 | |
|
Captain
80
Rep 961
Posts |
Quote:
You might make the point in your initial post that a common error with the rear brakes is to try to take the rotor off with the hand brake applied. It won't move, of course. |
|
|
Appreciate
0
|
| 03-08-2011, 09:24 PM | #16 | |
|
Lieutenant General
611
Rep 10,407
Posts |
Quote:
__________________
E92 M3 | Space Gray on Fox Red | M-DCT | CF Roof | RAC RG63 Wheels | Brembo 380mm BBK | | Vorsteiner Ti Exhaust | Matte Black Grilles/Side Gills/Rear Emblem/Mirrors | | Alekshop Back up Camera | GP Thunders | BMW Aluminum Pedals | Elite Angels | | XPEL Full Front Wrap | Hardwired V1 | Interior Xenon Light Kit | |
|
|
Appreciate
0
|
| 03-15-2011, 10:23 PM | #18 |
|
Major General
2750
Rep 6,759
Posts |
I used a different method to unstick the seized rotors - clamped them against the caliper brackets with a C clamp, then tightened just about 2mm, to break the corrosion film. Once the rotor has moved a little bit, remove the clamp and it's done.
Can anybody think of a reason this can cause a problem?
__________________
 2018 F80 Santorini 2019 Z4 3.0i 2022 X2 M35i |
|
Appreciate
0
|
| 03-16-2011, 01:01 AM | #19 |
|
Lieutenant General
611
Rep 10,407
Posts |
^ Sounds like an OK method. I wouldn't recommend it in general though.
The caliper brackets are really designed to be the stiffest and strongest in the direction parallel to the discs travel direction through the pads. In other words the force you applied is more or less perpendicular to that direction. Almost for sure that is a weaker load direction. That being said these brackets are very strong/"beefy" so I'm sure it did not get anywhere close to a yield/damage point for the load you put into them.
__________________
E92 M3 | Space Gray on Fox Red | M-DCT | CF Roof | RAC RG63 Wheels | Brembo 380mm BBK | | Vorsteiner Ti Exhaust | Matte Black Grilles/Side Gills/Rear Emblem/Mirrors | | Alekshop Back up Camera | GP Thunders | BMW Aluminum Pedals | Elite Angels | | XPEL Full Front Wrap | Hardwired V1 | Interior Xenon Light Kit | |
|
Appreciate
0
|
| 08-12-2011, 12:45 PM | #20 |
|
drop a gear and...
79
Rep 967
Posts |
I’d like to add that step 2 ‘Reduce the mess’ is a brilliant solution! I locked my brake pedal about half way down with a section of jack handle and a t-shirt, bled off the initial pressure from each caliper and I didn’t have a single drip when I disconnected the lines! – Thanks swamp2, JAJ!
Also - my front rotors came off with no issue but both of my rears were pretty frozen on. I tapped the bottom of the rotor gently with a dead blow to slightly pivot it on the hub and then squirted some WD40 into the disk-to-hub bolt holes so that it could gravity penetrate down between the disk and the hub. After about 15 minutes they both popped off with an easy tap from the dead blow.
__________________
|
|
Appreciate
0
|
| 06-05-2012, 09:06 AM | #21 |
|
Major General
530
Rep 6,149
Posts |
First off great write up. I am going to bring this back from the dead.
I wanted to thank you for providing the torque settings for this kit. I just readjusted all the bolts to your specs this evening.
__________________
If you will be purchasing ANY AT&T services online or in store could you mention that you were referred by me? My Employee Referral ID is eo4489. This would be a great help and it costs you nothing, thank you!
Last edited by spdy330; 06-06-2012 at 10:44 PM.. |
|
Appreciate
0
|
Post Reply |
| Bookmarks |
|
|


