

 |
|
 |

|
|
|
| 08-28-2013, 12:49 PM | #67 |
|
New Member
0
Rep 6
Posts |
The engine is from a E39 but I'm using a E36 loom/ecu for the same engine (m52).
I'm leaning more and more towards a phablet like you have, could you measure the visible screen size for me? I can find over all dims but not of the screen it self. Being 175mm wide it's a very tight squize in the spot I want it but not impossible and it's pretty much as big as I could go. Maybe I missed it but can you charge these phablets and at the same time have a usb flash drive connected or a powered usb hub with other devices? |
|
Appreciate
0
|
| 08-28-2013, 01:00 PM | #68 | |
|
Banned

829
Rep 3,387
Posts |
Quote:
Both units are specs sheets say they are USB OTG compatible, so the answer to your question would be yes, but I haven't had need to test that, so I can't give you confirmation on your last question. The way I'm setting this up, I don't ever have to have a physical connection for anything outside of charging. Files will be transfered wirelessly using a combination of: Airdroid: https://play.google.com/store/apps/d....sand.airdroid SyncMe Wireless: https://play.google.com/store/apps/d...om.bv.wifisync And ES File Explorer: https://play.google.com/store/apps/d...gs.android.pop With these, you should never have a reason to hook up any other device. I'm also using MacroDroid to automate a series of functions: https://play.google.com/store/apps/d...oft.macrodroid |
|
|
Appreciate
0
|
| 08-28-2013, 01:23 PM | #69 |
|
New Member
0
Rep 6
Posts |
Both actually just for some sort of reference for myself.
I thought you would have had it permanently plugged in (and non-removable), with 32gb there's prob not much need for additional storage. Been using Airdroid for awhile, very handy app. Syncme looks quite good! Defo getting more and more idea's for my own little project! |
|
Appreciate
0
|
| 08-28-2013, 01:53 PM | #70 | |
|
Banned
829
Rep 3,387
Posts |
Quote:
 Since I also use https://play.google.com/store/apps/d...m.dailyroads.v I wanted to make sure I have enough space for storage of the video. Using SyncMe, I plan to have the directory in which the video is stored upload to my NAS in the middle of the night. If it's nothing that needs to be kept, I'll delete. Tested it out, and it works perfectly. Both tablets also have built in auto on/off timers via Android so after the sync is finished, it turns itself off. Since I also use https://play.google.com/store/apps/d...m.dailyroads.v I wanted to make sure I have enough space for storage of the video. Using SyncMe, I plan to have the directory in which the video is stored upload to my NAS in the middle of the night. If it's nothing that needs to be kept, I'll delete. Tested it out, and it works perfectly. Both tablets also have built in auto on/off timers via Android so after the sync is finished, it turns itself off. As far as the tablet, it will be permanently mounted. The power will come from a 2.1A adapter plugged into the 12V plug in the armrest. I'll grab the screen dimensions for you later this evening. Last edited by whats77inaname; 08-28-2013 at 03:15 PM.. |
|
|
Appreciate
0
|
| 08-31-2013, 01:01 PM | #72 | |
|
Banned
829
Rep 3,387
Posts |
Quote:
C2: 11cm x 6.2cm |
|
|
Appreciate
0
|
| 08-31-2013, 04:30 PM | #74 |
|
Banned
829
Rep 3,387
Posts |
N/p. The viewable screen size on the V65 is *exactly* the same as the 1-series navi screen that I picked up, which is awesome. Should work out well for any 1-series CCC owners that want to do this.
|
|
Appreciate
0
|
| 09-07-2013, 08:22 PM | #75 |
|
Banned
829
Rep 3,387
Posts |
I finally had some time to work on the setup today. I picked up the dash on eBay for $250 a few weeks ago and drove to Stafford to pick it up. Found out today that the airbag is still in it, and they're going for ~$300 on eBay, so hopefully this dash will turn out to be free.
I cut a hole in it to fit the 1-series navi screen. I just need to pull out my heat gun tomorrow and shape the surround so that it fits the dash flush. Other than that, I'm *very* pleased with the results so far. Since I have premium audio, I'll have to modify the center channel speaker cover so that the speaker and vents will be still be functional. 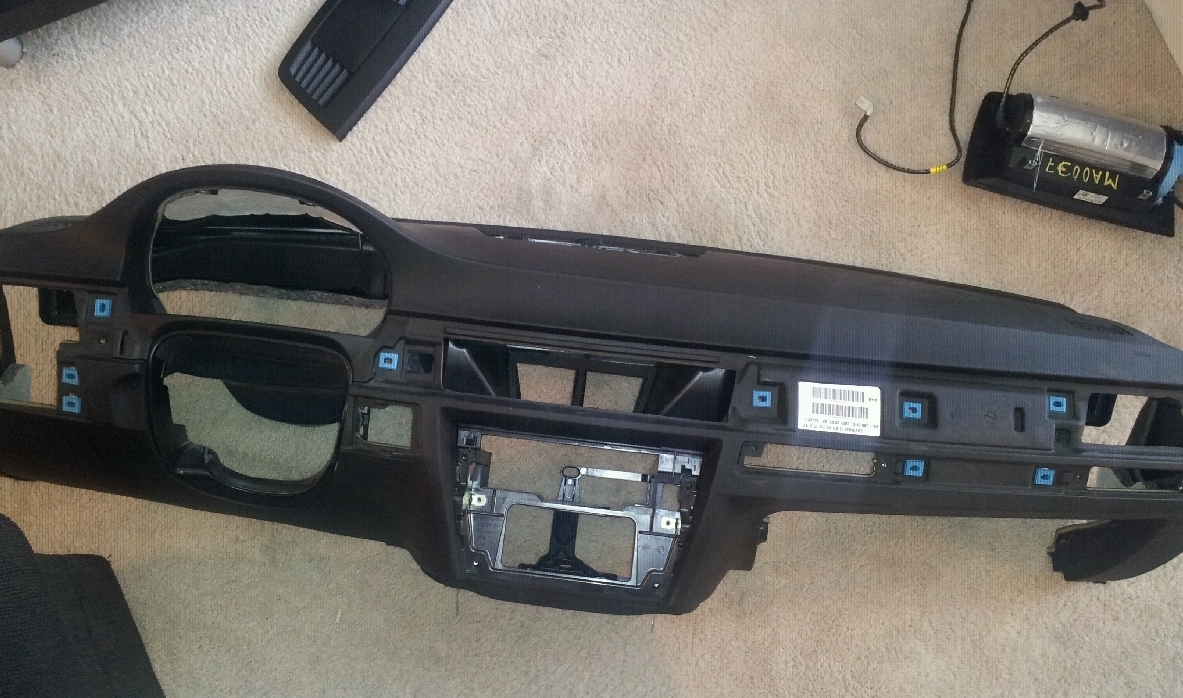  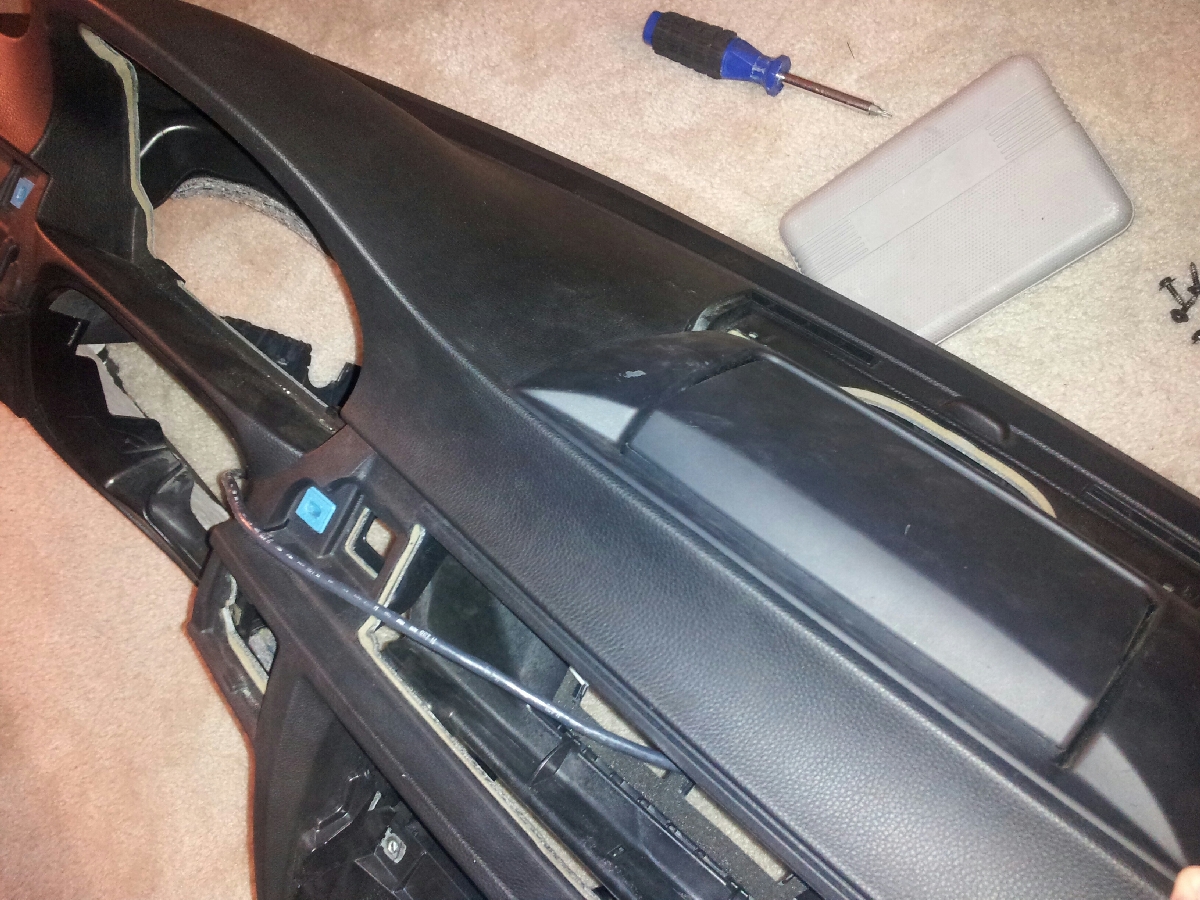 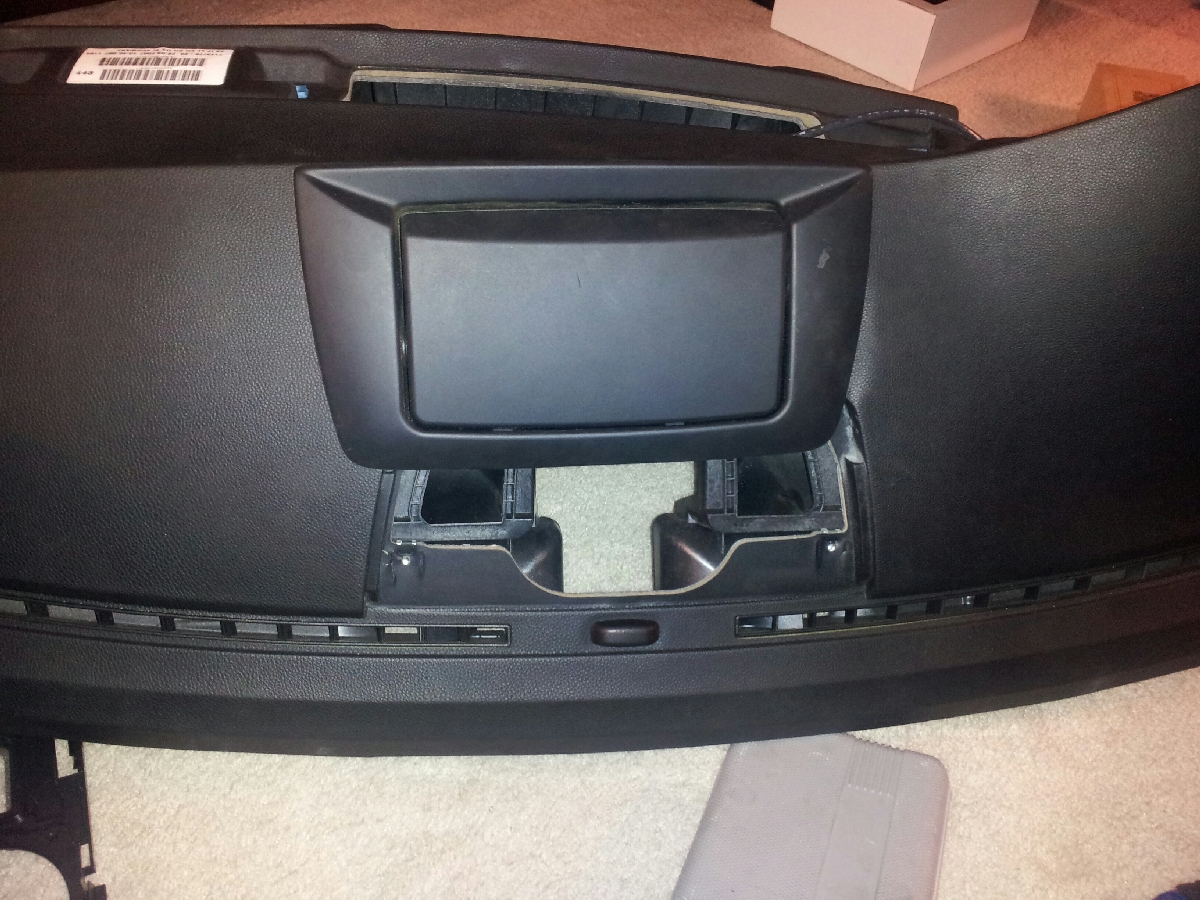   Last edited by whats77inaname; 09-07-2013 at 08:31 PM.. |
|
Appreciate
0
|
| 10-11-2013, 05:21 PM | #78 |
|
Banned
829
Rep 3,387
Posts |
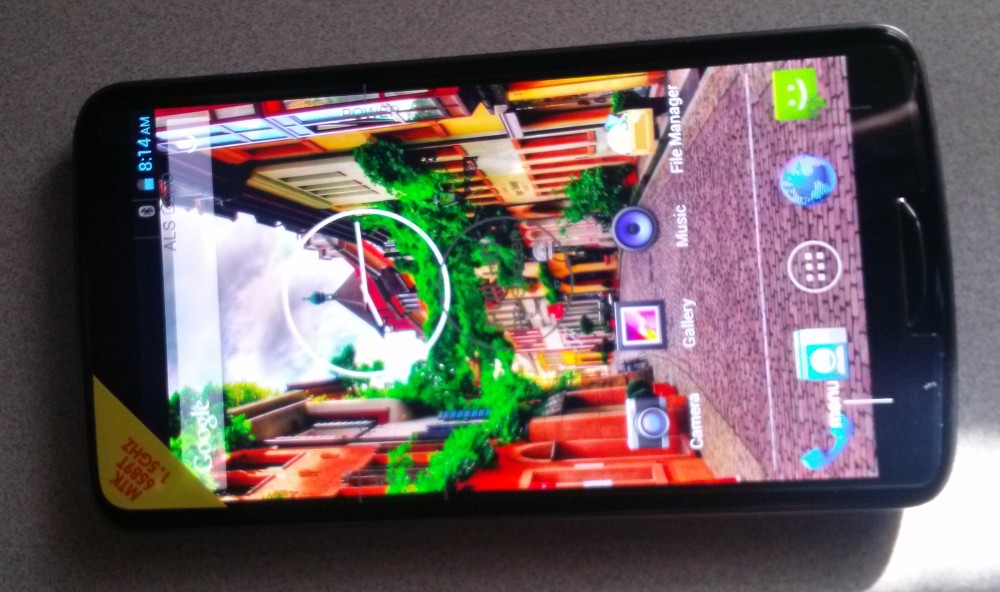
Time for an update. The phablet I am using was recently released in black, which would look a *lot* better than the white, so I sold the other on eBay and picked one up. It came in today. I decided to upgrade to the unit that has 32GB built instead of 16GB. I figure I can store multimedia on the internal storage and recorded video on the 64GB microSD.
 I also picked up some 3M DI NOC c/f vinyl, which I'll be using to wrap the OEM nav housing. This weekend I'm going to working on pulling an engine/5MT tranny from a wrecked Trooper so I can convert my VehiCROSS over to a 5MT, as well as getting the new phablet rooted and everything configured to my liking. Hopefully the vinyl will arrive this weekend. As I've been going about this, if there's one time I wish my car didn't have idrive/nav, this would be it. If I didn't, I could just gut the 1M nav housing and use it for my project w/out having to work on making both screens viewable, and this project would have been done by now. Alas, such is not the case. BUT, since more Ms were sold w/nav than not, this is good news for anyone wanting to duplicate this setup Last edited by whats77inaname; 10-11-2013 at 05:26 PM.. |
|
Appreciate
0
|
| 10-12-2013, 04:51 PM | #79 |
|
Banned
829
Rep 3,387
Posts |
I was playing around w/the new unit, seems like they made a mistake when advertising the specs. The camera shoots 4928x3696, i.e, 18MP, not the advertised 13MP. So far, the upgrade simply to change color seems to have been a good idea *lol*.
|
|
Appreciate
0
|
| 10-23-2013, 05:20 PM | #82 |
|
Banned
829
Rep 3,387
Posts |
Haven't completed installation as of yet. I've been busy pulling the drive train out of my donor truck to convert my VehiCROSS to a 5MT. I'll post an update this weekend sometime, most likely Sunday as the TX Mile is this weekend.
|
|
Appreciate
0
|
| 10-28-2013, 11:07 PM | #83 |
|
Banned
829
Rep 3,387
Posts |
Another update
As I've been working on my truck trying to convert it to a 5MT before the end of the year, and due to the fact that I'm waiting on parts from Asia, this project has somewhat slowed.
1) The new phablet didn't come with the leather-bound, folding back case, which I need so for the install, so I ordered it (from Hong Kong). 2) I ordered a microsd Y splitter (from China) that will allow me to charge and connect to the USB hub at the same time, allowing me to use USB OTG. 3) I picked up some 3M di-noc c/f vinyl to cover everything. That's about it, I'll be updating as things start coming in and I start piecing it together. In other news, my buddy sent me this video showing off a Raytheon-sourced FLIR that Cadillac used in their 2000-2005 Devilles retrofitted to a Jeep. Today, after doing some digging, I found (and purchased) a complete Caddy setup (FLIR camera, HUD unit, on/off/intensity switch) for a really good price. Plans are to retrofit it in my VehiCROSS. I saw some guys that were retro'ing one into an E46 *lol*. Since the resolution is so low, I can hook it up via the modmynav and use the stock LCD. I'll play around with it when it comes.....might end up w/one for the M3, as well. |
|
Appreciate
0
|
| 11-01-2013, 11:34 PM | #84 |
|
Banned
829
Rep 3,387
Posts |
OBD II port replicator
I hate having to have to unplug the P3 vent gauge when I have to plug something else into the OBD II port. I also need to plug in the BT OBD II connector for the phablet, and they both can't be plugged in at the same time. Finally, I hate having the stock OBD II port obstructed at all. Given all of this, a port replicator/splitter is necessary. I checked on Amazon and found a few, but they were 2 way splitters, and I need 3 female plugs. The units on Amazon were kind of thick and bulky as well, so I hit up eBay. $15 later and I found a 3 way replicator, and a bracket. The auctions are listed below.
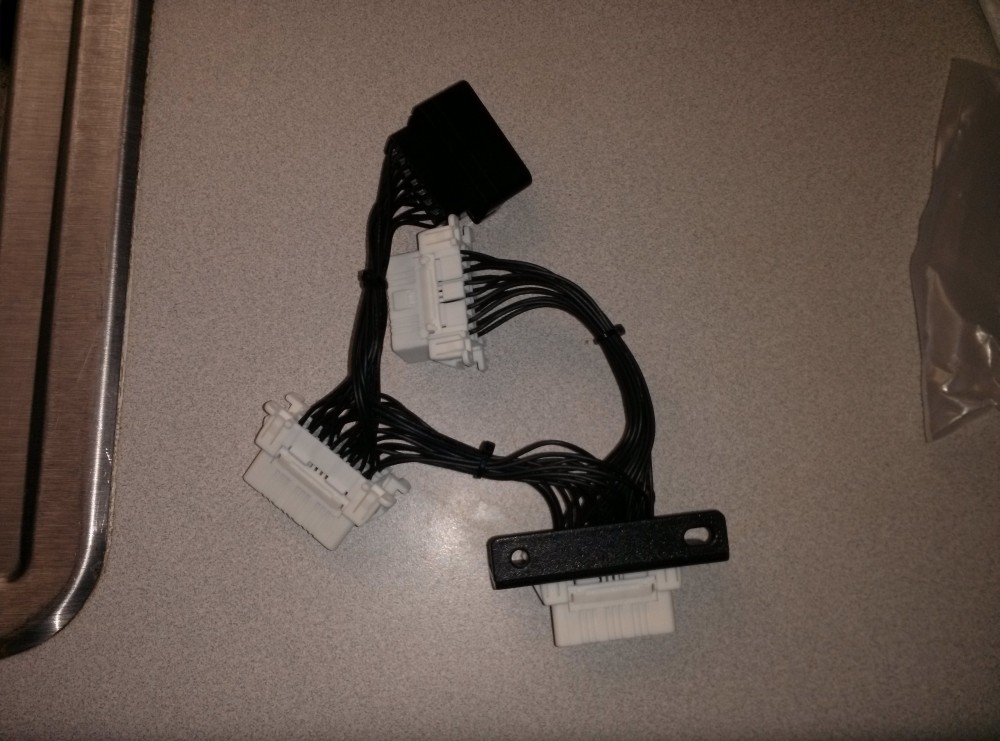 The replicator came in today, so the first thing I did was a dry run to make sure everything works when plugged in simultaneously. Check and check. So here's the install. Time allotment: 30-45 mins DIY: How to install a 3-way OBDII splitter/replicator What you need to purchase: 1) This bracket: http://www.ebay.com/itm/200901287023 2) This ODBII splitter: www.ebay.com/itm/321221830865 What tools you'll need: a) Phillips head screwdriver b) small torx set c) trim removal tool d) mini flat head screw driver 1. Use the Phillips screwdriver to remove the hood release handle. There will be another screw now visible. Use the torx to remove it. 2. Pull back the door weather stripping by the dash, then remove the black, plastic door trim. Remove the kick panel surrounding the OBD II port by carefully pulling it towards the transmission tunnel. There will be 2 snap clips, one in the lower middle of the panel, and the other will be visible when you remove the weather stripping. Use the trim removal tool and remove the snap connector closest to the trunk release, and put it in the appropriate place in the kick panel. (Trust me on this one). 3. Push the trunk release button from behind to release it from the kick panel. Rotate it around so you can see how the wire harness clips into the release. Use a miniature flat head screwdriver to release it. Set it, and the kick panel, to the side. 4. Use the torx to unscrew the lower dash panel screws. You only need to remove the one closest to the door, and the screw to the right of it (2 out of 3). 5. There are 2 Phillips screws that attach the OEM OBD II port to the car. Remove them both. 6. Take the OEM harness and plug it into the replicator. 7. Take the first connector in the series and plug it into the aftermarket bracket. 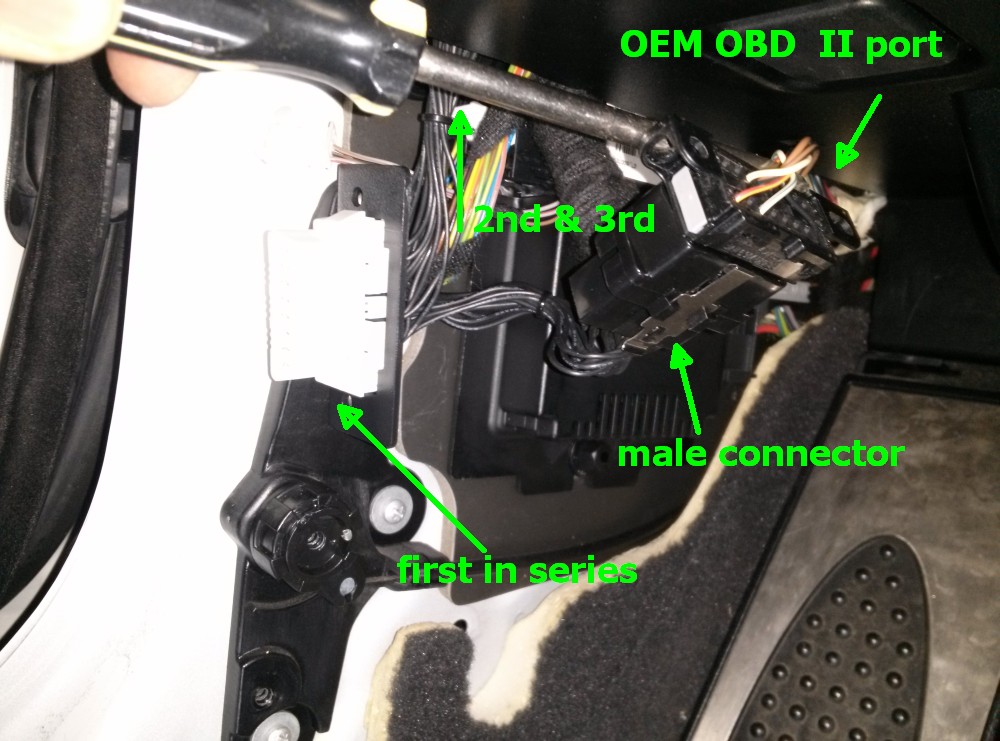 8. Plug in any auxiliary devices into the remaining 2 connectors. Pull down a bit on the lower dash panel and shove those 2 connectors up there. Screw the panel back in to place. 9. Screw the new bracket in place. 10. The orientation and location of the OEM harness/replicator connection is crucial in making sure the kick panel fits back into place smoothly, I can't stress that enough. When positioning, make sure the trunk release harness is as shown to make it easier to reconnect. Check the picture. 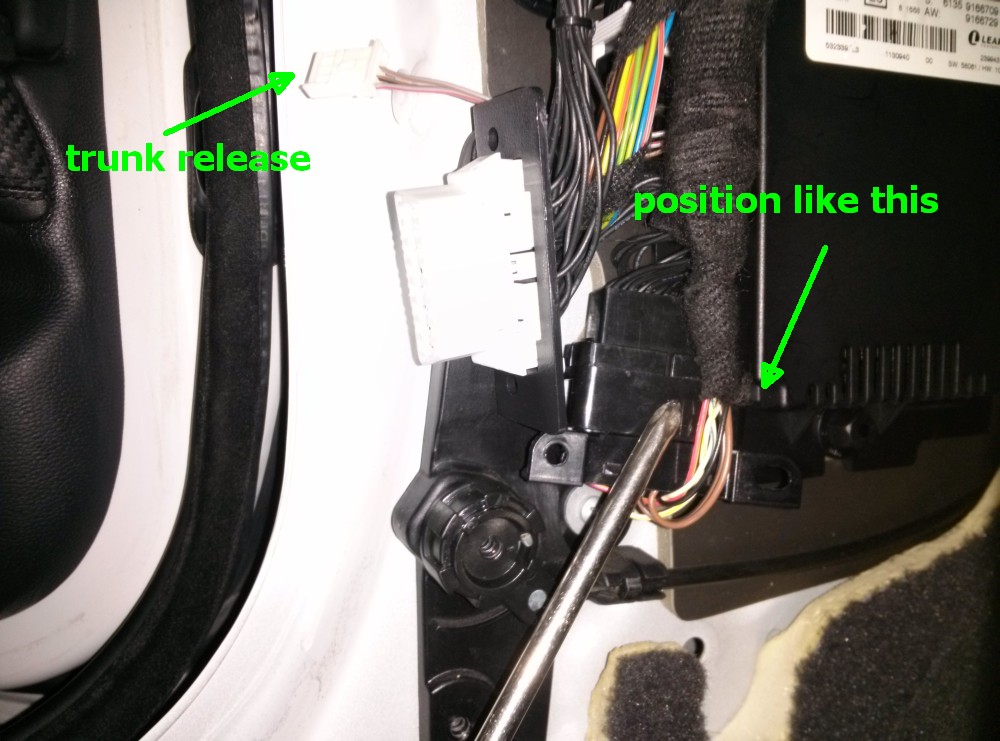 11. Put the kick panel back into place. That top snap connector you removed in step 2? The kick panel goes in place a lot easier when in the snap connector is in the kick panel vs having to slide the kick panel over the snap connector. Make sure the the trunk release wiring is still accessible, and then plug in the trunk release button. 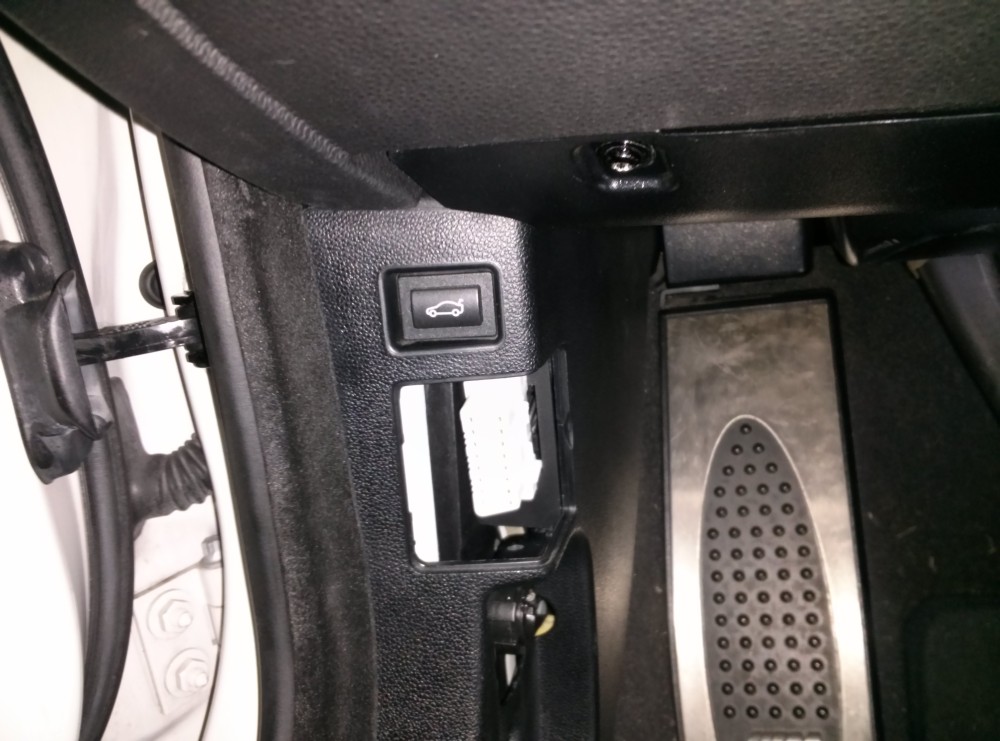 12. Put the door trim back in place, followed by the weather stripping, and finally, the OBD II access cover. 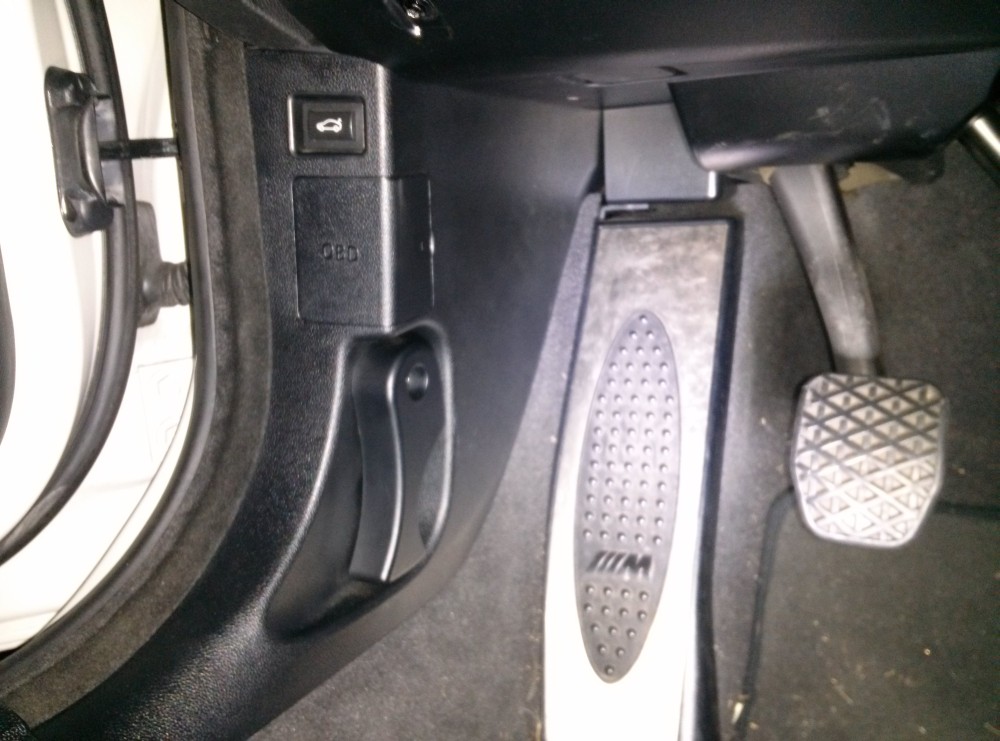 |
|
Appreciate
0
|
| 11-07-2013, 10:48 AM | #85 |
|
Private First Class
 10
Rep 114
Posts |
question about hdmi2av converter
Hi, I want to connect my phone with my stock cic navigation, which I think is 1280x480, and was wondering if that hdmi2av converter combined with the modmynav multimedia interface will be able to output at that resolution, and if not if there's any way to do that? The modmynav device looks to have rgb input, is there a way to use it?
|
|
Appreciate
0
|
| 11-08-2013, 05:19 PM | #86 | |
|
Banned
829
Rep 3,387
Posts |
Quote:
|
|
|
Appreciate
0
|
Post Reply |
| Bookmarks |
|
|


