

 |
|
 |

|
|
|
|

|
|||||||||
Post Reply |
|
|
Thread Tools | Search this Thread |
| 10-22-2009, 10:07 PM | #1 |
|
Lieutenant
 42
Rep 442
Posts |
So as I found this post:
V1 Stealth Integration - E90 M3 I contacted RaceMX-M3 to inquire about possibly having him do this...well after thinking about the cost he was charging & really knowing I could do this myself too...I decided on the later...doing it myself! So I decided on a twist though. I decided to do the hidden display in the ashtray like I did on my E46 M3 Vert I used to own. So here is what I did: Well to kind of quote RaceMx-M3 & use his pics to start off with, I got the headrest out of my E90 M3 & all apart (my headrest is Bamboo of course  ): ):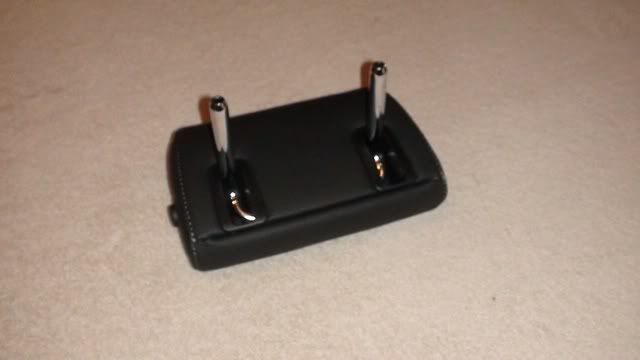 I found that trying to get the long bottom clip was a PITA & suggest starting off pulling all of the leather out from behind the black plastic parts (around the metal studs & side button). Then from there I was able to get the smaller long strip undone & then the 2 little side clips and then finally the long strip. 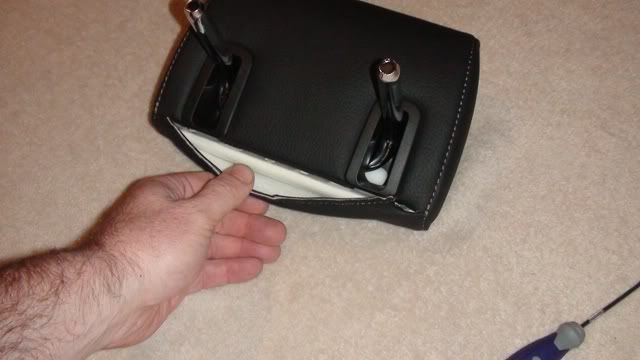 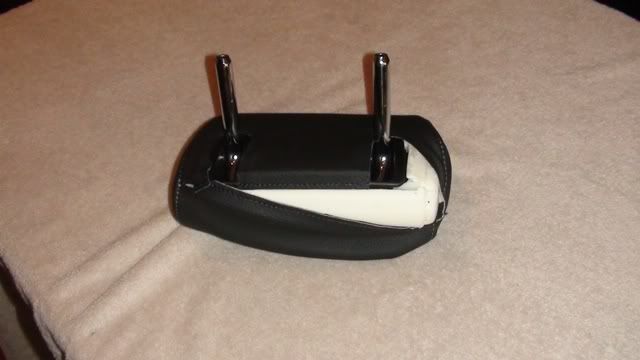 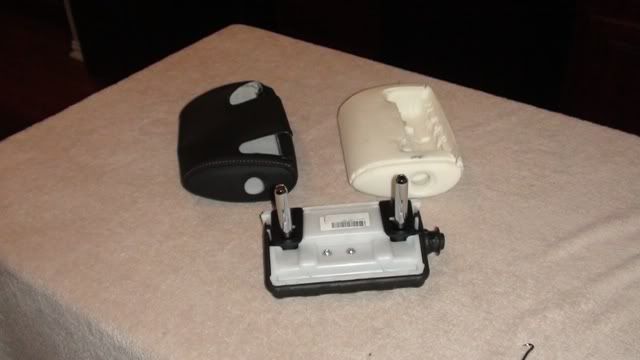 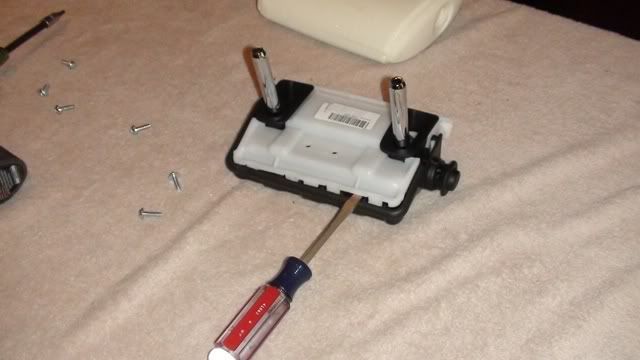 From here is where I will continue with what I did (NOTE: I apologize right now about my poorly manicured fingers that you will see in some of the future pictures, lol I still have a nail biting issue): I then took apart the V1 so I could figure out where I had to cut:  Yes I broke the V1 on/off turn switch by accident, though it wasn't a big deal, lol.   With my trusty B&DPW  I cut out the Black Plastic Headrest Base piece to accommodate the V1:    Note: It took a couple of times to get the depth right so that the top of the unassembled V1 would be flush with the top of the Black Plastic Headrest Base. Though not in the order of how I really did it and later end up doing, I cut & modified the Flat White Plastic Cover:  You'll see in a later picture that I later realized that this had to be done since the V1 wouldn't have fit in flush. Then the Metal Stud part had to be modified by cutting off the metal tabs & then filing them so they weren't sharp:   Then I fit the modified Metal Stud Part back in to the Black Plastic Head Rest Base to make sure of the clearance for the V1:  Then from here I again strayed from what I'm about to tell you. When I had the headrest disassembled, I took the White Plastic End Piece & based on RaceMX-M3 picture: 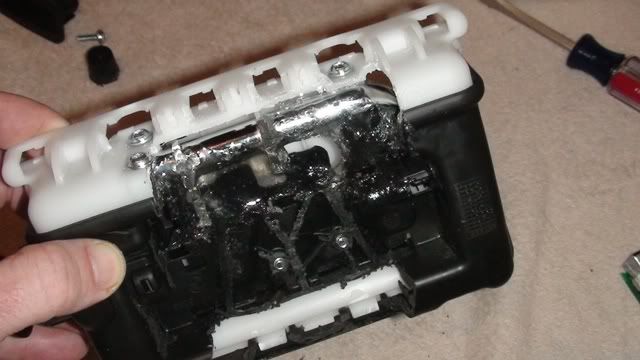 I marked the area he had cut out on my White Plastic End Piece with a silver sharpie and cut it out using a utility knife. So I didn't get to take a pic of that process, though you will see how it looked in upcoming pictures... So in all intents & purposes, here is where you would modify the White Plastic End Piece to make clearance for the V1 Now I knew that the V1 cable to power it would have to lead out of the center of one of the Metal Stud ends. I chose the side that the V1 cable would connect to the V1 of course and analyzed the Metal Stud part to figure out where I had to open up a hole to feed the cable through. I chose the closest bend in the Metal Stud part. I also knew if I was to drill into this, the drill bit would walk on me, so I filed the edge flat to have a better drilling surface:  I then took a 1/8 drill bit to get a hole started and continued to drill the hole bigger until it was about the same diameter as the Metal Stud end opening:  I had earlier that day took a trip to radio shack for some supplies since I wanted to get a longer cable to run from the back of my car to somewhere up front and knew that ANY cable connector wasn't going to fit through the Metal Stud part's inner core:   
__________________
08 E90 M3, JrzB/BB, 360 Forged 8 Mesh, H&R Springs, RPI Scoops, Eisenmann Sport Exh, VRS Lip, CF Decklid, CF Diffuser, OSS LED AE, Rear Headrest V1, '09 iDrive Controller, Euro Rear Fog, OEM BlackLine TL, MRTM Design E90 Pedals & Door Lock Studs
|
| 10-22-2009, 10:08 PM | #2 |
|
Lieutenant
42
Rep 442
Posts |
With my longer cable on hand, I had to cut off one 4-wire plug connector, feed it through the Metal Stud part opening and install a new 4-pin plug:
   Slid the new 4-Pin Plug on & made sure it matched the way the one I cut was:  Then Crimped:  Though I trust the crimping tool, I just needed to make sure the cable would still provide power, so I did a quick check:  ...OK, it works! NOTE: BEFORE you proceed to what I did next...you need to slip & clip in the 2 black plastic parts that the Metal Stud ends go through (what are exposed when the leather is back on the headrest! You will see in the upcoming pictures I did not & found myself almost messing everything up! 2 Black parts in RaceMX-M3's picture here: 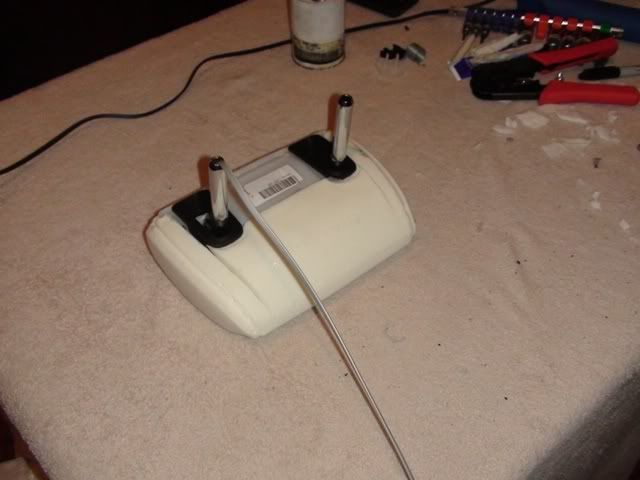 I proceeded to screw the Flat White Plastic piece back on:  Screwed in the White Plastic End piece:  I had also gone to Home Depot earlier & picked up some clear Silicon:  With the Silicon, I proceeded to put on a lot of silicon to make sure that nothing metal touched the circuit board of the V1 when the V1 was in place...it of course also acted as the glue to keep the V1 in place:  Now do you see why I almost messed everything up From here I connected the Cable to the V1 & placed it in the Silicon to secure it in place. I didn't take a pic for some reason, but it looked just like what RaceMX-M3 did: 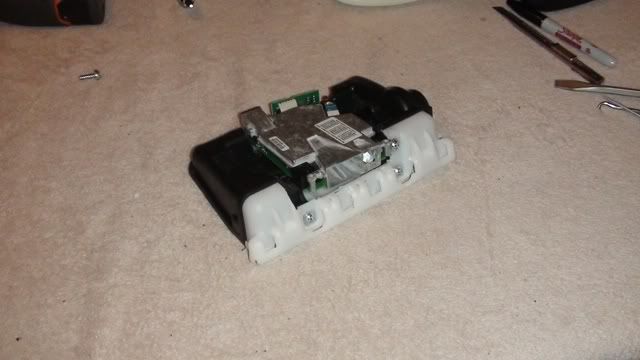 I then had to remove some of the foam of the inside of the top of the headrest to accommodate the new V1 assembly:  I did this by hand, VERY carefully and also had to remove some of the foam from the front of the inside as well (see the square nubs on the bottom of the picture)  Then I carefully placed the V1 Assembly inside the headrest foam:  I inserted the black side button & put the leather cover back on. Stretching the stitches made me a bit nervous, but the end result was great! 
__________________
08 E90 M3, JrzB/BB, 360 Forged 8 Mesh, H&R Springs, RPI Scoops, Eisenmann Sport Exh, VRS Lip, CF Decklid, CF Diffuser, OSS LED AE, Rear Headrest V1, '09 iDrive Controller, Euro Rear Fog, OEM BlackLine TL, MRTM Design E90 Pedals & Door Lock Studs
|
|
Appreciate
0
|
| 10-22-2009, 10:09 PM | #3 |
|
Lieutenant
42
Rep 442
Posts |
Here's what I started with for the hardwire V1 install (Ended up NOT using the short cable):
 How it has to be wired together:  Well I started by taking out the rear seat bottom:  Took out & took apart the Ski/Access area of the rear seat back:    After taking the 4 torx screws from the front black side, you pull the gray back side off & from there you can pull off the black front piece:   With a TB40 Torx socket, I unscrewed the center armrest assembly:  Looking at the opening, there are metal wires holding the leather in place surrounding the whole opening. Each metal tab that is holding the metal wire in place had to be pried loose a little & then the leather material could be moved out of the way...starting from the bottom and side:      Then on the top:    Finally, with everything out of the way, we can grab the Rear Center Headrest:  Run the long 25Ft cable into the hole before installing the Rear Center Headrest in place:  Then hide the cable behind the leather:  On the bottom left side ,the plastic is surrounded by leather at the console pivot point. There you pull the leather to the side & run the cable through. Once cable is through, pull the remaining cable till taunt:   Starting from the top and around the rest of the opening, replace the leather covering by placing the metal wire back into the metal tabs and applying pressure to the tabs to secure in place:   
__________________
08 E90 M3, JrzB/BB, 360 Forged 8 Mesh, H&R Springs, RPI Scoops, Eisenmann Sport Exh, VRS Lip, CF Decklid, CF Diffuser, OSS LED AE, Rear Headrest V1, '09 iDrive Controller, Euro Rear Fog, OEM BlackLine TL, MRTM Design E90 Pedals & Door Lock Studs
|
|
Appreciate
0
|
| 10-22-2009, 10:09 PM | #4 |
|
Lieutenant
42
Rep 442
Posts |
Put the center armrest back in, secure with torx screw and then re-assemble the ski/access area the reverse of taking it out:
      And the rear seat back put back together with rear center headrest installed:  I put the V1 cable through a square opening in the padding covering the rear seat floor and ran it under the padding, up to the front of the seat bottom floor. Then ran the cable under the carpet that the padding overlapped to the driver's side of the rear seat:  I loosened a side push pin to get the cable underneath the plastic molding that was near the door frame:   Then reinstalled the rear seat:  I then proceeded to tuck the V1 cable under the lower door molding to the front of the driver's side:  About almost to the front of the front seat frame, the carpet allows the cable to cross over to the center console, near the stick shifter. To do that, I had to unscrew the front driver's seat from the floor, lean it back & remove the under seat sub cover:  I pulled back the carpet and ran the V1 cable underneath to the center console:  With that done, I put the sub cover & front driver's seat back in place. Then I decided to make sure the whole system worked before I went any further. So I did a mock set-up under the hood with all the V1 components hooked up to the V1 detector in the rear center headrest...AND it works  : : Confident that the system will work how I want it to, I disassembled the center console & took it out:  My plan was to put the V1 Remote Display & Audio/Power controller in the ashtray, I had to remove the ashtray from the center console cover:  I placed the V1 Display & Audio/power controller where I wanted then in the ashtray & found that part of the ash tray had to be cut to fit the 2 into the ashtray. I took visual calculations with points on the ashtray & used the V1 Display & Audi/power controller as edges to draw the area to cut with a silver sharpie. Then I pulled the cigarette lighter wires to the side & tape up the area I was not going to cut:    Using my trusty B&DPW, I cut out the opening & got it right the first time without having to do any additional trimming!!!:  I put double sided tape onto the V1 Display, both top & bottom, plugged one of the 8ft cable into it & stuck it into the ashtray:  
__________________
08 E90 M3, JrzB/BB, 360 Forged 8 Mesh, H&R Springs, RPI Scoops, Eisenmann Sport Exh, VRS Lip, CF Decklid, CF Diffuser, OSS LED AE, Rear Headrest V1, '09 iDrive Controller, Euro Rear Fog, OEM BlackLine TL, MRTM Design E90 Pedals & Door Lock Studs
|
|
Appreciate
0
|
| 10-22-2009, 10:10 PM | #5 |
|
Lieutenant
42
Rep 442
Posts |
Then I placed the V1 Audio/power controller under the V1 Display and connected the other 8 ft cable to it. This became a little more of a PITA than I thought because I had to adjust the Audio/power controller to sit right & the pressure from the bottom of the cutout & the double sided tape caused some struggle. But I got it in place & was able to test the ashtray cover & everything fit! Also I found that the LED to the ashtray still could stay, but I had to use some silicon to keep it in place:
   Then I put the ashtray back into the center console cover:   I unclipped the e-brake boot & ran the V1 cable form the rear center headrest under it & up through the back area of the center console. I estimated how much cable I would need to reach the ashtray with a little extra and then zip-tied the remaining cable & tucked it back in that same area under the back of the center console:    I'm actually feeling a bit dumb right now preparing this install post...why? Because I bought a tool & connectors that allowed me to be able to shorten the cables to the right lengths and not have any extra cable needing to be stuffed in hidden areas :chair: I might go back & shorten up all the V1 cables at another time...Oh well, LOL! Power & ground was needed for the V1 Direct-Wire Power Adapter, so I decided to tap into the Ashtray connector. I had to sacrifice my cable to one of my test lights for the ground wire to be the same length as the positive wire and reach the ashtray connector:    I connected the V1 cable from the rear center headrest into the Audio/Power controller and tested the system for the real deal...It was a go!:  I wrapped all the V1 cables & wiring in electrical tape, all the way passed the iDrive Controller. I put the top of the center console cover into place & ran the wiring around the shifter, tucking the rest of the excess cable, wiring & the V1 Direct-Wire Power Adapter in the same area under the end of the center console. I purposely made sure the fuse was easily accessed by only having to unclip the e-brake boot:    I put the center console cover back in place, clipped the e-brake boot back in place & I was ready to rock!!! :thumbsup2: Finished layout... V1 Hidden Ashtray Display:   V1 Hidden in rear center headrest (with daughter's car seat ):
__________________
08 E90 M3, JrzB/BB, 360 Forged 8 Mesh, H&R Springs, RPI Scoops, Eisenmann Sport Exh, VRS Lip, CF Decklid, CF Diffuser, OSS LED AE, Rear Headrest V1, '09 iDrive Controller, Euro Rear Fog, OEM BlackLine TL, MRTM Design E90 Pedals & Door Lock Studs
|
|
Appreciate
0
|
| 10-25-2009, 06:51 PM | #7 |
|
Major General
 258
Rep 5,012
Posts |
Have something to contribute folks, as I just hardwired my V1 directly from the map lights on my Accord, and am going to do the same with the M3:
The V1 just needs TWO wires for power, and are the middle ones: RED for power, and GREEN for ground, so you can use ANY telephone wire, as all have at least the middle 2 wires, which happens to be what you need .By the way, it didn't occur to me that if you cut a telephone cable extension (meaning jacks at both ends), one side will be reversed  , so check the wires against the V1 to see if you connect power to the red or the green wire (and ground the other, of course). , so check the wires against the V1 to see if you connect power to the red or the green wire (and ground the other, of course). Oh, and more good news: nothing happens to the V1 if you reverse the polarity  (Whew!!), so it was just the PITA of having to take everything apart and reverse my installation. So if you think nothing can go wrong with just 2 wires and making sure you match the colors, think again (Whew!!), so it was just the PITA of having to take everything apart and reverse my installation. So if you think nothing can go wrong with just 2 wires and making sure you match the colors, think again  . Hope this helps folks. . Hope this helps folks. |
|
Appreciate
0
|
| 11-12-2009, 09:21 AM | #8 |
|
New Member
0
Rep 6
Posts |
doba_s,
How did you put the v1 display into the mirror?? did you do it yourself? Did u use a remote display or the actual v1 display off the original unit?... I have an e92 m3 08 and want to do the same thing. I duno where im gana put the actual. where did you get your mirror resilvered? did you find an online guide and follow it? I know the guy who used to make the Inv1si mirro posted a DIY after he stopped manufacturing his product. My friend got one of the last ones for his m5 |
|
Appreciate
0
|
Post Reply |
| Bookmarks |
|
|


