

 |
|
 |

|
|
|
| 03-06-2011, 05:23 PM | #1 |
|
Private First Class
 10
Rep 128
Posts |
E90 black chrome grills and gills DIY
E90 OEM Chrome nose grills and gills proper install DIY
I simply loved this mod. I can only speak for my car but it really made a difference and I like the black chrome over the matte black, and the fact that this is an OEM option makes it really nice! Now on to the DIY: 1) You must buy the parts; since there are no e90 options for this set you must buy the package for e92, which is just fine with this install. I bought them here http://www.trademotion.com/partlocat...catalogid=4462 2) Now once you have received the parts you must unclip both black plastic parts for e92 here squared off in red does this with confidence that the other part left fits perfect into e90.
__________________
 Jerez e90m3 with some mods Jerez e90m3 with some mods ") |
| 03-06-2011, 05:25 PM | #2 |
|
Private First Class
10
Rep 128
Posts |
3) You must now jack your car {AFTER cracking the lugs on both left and right sides of the front wheels} now simply take off both wheels after properly jacking the front of the car.
__________________
Jerez e90m3 with some mods |
|
Appreciate
0
|
| 03-06-2011, 05:26 PM | #3 |
|
Private First Class
10
Rep 128
Posts |
4) Now proceed to start taking off the wheel well covers starting with the one on the bottom, both covers should produce 12 screws total well 11 and one plastic nut to be exact.
__________________
Jerez e90m3 with some mods |
|
Appreciate
0
|
| 03-06-2011, 05:29 PM | #4 |
|
Private First Class
10
Rep 128
Posts |
5) On this step I did not take the cover off the rounded second cover . I simple left it hanging which was sufficient to reach inside the well and start to work the clips on the gill. Starting with the drivers side first. {Note: do not take off the front facing wheel well cover- there is no need}
__________________
Jerez e90m3 with some mods |
|
Appreciate
0
|
| 03-06-2011, 05:31 PM | #5 |
|
Private First Class
10
Rep 128
Posts |
6) Tape very thin and log flat head screw driver with electrical tape. Now once done insert and begin squeezing the outer most set of clips on the gill light harness which we are replacing working those out first from that outer end of the gill to the front of the car.
TIP: push the screw driver in slightly behind the front edge to grip the light harness and by NOT putting pressure against the outer car body and paint, help grip and pull the harness out by unclipping each set of clips down the line of the harness body from right to left- this on my car was slightly difficult and took 20 mins on the drivers side including breaking the last clip down the line. As you pinch together the harnesses top and bottom clip sets together work the screwdriver to pull hard out ward at the same time.
__________________
Jerez e90m3 with some mods |
|
Appreciate
0
|
| 03-06-2011, 05:32 PM | #6 |
|
Private First Class
10
Rep 128
Posts |
7) When you get to this clip try and use another skinny flat head to work in between the honey comb and push down the clip to pop out the light harness with out breaking it off. We broke one of the clips on the first light by just working/trying to get the light harness out with out doing this step.
__________________
Jerez e90m3 with some mods |
|
Appreciate
0
|
| 03-06-2011, 05:33 PM | #7 |
|
Private First Class
10
Rep 128
Posts |
8) Now with the old gill out of the car simply unclip the wire by taking the flat head screw driver and lift the edge of the plastic outward with the little notch on it to unplug it.
Now plug in your new black chrome gill in and turn on the cars turning signal to make sure all is working correctly before popping it back into place and sealing up the job. Now that you confirmed the lighting, start by popping the new gill into place by starting with the left edge nearest the M3 logo and push it into place until you hear all the clips pop and everything is secure you may now put the wheel covers back on including the wheel. And youre done with that side.
__________________
Jerez e90m3 with some mods |
|
Appreciate
0
|
| 03-06-2011, 05:34 PM | #8 |
|
Private First Class
10
Rep 128
Posts |
9) Next we have the passengers side start by removing the bottom wheel well panel, then the inner wheel well panel, here you will see once done a reservoir you will find. Its simple as its only in place by 1 screw. Once you unscrew the mounting bolt simply move it out and to the side in the wheel well.
Proceed to work out the gill in the same fashion. Once done put everything back together and lower the car- the hardest part is done!
__________________
Jerez e90m3 with some mods |
|
Appreciate
0
|
| 03-06-2011, 05:38 PM | #9 |
|
Private First Class
10
Rep 128
Posts |
10) Nose Grills
Now its time to replace the front grills- since there is a DIY for this I will now refer you here- then your done. I used this http://www.raceprecision.com/forums/...c.php?f=7&t=13
__________________
Jerez e90m3 with some mods |
|
Appreciate
0
|
| 03-06-2011, 05:40 PM | #10 |
|
Private First Class
10
Rep 128
Posts |
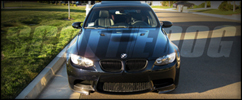
Hope you enjoyed the DIY
 here is the final outcome: http://www.m3post.com/forums/showthr...59#post9066759
__________________
Jerez e90m3 with some mods |
|
Appreciate
0
|
| 04-21-2011, 01:47 PM | #11 |
|
Major General
 
1250
Rep 6,912
Posts |
wow...cool writeup but a lot of unnecessary steps no? i replaced my side grills from the outside...twice! No need to remove the fender liners to do so.
__________________
2022 Dravit/Fiona M3cx - Dinan midpipe w/VC, NW Carbonhaus CF, AST Springs, FC Spacers...more to come!
2016 Indi F80 M3 - SMB|Amaro | Mode Carbon | ESS | Akra EVO | KW HAS...SOLD 2012 MR e92 M3 DCT, ESS SC, Brembo BBK, BBS FI... GONE but not forgotten! 2008 AW e92 M3 6MT, ESS SC, BBS LM's...SOLD! |
|
Appreciate
1
B8bydesign678.50 |
| 05-27-2011, 02:48 PM | #14 |
|
Banned

1770
Rep 6,696
Posts
Drives: F30 340i
Join Date: Jan 2009
Location: San Diego,CA
|
yea like others have said no need for the excess steps...i had a local bmw mod shop do it for me and they did it all from the outside. did a perfect job too
|
|
Appreciate
0
|
| 05-27-2011, 03:38 PM | #15 | |
|
Lieutenant Colonel
 
458
Rep 1,633
Posts |
Yeah Man it is much easier...
[u2b][/u2b] Quote:
|
|
|
Appreciate
0
|
| 05-27-2011, 04:27 PM | #16 | |
|
Major General
684
Rep 5,069
Posts
Drives: BMW 230i Msport w/LSD
Join Date: Nov 2007
Location: Astral Projecting: ∞ 23.516 -122 02.625 0242.101 ĕv'rē-hwâr'
iTrader: (16)
Garage List 2009 Porsche 911 997.2 [10.00]
2019 Hyundai N (Sold) [10.00] 2013 BMW M3 (Sold) [10.00] 2011 1M Coupe (Sold) [8.78] 2008 E90 M3 (Sold) [8.60] 2007 Z4 Mcpe (Sold) [9.50] 2005 BMW M3 (Sold) [10.00] |
Quote:

__________________
 |
|
|
Appreciate
0
|
| 05-27-2011, 09:39 PM | #17 | |
|
Ninja
390
Rep 4,014
Posts |
Quote:
but thanx for playing...
__________________
2019 AW G30 530e l ZPP l ZMP l ZDH
Retired: 2016 F80 M3, 2012 E90 M3, 2008 535i |
|
|
Appreciate
0
|
| 07-18-2011, 07:37 PM | #18 |
|
Lieutenant
 
33
Rep 489
Posts |
With all due respect, DO NOT DO THIS. Don't use a screwdriver on your paint. Don't pull out the fender liner. Use packing tape to wrap around it, hold the gill with a towel, and pull hard on the tape. Wriggle while you pull. Pops out easily without breaking anything, marring the paint or spending an hour taking the car apart. Check for the other DIY thread.
__________________
E92 M3 MR on Red/Black ZCP Sound
Carbon 2007 997S - sold 2003 E46 M3 Steel Grey on Red- sold 1997 E36 M3 Arctic Silver on Black- sold |
|
Appreciate
0
|
| 08-14-2011, 04:24 PM | #19 |
|
Major General
1570
Rep 8,075
Posts
Drives: 11 E90 M3 Individual
Join Date: Mar 2006
Location: Houston, TX
|
I used this DIY and it is much less risky. If you have an air ratchet...it goes much quicker. About 45 minutes.
__________________
2018 F30 320iX Melbourne Red
2011 E90 M3 Monte Carlo Blue 2004 E46 M3 Imola Red 2000 E36/7 Z3 Steel Blue |
|
Appreciate
0
|
| 09-01-2011, 09:10 PM | #20 | |
|
Bimmerpost Resident Marijuana Consultant

448
Rep 3,197
Posts
Drives: 320i, 325xi, 335Xi, 335i, M3
Join Date: Nov 2006
Location: Queens/NYC
iTrader: (4)
Garage List 2010 BMW 335i [0.00]
2011 BMW X335i [0.00] 2006 BMW E90 325xi [0.00] 2011 BMW E90 335xi [4.00] 2011 BMW M3 E90 [7.00] 2006 E90 320i [0.00] |
Quote:
__________________
 "AMG What! S-Line Who? If you ain't got that M I got no respect for you!"  '06 Alpine Weiss E90 320i | '06 The Green Machine E90 325xi | '11 Alpine Weiss E90 M3 ZCP | '10 Silverstone X5M | '11 Alpine Weiss E90 335xi |
|
|
Appreciate
0
|
| 09-01-2011, 09:18 PM | #21 |
|
Major General
1570
Rep 8,075
Posts
Drives: 11 E90 M3 Individual
Join Date: Mar 2006
Location: Houston, TX
|
The side markers? I removed the inner fender lining which is why it took so long. Seemed to be well worth it to me.
__________________
2018 F30 320iX Melbourne Red
2011 E90 M3 Monte Carlo Blue 2004 E46 M3 Imola Red 2000 E36/7 Z3 Steel Blue |
|
Appreciate
0
|
| 11-24-2011, 10:28 AM | #22 |
|
Private

7
Rep 55
Posts |
Gorilla tape worked for me
I used Gorilla tape on the side markers and with 2 people, one squeezing the top and bottom while the other pulls and wiggles the marker up and down it came right out. About 10 sec. No problems at all.
Replacing the front grills was harder! I didn't have the torx driver, so used a allen wrench and that did ok, but one of the screws was in there pretty good. Got all the tabs pushed out with finger pressure except the ones on the far R and L. Used a screwdriver for those. Looks really nice now. |
|
Appreciate
0
|
Post Reply |
| Bookmarks |
| Thread Tools | Search this Thread |
|
|


